TravelMate 3260 / 3270 Service Guide
Page 48
...-10, DVD-18),DVD-Video, DVD-R 3.95G, DVD-R 4.7G, DVD-RW, DVD+R, DVD+RW, Multi-Border DVD-R/DVDRW, Multi-session DVD+R, DVD+RW and DVD-RAM (optional) Applicable CD Formats (Read): CD: CD-DA, CD-ROM Mode-1, CD-ROM/XA Mode Mode-2 Form-1 and Mode2 Form-2, CD-i Ready, Video-CD (MPEG..., CD-ROM, CD-R, CD-RW, CD-ROM XA, Photo CD (Multi session), Video CD, CD-Extra (CD+), CD-text DVD:DVD-ROM, DVD-Video, DVD-RAM (2.6GB/4.7GB), DVD-R, DVD-RW (ver. 1.1) (Supporting Multi Border) DVD+R, DVD+RW (Supporting Multi Session) Load: Manual Release: (a) Electrical Release (Release Button) (b) Release by ATAPI...
...-10, DVD-18),DVD-Video, DVD-R 3.95G, DVD-R 4.7G, DVD-RW, DVD+R, DVD+RW, Multi-Border DVD-R/DVDRW, Multi-session DVD+R, DVD+RW and DVD-RAM (optional) Applicable CD Formats (Read): CD: CD-DA, CD-ROM Mode-1, CD-ROM/XA Mode Mode-2 Form-1 and Mode2 Form-2, CD-i Ready, Video-CD (MPEG..., CD-ROM, CD-R, CD-RW, CD-ROM XA, Photo CD (Multi session), Video CD, CD-Extra (CD+), CD-text DVD:DVD-ROM, DVD-Video, DVD-RAM (2.6GB/4.7GB), DVD-R, DVD-RW (ver. 1.1) (Supporting Multi Border) DVD+R, DVD+RW (Supporting Multi Session) Load: Manual Release: (a) Electrical Release (Release Button) (b) Release by ATAPI...

TravelMate 3260 / 3270 Service Guide
Page 49
... Sampling Rate) Yes Yes/2 (1.5W speakers) Video Interface Item Chipset Chapter 1 Specification Intel® 945GM (for TravelMate 3260/3270 UMA models) and Intel® 940GML (TravelMate 2480) Nvidia G7300 (G72M-V) (for TravelMate 3260/3270 discrete models) 41 DVD-Super Multi Interface Item Applicable disc format Loading mechanism Power Requirement Input Voltage Specification For...XA, PhotoCD (multi-session), Video CD, CdExtra (CD+), CD-text DVD: DVD-VIDEO, DVD-ROM, DVD-R (3.9GB, 4.7GB) DVD-R DL, DVD-RW, DVD-RAM, DVD+R, DVD+R DL, DVD+RW For Toshiba TSST TS-L632D CD: CD-DA (Red Book) -
... Sampling Rate) Yes Yes/2 (1.5W speakers) Video Interface Item Chipset Chapter 1 Specification Intel® 945GM (for TravelMate 3260/3270 UMA models) and Intel® 940GML (TravelMate 2480) Nvidia G7300 (G72M-V) (for TravelMate 3260/3270 discrete models) 41 DVD-Super Multi Interface Item Applicable disc format Loading mechanism Power Requirement Input Voltage Specification For...XA, PhotoCD (multi-session), Video CD, CdExtra (CD+), CD-text DVD: DVD-VIDEO, DVD-ROM, DVD-R (3.9GB, 4.7GB) DVD-R DL, DVD-RW, DVD-RAM, DVD+R, DVD+R DL, DVD+RW For Toshiba TSST TS-L632D CD: CD-DA (Red Book) -
TravelMate 3260 / 3270 Service Guide
Page 53
System saves all system states and data onto the disc prior to Disk (S4) Power Management CPU set power down VGA Suspend PCMCIA Suspend Audio Power Down Hard Disk Power Down CD-ROM Power Down Super I/O Low Power mode Also called Hibernation Mode. Chapter 1 45 System Power Management ACPI mode Suspend to RAM (S3) Save to power off the whole system.
System saves all system states and data onto the disc prior to Disk (S4) Power Management CPU set power down VGA Suspend PCMCIA Suspend Audio Power Down Hard Disk Power Down CD-ROM Power Down Super I/O Low Power mode Also called Hibernation Mode. Chapter 1 45 System Power Management ACPI mode Suspend to RAM (S3) Save to power off the whole system.
TravelMate 3260 / 3270 Service Guide
Page 78
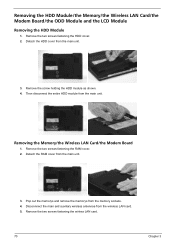
... Module 1. Detach the HDD cover from the main unit. Then disconnect the entire HDD module from the main unit. 3. Remove the two screws fastening the RAM cover. 2. Removing the Memory/the Wireless LAN Card/the Modem Board 1. Remove the screw holding the HDD module as shown. 4. Detach the... RAM cover from the memory sockets. 4. Pop out the memorys and remove the memorys from the main unit. 3. Remove the two screws fastening the HDD cover. 2. ...
... Module 1. Detach the HDD cover from the main unit. Then disconnect the entire HDD module from the main unit. 3. Remove the two screws fastening the RAM cover. 2. Removing the Memory/the Wireless LAN Card/the Modem Board 1. Remove the screw holding the HDD module as shown. 4. Detach the... RAM cover from the memory sockets. 4. Pop out the memorys and remove the memorys from the main unit. 3. Remove the two screws fastening the HDD cover. 2. ...
TravelMate 3260 / 3270 Service Guide
Page 93
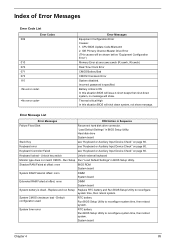
... BIOS will show message. Unlock key switch Unlock external keyboard Monitor type does not match CMOS - Shadow RAM Failed at offset: nnnn BIOS ROM System board System RAM Failed at offset: nnnn DIMM System board Extended RAM Failed at xxxx:xxxx:xxxxh (R:xxxxh, W:xxxxh) Real Time Clock Error CMOS Battery Bad CMOS Checksum...
... BIOS will show message. Unlock key switch Unlock external keyboard Monitor type does not match CMOS - Shadow RAM Failed at offset: nnnn BIOS ROM System board System RAM Failed at offset: nnnn DIMM System board Extended RAM Failed at xxxx:xxxx:xxxxh (R:xxxxh, W:xxxxh) Real Time Clock Error CMOS Battery Bad CMOS Checksum...
TravelMate 3260 / 3270 Service Guide
Page 96
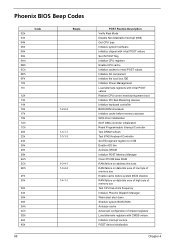
... DRAM refresh Test 8742 Keyboard Controller Set ES segment register to 4 GB Enable A20 line Autosize DRAM Initialize POST Memory Manager Clear 215 KB base RAM RAM failure on address line xxxx RAM failure on data bits xxxx of low byte of memory bus Enable cache before system BIOS shadow... RAM failure on data bits xxxx of high byte of memory bus Test CPU bus-clock frequency Initialize Phoenix Dispatch Manager Warm start shut down Shadow ...
... DRAM refresh Test 8742 Keyboard Controller Set ES segment register to 4 GB Enable A20 line Autosize DRAM Initialize POST Memory Manager Clear 215 KB base RAM RAM failure on address line xxxx RAM failure on data bits xxxx of low byte of memory bus Enable cache before system BIOS shadow... RAM failure on data bits xxxx of high byte of memory bus Test CPU bus-clock frequency Initialize Phoenix Dispatch Manager Warm start shut down Shadow ...

TravelMate 3260 / 3270 Service Guide
Page 97
... keyboard Set key click if enabled Test for unexpected interrupts Initialize POST display service Display prompt "Press F2 to enter SETUP" Disable CPU cache Test RAM between 512 and 640 KB Test extended memory Test extended memory address lines Jump to User Patch1 Configure advanced cache registers Initialize Multi Processor APIC...
... keyboard Set key click if enabled Test for unexpected interrupts Initialize POST display service Display prompt "Press F2 to enter SETUP" Disable CPU cache Test RAM between 512 and 640 KB Test extended memory Test extended memory address lines Jump to User Patch1 Configure advanced cache registers Initialize Multi Processor APIC...


