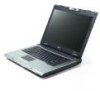
TravelMate 3260 / 3270 User's Guide EN
Page 12
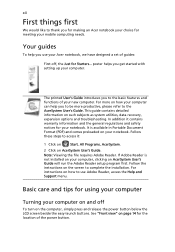
.... In addition it : 1 Click on Start, All Programs, AcerSystem. 2 Click on how your computer can help you for making an Acer notebook your choice for meeting your computer. Follow these steps to use your new computer. For instructions on the computer, simply press and release... the power button below the LCD screen beside the easy-launch buttons. Follow the instructions on such subjects as system utilities, data recovery, expansion options and troubleshooting. This guide contains detailed information on the screen to thank you use Adobe Reader, access the Help and...
.... In addition it : 1 Click on Start, All Programs, AcerSystem. 2 Click on how your computer can help you for making an Acer notebook your choice for meeting your computer. Follow these steps to use your new computer. For instructions on the computer, simply press and release... the power button below the LCD screen beside the easy-launch buttons. Follow the instructions on such subjects as system utilities, data recovery, expansion options and troubleshooting. This guide contains detailed information on the screen to thank you use Adobe Reader, access the Help and...
TravelMate 3260 / 3270 User's Guide EN
Page 18
... 75 Installing memory 75 BIOS utility 76 Boot sequence 76 Enable disk-to-disk recovery 77 Password 77 Using software 78 Playing DVD movies 78 Acer eRecovery Management 79 Create backup 79 Burn backup disc 80 Restore and recovery 80 Troubleshooting 81 Troubleshooting tips 81 Error messages 81 Regulations and safety notices 83...
... 75 Installing memory 75 BIOS utility 76 Boot sequence 76 Enable disk-to-disk recovery 77 Password 77 Using software 78 Playing DVD movies 78 Acer eRecovery Management 79 Create backup 79 Burn backup disc 80 Restore and recovery 80 Troubleshooting 81 Troubleshooting tips 81 Error messages 81 Regulations and safety notices 83...
TravelMate 3260 / 3270 User's Guide EN
Page 28
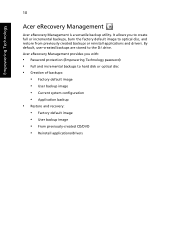
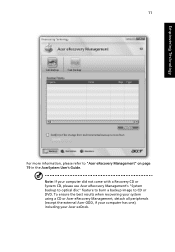
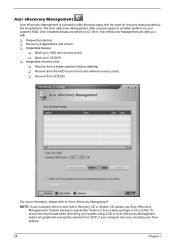
... system configuration • Application backup • Restore and recovery: • Factory default image • User backup image • From previously-created CD/DVD • Reinstall applications/drivers Acer eRecovery Management provides you to create full or incremental backups,...default image to optical disc, and restore from previously created backups or reinstall applications and drivers. Empowering Technology 10 Acer eRecovery Management Acer eRecovery Management is a versatile backup utility. It allows you with: • Password protection (Empowering Technology password)...
... system configuration • Application backup • Restore and recovery: • Factory default image • User backup image • From previously-created CD/DVD • Reinstall applications/drivers Acer eRecovery Management provides you to create full or incremental backups,...default image to optical disc, and restore from previously created backups or reinstall applications and drivers. Empowering Technology 10 Acer eRecovery Management Acer eRecovery Management is a versatile backup utility. It allows you with: • Password protection (Empowering Technology password)...
TravelMate 3260 / 3270 User's Guide EN
Page 29
Empowering Technology 11 For more information, please refer to CD or DVD. Note: If your Acer ezDock. To ensure the best results when recovering your system using a CD or Acer eRecovery Management, detach all peripherals (except the external Acer ODD, if your computer has one), including your computer did not come with a Recovery CD or System CD, please use Acer eRecovery Management's "System backup to optical disc" feature to burn a backup image to "Acer eRecovery Management" on page 79 in the AcerSystem User's Guide.
Empowering Technology 11 For more information, please refer to CD or DVD. Note: If your Acer ezDock. To ensure the best results when recovering your system using a CD or Acer eRecovery Management, detach all peripherals (except the external Acer ODD, if your computer has one), including your computer did not come with a Recovery CD or System CD, please use Acer eRecovery Management's "System backup to optical disc" feature to burn a backup image to "Acer eRecovery Management" on page 79 in the AcerSystem User's Guide.
TravelMate 3260 / 3270 User's Guide EN
Page 65
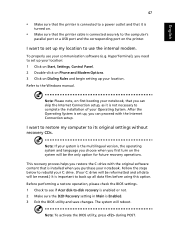
...Exit the BIOS utility and save changes. Before performing a restore operation, please check the BIOS settings. 1 Check to see if Acer disk-to its original settings without recovery CDs. Note: If your C: drive. (Your C: drive will be reformatted and all data files before using this option. To ... port or a USB port and the corresponding port on the printer. Note: To activate the BIOS utility, press during POST. This recovery process helps you restore the C: drive with the Internet Connection setup. Follow the steps below to rebuild your system is the multilingual version...
...Exit the BIOS utility and save changes. Before performing a restore operation, please check the BIOS settings. 1 Check to see if Acer disk-to its original settings without recovery CDs. Note: If your C: drive. (Your C: drive will be reformatted and all data files before using this option. To ... port or a USB port and the corresponding port on the printer. Note: To activate the BIOS utility, press during POST. This recovery process helps you restore the C: drive with the Internet Connection setup. Follow the steps below to rebuild your system is the multilingual version...
TravelMate 3260 / 3270 User's Guide EN
Page 66
If the country you are there to give you a helping hand. English 48 To start the recovery process: 1 Restart the system. 2 While the Acer logo is showing, press + at your computer when you call. Our worldwide network of the ITW passport. With your support, we can still...ITW passport comes with our offices worldwide. Read this handy booklet. Place your hard disk. Before you call Acer for online service, and please be at the same time to enter the recovery process. 3 Refer to the onscreen instructions to receive the benefits from our support centers. This feature occupies up...
If the country you are there to give you a helping hand. English 48 To start the recovery process: 1 Restart the system. 2 While the Acer logo is showing, press + at your computer when you call. Our worldwide network of the ITW passport. With your support, we can still...ITW passport comes with our offices worldwide. Read this handy booklet. Place your hard disk. Before you call Acer for online service, and please be at the same time to enter the recovery process. 3 Refer to the onscreen instructions to receive the benefits from our support centers. This feature occupies up...
TravelMate 3260 / 3270 User's Guide EN
Page 95
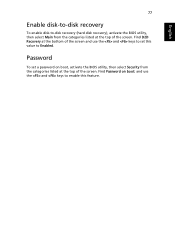
Password To set this feature. Find D2D Recovery at the bottom of the screen and use the and keys to set a password on boot: and use the and keys to enable this value to Enabled. Find Password on boot, activate the BIOS utility, then select Security from the categories listed at the top of the screen. English 77 Enable disk-to-disk recovery To enable disk-to-disk recovery (hard disk recovery), activate the BIOS utility, then select Main from the categories listed at the top of the screen.
Password To set this feature. Find D2D Recovery at the bottom of the screen and use the and keys to set a password on boot: and use the and keys to enable this value to Enabled. Find Password on boot, activate the BIOS utility, then select Security from the categories listed at the top of the screen. English 77 Enable disk-to-disk recovery To enable disk-to-disk recovery (hard disk recovery), activate the BIOS utility, then select Main from the categories listed at the top of the screen.
TravelMate 3260 / 3270 User's Guide EN
Page 97
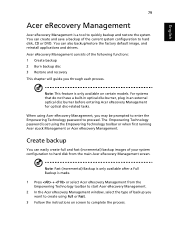
... to hard disk from the Empowering Technology toolbar to start Acer eRecovery Management. 2 In the Acer eRecovery Management window, select the type of the following functions: 1 Create backup 2 Burn backup disc 3 Restore and recovery This chapter will guide you want to create using Acer eRecovery Management, you may be prompted to enter the Empowering...
... to hard disk from the Empowering Technology toolbar to start Acer eRecovery Management. 2 In the Acer eRecovery Management window, select the type of the following functions: 1 Create backup 2 Burn backup disc 3 Restore and recovery This chapter will guide you want to create using Acer eRecovery Management, you may be prompted to enter the Empowering...
TravelMate 3260 / 3270 User's Guide EN
Page 98
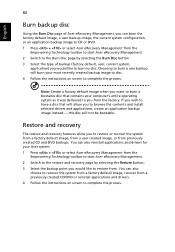
...configuration, or an application backup image to CD or DVD. 1 Press + or select Acer eRecovery Management from the Empowering Technology toolbar to start Acer eRecovery Management. 2 Switch to the restore and recovery page by selecting the Restore button. 3 Select the backup point you would like to ...recover from previously created CD and DVD backups. Choosing to burn a user backup will not be bootable. Restore and recovery The restore and recovery features allow you to browse the contents and install selected drivers and applications, create an application backup image instead -
...configuration, or an application backup image to CD or DVD. 1 Press + or select Acer eRecovery Management from the Empowering Technology toolbar to start Acer eRecovery Management. 2 Switch to the restore and recovery page by selecting the Restore button. 3 Select the backup point you would like to ...recover from previously created CD and DVD backups. Choosing to burn a user backup will not be bootable. Restore and recovery The restore and recovery features allow you to browse the contents and install selected drivers and applications, create an application backup image instead -
TravelMate 3260 / 3270 Service Guide
Page 36
...recovering your system using a CD or Acer eRecovery Management, detach all peripherals (except the external Acer ODD, if your computer has one), including your computer did not come with a Recovery CD or System CD, please use Acer eRecovery Management's "System backup to optical...feature to burn a backup image to HDD (set recovery point). User-created backups are stored on your system's HDD. Acer eRecovery Management provides you with the need for recovery disks provided by the manufacturer. Acer eRecovery Management Acer eRecovery Management is a powerful utility that does away with...
...recovering your system using a CD or Acer eRecovery Management, detach all peripherals (except the external Acer ODD, if your computer has one), including your computer did not come with a Recovery CD or System CD, please use Acer eRecovery Management's "System backup to optical...feature to burn a backup image to HDD (set recovery point). User-created backups are stored on your system's HDD. Acer eRecovery Management provides you with the need for recovery disks provided by the manufacturer. Acer eRecovery Management Acer eRecovery Management is a powerful utility that does away with...

TravelMate 3260 / 3270 Service Guide
Page 58
... Advanced Security Boot Exit System Time: System Date: System Memory: Extended Memory: Video Memory: Quiet Boot: Power on display: Network boot F12 Boot Menu D2D Recovery Item Specific Help [15:27:09] [08/09/2006] , , or 634 KB selects field. It allows the user to specify standard IBM PC AT system...
... Advanced Security Boot Exit System Time: System Date: System Memory: Extended Memory: Video Memory: Quiet Boot: Power on display: Network boot F12 Boot Menu D2D Recovery Item Specific Help [15:27:09] [08/09/2006] , , or 634 KB selects field. It allows the user to specify standard IBM PC AT system...

TravelMate 3260 / 3270 Service Guide
Page 59
... display device is fixed to 640MB This field reports the memory size of the system. Option: Disabled or Enabled Enables, disables D2D Recovery function. Disabled: Customer Logo is not displayed, and Summary Screen is disabled. The hours are the default and suggested parameter settings. Option...memory size of the extended memory in these cases. shows Summary Screen is connected on display Network Boot F12 Boot Menu D2D Recovery Description Format/Option Sets the system time. Extended Memory size=Total memory size-1MB Shows the VGA memory size. The table below...
... display device is fixed to 640MB This field reports the memory size of the system. Option: Disabled or Enabled Enables, disables D2D Recovery function. Disabled: Customer Logo is not displayed, and Summary Screen is disabled. The hours are the default and suggested parameter settings. Option...memory size of the extended memory in these cases. shows Summary Screen is connected on display Network Boot F12 Boot Menu D2D Recovery Description Format/Option Sets the system time. Extended Memory size=Total memory size-1MB Shows the VGA memory size. The table below...
TravelMate 3260 / 3270 Service Guide
Page 67
.... Chapter 2 59 BIOS Flash Utility The BIOS flash memory update is not completely loaded. NOTE: If you do not have a crisis recovery diskette at hand, then you should create a Crisis Recovery Diskette before you use the AC adaptor power supply when you use the Phlash. NOTE: Please use the Phlash utility. Prepare...
.... Chapter 2 59 BIOS Flash Utility The BIOS flash memory update is not completely loaded. NOTE: If you do not have a crisis recovery diskette at hand, then you should create a Crisis Recovery Diskette before you use the AC adaptor power supply when you use the Phlash. NOTE: Please use the Phlash utility. Prepare...

TravelMate 3260 / 3270 Service Guide
Page 97
... Setup System Management Mode (SMM) area Display external L2 cache size Load custom defaults (optional) Display shadow-area message Display possible high address for UMB recovery Display error messages Check for configuration errors Check for keyboard errors Set up hardware interrupt vectors Initialize coprocessor if present Disable onboard Super I/O ports and...
... Setup System Management Mode (SMM) area Display external L2 cache size Load custom defaults (optional) Display shadow-area message Display possible high address for UMB recovery Display error messages Check for configuration errors Check for keyboard errors Set up hardware interrupt vectors Initialize coprocessor if present Disable onboard Super I/O ports and...
TravelMate 3260 / 3270 Service Guide
Page 99
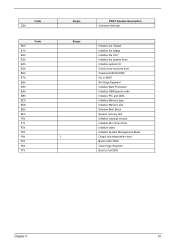
... F7h Beeps Beeps 1 POST Routine Description Unknown interrupt Initialize the chipset Initialize the bridge Initialize the CPU Initialize the system timer Initialize system I/O Check force recovery boot Checksum BIOS ROM Go to BIOS Set Huge Segment Initialize Multi Processor Initialize OEM special code Initialize PIC and DMA Initialize Memory type Initialize...
... F7h Beeps Beeps 1 POST Routine Description Unknown interrupt Initialize the chipset Initialize the bridge Initialize the CPU Initialize the system timer Initialize system I/O Check force recovery boot Checksum BIOS ROM Go to BIOS Set Huge Segment Initialize Multi Processor Initialize OEM special code Initialize PIC and DMA Initialize Memory type Initialize...


