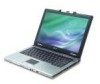
TravelMate 3010 Service Guide
Page 6
... Specifications 1 Features 1 Block Diagram 3 TM 3010 Outlook View 4 Indicators 9 Easy-Launch Buttons 10 Touchpad 12 Using the System Utilities 16 Acer Empowering Technology 19 Hardware Specifications and Configurations 29... Chapter 2 System Utilities 38 BIOS Setup Utility 38 Main 40 Advanced 42 Security 44 Boot 47 Exit 48 Chapter 3 Machine Disassembly and Replacement 49 General Information 50 Disassembly Procedure Flowchart 51 Removing the Battery Pack 52 Removing the miniPCI/Memory/HDD Module/Keyboard...
... Specifications 1 Features 1 Block Diagram 3 TM 3010 Outlook View 4 Indicators 9 Easy-Launch Buttons 10 Touchpad 12 Using the System Utilities 16 Acer Empowering Technology 19 Hardware Specifications and Configurations 29... Chapter 2 System Utilities 38 BIOS Setup Utility 38 Main 40 Advanced 42 Security 44 Boot 47 Exit 48 Chapter 3 Machine Disassembly and Replacement 49 General Information 50 Disassembly Procedure Flowchart 51 Removing the Battery Pack 52 Removing the miniPCI/Memory/HDD Module/Keyboard...

TravelMate 3010 Service Guide
Page 10
... which functions like the left and right buttons function like a computer mouse. 8 Microphone Internal microphone for your hands when you would with a desktop PC. TM 3010 Outlook View A general introduction of ports allow you to show the status of the computer's functions and components. 5 Palmrest COmfortable support area for sound recording...
... which functions like the left and right buttons function like a computer mouse. 8 Microphone Internal microphone for your hands when you would with a desktop PC. TM 3010 Outlook View A general introduction of ports allow you to show the status of the computer's functions and components. 5 Palmrest COmfortable support area for sound recording...

TravelMate 3010 Service Guide
Page 18
... function as a calculator(complete with the arithmetic operators+,-,*, and /). Num Lock off Num Lock off by small characters located on embedded keypad Main keyboard keys Hold while using cursor-control keys. Lock Key Description Caps Lock When Caps Lock is on the left side of the... keyboard. To simplify the keyboard legend, cursor-control key symbols are not printed on , all alphabetic characters are typed in a normnner. 12 Chapter 1 Desired access Num Lock on...
... function as a calculator(complete with the arithmetic operators+,-,*, and /). Num Lock off Num Lock off by small characters located on embedded keypad Main keyboard keys Hold while using cursor-control keys. Lock Key Description Caps Lock When Caps Lock is on the left side of the... keyboard. To simplify the keyboard legend, cursor-control key symbols are not printed on , all alphabetic characters are typed in a normnner. 12 Chapter 1 Desired access Num Lock on...
TravelMate 3010 Service Guide
Page 19
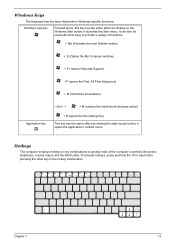
... computer employs hotkeys or key combinations to provide a variety of the computer's controls like screen brightness, volume output and the BIOS utility. Windows Keys The keyboard has two keys that perform Windows-specific functoins. Windows logo key Pressed alone, this key has the same effect as clicking the right mouse button...
... computer employs hotkeys or key combinations to provide a variety of the computer's controls like screen brightness, volume output and the BIOS utility. Windows Keys The keyboard has two keys that perform Windows-specific functoins. Windows logo key Pressed alone, this key has the same effect as clicking the right mouse button...
TravelMate 3010 Service Guide
Page 21
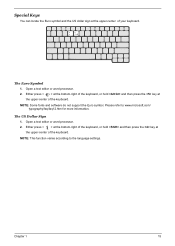
Open a text editor or word processor. Either press < >>the bottom-right of the keyboard, or hold r> and then press the key at th the upper-center of the keyboard. Alt Gr> 2. The Euro Symbol Alt Gr> 1. NOTE:tySpoomgreNaNfopoothteneyts/faaqn/dfasqo1f2wtw.whawtmr.emfdiocorromnsooowfttr.sewcuoiwmpnpf./...Note: Note: Note: Chapter 1 15 Open a text editor or word processor. 2. Either press < ifatt>the bottom-right of your keyboard. NOTE: This function varies according to the language settings. Special Keys You can locate the Euro symbol and the US dollar sign at ...
Open a text editor or word processor. Either press < >>the bottom-right of the keyboard, or hold r> and then press the key at th the upper-center of the keyboard. Alt Gr> 2. The Euro Symbol Alt Gr> 1. NOTE:tySpoomgreNaNfopoothteneyts/faaqn/dfasqo1f2wtw.whawtmr.emfdiocorromnsooowfttr.sewcuoiwmpnpf./...Note: Note: Note: Chapter 1 15 Open a text editor or word processor. 2. Either press < ifatt>the bottom-right of your keyboard. NOTE: This function varies according to the language settings. Special Keys You can locate the Euro symbol and the US dollar sign at ...
TravelMate 3010 Service Guide
Page 23
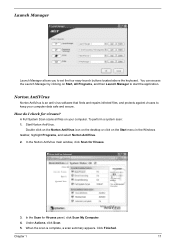
... is an anti-virus software that finds and repairs infected files, and protects against viruses to set the four easy-launch buttons located above the keyboard. A Full System Scan scans all files on the Start menu in the Windows taskbar, highlight Programs, and selecNtoNrtoonrtAonntiVAirnutsiVirus. 2. Norton AntiVLaiurnuchsManager Start All Programs Norton AntiVirus...
... is an anti-virus software that finds and repairs infected files, and protects against viruses to set the four easy-launch buttons located above the keyboard. A Full System Scan scans all files on the Start menu in the Windows taskbar, highlight Programs, and selecNtoNrtoonrtAonntiVAirnutsiVirus. 2. Norton AntiVLaiurnuchsManager Start All Programs Norton AntiVirus...
TravelMate 3010 Service Guide
Page 37
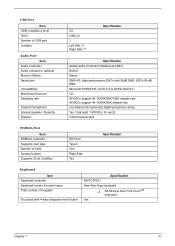
... PCMCIA Port Item PCMCIA controller Supports card type Number of slots Access location Supports 32 bit CardBus PCI7412 Type II One Right Side Yes Specification Keyboard Item Keyboard controller Keyboard vendor & model name Total number of keypads Touchpad with 4-way integrated scroll button Specification NS PC97551 New...
... PCMCIA Port Item PCMCIA controller Supports card type Number of slots Access location Supports 32 bit CardBus PCI7412 Type II One Right Side Yes Specification Keyboard Item Keyboard controller Keyboard vendor & model name Total number of keypads Touchpad with 4-way integrated scroll button Specification NS PC97551 New...

TravelMate 3010 Service Guide
Page 38
Keyboard Feature Item Four easy-launch buttons Battery Item Vendor & model name Battery Type Number of battery cell Pin 1 Pin 2 Pin 3 Pin 4 Pin 5 Pin 6 Pin 7 Pin 8 ...
Keyboard Feature Item Four easy-launch buttons Battery Item Vendor & model name Battery Type Number of battery cell Pin 1 Pin 2 Pin 3 Pin 4 Pin 5 Pin 6 Pin 7 Pin 8 ...
TravelMate 3010 Service Guide
Page 45
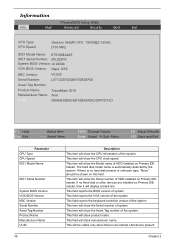
...line This field reports the BIOS version of system This field reports the VGA version of the system This field reports the keyboard controller version of the system This item will show the Asset Tag number of the system. This field will show the ...System BIOS Version: v0.2404b VGA BIOS Version: Napa 1256 KBC Version: V0.020 Serial Number: LXT123ZH2000470082EF00 Asset Tag Number: Product Name: TravelMate 3010 Manufacturer Name: Acer UUID: 00980420B0640010BA0A00C09FF974C3 F1 Help Esc Exit ↑ ↓ Select Item ← → Select Menu F5/F6 Change Values Enter Select ...
...line This field reports the BIOS version of system This field reports the VGA version of the system This field reports the keyboard controller version of the system This item will show the Asset Tag number of the system. This field will show the ...System BIOS Version: v0.2404b VGA BIOS Version: Napa 1256 KBC Version: V0.020 Serial Number: LXT123ZH2000470082EF00 Asset Tag Number: Product Name: TravelMate 3010 Manufacturer Name: Acer UUID: 00980420B0640010BA0A00C09FF974C3 F1 Help Esc Exit ↑ ↓ Select Item ← → Select Menu F5/F6 Change Values Enter Select ...
TravelMate 3010 Service Guide
Page 57
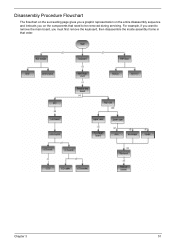
Chapter 3 51 For example, if you want to remove the main board, you on the components that order. Disassembly Procedure Flowchart The flowchart on the succeeding page gives you a graphic representation on the entire disassembly sequence and instructs you must first remove the keyboard, then disassemble the inside assembly frame in that need to be removed during servicing.
Chapter 3 51 For example, if you want to remove the main board, you on the components that order. Disassembly Procedure Flowchart The flowchart on the succeeding page gives you a graphic representation on the entire disassembly sequence and instructs you must first remove the keyboard, then disassemble the inside assembly frame in that need to be removed during servicing.

TravelMate 3010 Service Guide
Page 59
... memory and remove it from the main unit. Removing the HDD 1. Open the LCD panel. 2. Chapter 3 53 Removing the miniPCI/Memory/HDD Module/Keyboard Removing the miniPCI and Memory 1. Remove the two screws securing the miniPCI card. 4. Remove the two screws that secure the... keyboard with flat screw driver. 3. Pull the HDD out and remove it . Press the two inner keyboard latches that secure the RAM door and remove the RAM door. 2. Release the wireless antenna. 3. Release ...
... memory and remove it from the main unit. Removing the HDD 1. Open the LCD panel. 2. Chapter 3 53 Removing the miniPCI/Memory/HDD Module/Keyboard Removing the miniPCI and Memory 1. Remove the two screws securing the miniPCI card. 4. Remove the two screws that secure the... keyboard with flat screw driver. 3. Pull the HDD out and remove it . Press the two inner keyboard latches that secure the RAM door and remove the RAM door. 2. Release the wireless antenna. 3. Release ...
TravelMate 3010 Service Guide
Page 60
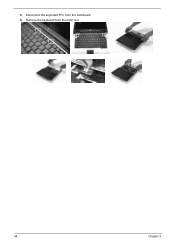
Remove the keyboard from the mainboard. 6. 5. Disconnect the keyboard FFC from the main unit. 54 Chapter 3
Remove the keyboard from the mainboard. 6. 5. Disconnect the keyboard FFC from the main unit. 54 Chapter 3
TravelMate 3010 Service Guide
Page 61
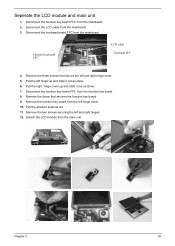
... module and main unit 1. Pull the right hinge cover up and slide it out as show . 7. Pull the wireless antenna out. 11. Chapter 3 55 Function keyboard FFC LCD cable Touchpad FFC 4. Disconnect the function key board FFC from the main unit. Remove the three screws that secures the function key board...
... module and main unit 1. Pull the right hinge cover up and slide it out as show . 7. Pull the wireless antenna out. 11. Chapter 3 55 Function keyboard FFC LCD cable Touchpad FFC 4. Disconnect the function key board FFC from the main unit. Remove the three screws that secures the function key board...
TravelMate 3010 Service Guide
Page 69
... reconnect the connector on the system board. Reconnect the external diskette drive/CD-ROM module. 2. Keyboard or Auxiliary Input Device Check Remove the external keyboard if the internal keyboard is to correct the problem. Follow the instructions in the test items. 3. System Check Procedures ... 4 Do the following auxiliary input devices are supported by this computer: T Numeric keypad T External keyboard If any label attached to a controller, drive, or CD-ROM. If the keyboard cable connection is passed when the program runs to main board. 2. Do not replace a non-...
... reconnect the connector on the system board. Reconnect the external diskette drive/CD-ROM module. 2. Keyboard or Auxiliary Input Device Check Remove the external keyboard if the internal keyboard is to correct the problem. Follow the instructions in the test items. 3. System Check Procedures ... 4 Do the following auxiliary input devices are supported by this computer: T Numeric keypad T External keyboard If any label attached to a controller, drive, or CD-ROM. If the keyboard cable connection is passed when the program runs to main board. 2. Do not replace a non-...

TravelMate 3010 Service Guide
Page 73
.../Action in BIOS Setup Utility. Default configuration used Real time clock error Previous boot incomplete - RTC battery Main baord "Load Default Settings" in Sequence See "Keyboard or Auxiliary Input Device Check" on page 63 RTC battery Run BIOS Setup Utility to reconfigure system time, then reboot system. Main board "Load Default...
.../Action in BIOS Setup Utility. Default configuration used Real time clock error Previous boot incomplete - RTC battery Main baord "Load Default Settings" in Sequence See "Keyboard or Auxiliary Input Device Check" on page 63 RTC battery Run BIOS Setup Utility to reconfigure system time, then reboot system. Main board "Load Default...

TravelMate 3010 Service Guide
Page 75
... Load alternate registers with initial POST values Restore CPU control word during warm boot Initialize PCI Bus Mastering devices Initialize keyboard controller BIOS ROM checksum Initialize cache before memory autosize 8254 timer initialization 8237 DMA controller initialization Reset Programmable Interrupt Controller... Test DRAM refresh Test 8742 Keyboard Controller Set ES segment register to 4 GB Autosize DRAM Initialize POST Memory Manager Clear 215 KB base RAM RAM ...
... Load alternate registers with initial POST values Restore CPU control word during warm boot Initialize PCI Bus Mastering devices Initialize keyboard controller BIOS ROM checksum Initialize cache before memory autosize 8254 timer initialization 8237 DMA controller initialization Reset Programmable Interrupt Controller... Test DRAM refresh Test 8742 Keyboard Controller Set ES segment register to 4 GB Autosize DRAM Initialize POST Memory Manager Clear 215 KB base RAM RAM ...

TravelMate 3010 Service Guide
Page 76
...system QuietBoot start (optional) Shadow video BIOS ROM Display BIOS copyright notice Display CPU type and speed Initialize EISA board Test keyboard Set key click if enabled Enable USB devices Test for unexpected interrupts Initialize POST display service Display prompt "Press F2 to ... (optional) Display shadow-area message Display possible high address for UMB recovery Display error messages Check for configuration errors Check for keyboard errors Set up hardware interrupt vectors Initialize coprocessor if present Disable onboard Super I/O ports and IRQs Late POST device initialization Detect...
...system QuietBoot start (optional) Shadow video BIOS ROM Display BIOS copyright notice Display CPU type and speed Initialize EISA board Test keyboard Set key click if enabled Enable USB devices Test for unexpected interrupts Initialize POST display service Display prompt "Press F2 to ... (optional) Display shadow-area message Display possible high address for UMB recovery Display error messages Check for configuration errors Check for keyboard errors Set up hardware interrupt vectors Initialize coprocessor if present Disable onboard Super I/O ports and IRQs Late POST device initialization Detect...

TravelMate 3010 Service Guide
Page 78
... F3h F4h F5h F6h F7h Beeps POST Routine Description Initialize notebook docking late Force check (optional) Extended checksum (optional) Redirect Int 15h to enable remote keyboard Redirect Int 13h to enable remote serial video Re-map I /O Check force recovery boot Checksum BIOS ROM Go to BIOS Set Huge Segment Initialize Multi...
... F3h F4h F5h F6h F7h Beeps POST Routine Description Initialize notebook docking late Force check (optional) Extended checksum (optional) Redirect Int 15h to enable remote keyboard Redirect Int 13h to enable remote serial video Re-map I /O Check force recovery boot Checksum BIOS ROM Go to BIOS Set Huge Segment Initialize Multi...
TravelMate 3010 Service Guide
Page 79
Keyboard (if the brightness function key doesn't work ). The system cannot power-off , then the main board is OK. Main board Power source (battery pack and ... reboot system. Verify OS in Sequence Power source (battery pack and power adapter). Main board 73 Chapter 4 Reconnect the LCD connectors. Action in the HDD. Keyboard (if the brightness function key doesn't work ). Reconnect the LCD connectors. Battery pack AC adapter See if the thermal module is too dark LCD brightness...
Keyboard (if the brightness function key doesn't work ). The system cannot power-off , then the main board is OK. Main board Power source (battery pack and ... reboot system. Verify OS in Sequence Power source (battery pack and power adapter). Main board 73 Chapter 4 Reconnect the LCD connectors. Action in the HDD. Keyboard (if the brightness function key doesn't work ). Reconnect the LCD connectors. Battery pack AC adapter See if the thermal module is too dark LCD brightness...
TravelMate 3010 Service Guide
Page 81
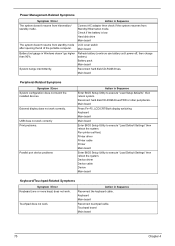
...Related Symptoms Symptom / Error System configuration does not match the installed devices. Main board Press Fn+F5, LCD/CRT/Both display switching Keyboard Main board Main board Enter BIOS Setup Utility to execute "Load Default Settings" then reboot the system. Check if the battery is ... BIOS Setup Utility to execute "Load Setup defaults", then reboot system. Device driver Device cable Device Main board Keyboard/Touchpad-Related Symptoms Symptom / Error Keyboard (one or more keys) does not work correctly Print problems. Parallel port device problems Action in Sequence Reconnect the...
...Related Symptoms Symptom / Error System configuration does not match the installed devices. Main board Press Fn+F5, LCD/CRT/Both display switching Keyboard Main board Main board Enter BIOS Setup Utility to execute "Load Default Settings" then reboot the system. Check if the battery is ... BIOS Setup Utility to execute "Load Setup defaults", then reboot system. Device driver Device cable Device Main board Keyboard/Touchpad-Related Symptoms Symptom / Error Keyboard (one or more keys) does not work correctly Print problems. Parallel port device problems Action in Sequence Reconnect the...


