TravelMate 2420 / Aspire 3620 Service Guide
Page 7
...1 Features 1 System Block Diagram 3 Board Layout 4 Top View 4 Bottom View 5 Your Acer Notebook tour 7 Aspire 3620 front View 7 TravelMate 2420 front view 8 Closed Front View 9 Left View 10 Right View 10 Rear Panel 11 Bottom...Acer ePerformance Management 23 Acer eRecovery Management 24 Acer eSettings Management 25 Acer ePower Management 26 Hardware Specifications and Configurations 29 Chapter 2 System Utilities 37 BIOS Setup Utility 37 Navigating the BIOS Utility 38 Information 39 Main 40 Security 42 Boot 46 Exit 47 BIOS Flash Utility 48 Chapter 3 Machine Disassembly...
...1 Features 1 System Block Diagram 3 Board Layout 4 Top View 4 Bottom View 5 Your Acer Notebook tour 7 Aspire 3620 front View 7 TravelMate 2420 front view 8 Closed Front View 9 Left View 10 Right View 10 Rear Panel 11 Bottom...Acer ePerformance Management 23 Acer eRecovery Management 24 Acer eSettings Management 25 Acer ePower Management 26 Hardware Specifications and Configurations 29 Chapter 2 System Utilities 37 BIOS Setup Utility 37 Navigating the BIOS Utility 38 Information 39 Main 40 Security 42 Boot 46 Exit 47 BIOS Flash Utility 48 Chapter 3 Machine Disassembly...
TravelMate 2420 / Aspire 3620 Service Guide
Page 8
... Contents Separate the Main Unit Into the Upper and the Lower Case Assembly 58 Disassembling the Lower Case Assembly 58 Disassembling the Upper Case Assembly 60 Disassembling the LCD Module 62 Disassembling the External Modules 64 Disassembling the HDD Module 64 Disassembling the ODD Module 64 Chapter 4 Troubleshooting 65 System Check Procedures 66 External Diskette Drive... 81 Undetermined Problems 82 Chapter 5 Jumper and Connector Locations 83 Top View 83 Bottom View 84 Chapter 6 FRU (Field Replaceable Unit) List 85 Aspire 3620/TravelMate 2420 Exploded Diagram 86 2
... Contents Separate the Main Unit Into the Upper and the Lower Case Assembly 58 Disassembling the Lower Case Assembly 58 Disassembling the Upper Case Assembly 60 Disassembling the LCD Module 62 Disassembling the External Modules 64 Disassembling the HDD Module 64 Disassembling the ODD Module 64 Chapter 4 Troubleshooting 65 System Check Procedures 66 External Diskette Drive... 81 Undetermined Problems 82 Chapter 5 Jumper and Connector Locations 83 Top View 83 Bottom View 84 Chapter 6 FRU (Field Replaceable Unit) List 85 Aspire 3620/TravelMate 2420 Exploded Diagram 86 2
TravelMate 2420 / Aspire 3620 Service Guide
Page 57
... Replacement This chapter contains step-by-step procedures on how to disassemble the notebook computer for the different components vary in size. During the disassembly process, group the screws with the corresponding components to scrape the cover. Chapter 3 49 When you need the following tools: T ... T Small Philips screw driver T Philips screwdriver T Plastic flat head screw driver T Tweezers NOTE: The screws for maintenance and troubleshooting. To disassemble the computer, you remove the stripe cover, please be careful not to avoid mismatch when putting back the components.
... Replacement This chapter contains step-by-step procedures on how to disassemble the notebook computer for the different components vary in size. During the disassembly process, group the screws with the corresponding components to scrape the cover. Chapter 3 49 When you need the following tools: T ... T Small Philips screw driver T Philips screwdriver T Plastic flat head screw driver T Tweezers NOTE: The screws for maintenance and troubleshooting. To disassemble the computer, you remove the stripe cover, please be careful not to avoid mismatch when putting back the components.
TravelMate 2420 / Aspire 3620 Service Guide
Page 58
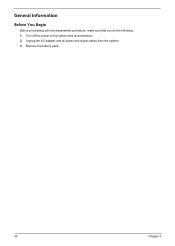
General Information Before You Begin Before proceeding with the disassembly procedure, make sure that you do the following: 1. Unplug the AC adapter and all peripherals. 2. Turn off the power to the system and all power and signal cables from the system. 3. Remove the battery pack. 50 Chapter 3
General Information Before You Begin Before proceeding with the disassembly procedure, make sure that you do the following: 1. Unplug the AC adapter and all peripherals. 2. Turn off the power to the system and all power and signal cables from the system. 3. Remove the battery pack. 50 Chapter 3
TravelMate 2420 / Aspire 3620 Service Guide
Page 59
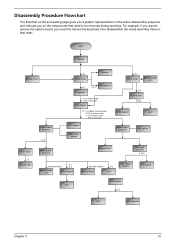
... The flowchart on the succeeding page gives you a graphic representation on the entire disassembly sequence and instructs you must first remove the keyboard, then disassemble the inside assembly frame in that need to be removed during servicing. Start Battery Middle Cover H*2 DIMM Cover Memory P*1 Keyboard ODD Module E*1 J*2 on bottom side K*2 ...
... The flowchart on the succeeding page gives you a graphic representation on the entire disassembly sequence and instructs you must first remove the keyboard, then disassemble the inside assembly frame in that need to be removed during servicing. Start Battery Middle Cover H*2 DIMM Cover Memory P*1 Keyboard ODD Module E*1 J*2 on bottom side K*2 ...
TravelMate 2420 / Aspire 3620 Service Guide
Page 66
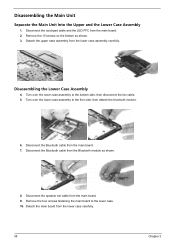
... board. 9. Disconnect the speaker set cable from the main board. 7. Disconnect the Bluetooth cable from the lower case carefully. 58 Chapter 3 Disassembling the Lower Case Assembly 4. Turn over the lower case assembly to the lower case. 10. Detach the main board from the Bluetooth module as... shown. 3. Disassembling the Main Unit Separate the Main Unit Into the Upper and the Lower Case Assembly 1. Disconnect the touchpad cable and the LED FFC from...
... board. 9. Disconnect the speaker set cable from the main board. 7. Disconnect the Bluetooth cable from the lower case carefully. 58 Chapter 3 Disassembling the Lower Case Assembly 4. Turn over the lower case assembly to the lower case. 10. Detach the main board from the Bluetooth module as... shown. 3. Disassembling the Main Unit Separate the Main Unit Into the Upper and the Lower Case Assembly 1. Disconnect the touchpad cable and the LED FFC from...
TravelMate 2420 / Aspire 3620 Service Guide
Page 68
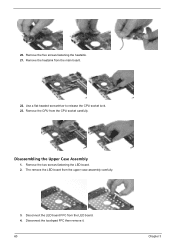
Use a flat-headed screwdriver to release the CPU socket lock. 23. The remove the LED board from the main board. 22. Disconnect the touchpad FFC then remove it. 60 Chapter 3 Remove the heatsink from the upper case assembly carefully. 3. Remove the two screws fastening the LED board. 2. Remove the CPU from the LED board. 4. Disassembling the Upper Case Assembly 1. Disconnect the LED board FFC from the CPU socket carefully. Remove the five screws fastening the heatsink. 21. 20.
Use a flat-headed screwdriver to release the CPU socket lock. 23. The remove the LED board from the main board. 22. Disconnect the touchpad FFC then remove it. 60 Chapter 3 Remove the heatsink from the upper case assembly carefully. 3. Remove the two screws fastening the LED board. 2. Remove the CPU from the LED board. 4. Disassembling the Upper Case Assembly 1. Disconnect the LED board FFC from the CPU socket carefully. Remove the five screws fastening the heatsink. 21. 20.

TravelMate 2420 / Aspire 3620 Service Guide
Page 70
... the wireless antenna set from the LCD module. 4. Remove the two screws fastening the LCD hinges. 12. Remove the two screws fastening the LCD inverter. 5. Disassembling the LCD Module 1. Remove the two screws holding the LCD bezel. 3. Then detach the LCD bezel from the LCD panel on the other side. 11...
... the wireless antenna set from the LCD module. 4. Remove the two screws fastening the LCD hinges. 12. Remove the two screws fastening the LCD inverter. 5. Disassembling the LCD Module 1. Remove the two screws holding the LCD bezel. 3. Then detach the LCD bezel from the LCD panel on the other side. 11...
TravelMate 2420 / Aspire 3620 Service Guide
Page 72
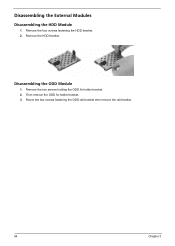
Remove the two screws holding the ODD fix holder bracket. 2. Disassembling the External Modules Disassembling the HDD Module 1. Disassembling the ODD Module 1. Then remove the ODD fix holder bracket. 3. Remove the four screws fastening the HDD bracket. 2. Remove the HDD bracket. Reove the two screws fastening the ODD rail bracket then remove the rail bracket. 64 Chapter 3
Remove the two screws holding the ODD fix holder bracket. 2. Disassembling the External Modules Disassembling the HDD Module 1. Disassembling the ODD Module 1. Then remove the ODD fix holder bracket. 3. Remove the four screws fastening the HDD bracket. 2. Remove the HDD bracket. Reove the two screws fastening the ODD rail bracket then remove the rail bracket. 64 Chapter 3

TravelMate 2420 User's Guide - EN
Page 66
... storm. Replace the battery with this product, make sure that the total rating of all telephone lines from the wall outlet before serving or disassembling this product from lightning. It should be a remote risk of them away from children and dispose of used with the same type as they... may present a risk of power supply cord set (provided in a fire or electric shock. There may explode if not handled properly. Do not disassemble or dispose of electric shock from the wall outlet and refer servicing to rain or water. Maximum length is damaged or frayed. Also, make sure...
... storm. Replace the battery with this product, make sure that the total rating of all telephone lines from the wall outlet before serving or disassembling this product from lightning. It should be a remote risk of them away from children and dispose of used with the same type as they... may present a risk of power supply cord set (provided in a fire or electric shock. There may explode if not handled properly. Do not disassemble or dispose of electric shock from the wall outlet and refer servicing to rain or water. Maximum length is damaged or frayed. Also, make sure...
TravelMate 2420 User's Guide - EN
Page 67
... DE CLASSE 1 PRODUIT LASERATTENTION: RADIATION DU FAISCEAU LASER INVISIBLE EN CAS D'OUVERTURE. EVITE EXPONERSE A LOS RAYOS. LAVATTAESSA OLET ALTTINA LASERSÅTEILYLLE. Reverse engineering or disassembly is a laser product. LUOKAN 1 LASERLAITE LASER KLASSE 1 VORSICHT: UNSICHTBARE LASERSTRAHLUNG, WENN ABDECKUNG GEÖFFNET NICHT DEM STRAHLL AUSSETZEN PRODUCTO LÁSER DE LA CLASE...
... DE CLASSE 1 PRODUIT LASERATTENTION: RADIATION DU FAISCEAU LASER INVISIBLE EN CAS D'OUVERTURE. EVITE EXPONERSE A LOS RAYOS. LAVATTAESSA OLET ALTTINA LASERSÅTEILYLLE. Reverse engineering or disassembly is a laser product. LUOKAN 1 LASERLAITE LASER KLASSE 1 VORSICHT: UNSICHTBARE LASERSTRAHLUNG, WENN ABDECKUNG GEÖFFNET NICHT DEM STRAHLL AUSSETZEN PRODUCTO LÁSER DE LA CLASE...


