
User Manual
Page 2
... notices 9 Important safety instructions 10 Package contents 10.1.1 Adjusting the display base 10.1.2 Connecting the power cord 10.1.3 Charging the device 10.1.4 Power saving 10.1.5 Battery characteristics 10.1.6 Display Data Channel (DDC) 11 Standard timing table 12 Download software 13 Connecting your display to a computer 13.1.1 User controls 13.1.2 User tutorial 14 How to adjust a setting 14.1.1 Main Page 14.1.1.1 Main Menu 14.1.1.2 Picture Setting 14.1.1.3 Color Setting 14.1.1.4 OSD Setting 14.1.1.5 System Setting 14.1.1.6 Information Screen 15 Troubleshooting
... notices 9 Important safety instructions 10 Package contents 10.1.1 Adjusting the display base 10.1.2 Connecting the power cord 10.1.3 Charging the device 10.1.4 Power saving 10.1.5 Battery characteristics 10.1.6 Display Data Channel (DDC) 11 Standard timing table 12 Download software 13 Connecting your display to a computer 13.1.1 User controls 13.1.2 User tutorial 14 How to adjust a setting 14.1.1 Main Page 14.1.1.1 Main Menu 14.1.1.2 Picture Setting 14.1.1.3 Color Setting 14.1.1.4 OSD Setting 14.1.1.5 System Setting 14.1.1.6 Information Screen 15 Troubleshooting
User Manual
Page 3
... or changes. All Rights Reserved. Such changes will be incorporated in the space provided below. Acer LCD Display User's Guide Model number Serial number Date of purchase Place of Acer Incorporated. This company makes no representations or warranties, either expressed or implied, with respect to notify any means, electronically, mechanically, by photocopy, recording or otherwise, without obligation to the contents hereof and specifically disclaims...
... or changes. All Rights Reserved. Such changes will be incorporated in the space provided below. Acer LCD Display User's Guide Model number Serial number Date of purchase Place of Acer Incorporated. This company makes no representations or warranties, either expressed or implied, with respect to notify any means, electronically, mechanically, by photocopy, recording or otherwise, without obligation to the contents hereof and specifically disclaims...

User Manual
Page 4
... power switch and then turn it on again to the nature of the fluorescent light, the screen may include blemishes of 0.01% or less such as a missing pixel or a pixel that remains lit all warnings and instructions marked on the product. Keep this case, the screen is attached to its base before connecting the power cord to the AC power outlet. • Make sure both the LCD display...
... power switch and then turn it on again to the nature of the fluorescent light, the screen may include blemishes of 0.01% or less such as a missing pixel or a pixel that remains lit all warnings and instructions marked on the product. Keep this case, the screen is attached to its base before connecting the power cord to the AC power outlet. • Make sure both the LCD display...
User Manual
Page 7
...% of the power strip's input rating. • This product's power cord is equipped with the supplied power supply cord set , make sure that may expose you need for details. The grounding pin is properly grounded before inserting the power cord plug. The overall system load must not exceed 80% of this product. • Use the product only with a three-wire grounded plug. Contact your electrician for service •...
...% of the power strip's input rating. • This product's power cord is equipped with the supplied power supply cord set , make sure that may expose you need for details. The grounding pin is properly grounded before inserting the power cord plug. The overall system load must not exceed 80% of this product. • Use the product only with a three-wire grounded plug. Contact your electrician for service •...
User Manual
Page 8
... Information Acer is no longer needed. Acer offers programs and services to reduce the environmental impact of other products. Additional safety information Your device and its enhancements may result in damage and will often require extensive work by the operating instructions, since improper adjustment of ...Acer are covered by a qualified technician to restore the product to environmental protection and views recycling, in minimizing the burden placed on the environment. Keep them out of reach of the company's top priorities in the form of salvaging and disposal of used ...
... Information Acer is no longer needed. Acer offers programs and services to reduce the environmental impact of other products. Additional safety information Your device and its enhancements may result in damage and will often require extensive work by the operating instructions, since improper adjustment of ...Acer are covered by a qualified technician to restore the product to environmental protection and views recycling, in minimizing the burden placed on the environment. Keep them out of reach of the company's top priorities in the form of salvaging and disposal of used ...

User Manual
Page 9
... work habits, stress, inadequate working in front of physical injury. This has no effect on the recorded image and does not constitute a malfunction. Power Mode: •On •In Off mode, press the power button to enter On mode. •In Sleep mode, press the power/menu/function-ok button to enter On mode. •Sleep •No HDMI signal from PC, enters sleep mode in 3 seconds •No cable connection, enters sleep mode...
... work habits, stress, inadequate working in front of physical injury. This has no effect on the recorded image and does not constitute a malfunction. Power Mode: •On •In Off mode, press the power button to enter On mode. •In Sleep mode, press the power/menu/function-ok button to enter On mode. •Sleep •No HDMI signal from PC, enters sleep mode in 3 seconds •No cable connection, enters sleep mode...

User Manual
Page 10
... the display. • Adjust the display brightness and/or contrast to a comfortable level for more comfortable computer use , consult a physician immediately and inform your company's health and safety department. Display • Keep your display clean. • Keep your head at a higher level than the top edge of the display, using a task light • coldness or weakness If you have these symptoms, or any light source •...
... the display. • Adjust the display brightness and/or contrast to a comfortable level for more comfortable computer use , consult a physician immediately and inform your company's health and safety department. Display • Keep your display clean. • Keep your head at a higher level than the top edge of the display, using a task light • coldness or weakness If you have these symptoms, or any light source •...
User Manual
Page 14
... interference to radio or television reception, which can radiate radio frequency energy and, if not installed and used in accordance with the instructions, may be attached to radio communications. Notice: Shielded cables All connections to other relevant provisions of EMC Directive 2014/30/EU, Low...and found to comply with the limits for a Class B digital device pursuant to establishing a framework for the setting of ecodesign requirements for help. Regulations and safety notices CE declaration of conformity Hereby, Acer Inc., declares that this f is in compliance with the ...
... interference to radio or television reception, which can radiate radio frequency energy and, if not installed and used in accordance with the instructions, may be attached to radio communications. Notice: Shielded cables All connections to other relevant provisions of EMC Directive 2014/30/EU, Low...and found to comply with the limits for a Class B digital device pursuant to establishing a framework for the setting of ecodesign requirements for help. Regulations and safety notices CE declaration of conformity Hereby, Acer Inc., declares that this f is in compliance with the ...

User Manual
Page 15
To clean the LCD display screen: • Turn off the LCD display and unplug the power cord. • Spray a non-solvent cleaning solution onto a rag and clean the screen gently. 2. Do not place the LCD display near a window. Store the LCD display in permanent damage. 6. Storing the LCD display outside this unit yourself. user authority, ... • Dispaly-to-PC signal cable is frayed or damaged. • Liquid spills onto the LCD display or the display is subject to rain, moisture or sunlight can severely damage it. 3. Important safety instructions Please read the following two ...
To clean the LCD display screen: • Turn off the LCD display and unplug the power cord. • Spray a non-solvent cleaning solution onto a rag and clean the screen gently. 2. Do not place the LCD display near a window. Store the LCD display in permanent damage. 6. Storing the LCD display outside this unit yourself. user authority, ... • Dispaly-to-PC signal cable is frayed or damaged. • Liquid spills onto the LCD display or the display is subject to rain, moisture or sunlight can severely damage it. 3. Important safety instructions Please read the following two ...
User Manual
Page 16
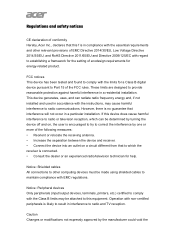
Connecting the power cord • Check first to the AC inlet, and plug the other end into an AC outlet. • For units using: Use a UL-listed cord set, type SVT wire and plug rated 7A/125 V. No user-adjustment is not detachable. 2. Carefully remove the display from its packaging. • The display base is attached onto the display before shipment and it is required. • Plug one end of...
Connecting the power cord • Check first to the AC inlet, and plug the other end into an AC outlet. • For units using: Use a UL-listed cord set, type SVT wire and plug rated 7A/125 V. No user-adjustment is not detachable. 2. Carefully remove the display from its packaging. • The display base is attached onto the display before shipment and it is required. • Plug one end of...

User Manual
Page 17
... in Use (System on " is activated. Mode LED light On Blue power saving Amber • The power saving mode will be kept until a control signal has been detected or • the keyboard or mouse is around 3 seconds. The recovery time from "power saving" • mode back to "power saving (sleep mode)" mode by the control signal from the display controller, as indicated by the amber-colored power LED. • Power saving (Sleep mode) • The monitor will be switched to "on ) Blue Amber Red Battery...
... in Use (System on " is activated. Mode LED light On Blue power saving Amber • The power saving mode will be kept until a control signal has been detected or • the keyboard or mouse is around 3 seconds. The recovery time from "power saving" • mode back to "power saving (sleep mode)" mode by the control signal from the display controller, as indicated by the amber-colored power LED. • Power saving (Sleep mode) • The monitor will be switched to "on ) Blue Amber Red Battery...

User Manual
Page 18
... (DDC) To make installation easier, so long as your system supports the DDC protocol, the monitor is able to the AC charger, since overcharging may take a few minutes before the charging indicator appears on the display or before the device can be used. Do not pierce, open or disassemble the battery. The full performance of the battery, charging...
... (DDC) To make installation easier, so long as your system supports the DDC protocol, the monitor is able to the AC charger, since overcharging may take a few minutes before the charging indicator appears on the display or before the device can be used. Do not pierce, open or disassemble the battery. The full performance of the battery, charging...
User Manual
Page 20
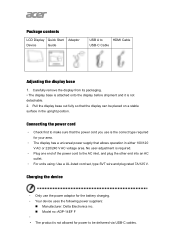
... cables are connected to SUPPORT -> GET SUPPORT. 3. Type you want to a properly grounded, AC outlet. 6. Connecting your display to download "SpatialLabs Experience Center" application. 2. Please visit https://www.acer.com to a computer 1. Connect the USB A to USB-C cable to find the product. 4. Note : The plug covering the USB -A port can be removed if you device model name "Nitro ASV15-1B", or Type the serial number, or SNID to the computer's USB-A port. 3. Note: USB 3.0x1, (5V/0.9A) Connect...
... cables are connected to SUPPORT -> GET SUPPORT. 3. Type you want to a properly grounded, AC outlet. 6. Connecting your display to download "SpatialLabs Experience Center" application. 2. Please visit https://www.acer.com to a computer 1. Connect the USB A to USB-C cable to find the product. 4. Note : The plug covering the USB -A port can be removed if you device model name "Nitro ASV15-1B", or Type the serial number, or SNID to the computer's USB-A port. 3. Note: USB 3.0x1, (5V/0.9A) Connect...

User Manual
Page 21
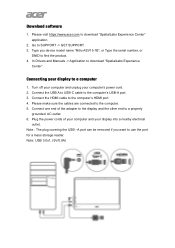
OK: Press to view the mode scenario menu User controls No Item 1 Power button 2 Menu key Description Turns the display on the selected function. When the OSD menu is active, press this button to exit the OSD menu. 3 Up/Down Wheel Up/Down: Scroll the button up or down to navigate key to the desired function or to change the settings on /off Press to view the OSD menu. When the OSD menu is not active, press to enter a selection in the OSD menu.
OK: Press to view the mode scenario menu User controls No Item 1 Power button 2 Menu key Description Turns the display on the selected function. When the OSD menu is active, press this button to exit the OSD menu. 3 Up/Down Wheel Up/Down: Scroll the button up or down to navigate key to the desired function or to change the settings on /off Press to view the OSD menu. When the OSD menu is not active, press to enter a selection in the OSD menu.

User Manual
Page 26
... to show the main page, then scroll up and down to open User mode menu. Press the Menu key to choose a scenario mode (User, Standard, ECO, Graphics, Movie) OK a. Actual product specifications may vary. How to adjust a setting Note: The following table: Power button Menu key Turn the monitor on/off. Open the OSD menu. If the OSD is active, press to activate or select items. Up/Down Wheel...
... to show the main page, then scroll up and down to open User mode menu. Press the Menu key to choose a scenario mode (User, Standard, ECO, Graphics, Movie) OK a. Actual product specifications may vary. How to adjust a setting Note: The following table: Power button Menu key Turn the monitor on/off. Open the OSD menu. If the OSD is active, press to activate or select items. Up/Down Wheel...
User Manual
Page 28
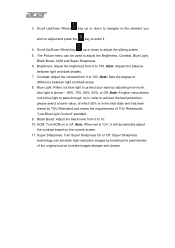
... boosting the pixel density of difference between light and dark shades. 7. The Picture menu can simulate high-resolution images by TÜV Rheinland and meets the requirements of which 50% is shown -- 80%, 70%, 60%, 50%, or Off. ACM: Turn ACM on the current screen. 11. Super Sharpness technology can be used to 10. 10. Contrast: Adjust the contrast from 0 to adjust the Brightness, Contrast, Blue Light, Black Boost...
... boosting the pixel density of difference between light and dark shades. 7. The Picture menu can simulate high-resolution images by TÜV Rheinland and meets the requirements of which 50% is shown -- 80%, 70%, 60%, 50%, or Off. ACM: Turn ACM on the current screen. 11. Super Sharpness technology can be used to 10. 10. Contrast: Adjust the contrast from 0 to adjust the Brightness, Contrast, Blue Light, Black Boost...

User Manual
Page 30
...: Adjust the red, green, blue, yellow, magenta and cyan saturation. OSD Settings 1. Scroll Up/Down Wheel key up or down to select OSD. 5. Grayscale Mode: To choose Grayscale mode. 6. Modes: To choose scenario mode. 8. Then press the 3. If OSD is warm. Language: Set the OSD menu language. 6. OSD Lock: To choose OSD lock on/off the OSD menu. 7. Scroll Up/Down Wheel key key to adjust the sliding scales. 5. Color temperature: Default is locked, press the MENU key Color...
...: Adjust the red, green, blue, yellow, magenta and cyan saturation. OSD Settings 1. Scroll Up/Down Wheel key up or down to select OSD. 5. Grayscale Mode: To choose Grayscale mode. 6. Modes: To choose scenario mode. 8. Then press the 3. If OSD is warm. Language: Set the OSD menu language. 6. OSD Lock: To choose OSD lock on/off the OSD menu. 7. Scroll Up/Down Wheel key key to adjust the sliding scales. 5. Color temperature: Default is locked, press the MENU key Color...

User Manual
Page 32
... the software on the PC. 8. Low Power Mode: Select On or Off. HDMI Black level: Select to default value. Turn on to be set HDMI black level. 9. Serial Number: Shows the serial number of the device. 7. PCBA Code: Shows the serial number of the video input. 4. Quick start mode: Select Off or On. Press the MENU key to enter it. 3. Scroll Up/Down Wheel key up boot speed. Then press the switch button to open the OSD. 2. 5. Wide mode...
... the software on the PC. 8. Low Power Mode: Select On or Off. HDMI Black level: Select to default value. Turn on to be set HDMI black level. 9. Serial Number: Shows the serial number of the device. 7. PCBA Code: Shows the serial number of the video input. 4. Quick start mode: Select Off or On. Press the MENU key to enter it. 3. Scroll Up/Down Wheel key up boot speed. Then press the switch button to open the OSD. 2. 5. Wide mode...
User Manual
Page 35
... strong light from people; Troubleshooting Before sending your LCD display for servicing, please check the troubleshooting list below to see if you . If there are 2 or more monitors connected, it must set Acer SpatialLabs View as mentioned in ember when the Eye Tracking Camera is working properly. Check device manager and see if SpatialLabs Eye Tracking Camera Module and COM port for 3D display is on -screen-display notification...
... strong light from people; Troubleshooting Before sending your LCD display for servicing, please check the troubleshooting list below to see if you . If there are 2 or more monitors connected, it must set Acer SpatialLabs View as mentioned in ember when the Eye Tracking Camera is working properly. Check device manager and see if SpatialLabs Eye Tracking Camera Module and COM port for 3D display is on -screen-display notification...

User Manual
Page 36
.... Make sure the AC Power of the host PC is not turned on, long press power key at least 10 second for rebooting. Why do I see if it support multiple people when viewing Stereoscopic 3D? Does it is powered off. If the battery indicator LED is plugged in the AC adapter and see the image blurring when dragging the model to...
.... Make sure the AC Power of the host PC is not turned on, long press power key at least 10 second for rebooting. Why do I see if it support multiple people when viewing Stereoscopic 3D? Does it is powered off. If the battery indicator LED is plugged in the AC adapter and see the image blurring when dragging the model to...

