User Manual SA220Q A
Page 2
... information in this manual or supplementary documents and publications. All correspondence concerning your computer. Acer LCD Monitor User Guide Original Issue: 07/2016 Changes may be reproduced, stored in a retrieval system, or transmitted, in any form or by photocopy, recording or otherwise, without obligation to the information in the space provided below. Record the model number, serial number, purchase date and...
... information in this manual or supplementary documents and publications. All correspondence concerning your computer. Acer LCD Monitor User Guide Original Issue: 07/2016 Changes may be reproduced, stored in a retrieval system, or transmitted, in any form or by photocopy, recording or otherwise, without obligation to the information in the space provided below. Record the model number, serial number, purchase date and...
User Manual SA220Q A
Page 3
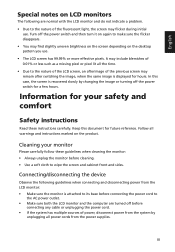
... on LCD monitors The following guidelines when connecting and disconnecting power from the LCD monitor: • Make sure the monitor is attached to the nature of the fluorescent light, the screen may include blemishes of 0.01% or less such as a missing pixel or pixel lit all power cords from the power supplies. English Special notes on the product. Turn off the power switch for your monitor Please carefully follow these instructions carefully. Keep...
... on LCD monitors The following guidelines when connecting and disconnecting power from the LCD monitor: • Make sure the monitor is attached to the nature of the fluorescent light, the screen may include blemishes of 0.01% or less such as a missing pixel or pixel lit all power cords from the power supplies. English Special notes on the product. Turn off the power switch for your monitor Please carefully follow these instructions carefully. Keep...
User Manual SA220Q A
Page 4
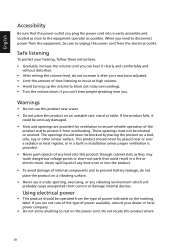
... installation unless proper ventilation is easily accessible and located as close to the equipment operator as they may touch dangerous voltage points or short-out parts that the power outlet you need to disconnect power from the equipment, be sure to unplug the power cord from overheating. English Accessibility Be sure that could be seriously damaged. • Slots and openings...
... installation unless proper ventilation is easily accessible and located as close to the equipment operator as they may touch dangerous voltage points or short-out parts that the power outlet you need to disconnect power from the equipment, be sure to unplug the power cord from overheating. English Accessibility Be sure that could be seriously damaged. • Slots and openings...
User Manual SA220Q A
Page 5
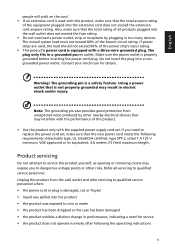
... protection from the wall outlet and refer servicing to replace the power cord set . Also, make sure that the total ampere rating of the branch circuit rating. If you to service this product, make sure that the new power cord meets the following the operating instructions v English people will walk on the cord. • If an extension cord is properly grounded before inserting the power cord plug. The overall system...
... protection from the wall outlet and refer servicing to replace the power cord set . Also, make sure that the total ampere rating of the branch circuit rating. If you to service this product, make sure that the new power cord meets the following the operating instructions v English people will walk on the cord. • If an extension cord is properly grounded before inserting the power cord plug. The overall system...

User Manual SA220Q A
Page 6
... the best working procedures to this electronic device into the trash when discarding. Disposal instructions Do not throw this website: http://www.acer-group.com/public/Sustainability/sustainability Visit www.acer-group.com for video and visual display of information obtained from Electrical and Electronics Equipment (WEEE) regulations, visit http://www.acer-group.com/public/Sustainability/sustainability Acer monitor is...
... the best working procedures to this electronic device into the trash when discarding. Disposal instructions Do not throw this website: http://www.acer-group.com/public/Sustainability/sustainability Visit www.acer-group.com for video and visual display of information obtained from Electrical and Electronics Equipment (WEEE) regulations, visit http://www.acer-group.com/public/Sustainability/sustainability Acer monitor is...

User Manual SA220Q A
Page 7
... techniques. Users are also at risk of physical injury after prolonged use . Incorrect computer usage may occasionally misfire or appear as black or red dots. English LCD pixel statement The LCD unit is in one fixed posture • avoid slouching forward and/or leaning backward • stand up and walk around regularly to remove the strain on the recorded image and does...
... techniques. Users are also at risk of physical injury after prolonged use . Incorrect computer usage may occasionally misfire or appear as black or red dots. English LCD pixel statement The LCD unit is in one fixed posture • avoid slouching forward and/or leaning backward • stand up and walk around regularly to remove the strain on the recorded image and does...

User Manual SA220Q A
Page 8
... any light source • minimizing room light by looking at bright light sources, such as open windows, for extended periods of cardboard extended from drying out. Developing good work habits Develop the following sections provide suggestions on a distant point. • Blink frequently to keep your eyes from the display's top front edge • Avoid adjusting your eyes. English Taking care of your vision Long viewing...
... any light source • minimizing room light by looking at bright light sources, such as open windows, for extended periods of cardboard extended from drying out. Developing good work habits Develop the following sections provide suggestions on a distant point. • Blink frequently to keep your eyes from the display's top front edge • Avoid adjusting your eyes. English Taking care of your vision Long viewing...
User Manual SA220Q A
Page 10
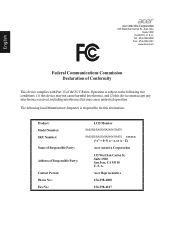
...: Phone No.: Fax No.: LCD Monitor SA220Q/SA230/SA240Y/SA270 SA220Q/SA230/SA240Y/SA270 xxxxxx; ("x" = 0~9, a ~ z, or A ~ Z) Acer America Corporation 333 West San Carlos St. The following two conditions: (1) this device may not cause harmful interference, and (2) this declaration: Product: Model Number: SKU Number: Name of Responsible Party: Address of the FCC Rules. A. English Acer America Corporation 333 West...
...: Phone No.: Fax No.: LCD Monitor SA220Q/SA230/SA240Y/SA270 SA220Q/SA230/SA240Y/SA270 xxxxxx; ("x" = 0~9, a ~ z, or A ~ Z) Acer America Corporation 333 West San Carlos St. The following two conditions: (1) this device may not cause harmful interference, and (2) this declaration: Product: Model Number: SKU Number: Name of Responsible Party: Address of the FCC Rules. A. English Acer America Corporation 333 West...
User Manual SA220Q A
Page 11
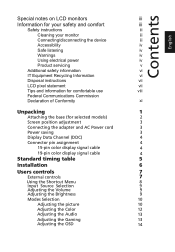
...the base (for selected models) 2 Screen position adjustment 3 Connecting the adapter and AC Power cord 3 Power saving 3 Display Data Channel (DDC) 4 Connector pin assignment 4 15-pin color display signal cable 4 19-pin color display signal cable 4 Standard timing table 5 Installation 6 Users controls 7 External controls 77 Using the Shortcut Menu 8 Input Source Selection 9 Adjusting the Volume 9 Adjusting the B rightness 9 Modes Selection 10 Adjusting the picture 10 Adjusting the Color 12 Adjusting the Audio 13 Adjusting the Gaming 13 Adjusting the OSD...
...the base (for selected models) 2 Screen position adjustment 3 Connecting the adapter and AC Power cord 3 Power saving 3 Display Data Channel (DDC) 4 Connector pin assignment 4 15-pin color display signal cable 4 19-pin color display signal cable 4 Standard timing table 5 Installation 6 Users controls 7 External controls 77 Using the Shortcut Menu 8 Input Source Selection 9 Adjusting the Volume 9 Adjusting the B rightness 9 Modes Selection 10 Adjusting the picture 10 Adjusting the Color 12 Adjusting the Audio 13 Adjusting the Gaming 13 Adjusting the OSD...

User Manual SA220Q A
Page 12
Adjusting the System 15 Product Information 16 Save Settings to User mode only) 16 English Troubleshooting 17 VGA Mode 17 HDMI Mode (Optional) 18
Adjusting the System 15 Product Information 16 Save Settings to User mode only) 16 English Troubleshooting 17 VGA Mode 17 HDMI Mode (Optional) 18
User Manual SA220Q A
Page 13
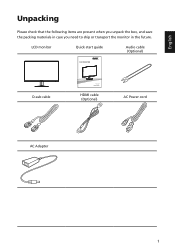
LCD monitor Quick start guide Audio cable (Optional) D-sub cable HDMI cable (Optional) AC Power cord AC Adapter 1 English Unpacking Please check that the following items are present when you unpack the box, and save the packing materials in case you need to ship or transport the monitor in the future.
LCD monitor Quick start guide Audio cable (Optional) D-sub cable HDMI cable (Optional) AC Power cord AC Adapter 1 English Unpacking Please check that the following items are present when you unpack the box, and save the packing materials in case you need to ship or transport the monitor in the future.
User Manual SA220Q A
Page 14
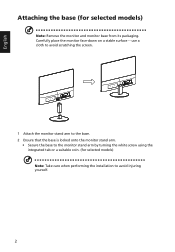
Carefully place the monitor face-down on a stable surface -- use a cloth to avoid scratching the screen. 1 Attach the monitor stand arm to the base. 2 Ensure that the base is locked onto the monitor stand arm. • Secure the base to the monitor stand arm by turning the white screw using the integrated tab or a suitable coin. (for selected models) Note: Remove the monitor and monitor base from its packaging. English Attaching the base (for selected models) Note: Take care when performing the installation to avoid injuring yourself. 2
Carefully place the monitor face-down on a stable surface -- use a cloth to avoid scratching the screen. 1 Attach the monitor stand arm to the base. 2 Ensure that the base is locked onto the monitor stand arm. • Secure the base to the monitor stand arm by turning the white screw using the integrated tab or a suitable coin. (for selected models) Note: Remove the monitor and monitor base from its packaging. English Attaching the base (for selected models) Note: Take care when performing the installation to avoid injuring yourself. 2
User Manual SA220Q A
Page 15
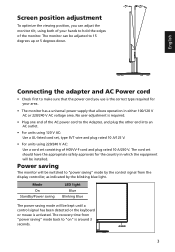
... degrees up or 5 degrees down. Power saving The monitor will be switched to "power saving" mode by the blinking blue light. Screen position adjustment To optimize the viewing position, you use is the correct type required for the country in either 100/120 V AC or 220/240 V AC voltage area. No user-adjustment is required. • Plug one end of the AC power cord to the Adapter, and plug the other end into an...
... degrees up or 5 degrees down. Power saving The monitor will be switched to "power saving" mode by the blinking blue light. Screen position adjustment To optimize the viewing position, you use is the correct type required for the country in either 100/120 V AC or 220/240 V AC voltage area. No user-adjustment is required. • Plug one end of the AC power cord to the Adapter, and plug the other end into an...
User Manual SA220Q A
Page 16
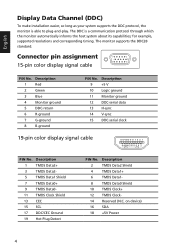
... color display signal cable 1 5 6 10 11 15 PIN No. on device) 16 SDA 18 +5V Power 4 Description 2 TMDS Data2 Shield 4 TMDS Data1+ 6 TMDS Data1- 8 TMDS Data0 Shield 10 TMDS Clock+ 12 TMDS Clock- 14 Reserved (N.C. for example, supported resolutions and corresponding timing. The monitor supports the DDC2B standard. The DDC is able to plug-and-play. English Display Data Channel (DDC) To make installation...
... color display signal cable 1 5 6 10 11 15 PIN No. on device) 16 SDA 18 +5V Power 4 Description 2 TMDS Data2 Shield 4 TMDS Data1+ 6 TMDS Data1- 8 TMDS Data0 Shield 10 TMDS Clock+ 12 TMDS Clock- 14 Reserved (N.C. for example, supported resolutions and corresponding timing. The monitor supports the DDC2B standard. The DDC is able to plug-and-play. English Display Data Channel (DDC) To make installation...

User Manual SA220Q A
Page 17
English Standard timing table No. Mode 1 VGA 2 MAC 3 VESA 4 SVGA 5 6 XGA 7 8 VESA 9 SXGA 10 VESA 11 WXGA 12 WXGA+ 13 WSXGA+ 14 Resolution 640x480 640x480 720x400 800x600 800x600 1024x768 1024x768 1152x864 1280x1024 1280x720 1280x800 1440x900 1680x1050 1920x1080 Refresh Rate 60 Hz 66.7 Hz 70 Hz 56 Hz 60 Hz 60 Hz 70 Hz 75 Hz 60 Hz 60 Hz 60 Hz 60 Hz 60 Hz 60 Hz 5
English Standard timing table No. Mode 1 VGA 2 MAC 3 VESA 4 SVGA 5 6 XGA 7 8 VESA 9 SXGA 10 VESA 11 WXGA 12 WXGA+ 13 WSXGA+ 14 Resolution 640x480 640x480 720x400 800x600 800x600 1024x768 1024x768 1152x864 1280x1024 1280x720 1280x800 1440x900 1680x1050 1920x1080 Refresh Rate 60 Hz 66.7 Hz 70 Hz 56 Hz 60 Hz 60 Hz 70 Hz 75 Hz 60 Hz 60 Hz 60 Hz 60 Hz 60 Hz 60 Hz 5
User Manual SA220Q A
Page 18
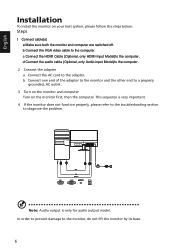
This sequence is only for audio output model. b Connect one end of the adapter to the monitor and the other end to the computer. b Connect the VGA video cable to diagnose the problem. English Installation To install the monitor on the monitor first, then the computer. d Connect the audio cable (Optional, only Audio-input Model)to the computer. 2 Connect the adapter a Connect the AC cord to the monitor, do not lift the monitor by its base. 6 In order to...
This sequence is only for audio output model. b Connect one end of the adapter to the monitor and the other end to the computer. b Connect the VGA video cable to diagnose the problem. English Installation To install the monitor on the monitor first, then the computer. d Connect the audio cable (Optional, only Audio-input Model)to the computer. 2 Connect the adapter a Connect the AC cord to the monitor, do not lift the monitor by its base. 6 In order to...

User Manual SA220Q A
Page 19
... Input select function. Press to enter Volume adjustment function. Press again to view Main page. Press to return previous Menu or exit current Menu. Press to view Main page. Press again to enter brightness adjustment function. a. Press again to enter next function in the OSD. When the Function Menu is active. Icon 1 2 3 4 5 6 Item Power button/ indicator OSD function Input Volume Brightness Mode Description Turns the monitor on . b. b. b. When the Function Menu...
... Input select function. Press to enter Volume adjustment function. Press again to view Main page. Press to return previous Menu or exit current Menu. Press to view Main page. Press again to enter brightness adjustment function. a. Press again to enter next function in the OSD. When the Function Menu is active. Icon 1 2 3 4 5 6 Item Power button/ indicator OSD function Input Volume Brightness Mode Description Turns the monitor on . b. b. b. When the Function Menu...
User Manual SA220Q A
Page 23
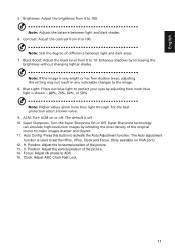
Clock: Adjust ADC Clock Fast Lock. The Auto adjustment function is used to ADC. 15. V. Position: Adjust the horizontal position of the picture. 14. Position: Adjust the vertical position of the picture. 13. 11. H. Focus: Adjust clk phase to set the HPos, VPos, Clock and Focus. (Only available on VGA port.) 12. Auto Config: Press this button to activate the Auto Adjustment function.
Clock: Adjust ADC Clock Fast Lock. The Auto adjustment function is used to ADC. 15. V. Position: Adjust the horizontal position of the picture. 14. Position: Adjust the vertical position of the picture. 13. 11. H. Focus: Adjust clk phase to set the HPos, VPos, Clock and Focus. (Only available on VGA port.) 12. Auto Config: Press this button to activate the Auto Adjustment function.

User Manual SA220Q A
Page 29
... specification of monitor. Unstable picture Blue Abnormal picture (Image is in power saving/standby mode. Using the OSD menu, adjust focus, clock, H-position and V-position with non-standard signals. Check the display setting on your LCD monitor for a few seconds after adjusting the size of a missing image, please select another resolution or vertical refresh rate. Wait for servicing, please check the troubleshooting list below to their default settings. VGA Mode Problem No picture visible LED status Blue Off Remedy Using the OSD menu, adjust brightness and contrast...
... specification of monitor. Unstable picture Blue Abnormal picture (Image is in power saving/standby mode. Using the OSD menu, adjust focus, clock, H-position and V-position with non-standard signals. Check the display setting on your LCD monitor for a few seconds after adjusting the size of a missing image, please select another resolution or vertical refresh rate. Wait for servicing, please check the troubleshooting list below to their default settings. VGA Mode Problem No picture visible LED status Blue Off Remedy Using the OSD menu, adjust brightness and contrast...
User Manual SA220Q A
Page 30
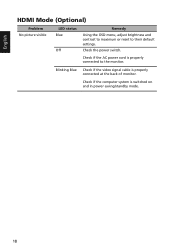
English HDMI Mode (Optional) Problem No picture visible LED status Blue Off Remedy Using the OSD menu, adjust brightness and contrast to maximum or reset to the monitor. Check the power switch. Blinking Blue Check if the video signal cable is switched on and in power saving/standby mode. 18 Check if the computer system is properly connected at the back of monitor. Check if the AC power cord is properly connected to their default settings.
English HDMI Mode (Optional) Problem No picture visible LED status Blue Off Remedy Using the OSD menu, adjust brightness and contrast to maximum or reset to the monitor. Check the power switch. Blinking Blue Check if the video signal cable is switched on and in power saving/standby mode. 18 Check if the computer system is properly connected at the back of monitor. Check if the AC power cord is properly connected to their default settings.


