
User Manual
Page 3
..., an afterimage of the previous screen may flicker during initial use . • The LCD screen has 99.99% or more effective pixels. Turn off the power switch and then turn it on again to the nature of 0.01% or less such as a missing pixel or a pixel lit all warnings and instructions... fluorescent light, the screen may remain after switching the image, when the same image is recovered slowly by changing the image or turning off the power switch for a few hours. iii Information for your monitor Please carefully follow these instructions carefully.
..., an afterimage of the previous screen may flicker during initial use . • The LCD screen has 99.99% or more effective pixels. Turn off the power switch and then turn it on again to the nature of 0.01% or less such as a missing pixel or a pixel lit all warnings and instructions... fluorescent light, the screen may remain after switching the image, when the same image is recovered slowly by changing the image or turning off the power switch for a few hours. iii Information for your monitor Please carefully follow these instructions carefully.

User Manual
Page 4
... used with this product, make sure that could be seriously damaged. • Slots and openings are not sure of the type of power available, consult your dealer or local power company. • Do not allow anything to rest on the cord. • If an extension cord is only used for this monitor... ,do not place the product on the marking label. iv Accessibility Be sure that the power outlet you plug the power cord into is provided. • Never push objects of any kind into the product. • To avoid damage of internal components and to...
... used with this product, make sure that could be seriously damaged. • Slots and openings are not sure of the type of power available, consult your dealer or local power company. • Do not allow anything to rest on the cord. • If an extension cord is only used for this monitor... ,do not place the product on the marking label. iv Accessibility Be sure that the power outlet you plug the power cord into is provided. • Never push objects of any kind into the product. • To avoid damage of internal components and to...
User Manual
Page 5
...; the product exhibits a distinct change in electric shock and/or injury. Warning! The grounding pin is properly grounded before inserting the power cord plug. Note: The grounding pin also provides good protection from the wall outlet and refer servicing to qualified service personnel when: •...or other nearby electrical devices that the total rating of the branch circuit rating. v ampere rating of the equipment plugged into a non-grounded power outlet. The overall system load must not exceed 80% of all servicing to service this product. • Use the product only with a...
...; the product exhibits a distinct change in electric shock and/or injury. Warning! The grounding pin is properly grounded before inserting the power cord plug. Note: The grounding pin also provides good protection from the wall outlet and refer servicing to qualified service personnel when: •...or other nearby electrical devices that the total rating of the branch circuit rating. v ampere rating of the equipment plugged into a non-grounded power outlet. The overall system load must not exceed 80% of all servicing to service this product. • Use the product only with a...

User Manual
Page 7
... tightness • coldness or weakness If you have these symptoms, or any other musculoskeletal disorders. The following section provides tips for power management: • Activate display's Sleep mode within 15 minutes of user inactivity. • Activate computer's Sleep mode within 30 minutes...footrest, or raising your sitting height to computer use, consult a physician immediately and inform your comfort zone by pushing the power button. vii LCD pixel statement The LCD unit is produced with high-precision manufacturing techniques. Incorrect computer usage may occasionally misfire...
... tightness • coldness or weakness If you have these symptoms, or any other musculoskeletal disorders. The following section provides tips for power management: • Activate display's Sleep mode within 15 minutes of user inactivity. • Activate computer's Sleep mode within 30 minutes...footrest, or raising your sitting height to computer use, consult a physician immediately and inform your comfort zone by pushing the power button. vii LCD pixel statement The LCD unit is produced with high-precision manufacturing techniques. Incorrect computer usage may occasionally misfire...
User Manual
Page 9
TABLE OF CONTENTS UNPACKING 1 ATTACHING / REMOVING THE BASE 2 SCREEN POSITION ADJUSTMENT 2 CONNECTING THE POWER CORD 3 SAFETY PRECAUTION 3 CLEANING YOUR MONITOR 3 POWER SAVING 4 DDC...4 CONNECTOR PIN ASSIGNMENT 5 STANDARD TIMING TABLE 7 INSTALLATION 8 USER CONTROLS 9 TROUBLESHOOTING 15
TABLE OF CONTENTS UNPACKING 1 ATTACHING / REMOVING THE BASE 2 SCREEN POSITION ADJUSTMENT 2 CONNECTING THE POWER CORD 3 SAFETY PRECAUTION 3 CLEANING YOUR MONITOR 3 POWER SAVING 4 DDC...4 CONNECTOR PIN ASSIGNMENT 5 STANDARD TIMING TABLE 7 INSTALLATION 8 USER CONTROLS 9 TROUBLESHOOTING 15
User Manual
Page 10
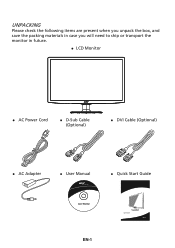
UNPACKING Please check the following items are present when you unpack the box, and save the packing materials in case you will need to ship or transport the monitor in future. LCD Monitor AC Power Cord D-Sub Cable (Optional) DVI Cable (Optional) AC Adapter User Manual Quick Start Guide EN-1
UNPACKING Please check the following items are present when you unpack the box, and save the packing materials in case you will need to ship or transport the monitor in future. LCD Monitor AC Power Cord D-Sub Cable (Optional) DVI Cable (Optional) AC Adapter User Manual Quick Start Guide EN-1
User Manual
Page 12
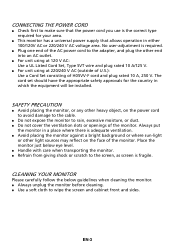
... that allows operation in either 100/120V AC or 220/240 V AC voltage area. EN-3 CONNECTING THE POWER CORD Check first to make sure that the power cord you use is the correct type required for the country in a place where there is adequate ventilation. Avoid placing the ...monitor against a bright background or where sun-light or other light sources may reflect on the power cord to avoid damage to the cable. Do not expose the monitor to rain, excessive moisture, or dust. Do not cover the...
... that allows operation in either 100/120V AC or 220/240 V AC voltage area. EN-3 CONNECTING THE POWER CORD Check first to make sure that the power cord you use is the correct type required for the country in a place where there is adequate ventilation. Avoid placing the ...monitor against a bright background or where sun-light or other light sources may reflect on the power cord to avoid damage to the cable. Do not expose the monitor to rain, excessive moisture, or dust. Do not cover the...
User Manual
Page 13
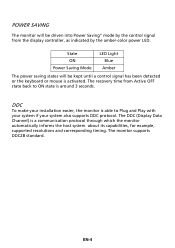
... monitor will be driven into Power Saving" mode by the amber-color power LED. The recovery time from the display controller, as indicated by the control signal from Active OFF state back to Plug and Play with your ... DDC2B standard. The DDC (Display Data Channel) is activated. DDC To make your system also supports DDC protocol. EN-4 State ON Power Saving Mode LED Light Blue Amber The power saving states will be kept until a control signal has been detected or the keyboard or mouse is a communication protocol through which the...
... monitor will be driven into Power Saving" mode by the amber-color power LED. The recovery time from the display controller, as indicated by the control signal from Active OFF state back to Plug and Play with your ... DDC2B standard. The DDC (Display Data Channel) is activated. DDC To make your system also supports DDC protocol. EN-4 State ON Power Saving Mode LED Light Blue Amber The power saving states will be kept until a control signal has been detected or the keyboard or mouse is a communication protocol through which the...
User Manual
Page 15
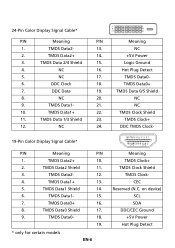
...Plug Detect 5. TMDS Data0- 6. TMDS Data0+ 7. DDC Data 19. NC 9. NC 10. TMDS Clock+ 12. CEC Reserved (N.C. TMDS Data2+ 14. +5V Power 3. DDC Clock 18. TMDS Clock Shield 11. TMDS Data 1/3 Shield 23. TMDS Data1 Shield 14. 6. TMDS Data1- 15. 7. TMDS Data0+ 16. 8....4. TMDS Data1+ 22. TMDS Data1+ 13. 5. TMDS Data1- 21. TMDS Data2- 12. 4. on device) SCL SDA DDC/CEC Ground +5V Power Hot Plug Detect 24-Pin Color Display Signal Cable* PIN Meaning PIN Meaning 1. TMDS Data2- 13. NC 2. NC 20. DDC TMDS Clock- 19-Pin...
...Plug Detect 5. TMDS Data0- 6. TMDS Data0+ 7. DDC Data 19. NC 9. NC 10. TMDS Clock+ 12. CEC Reserved (N.C. TMDS Data2+ 14. +5V Power 3. DDC Clock 18. TMDS Clock Shield 11. TMDS Data 1/3 Shield 23. TMDS Data1 Shield 14. 6. TMDS Data1- 15. 7. TMDS Data0+ 16. 8....4. TMDS Data1+ 22. TMDS Data1+ 13. 5. TMDS Data1- 21. TMDS Data2- 12. 4. on device) SCL SDA DDC/CEC Ground +5V Power Hot Plug Detect 24-Pin Color Display Signal Cable* PIN Meaning PIN Meaning 1. TMDS Data2- 13. NC 2. NC 20. DDC TMDS Clock- 19-Pin...

User Manual
Page 17
...cable to diagnose the problem. Connect the adapter a. b. Connect the VGA video cable to the adapter. Make sure both the monitor and computer are powered-OFF. Connect one end of the monitor and connect the other end to a properly grounded, AC outlet. 3. This sequence is very important. 4....the other end to your host system, please follow the steps as given below: Steps 1. 1-1 Connect Video Cable a. Power-ON Monitor and Computer Power-ON the monitor first, then power-ON the computer. Connect the AC cord to the computer. 1-2 Connect Digital Cable (Only Dual-input model) a. DC ...
...cable to diagnose the problem. Connect the adapter a. b. Connect the VGA video cable to the adapter. Make sure both the monitor and computer are powered-OFF. Connect one end of the monitor and connect the other end to a properly grounded, AC outlet. 3. This sequence is very important. 4....the other end to your host system, please follow the steps as given below: Steps 1. 1-1 Connect Video Cable a. Power-ON Monitor and Computer Power-ON the monitor first, then power-ON the computer. Connect the AC cord to the computer. 1-2 Connect Digital Cable (Only Dual-input model) a. DC ...

User Manual
Page 18
Lights up to indicate the power is turned ON. / Minus / Plus: If the OSD is used to set the HPos, VPos, Clock and Focus. The Auto Adjustment function is ... activate the OSD menu. MENU OSD functions Press this button to toggle between the OSD options. AUTO Auto Adjust: Press this botton to open the Acer eColor Management OSD and access the scenario modes. EN-9 USER CONTROLS Base Controls Power Switch / Power LED: To turn the monitor ON or OFF.
Lights up to indicate the power is turned ON. / Minus / Plus: If the OSD is used to set the HPos, VPos, Clock and Focus. The Auto Adjustment function is ... activate the OSD menu. MENU OSD functions Press this button to toggle between the OSD options. AUTO Auto Adjust: Press this botton to open the Acer eColor Management OSD and access the scenario modes. EN-9 USER CONTROLS Base Controls Power Switch / Power LED: To turn the monitor ON or OFF.
User Manual
Page 19
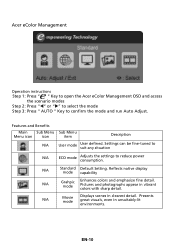
... in clearest detail. Features and Benefits Main Sub Menu Sub Menu Menu icon icon item Description N/A User mode User defined. Acer eColor Management Operation instructions Step 1: Press " " Key to open the Acer eColor Management OSD and access the scenario modes Step 2: Press "" or "" to select the mode Step 3: Press " AUTO...
... in clearest detail. Features and Benefits Main Sub Menu Sub Menu Menu icon icon item Description N/A User mode User defined. Acer eColor Management Operation instructions Step 1: Press " " Key to open the Acer eColor Management OSD and access the scenario modes Step 2: Press "" or "" to select the mode Step 3: Press " AUTO...
User Manual
Page 24
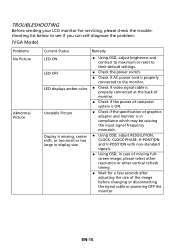
... display size Remedy Using OSD, adjust brightness and contrast to maximum or reset to their default settings. Check the power switch. Check if AC power cord is properly connected to the monitor. Check if video signal cable is properly connected at the back of monitor. ...; Check if the power of computer system is ON. Check if the specification of graphics adapter and monitor is in compliance which may be causing the input...
... display size Remedy Using OSD, adjust brightness and contrast to maximum or reset to their default settings. Check the power switch. Check if AC power cord is properly connected to the monitor. Check if video signal cable is properly connected at the back of monitor. ...; Check if the power of computer system is ON. Check if the specification of graphics adapter and monitor is in compliance which may be causing the input...
User Manual
Page 25
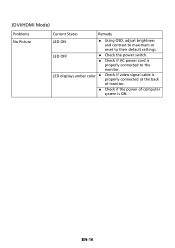
LED OFF Check the power switch. Check if AC power cord is ON. LED displays amber color Check if video signal cable is properly connected at the back of monitor. Check if the power of computer system is properly connected to their default settings. EN-16 (DVI/HDMI Mode) Problems No Picture Current Status Remedy LED ON Using OSD, adjust brightness and contrast to maximum or reset to the monitor.
LED OFF Check the power switch. Check if AC power cord is ON. LED displays amber color Check if video signal cable is properly connected at the back of monitor. Check if the power of computer system is properly connected to their default settings. EN-16 (DVI/HDMI Mode) Problems No Picture Current Status Remedy LED ON Using OSD, adjust brightness and contrast to maximum or reset to the monitor.


