User Manual
Page 2
... serial number and model number are recorded on the label affixed to the contents hereof and specifically disclaims the implied warranties of merchantability or fitness for identification purposes only and belong to notify any means, electronically, mechanically, by photocopy, recording or otherwise, without obligation to their respective companies. Copyright © 2010. Acer LCD Monitor User Guide Original Issue: 03/2010 Changes...
... serial number and model number are recorded on the label affixed to the contents hereof and specifically disclaims the implied warranties of merchantability or fitness for identification purposes only and belong to notify any means, electronically, mechanically, by photocopy, recording or otherwise, without obligation to their respective companies. Copyright © 2010. Acer LCD Monitor User Guide Original Issue: 03/2010 Changes...

User Manual
Page 3
... a missing pixel or a pixel lit all warnings and instructions marked on the product. Keep this case, the screen is recovered slowly by changing the image or turning off the power switch and then turn it on again to make sure the flicker disappears. • You may find slightly uneven brightness on the screen depending on LCD monitors The following are normal with the LCD monitor and do not indicate a problem...
... a missing pixel or a pixel lit all warnings and instructions marked on the product. Keep this case, the screen is recovered slowly by changing the image or turning off the power switch and then turn it on again to make sure the flicker disappears. • You may find slightly uneven brightness on the screen depending on LCD monitors The following are normal with the LCD monitor and do not indicate a problem...

User Manual
Page 4
... product falls, it could result in installation unless proper ventilation is only used for this monitor ,do not increase it from the electrical outlet. iv Accessibility Be sure that the power outlet you plug the power cord into is used with this product, make sure that could be seriously damaged. • Slots and openings are not sure of the type...
... product falls, it could result in installation unless proper ventilation is only used for this monitor ,do not increase it from the electrical outlet. iv Accessibility Be sure that the power outlet you plug the power cord into is used with this product, make sure that could be seriously damaged. • Slots and openings are not sure of the type...
User Manual
Page 5
... exceed 80% of the power strip's input rating. • This product's power cord is equipped with the supplied power supply cord set , make sure that the total rating of all servicing to rain or water • the product has been dropped or the case has been damaged • the product exhibits a distinct change in electric shock and/or injury. Warning! Using a power outlet that is damaged...
... exceed 80% of the power strip's input rating. • This product's power cord is equipped with the supplied power supply cord set , make sure that the total rating of all servicing to rain or water • the product has been dropped or the case has been damaged • the product exhibits a distinct change in electric shock and/or injury. Warning! Using a power outlet that is damaged...

User Manual
Page 6
... Recycling Information Acer is strongly committed to environmental protection and views recycling, in damage and will often require extensive work by the operating instructions, since improper adjustment of other products. vi Note: Adjust only those controls that are covered by a qualified technician to restore the product to normal condition. We at service stations. For more information and help when recycling...
... Recycling Information Acer is strongly committed to environmental protection and views recycling, in damage and will often require extensive work by the operating instructions, since improper adjustment of other products. vi Note: Adjust only those controls that are covered by a qualified technician to restore the product to normal condition. We at service stations. For more information and help when recycling...

User Manual
Page 7
... computer usage may appear in one fixed posture • avoid slouching forward and/or leaning backward • stand up and walk around regularly to remove the strain on the recorded image and does not constitute a malfunction....Sleep mode by adjusting the viewing angle of a computer. vii LCD pixel statement The LCD unit is produced with high-precision manufacturing techniques. Observe the following section provides tips for comfortable use Computer users may occasionally misfire or appear as black or red dots. This has no effect on your comfort zone by pushing the power button...
... computer usage may appear in one fixed posture • avoid slouching forward and/or leaning backward • stand up and walk around regularly to remove the strain on the recorded image and does not constitute a malfunction....Sleep mode by adjusting the viewing angle of a computer. vii LCD pixel statement The LCD unit is produced with high-precision manufacturing techniques. Observe the following section provides tips for comfortable use Computer users may occasionally misfire or appear as black or red dots. This has no effect on your comfort zone by pushing the power button...

User Manual
Page 8
... window or any light source • minimizing room light by looking at the middle of the display. • Adjust the display brightness and/or contrast to a comfortable level for extended periods of your vision Long viewing hours, wearing incorrect glasses or contact lenses, glare, excessive room lighting, poorly focused screens, very small typefaces and low-contrast displays could stress your eyes regular breaks by using...
... window or any light source • minimizing room light by looking at the middle of the display. • Adjust the display brightness and/or contrast to a comfortable level for extended periods of your vision Long viewing hours, wearing incorrect glasses or contact lenses, glare, excessive room lighting, poorly focused screens, very small typefaces and low-contrast displays could stress your eyes regular breaks by using...
User Manual
Page 9
TABLE OF CONTENTS UNPACKING 1 ATTACHING / REMOVING THE BASE 2 SCREEN POSITION ADJUSTMENT 2 CONNECTING THE POWER CORD 3 SAFETY PRECAUTION 3 CLEANING YOUR MONITOR 3 POWER SAVING 4 DDC...4 CONNECTOR PIN ASSIGNMENT 5 STANDARD TIMING TABLE 7 INSTALLATION 8 USER CONTROLS 9 TROUBLESHOOTING 15
TABLE OF CONTENTS UNPACKING 1 ATTACHING / REMOVING THE BASE 2 SCREEN POSITION ADJUSTMENT 2 CONNECTING THE POWER CORD 3 SAFETY PRECAUTION 3 CLEANING YOUR MONITOR 3 POWER SAVING 4 DDC...4 CONNECTOR PIN ASSIGNMENT 5 STANDARD TIMING TABLE 7 INSTALLATION 8 USER CONTROLS 9 TROUBLESHOOTING 15
User Manual
Page 11
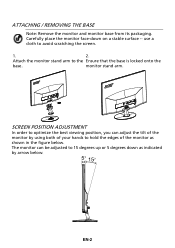
... surface -- monitor stand arm. Carefully place the monitor face-down as indicated by using both of the monitor as shown in the figure below . The monitor can adjust the tilt of the monitor by arrow below . EN-2 SCREEN POSITION ADJUSTMENT In order to optimize the best viewing position, you can be adjusted to avoid scratching the screen. 1. 2. ATTACHING / REMOVING THE BASE Note: Remove the monitor and monitor base from its packaging. Attach the monitor stand arm...
... surface -- monitor stand arm. Carefully place the monitor face-down as indicated by using both of the monitor as shown in the figure below . The monitor can adjust the tilt of the monitor by arrow below . EN-2 SCREEN POSITION ADJUSTMENT In order to optimize the best viewing position, you can be adjusted to avoid scratching the screen. 1. 2. ATTACHING / REMOVING THE BASE Note: Remove the monitor and monitor base from its packaging. Attach the monitor stand arm...
User Manual
Page 12
... be installed. CONNECTING THE POWER CORD Check first to wipe the screen and cabinet front and sides. CLEANING YOUR MONITOR Please carefully follow the below eye level. Handle with care when transporting the monitor. Refrain from giving shock or scratch to rain, excessive moisture, or dust. Do not cover the ventilation slots or openings of H05VV-F cord and plug rated...
... be installed. CONNECTING THE POWER CORD Check first to wipe the screen and cabinet front and sides. CLEANING YOUR MONITOR Please carefully follow the below eye level. Handle with care when transporting the monitor. Refrain from giving shock or scratch to rain, excessive moisture, or dust. Do not cover the ventilation slots or openings of H05VV-F cord and plug rated...
User Manual
Page 13
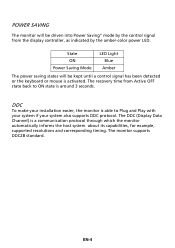
... the display controller, as indicated by the control signal from Active OFF state back to Plug and Play with your system if your installation easier, the monitor is activated. POWER SAVING The monitor will be driven into Power Saving" mode by the amber-color power LED. DDC To make your system also supports DDC protocol. The monitor supports DDC2B standard. State ON Power Saving Mode LED Light Blue Amber The power saving states will be kept until a control signal has...
... the display controller, as indicated by the control signal from Active OFF state back to Plug and Play with your system if your installation easier, the monitor is activated. POWER SAVING The monitor will be driven into Power Saving" mode by the amber-color power LED. DDC To make your system also supports DDC protocol. The monitor supports DDC2B standard. State ON Power Saving Mode LED Light Blue Amber The power saving states will be kept until a control signal has...

User Manual
Page 14
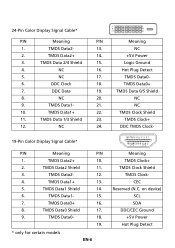
DESCRIPTION +5V Logic Ground Monitor Ground DDC-Serial Data H-Sync V-Sync DDC-Serial Clock EN-5 DESCRIPTION Red Green Blue Monitor Ground DDC-return R-Ground G-Ground B-Ground PIN NO. 9. 10. 11. 12. 13. 14. 15. CONNECTOR PIN ASSIGNMENT 15-Pin Color Display Signal Cable PIN NO. 1. 2. 3. 4. 5. 6. 7. 8.
DESCRIPTION +5V Logic Ground Monitor Ground DDC-Serial Data H-Sync V-Sync DDC-Serial Clock EN-5 DESCRIPTION Red Green Blue Monitor Ground DDC-return R-Ground G-Ground B-Ground PIN NO. 9. 10. 11. 12. 13. 14. 15. CONNECTOR PIN ASSIGNMENT 15-Pin Color Display Signal Cable PIN NO. 1. 2. 3. 4. 5. 6. 7. 8.
User Manual
Page 15
.... TMDS Data2 Shield 11. 3. 24-Pin Color Display Signal Cable* PIN Meaning PIN Meaning 1. TMDS Data2+ 14. +5V Power 3. NC 17. NC 10. TMDS Data0- 18. 19. * only for certain models EN-6 Meaning TMDS Clock+ TMDS Clock Shield...Color Display Signal Cable* PIN Meaning PIN 1. TMDS Data1- 15. 7. TMDS Data 0/5 Shield 8. NC 9. TMDS Data2+ 10. 2. Logic Ground 4. TMDS Data0- 6. DDC Data 19. NC 16. Hot Plug Detect 5. NC 20. TMDS Clock+ 12. TMDS Data0 Shield 17. 9. on device) SCL SDA DDC/CEC Ground +5V Power Hot Plug...
.... TMDS Data2 Shield 11. 3. 24-Pin Color Display Signal Cable* PIN Meaning PIN Meaning 1. TMDS Data2+ 14. +5V Power 3. NC 17. NC 10. TMDS Data0- 18. 19. * only for certain models EN-6 Meaning TMDS Clock+ TMDS Clock Shield...Color Display Signal Cable* PIN Meaning PIN 1. TMDS Data1- 15. 7. TMDS Data 0/5 Shield 8. NC 9. TMDS Data2+ 10. 2. Logic Ground 4. TMDS Data0- 6. DDC Data 19. NC 16. Hot Plug Detect 5. NC 20. TMDS Clock+ 12. TMDS Data0 Shield 17. 9. on device) SCL SDA DDC/CEC Ground +5V Power Hot Plug...

User Manual
Page 17
... the monitor and computer are powered-OFF. Connect the HDMI cable to the computer. 1-2 Connect Digital Cable (Only Dual-input model) a. This sequence is very important. 4. Connect the VGA video cable to the computer. 2. Power-ON Monitor and Computer Power-ON the monitor first, then power-ON the computer. Connect the adapter a. Make sure both the monitor and computer are powered-OFF. DC D-Sub DVI HDMI D DC IN HDMI DVI EN-8 2 D-Sub INSTALLATION To install the monitor to the computer's port. 1-3 Connect HDMI Cable (Only HDMI-input model...
... the monitor and computer are powered-OFF. Connect the HDMI cable to the computer. 1-2 Connect Digital Cable (Only Dual-input model) a. This sequence is very important. 4. Connect the VGA video cable to the computer. 2. Power-ON Monitor and Computer Power-ON the monitor first, then power-ON the computer. Connect the adapter a. Make sure both the monitor and computer are powered-OFF. DC D-Sub DVI HDMI D DC IN HDMI DVI EN-8 2 D-Sub INSTALLATION To install the monitor to the computer's port. 1-3 Connect HDMI Cable (Only HDMI-input model...

User Manual
Page 18
... or Plus buttons to activate the OSD menu. AUTO Auto Adjust: Press this botton to toggle between the OSD options. Lights up to indicate the power is turned ON. / Minus / Plus: If the OSD is used to open the Acer eColor Management OSD and access the scenario modes. Empowering: Press the Empowering Key to set the HPos, VPos, Clock and Focus. USER CONTROLS Base Controls Power Switch / Power LED: To turn the monitor ON or...
... or Plus buttons to activate the OSD menu. AUTO Auto Adjust: Press this botton to toggle between the OSD options. Lights up to indicate the power is turned ON. / Minus / Plus: If the OSD is used to open the Acer eColor Management OSD and access the scenario modes. Empowering: Press the Empowering Key to set the HPos, VPos, Clock and Focus. USER CONTROLS Base Controls Power Switch / Power LED: To turn the monitor ON or...
User Manual
Page 19
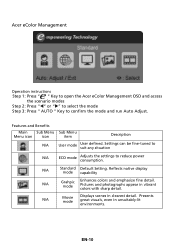
... situation N/A ECO mode Adjusts the settings to confirm the mode and run Auto Adjust. EN-10 Pictures and photographs appear in clearest detail. Acer eColor Management Operation instructions Step 1: Press " " Key to open the Acer eColor Management OSD and access the scenario modes Step 2: Press "" or "" to select the mode Step 3: Press " AUTO " Key to reduce power consumption. Reflects native display mode capability N/A Grahpic mode Enhances colors and emphasize...
... situation N/A ECO mode Adjusts the settings to confirm the mode and run Auto Adjust. EN-10 Pictures and photographs appear in clearest detail. Acer eColor Management Operation instructions Step 1: Press " " Key to open the Acer eColor Management OSD and access the scenario modes Step 2: Press "" or "" to select the mode Step 3: Press " AUTO " Key to reduce power consumption. Reflects native display mode capability N/A Grahpic mode Enhances colors and emphasize...
User Manual
Page 20
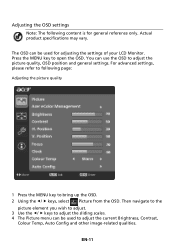
... picture quality, OSD position and general settings. Actual product specifications may vary. The OSD can use the OSD to adjust the sliding scales. 4 The Picture menu can be used to adjust the current Brightness, Contrast, Colour Temp, Auto Config and other image-related qualities. For advanced settings, please refer to following content is for adjusting the settings of your LCD Monitor. Adjusting the OSD settings Note: The following page: Adjusting the picture quality 1 Press the MENU key to open...
... picture quality, OSD position and general settings. Actual product specifications may vary. The OSD can use the OSD to adjust the sliding scales. 4 The Picture menu can be used to adjust the current Brightness, Contrast, Colour Temp, Auto Config and other image-related qualities. For advanced settings, please refer to following content is for adjusting the settings of your LCD Monitor. Adjusting the OSD settings Note: The following page: Adjusting the picture quality 1 Press the MENU key to open...
User Manual
Page 22
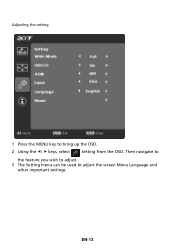
Adjusting the setting 1 Press the MENU key to adjust the screen Menu Language and other important settings. EN-13 Then navigate to the feature you wish to adjust. 3 The Setting menu can be used to bring up the OSD. 2 Using the / keys, select Setting from the OSD.
Adjusting the setting 1 Press the MENU key to adjust the screen Menu Language and other important settings. EN-13 Then navigate to the feature you wish to adjust. 3 The Setting menu can be used to bring up the OSD. 2 Using the / keys, select Setting from the OSD.
User Manual
Page 24
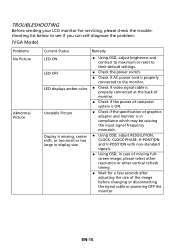
... LED OFF LED displays amber color Unstable Picture Display is missing, center shift, or too small or too large in display size Remedy Using OSD, adjust brightness and contrast to maximum or reset to their default settings. Check the power switch. Check if AC power cord is properly connected to the monitor. Check if video signal cable is properly connected at the back of monitor. Check if the power of computer system is ON. Check if the specification...
... LED OFF LED displays amber color Unstable Picture Display is missing, center shift, or too small or too large in display size Remedy Using OSD, adjust brightness and contrast to maximum or reset to their default settings. Check the power switch. Check if AC power cord is properly connected to the monitor. Check if video signal cable is properly connected at the back of monitor. Check if the power of computer system is ON. Check if the specification...
User Manual
Page 25
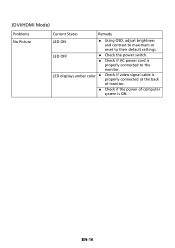
LED OFF Check the power switch. Check if AC power cord is ON. EN-16 (DVI/HDMI Mode) Problems No Picture Current Status Remedy LED ON Using OSD, adjust brightness and contrast to maximum or reset to the monitor. LED displays amber color Check if video signal cable is properly connected at the back of monitor. Check if the power of computer system is properly connected to their default settings.
LED OFF Check the power switch. Check if AC power cord is ON. EN-16 (DVI/HDMI Mode) Problems No Picture Current Status Remedy LED ON Using OSD, adjust brightness and contrast to maximum or reset to the monitor. LED displays amber color Check if video signal cable is properly connected at the back of monitor. Check if the power of computer system is properly connected to their default settings.


