
Quick Start Guide
Page 1
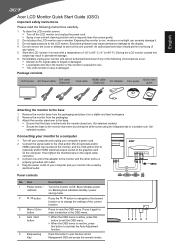
... computer's power cord. 2 Connect the signal cable to 60° C (-4° to140° F). English Acer LCD Monitor Quick Start Guide (QSG) Important safety instructions Please read the following circumstances occur: • Monitor-to-PC signal cable is frayed or damaged. • Liquid spills onto the LCD... and clean the screen gently. 2 Do not place the LCD monitor near a window. Exposing the monitor to rain, moisture or sunlight can severely damage it. 3 Do not apply pressure to change the settings of the adapter to the monitor and the other end to view the OSD menu. Press the ...
... computer's power cord. 2 Connect the signal cable to 60° C (-4° to140° F). English Acer LCD Monitor Quick Start Guide (QSG) Important safety instructions Please read the following circumstances occur: • Monitor-to-PC signal cable is frayed or damaged. • Liquid spills onto the LCD... and clean the screen gently. 2 Do not place the LCD monitor near a window. Exposing the monitor to rain, moisture or sunlight can severely damage it. 3 Do not apply pressure to change the settings of the adapter to the monitor and the other end to view the OSD menu. Press the ...
Quick Start Guide
Page 2
... and (2) this device must be attached to operate this equipment. If this LCD monitor is recycled in interference to radio or television reception, which can radiate radio frequency ... disposal will not occur in a residential installation. CE declaration of conformity Hereby, Acer Inc., declares that this product must not be determined by turning the device off... with the limits for a Class B digital device pursuant to establishing a framework for the setting of ecodesign requirements for energy-related product. Remarque a I'intention des utilisateurs canadiens Cet appareil ...
... and (2) this device must be attached to operate this equipment. If this LCD monitor is recycled in interference to radio or television reception, which can radiate radio frequency ... disposal will not occur in a residential installation. CE declaration of conformity Hereby, Acer Inc., declares that this product must not be determined by turning the device off... with the limits for a Class B digital device pursuant to establishing a framework for the setting of ecodesign requirements for energy-related product. Remarque a I'intention des utilisateurs canadiens Cet appareil ...
User Manual
Page 4
... Inc., Model: ADP-30MH B (S220HQL Model) Manufacture : Delta Electronics Inc., Model: ADP-40PH BB (S230HL Model) Using electrical power • This product should never be placed near or over a radiator or heat ... leakage, do not place the product on a vibrating surface. • Never use this monitor, do not increase it could result in installation unless proper ventilation is provided. • Never...Ltd. If you can hear it clearly and comfortably and without distortion. • After setting the volume level, do not be used for ventilation to protect it under sporting, exercising...
... Inc., Model: ADP-30MH B (S220HQL Model) Manufacture : Delta Electronics Inc., Model: ADP-40PH BB (S230HL Model) Using electrical power • This product should never be placed near or over a radiator or heat ... leakage, do not place the product on a vibrating surface. • Never use this monitor, do not increase it could result in installation unless proper ventilation is provided. • Never...Ltd. If you can hear it clearly and comfortably and without distortion. • After setting the volume level, do not be used for ventilation to protect it under sporting, exercising...
User Manual
Page 9
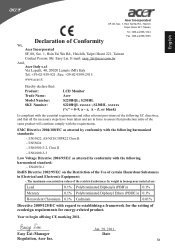
S230HL xxxxxx ("x" = 0~9, a ~ z, A ~ Z, or blank) Is compliant with...Ethers (PBDE's) 0.1% Hexavalent Chromium 0.1% Cadmium 0.01% Directive 2009/125/EC with regard to establishing a framework for the setting of ecodesign requirements for energy-related product. EMC Directive 2004/108/EC as attested by conformity with the following harmonized standards:...following harmonized standard: -. Year to assure that : Product: Trade Name: Model Number: SKU Number: LCD Monitor Acer S220HQL; English Acer Incorporated 8F, 88, Sec. 1, Hsin Tai Wu Rd., Hsichih Taipei Hsien 221, Taiwan Tel : ...
S230HL xxxxxx ("x" = 0~9, a ~ z, A ~ Z, or blank) Is compliant with...Ethers (PBDE's) 0.1% Hexavalent Chromium 0.1% Cadmium 0.01% Directive 2009/125/EC with regard to establishing a framework for the setting of ecodesign requirements for energy-related product. EMC Directive 2004/108/EC as attested by conformity with the following harmonized standards:...following harmonized standard: -. Year to assure that : Product: Trade Name: Model Number: SKU Number: LCD Monitor Acer S220HQL; English Acer Incorporated 8F, 88, Sec. 1, Hsin Tai Wu Rd., Hsichih Taipei Hsien 221, Taiwan Tel : ...
User Manual
Page 15
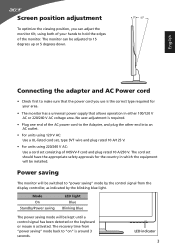
... • For units using 220/240 V AC: Use a cord set should have the appropriate safety approvals for your area. • The monitor has a universal power supply that the power cord you can be installed. Power saving The monitor will be switched to "on" is activated. LED indicator 3 The ...cord set consisting of the monitor. The recovery time from "power saving" mode back to "power saving" mode by the control signal ...
... • For units using 220/240 V AC: Use a cord set should have the appropriate safety approvals for your area. • The monitor has a universal power supply that the power cord you can be installed. Power saving The monitor will be switched to "on" is activated. LED indicator 3 The ...cord set consisting of the monitor. The recovery time from "power saving" mode back to "power saving" mode by the control signal ...
User Manual
Page 20
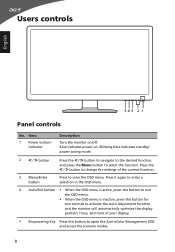
...menu. • When the OSD menu is inactive, press this button for two seconds to activate the Auto Adjustment function and the monitor will automatically optimize the display position, focus, and clock of the current function. 3 Menu/Enter button Press to view the OSD menu...Press the < / > button to navigate to the desired function, and press the Menu button to open the Acer eColor Management OSD and access the scenario modes. 8 Press the < / > button to change the settings of your display. 5 Empowering Key Press this button to select the function. Blue indicates power on /off.
...menu. • When the OSD menu is inactive, press this button for two seconds to activate the Auto Adjustment function and the monitor will automatically optimize the display position, focus, and clock of the current function. 3 Menu/Enter button Press to view the OSD menu...Press the < / > button to navigate to the desired function, and press the Menu button to open the Acer eColor Management OSD and access the scenario modes. 8 Press the < / > button to change the settings of your display. 5 Empowering Key Press this button to select the function. Blue indicates power on /off.
User Manual
Page 21
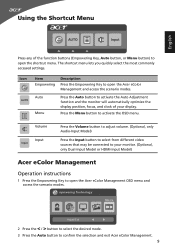
...the Auto Adjustment function and the monitor will automatically optimize the display position, focus, and clock of your monitor. (Optional, only Dual-Input Model or HDMI-Input Model) Acer eColor Management Operation instructions 1 Press the Empowering Key to open the Acer eColor Management and access the scenario... modes. Auto Menu Press the Auto button to open the Acer eColor Management OSD menu and access the scenario modes. The shortcut menu lets you quickly select the most commonly accessed settings. Volume Input Input Press the Volume button to adjust volume. (...
...the Auto Adjustment function and the monitor will automatically optimize the display position, focus, and clock of your monitor. (Optional, only Dual-Input Model or HDMI-Input Model) Acer eColor Management Operation instructions 1 Press the Empowering Key to open the Acer eColor Management and access the scenario... modes. Auto Menu Press the Auto button to open the Acer eColor Management OSD menu and access the scenario modes. The shortcut menu lets you quickly select the most commonly accessed settings. Volume Input Input Press the Volume button to adjust volume. (...

User Manual
Page 22
...type User mode Description User-defined. Reflects native display capability. Your LCD monitor is for making various adjustments and settings. Press the Menu button to reduce power consumption. ECO mode Adjusts the settings to open the OSD menu. Pictures and photographs appear in vibrant colors ...sharp detail. You can be fine-tuned to adjust the picture quality, OSD timeout, and general settings. 10 Graphic mode Movie mode Enhances colors and emphasizes fine detail. Settings can use the OSD menu to suit any situation. Presents great visuals, even in clearest detail....
...type User mode Description User-defined. Reflects native display capability. Your LCD monitor is for making various adjustments and settings. Press the Menu button to reduce power consumption. ECO mode Adjusts the settings to open the OSD menu. Pictures and photographs appear in vibrant colors ...sharp detail. You can be fine-tuned to adjust the picture quality, OSD timeout, and general settings. 10 Graphic mode Movie mode Enhances colors and emphasizes fine detail. Settings can use the OSD menu to suit any situation. Presents great visuals, even in clearest detail....
User Manual
Page 25
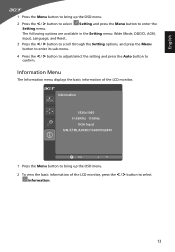
... the basic information of the LCD monitor, press the < / > button to enter the Setting menu. Information 1920x1080 H:68KHz V:60Hz VGA Input S/N: ETRLA00803104000502400 Exit 1 Press the Menu button to bring up the OSD menu. 2 To view the basic information of the LCD monitor. English 1 Press the Menu button... to bring up the OSD menu. 2 Press the < / > button to select Setting and press the Menu button to select Information. 13 The following options are available in ...
... the basic information of the LCD monitor, press the < / > button to enter the Setting menu. Information 1920x1080 H:68KHz V:60Hz VGA Input S/N: ETRLA00803104000502400 Exit 1 Press the Menu button to bring up the OSD menu. 2 To view the basic information of the LCD monitor. English 1 Press the Menu button... to bring up the OSD menu. 2 Press the < / > button to select Setting and press the Menu button to select Information. 13 The following options are available in ...
User Manual
Page 26
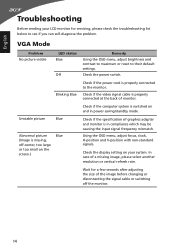
Check if the power cord is properly connected at the back of monitor. Check if the video signal cable is properly connected to the monitor. Check the display setting on your LCD monitor for a few seconds after adjusting the size of the image before changing or disconnecting the... (Image is in power saving/standby mode. Check the power switch. Check if the specification of graphics adapter and monitor is missing, off the monitor. 14 English Troubleshooting Before sending your system. In case of a missing image, please select another resolution or vertical refresh...
Check if the power cord is properly connected at the back of monitor. Check if the video signal cable is properly connected to the monitor. Check the display setting on your LCD monitor for a few seconds after adjusting the size of the image before changing or disconnecting the... (Image is in power saving/standby mode. Check the power switch. Check if the specification of graphics adapter and monitor is missing, off the monitor. 14 English Troubleshooting Before sending your system. In case of a missing image, please select another resolution or vertical refresh...
User Manual
Page 27
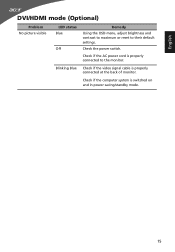
Check the power switch. Check if the computer system is properly connected at the back of monitor. Check if the AC power cord is properly connected to their default settings. English DVI/HDMI mode (Optional) Problem No picture visible LED status Blue Off Remedy Using the OSD menu, adjust brightness and contrast to maximum or reset to the monitor. Blinking Blue Check if the video signal cable is switched on and in power saving/standby mode. 15
Check the power switch. Check if the computer system is properly connected at the back of monitor. Check if the AC power cord is properly connected to their default settings. English DVI/HDMI mode (Optional) Problem No picture visible LED status Blue Off Remedy Using the OSD menu, adjust brightness and contrast to maximum or reset to the monitor. Blinking Blue Check if the video signal cable is switched on and in power saving/standby mode. 15


