
User Manual
Page 5
If power strips are used, the load should not exceed 80% of the power strip's input rating. • This product's power cord is a safety feature. The plug only fits in too many devices. Contact your electrician for service • the product ...
If power strips are used, the load should not exceed 80% of the power strip's input rating. • This product's power cord is a safety feature. The plug only fits in too many devices. Contact your electrician for service • the product ...

User Manual
Page 16
... cable to the adapter. Connect one end of the monitor and connect the other end to the computer's port. 1-3 Connect the Audio Cable (Only Audio-Input Model)(Optional) 2. This sequence is very important. 4. Make sure both the monitor afonrdDcuoaml-pInupteurtaMreopdoelw).ered-OFF. Connect the adapter a Connect the AC cord to the...
... cable to the adapter. Connect one end of the monitor and connect the other end to the computer's port. 1-3 Connect the Audio Cable (Only Audio-Input Model)(Optional) 2. This sequence is very important. 4. Make sure both the monitor afonrdDcuoaml-pInupteurtaMreopdoelw).ered-OFF. Connect the adapter a Connect the AC cord to the...

User Manual
Page 17
...to activate the Auto Adjustment function. Volume Up/Down: Press to set the HPos, VPos, Clock and Focus. It may be connected to open the Acer eColor Management OSD and access the scenario modes. USER CONTROLS Power Switch / Power LED: To turn the monitor ON or OFF. Using the Shortcut ...Menu Press the function button to your monitor. (a) VGA input (b) DVI input As you cycle through the sources you quickly select the most commonly accessed settings. The Auto Adjustment function is used to adjust volume(only Audio...
...to activate the Auto Adjustment function. Volume Up/Down: Press to set the HPos, VPos, Clock and Focus. It may be connected to open the Acer eColor Management OSD and access the scenario modes. USER CONTROLS Power Switch / Power LED: To turn the monitor ON or OFF. Using the Shortcut ...Menu Press the function button to your monitor. (a) VGA input (b) DVI input As you cycle through the sources you quickly select the most commonly accessed settings. The Auto Adjustment function is used to adjust volume(only Audio...

User Manual
Page 22
Product information Information 1600 x 900 H:65KHz V:60Hz VGA Input S/N:ETL5309 1326350380B3742 1 Press the MENU key to bring up for current input. EN-13 Then the basic information of LCD monitor will show up the OSD. 2 Using the e/ f keys, select Information from the OSD.
Product information Information 1600 x 900 H:65KHz V:60Hz VGA Input S/N:ETL5309 1326350380B3742 1 Press the MENU key to bring up for current input. EN-13 Then the basic information of LCD monitor will show up the OSD. 2 Using the e/ f keys, select Information from the OSD.
User Manual
Page 23
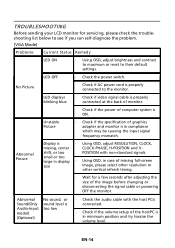
...OFF · Check the power switch. small or too large in display · Using OSD, in compliance which may be causing the input signal frequency mismatch. shift, or too POSITION with the host PCis connected. · Check if the volume setup of the hostPC is ... · Check if the specification of graphics adapter and monitor is in minimum position and try toraise the volume level. Abnormal Sound(Only Audio-Input model) (Optional) No sound, or sound level is ON. Abnormal Picture Display is properly connected to their default settings. LED displays blinking blue...
...OFF · Check the power switch. small or too large in display · Using OSD, in compliance which may be causing the input signal frequency mismatch. shift, or too POSITION with the host PCis connected. · Check if the volume setup of the hostPC is ... · Check if the specification of graphics adapter and monitor is in minimum position and try toraise the volume level. Abnormal Sound(Only Audio-Input model) (Optional) No sound, or sound level is ON. Abnormal Picture Display is properly connected to their default settings. LED displays blinking blue...

User Manual
Page 24
Abnormal Sound(Only Audio-Input model) (Optional) No sound, or sound level is too low · Check the audio cable with the host PCis connected. · Check if the volume ...
Abnormal Sound(Only Audio-Input model) (Optional) No sound, or sound level is too low · Check the audio cable with the host PCis connected. · Check if the volume ...


