
3D manual
Page 2
Acer Projector Series Operation Guide Original Issue: 09/2010 Model number Serial number Date of purchase Place of purchase © 2010 All Rights Reserved.
Acer Projector Series Operation Guide Original Issue: 09/2010 Model number Serial number Date of purchase Place of purchase © 2010 All Rights Reserved.
3D manual
Page 3
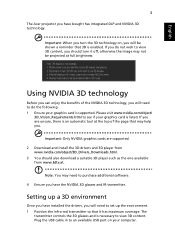
... have installed the drivers, you have bought has integrated DLP and NVIDIA 3D technology. The transmitter controls the 3D glasses and is listed. English 3 The Acer projector you will need to do not wish to view 3D content, you are supported. 2 Download and install the 3D drivers and 3D player from www...
... have installed the drivers, you have bought has integrated DLP and NVIDIA 3D technology. The transmitter controls the 3D glasses and is listed. English 3 The Acer projector you will need to do not wish to view 3D content, you are supported. 2 Download and install the 3D drivers and 3D player from www...
3D manual
Page 4
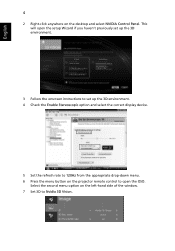
This will open the setup Wizard if you haven't previously set up the 3D environment. 3 Follow the onscreen instructions to set up the 3D environment. 4 Check the Enable Stereoscopic option and select the correct display device. 5 Set the refresh rate to 120Hz from the appropriate drop-down menu. 6 Press the menu button on the projector remote control to Nvidia 3D Vision. English 4 2 Right-click anywhere on the left-hand side of the window. 7 Set 3D to open the OSD. Select the second menu option on the desktop and select NVIDIA Control Panel.
This will open the setup Wizard if you haven't previously set up the 3D environment. 3 Follow the onscreen instructions to set up the 3D environment. 4 Check the Enable Stereoscopic option and select the correct display device. 5 Set the refresh rate to 120Hz from the appropriate drop-down menu. 6 Press the menu button on the projector remote control to Nvidia 3D Vision. English 4 2 Right-click anywhere on the left-hand side of the window. 7 Set 3D to open the OSD. Select the second menu option on the desktop and select NVIDIA Control Panel.
3D manual
Page 5
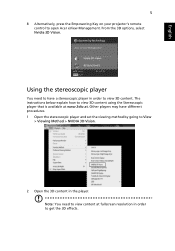
... the stereoscopic player and set the viewing method by going to View > Viewing Method > NVIDIA 3D Vision. 2 Open the 3D content in order to open Acer eView Management. From the 3D options, select Nvidia 3D Vision. English 5 8 Alternatively, press the Empowering Key on your...
... the stereoscopic player and set the viewing method by going to View > Viewing Method > NVIDIA 3D Vision. 2 Open the 3D content in order to open Acer eView Management. From the 3D options, select Nvidia 3D Vision. English 5 8 Alternatively, press the Empowering Key on your...
3D manual
Page 6
...-compatible 3D glasses. Note: Please refer to your graphics card supports 3D playback. Setting up the environment. 1 Set the refresh rate to 120Hz on the projector remote control to open the OSD. Select the second menu option on the left-hand side of the DLP 3D technology, you will need to...
...-compatible 3D glasses. Note: Please refer to your graphics card supports 3D playback. Setting up the environment. 1 Set the refresh rate to 120Hz on the projector remote control to open the OSD. Select the second menu option on the left-hand side of the DLP 3D technology, you will need to...
3D manual
Page 7
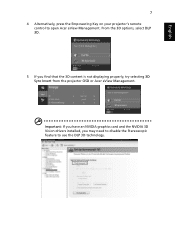
From the 3D options, select DLP 3D. 5 If you may need to disable the Stereoscopic feature to open Acer eView Management. English 7 4 Alternatively, press the Empowering Key on your projector's remote control to use the DLP 3D technology. Important: If you have an NVIDIA graphics card and the NVIDIA 3D Vision drivers installed, you find that the 3D content is not displaying properly, try selecting 3D Sync Invert from the projector OSD or Acer eView Management.
From the 3D options, select DLP 3D. 5 If you may need to disable the Stereoscopic feature to open Acer eView Management. English 7 4 Alternatively, press the Empowering Key on your projector's remote control to use the DLP 3D technology. Important: If you have an NVIDIA graphics card and the NVIDIA 3D Vision drivers installed, you find that the 3D content is not displaying properly, try selecting 3D Sync Invert from the projector OSD or Acer eView Management.

3D manual
Page 9
Select the second menu option on the left-hand side of the available input formats. 1 Press the menu button on your projector's remote control to open Acer eView Management. From the 3D options, select DLP 3D. 4 If you find that supports 3D playback, you have a DVD player that the ...3D content is not displaying properly, try selecting 3D Sync Invert from the projector OSD or Acer eView Management. Connect your Acer 3D-enabled projector. English 9 Watching 3D DVD content If you can watch 3D DVD contant using your DVD player to the...
Select the second menu option on the left-hand side of the available input formats. 1 Press the menu button on your projector's remote control to open Acer eView Management. From the 3D options, select DLP 3D. 4 If you find that supports 3D playback, you have a DVD player that the ...3D content is not displaying properly, try selecting 3D Sync Invert from the projector OSD or Acer eView Management. Connect your Acer 3D-enabled projector. English 9 Watching 3D DVD content If you can watch 3D DVD contant using your DVD player to the...

User Manual
Page 1
Acer Projector S1110/T200/XS-S10/S1210/T210/XSX10/S1210Hn/S1213/T212/XS-X13/ S1213Hn/T212DT/XS-X13HG/ S1310W/T220/XS-W10/S1310WHn/ S1313W/S1313WHn Series User's Guide
Acer Projector S1110/T200/XS-S10/S1210/T210/XSX10/S1210Hn/S1213/T212/XS-X13/ S1213Hn/T212DT/XS-X13HG/ S1310W/T220/XS-W10/S1310WHn/ S1313W/S1313WHn Series User's Guide

User Manual
Page 2
...of purchase information in new editions of this publication without the prior written permission of Acer Incorporated. Acer Projector S1110/T200/XS-S10/S1210/T210/XS-X10/S1210Hn/S1213/T212/XS-X13/S1213Hn/ T212DT/XS-X13HG/S1310W/T220/XS-W10/S1310WHn/S1313W/S1313WHn Series Model number Serial... the HDMI logo and High-Definition Multimedia Interface are registered trademarks of such revisions or changes. Acer Projector S1110/T200/XS-S10/S1210/T210/XS-X10/S1210Hn/S1213/T212/XS-X13/S1213Hn/ T212DT/XS-X13HG/S1310W/T220/XS-W10/S1310WHn/S1313W/S1313WHn Series User's Guide Original Issue:...
...of purchase information in new editions of this publication without the prior written permission of Acer Incorporated. Acer Projector S1110/T200/XS-S10/S1210/T210/XS-X10/S1210Hn/S1213/T212/XS-X13/S1213Hn/ T212DT/XS-X13HG/S1310W/T220/XS-W10/S1310WHn/S1313W/S1313WHn Series Model number Serial... the HDMI logo and High-Definition Multimedia Interface are registered trademarks of such revisions or changes. Acer Projector S1110/T200/XS-S10/S1210/T210/XS-X10/S1210Hn/S1213/T212/XS-X13/S1213Hn/ T212DT/XS-X13HG/S1310W/T220/XS-W10/S1310WHn/S1313W/S1313WHn Series User's Guide Original Issue:...

User Manual
Page 3
... that could be seriously damaged. • Slots and openings are provided for cleaning. Turning the product off before removing the power supply unit from the projector. • If the system has multiple sources of any kind onto or into this document for Your Safety and Comfort Read these instructions carefully. When...
... that could be seriously damaged. • Slots and openings are provided for cleaning. Turning the product off before removing the power supply unit from the projector. • If the system has multiple sources of any kind onto or into this document for Your Safety and Comfort Read these instructions carefully. When...
User Manual
Page 5
...above 40 ºC/104 ºF. • Locations where the altitudes are higher than 10000 feet. • Unplug immediately if there is on the projector first and then signal sources. • Do not place the product in damage and will often require extensive work by a qualified technician to restore... high, such as opening or removing covers may expose you to dangerous voltage points or other controls may contain small parts. Consult your projector. The bright light may hurt your eyes. • Turn on . For safety reasons, do not use non-compliant parts when adding or...
...above 40 ºC/104 ºF. • Locations where the altitudes are higher than 10000 feet. • Unplug immediately if there is on the projector first and then signal sources. • Do not place the product in damage and will often require extensive work by a qualified technician to restore... high, such as opening or removing covers may expose you to dangerous voltage points or other controls may contain small parts. Consult your projector. The bright light may hurt your eyes. • Turn on . For safety reasons, do not use non-compliant parts when adding or...
User Manual
Page 6
... Reset" function from the Onscreen Display "Management" menu after replacing the lamp module. • Do not attempt to the sun. Only use acer ceiling mount kit for replacement. • Do not operate lamps beyond the rated lamp life. In this case contact your dealer. • Do...is on the remote control. • The lamp becomes extremely hot during operation. There are clogged with any electronic components unless the projector is capable of the lamp itself. The temperature inside may rise and cause damage when the filter/ventilation slots are dangerous high voltages ...
... Reset" function from the Onscreen Display "Management" menu after replacing the lamp module. • Do not attempt to the sun. Only use acer ceiling mount kit for replacement. • Do not operate lamps beyond the rated lamp life. In this case contact your dealer. • Do...is on the remote control. • The lamp becomes extremely hot during operation. There are clogged with any electronic components unless the projector is capable of the lamp itself. The temperature inside may rise and cause damage when the filter/ventilation slots are dangerous high voltages ...
User Manual
Page 7
...; Do not listen to local, state or federal laws. For more information on the Waste from Electrical and Electronics Equipment (WEEE) regulations, visit http://www.acer-group.com/public/ Sustainability/sustainability01.htm Mercury advisory For projectors or electronic products containing an LCD/CRT monitor or display: "Lamp(s) contain Mercury, Dispose Properly."
...; Do not listen to local, state or federal laws. For more information on the Waste from Electrical and Electronics Equipment (WEEE) regulations, visit http://www.acer-group.com/public/ Sustainability/sustainability01.htm Mercury advisory For projectors or electronic products containing an LCD/CRT monitor or display: "Lamp(s) contain Mercury, Dispose Properly."
User Manual
Page 8
...the lamp, follow all warnings, precautions and maintenance as this may cause electric shock. • When changing the lamp, please allow the projector to cool down, and follow the procedures listed under the following conditions: • In extremely hot, cold or humid environments. • ...8226; Disconnect the power plug from the Onscreen Display "Management" menu after replacing the lamp module. • When switching the projector off, please ensure the projector completes its life, it shows warning messages. • Reset the "Lamp Hour Reset" function from AC outlet if the ...
...the lamp, follow all warnings, precautions and maintenance as this may cause electric shock. • When changing the lamp, please allow the projector to cool down, and follow the procedures listed under the following conditions: • In extremely hot, cold or humid environments. • ...8226; Disconnect the power plug from the Onscreen Display "Management" menu after replacing the lamp module. • When switching the projector off, please ensure the projector completes its life, it shows warning messages. • Reset the "Lamp Hour Reset" function from AC outlet if the ...

User Manual
Page 9
...Overview 2 Projector Overview 3 Projector Outlook 3 Control Panel 4 Remote Control Layout 5 Getting Started 7 Connecting the Projector 7 Turning the Projector On/Off 9 Turning On the Projector 9 Turning Off the Projector 10 ...Adjusting the Projected Image 11 Adjusting the Height of the Projected Image 11 How to Optimize Image Size and Distance 12 How to Get a Preferred Image Size by Adjusting Distance and Zoom 14 User Controls 16 Installation Menu 16 Acer...
...Overview 2 Projector Overview 3 Projector Outlook 3 Control Panel 4 Remote Control Layout 5 Getting Started 7 Connecting the Projector 7 Turning the Projector On/Off 9 Turning On the Projector 9 Turning Off the Projector 10 ...Adjusting the Projected Image 11 Adjusting the Height of the Projected Image 11 How to Optimize Image Size and Distance 12 How to Get a Preferred Image Size by Adjusting Distance and Zoom 14 User Controls 16 Installation Menu 16 Acer...

User Manual
Page 11
... DLP® projector, including the following outstanding features: • DLP® technology • S1110/T200/XS-S10: Native 800 x 600 SVGA resolution Auto / 4:3 / 16:9 aspect ratio supported S1210/T210/XS-X10/S1210Hn/S1213/T212/XS-X13/S1213Hn/T212DT/XSX13HG: ...Lower power consumption and economy (ECO) mode extends lamp life • Acer EcoProjection Technology delivers Intelligent power management approach and physical efficiency improvement • Empowering Key reveals Acer Empowering Technology functions (Acer eView, eTimer, ePower Management) for easy adjustment of settings •...
... DLP® projector, including the following outstanding features: • DLP® technology • S1110/T200/XS-S10: Native 800 x 600 SVGA resolution Auto / 4:3 / 16:9 aspect ratio supported S1210/T210/XS-X10/S1210Hn/S1213/T212/XS-X13/S1213Hn/T212DT/XSX13HG: ...Lower power consumption and economy (ECO) mode extends lamp life • Acer EcoProjection Technology delivers Intelligent power management approach and physical efficiency improvement • Empowering Key reveals Acer Empowering Technology functions (Acer eView, eTimer, ePower Management) for easy adjustment of settings •...
User Manual
Page 12
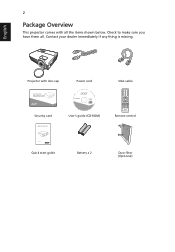
Projector with all . Contact your dealer immediately if any thing is missing. English 2 Package Overview This projector comes with lens cap Acer Projector Security Card Power cord Acer Projector This CD contains • User's manual • Quick Start Guide • Acrobat® Reader® www.acer.com Security card User's guide (CD-ROM) VGA cable ENTER BACK PgUp PgDn SD/USB A HDMI/DVI LAN/WiFi USBB Remote control Quick Start Guide Quick start guide Battery x 2 Dust filter (Optional) Check to make sure you have them all the items shown below.
Projector with all . Contact your dealer immediately if any thing is missing. English 2 Package Overview This projector comes with lens cap Acer Projector Security Card Power cord Acer Projector This CD contains • User's manual • Quick Start Guide • Acrobat® Reader® www.acer.com Security card User's guide (CD-ROM) VGA cable ENTER BACK PgUp PgDn SD/USB A HDMI/DVI LAN/WiFi USBB Remote control Quick Start Guide Quick start guide Battery x 2 Dust filter (Optional) Check to make sure you have them all the items shown below.
User Manual
Page 13
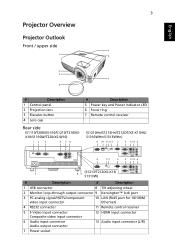
...Projector Overview Projector Outlook Front / upper side 5 1 6 2 3 7 4 # Description 1 Control panel 2 Projection lens 3 Elevator button 4 Lens cap # Description 5 Power key and Power indicator LED 6 Focus ring 7 Remote control receiver Rear side (S1110/T200/XS-S10/S1210/T210/XSX10/S1310W/T220/XS-W10) 12 3 4 56 (S1210Hn/S1213Hn... 11 12 2 3 5 13 6 RS232 LAN USB B HDMI VGA OUT 4 1 11 2 VGA IN 1 VGA IN 2 3 S-VIDEO AUDIO-R VIDEO AUDIO-L S1213Hn AUDIO IN 1 AUDIO IN 2 AUDIO OUT 5 13 6 RS232 USB B S-VIDEO AUDIO-R AUDIO IN 1 VGA OUT VGA IN 1 AUDIO IN 2 (S1213/T212/...
...Projector Overview Projector Outlook Front / upper side 5 1 6 2 3 7 4 # Description 1 Control panel 2 Projection lens 3 Elevator button 4 Lens cap # Description 5 Power key and Power indicator LED 6 Focus ring 7 Remote control receiver Rear side (S1110/T200/XS-S10/S1210/T210/XSX10/S1310W/T220/XS-W10) 12 3 4 56 (S1210Hn/S1213Hn... 11 12 2 3 5 13 6 RS232 LAN USB B HDMI VGA OUT 4 1 11 2 VGA IN 1 VGA IN 2 3 S-VIDEO AUDIO-R VIDEO AUDIO-L S1213Hn AUDIO IN 1 AUDIO IN 2 AUDIO OUT 5 13 6 RS232 USB B S-VIDEO AUDIO-R AUDIO IN 1 VGA OUT VGA IN 1 AUDIO IN 2 (S1213/T212/...

User Manual
Page 14
.... Hides the screen picture. Temp Indicator LED Chooses RGB, component video, S-Video, composite video or HDTV source. Enables unique Acer functions: eView, eTimer, ePower Management. Automatically synchronizes the projector to the "Turning the Projector On/ Off" section. Selects items or makes adjustments to the previous step for the OSD menu operation or exits...
.... Hides the screen picture. Temp Indicator LED Chooses RGB, component video, S-Video, composite video or HDTV source. Enables unique Acer functions: eView, eTimer, ePower Management. Automatically synchronizes the projector to the "Turning the Projector On/ Off" section. Selects items or makes adjustments to the previous step for the OSD menu operation or exits...

User Manual
Page 15
...choose the desired aspect ratio. Adjusts image distortion caused by tilting projection (±40 degrees). Automatically synchronizes the projector to the "Turning the Projector On/Off" section. Enables unique Acer functions: eView, eTimer, ePower Management. 5 Remote Control Layout English ENTER BACK PgUp PgDn SD/USB A.../720p/1080i/1080p), and YCbCr (480i/576i). (No function) To change source to your selection. To change source to the projector. Zooms the projector display in the "Setting" > "Security" OSD. To change source to HDMI™ (or DVI) (for the model with...
...choose the desired aspect ratio. Adjusts image distortion caused by tilting projection (±40 degrees). Automatically synchronizes the projector to the "Turning the Projector On/Off" section. Enables unique Acer functions: eView, eTimer, ePower Management. 5 Remote Control Layout English ENTER BACK PgUp PgDn SD/USB A.../720p/1080i/1080p), and YCbCr (480i/576i). (No function) To change source to your selection. To change source to the projector. Zooms the projector display in the "Setting" > "Security" OSD. To change source to HDMI™ (or DVI) (for the model with...


