
Acer P5000 Series Projector User's Guide
Page 6
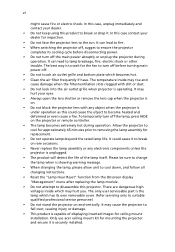
.... • Do not turn off before turning main power off the main power abruptly or unplug the projector during operation. Only use acer ceiling mount kit for mounting the projector and ensure it to wait for replacement. • Do not operate lamps beyond the rated lamp life....projector is on the projector or remote controller. • The lamp becomes extremely hot during operation. Please be sure to change the lamp when is showing warning message. • When changing the lamp, please allow unit to cool down, and follow all changing instructions. • Reset the "Lamp Hour Reset...
.... • Do not turn off before turning main power off the main power abruptly or unplug the projector during operation. Only use acer ceiling mount kit for mounting the projector and ensure it to wait for replacement. • Do not operate lamps beyond the rated lamp life....projector is on the projector or remote controller. • The lamp becomes extremely hot during operation. Please be sure to change the lamp when is showing warning message. • When changing the lamp, please allow unit to cool down, and follow all changing instructions. • Reset the "Lamp Hour Reset...
Acer P5000 Series Projector User's Guide
Page 10
.... If this may make a loud popping sound. Warning: • Do not look into the projector's lens when the lamp is on. Please be sure to change the lamp when it shows warning messages. • Reset the "Lamp Hour Reset" function from AC outlet if the product is not being used for ventilation. •...
.... If this may make a loud popping sound. Warning: • Do not look into the projector's lens when the lamp is on. Please be sure to change the lamp when it shows warning messages. • Reset the "Lamp Hour Reset" function from AC outlet if the product is not being used for ventilation. •...

Acer P5000 Series Projector User's Guide
Page 16
... socket 11 HDMI connector 12 Audio input connector (2) # Description Below items are for P5270/P5280/P5370W series only: 11 HDMI connector 12 Audio input connector (2) 13 PC analog...Power LED for wireless 16 Reset button 17 Audio output connector for wireless 18 Lan (RJ45 Port for distortion caused by tilting the projector (± 40 degrees). ...Temp Indicator LED Adjusts the image to compensate for 10/100M Ethernet) Control Panel 12 3 9 4 8 5 7 4 # Function 1 LAMP 2 Empowering key 3 TEMP 4 Keystone 6 Description Lamp Indicator LED Unique Acer...
... socket 11 HDMI connector 12 Audio input connector (2) # Description Below items are for P5270/P5280/P5370W series only: 11 HDMI connector 12 Audio input connector (2) 13 PC analog...Power LED for wireless 16 Reset button 17 Audio output connector for wireless 18 Lan (RJ45 Port for distortion caused by tilting the projector (± 40 degrees). ...Temp Indicator LED Adjusts the image to compensate for 10/100M Ethernet) Control Panel 12 3 9 4 8 5 7 4 # Function 1 LAMP 2 Empowering key 3 TEMP 4 Keystone 6 Description Lamp Indicator LED Unique Acer...

Acer P5000 Series Projector User's Guide
Page 34
... • Projection method • Menu location • Keystone settings • Language settings • Reset to factory default function Use the up and down arrow keys to select an option, the left and... to adjust selected option settings, and the right arrow key to enter a submenu for projector installation and maintenance. English 22 User Controls Installation menu The installation menu provides an onscreen ...alignment settings, such as screen size and distance, focus and more . 1 Turn on the projector by pressing "Power" button on the control pad. 2 Press the menu button on the ...
... • Projection method • Menu location • Keystone settings • Language settings • Reset to factory default function Use the up and down arrow keys to select an option, the left and... to adjust selected option settings, and the right arrow key to enter a submenu for projector installation and maintenance. English 22 User Controls Installation menu The installation menu provides an onscreen ...alignment settings, such as screen size and distance, focus and more . 1 Turn on the projector by pressing "Power" button on the control pad. 2 Press the menu button on the ...
Acer P5000 Series Projector User's Guide
Page 40
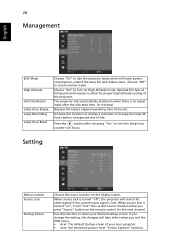
28 Management English ECO Mode High Altitude Auto Shutdown Lamp Hour Elapse Lamp Reminding Lamp Hour Reset Choose "On" to 0 hours. Choose "On" to turn the lamp hour counter to dim the projector lamp which will lower power consumption, extend the lamp life and reduce noise. Press the button ... search for proper high altitude cooling of the projector. Activate this function to change the setting, the changes will "lock" the current source channel unless you exit the OSD menu. • Acer: The default startup screen of -life. If you change the lamp 30 hours before its expected ...
28 Management English ECO Mode High Altitude Auto Shutdown Lamp Hour Elapse Lamp Reminding Lamp Hour Reset Choose "On" to 0 hours. Choose "On" to turn the lamp hour counter to dim the projector lamp which will lower power consumption, extend the lamp life and reduce noise. Press the button ... search for proper high altitude cooling of the projector. Activate this function to change the setting, the changes will "lock" the current source channel unless you exit the OSD menu. • Acer: The default startup screen of -life. If you change the lamp 30 hours before its expected ...
Acer P5000 Series Projector User's Guide
Page 42
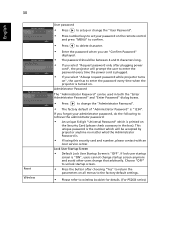
English 30 Reset Wireless User password • Press to setup or change the "User Password". • Press number keys to set your administrator password, do the following to change that arbitrarily. Administrator Password The "Administrator Password" can be accepted by projector anytime no matter what ... is. • If losing this security card and number, please contact with an Acer service center. If lock user startup screen is "OFF". If you select "Always request password while projector turns on . This unique password is the number which is "1234". Choose "OFF...
English 30 Reset Wireless User password • Press to setup or change the "User Password". • Press number keys to set your administrator password, do the following to change that arbitrarily. Administrator Password The "Administrator Password" can be accepted by projector anytime no matter what ... is. • If losing this security card and number, please contact with an Acer service center. If lock user startup screen is "OFF". If you select "Always request password while projector turns on . This unique password is the number which is "1234". Choose "OFF...

Acer P5270 Projector Series Service Guide
Page 5
... Upgrade Procedure Waveform Download Chapter 6 EDID Key-in Procedure Equipment Needed Setup Procedure (VGA1,VGA2,DVI) EDID Key-In Procedure Setup Procedure (HDMI) Default Language Reset Appendix A P5270/P5270 Refresh Exploaded Overview 5-1 5-1 5-1 5-2 5-6 5-8 6-1 6-1 6-4 6-5 6-9 6-12 7-1 Appendix B Serial Number System Definition PCBA Code Definition Appendix C RS232 Command Code 7-15 7-17 7-18 Confidential IV...
... Upgrade Procedure Waveform Download Chapter 6 EDID Key-in Procedure Equipment Needed Setup Procedure (VGA1,VGA2,DVI) EDID Key-In Procedure Setup Procedure (HDMI) Default Language Reset Appendix A P5270/P5270 Refresh Exploaded Overview 5-1 5-1 5-1 5-2 5-6 5-8 6-1 6-1 6-4 6-5 6-9 6-12 7-1 Appendix B Serial Number System Definition PCBA Code Definition Appendix C RS232 Command Code 7-15 7-17 7-18 Confidential IV...

Acer P5270 Projector Series Service Guide
Page 63
... / Shadow 10 Dead Pixel / Dust (Out of the OSD Menu - Ensure all connectors are assembled properly - Check Main Board - Do "Reset" of spec.) 11 Garbage Image Procedure - Ensure the Signal Cable and Source work - Clean Photo Sensor Board - Check DMD Board - Do...Ensure the Signal Cable and Source work - Check LVPS - Ensure the Projection Lens is less than spec.) - Check DMD Board Confidential 3-4 P5270/P5270 Refresh Ensure the Projection Lens is clean - Check Engine Module - Check Fan Module - Check DMD Board - Check DMD Board - Check Main Board -
... / Shadow 10 Dead Pixel / Dust (Out of the OSD Menu - Ensure all connectors are assembled properly - Check Main Board - Do "Reset" of spec.) 11 Garbage Image Procedure - Ensure the Signal Cable and Source work - Clean Photo Sensor Board - Check DMD Board - Do...Ensure the Signal Cable and Source work - Check LVPS - Ensure the Projection Lens is less than spec.) - Check DMD Board Confidential 3-4 P5270/P5270 Refresh Ensure the Projection Lens is clean - Check Engine Module - Check Fan Module - Check DMD Board - Check DMD Board - Check Main Board -
Acer P5270 Projector Series Service Guide
Page 64
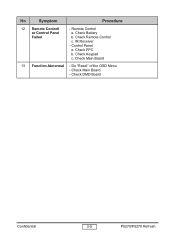
IR Receiver - Check Main Board 13 Function Abnormal - Check Main Board - Check Battery b. Check Keypad c. Check DMD Board Confidential 3-5 P5270/P5270 Refresh Control Panel a. Check Remote Control c. Remote Control a. Do "Reset" of the OSD Menu - Check FPC b. No Symptom Procedure 12 Remote Controll or Control Panel Failed -
IR Receiver - Check Main Board 13 Function Abnormal - Check Main Board - Check Battery b. Check Keypad c. Check DMD Board Confidential 3-5 P5270/P5270 Refresh Control Panel a. Check Remote Control c. Remote Control a. Do "Reset" of the OSD Menu - Check FPC b. No Symptom Procedure 12 Remote Controll or Control Panel Failed -

Acer P5270 Projector Series Service Guide
Page 67
... Reset (for P5270 Refresh) Waveform Download (for P5270 Refresh) M/B v v v v v v FW v v v v EDID v v Color Wheel v Lamp Module v Lamp Driver v 4-2 Service Mode No Step 1 Turn on the Projector and input the signal. 2 Do the following action sequentially to leave the Service Mode after all. Confidential 4-1 P5270/P5270 Refresh Chapter 4 Function Test & Alignment Procedure 4-1 Test Equipment Needed - DVD player with XGA...
... Reset (for P5270 Refresh) Waveform Download (for P5270 Refresh) M/B v v v v v v FW v v v v EDID v v Color Wheel v Lamp Module v Lamp Driver v 4-2 Service Mode No Step 1 Turn on the Projector and input the signal. 2 Do the following action sequentially to leave the Service Mode after all. Confidential 4-1 P5270/P5270 Refresh Chapter 4 Function Test & Alignment Procedure 4-1 Test Equipment Needed - DVD player with XGA...

Acer P5270 Projector Series Service Guide
Page 68
...in (Refer to erase all end-users' settings and restore the original setting: (1) Please enter OSD menu. (2) To execute "Reset" function . 4-4 Test Condition - 4-3 Reset(OSD) No Step 1 After final QC step, we have to erase all saved change again and restore the OSD default setting....The following actions will allow you to the table below). After repairing each P5270/P5270 Refresh, the unit should be run-in Time 2 Hours 4 Hours 6 Hours Confidential 4-2 P5270/P5270 ...
...in (Refer to erase all end-users' settings and restore the original setting: (1) Please enter OSD menu. (2) To execute "Reset" function . 4-4 Test Condition - 4-3 Reset(OSD) No Step 1 After final QC step, we have to erase all saved change again and restore the OSD default setting....The following actions will allow you to the table below). After repairing each P5270/P5270 Refresh, the unit should be run-in Time 2 Hours 4 Hours 6 Hours Confidential 4-2 P5270/P5270 ...
Acer P5270 Projector Series Service Guide
Page 81
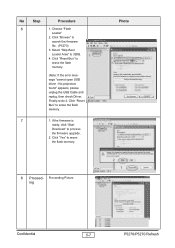
No projectors found" appears, please unplug the USB Cable and replug, then check Driver. Click "Reset Bus" to erase the flash memory. (Note: If the error message "cannot open USB driver - Click "Reset Bus" to erase the flash memory. 7 1. Select... "Skip Boot Loader Area" to process the firmware upgrade. 2. If the firmware is ready, click "Start Download" to 32KB. 1 4. Choose "Flash Loader" 2. Click "Browse" to erase the flash memory. 8 Proceed- Proceeding Picture ing Photo 2 3 4 2 1 Confidential 5-7 P5270/P5270...
No projectors found" appears, please unplug the USB Cable and replug, then check Driver. Click "Reset Bus" to erase the flash memory. (Note: If the error message "cannot open USB driver - Click "Reset Bus" to erase the flash memory. 7 1. Select... "Skip Boot Loader Area" to process the firmware upgrade. 2. If the firmware is ready, click "Start Download" to 32KB. 1 4. Choose "Flash Loader" 2. Click "Browse" to erase the flash memory. 8 Proceed- Proceeding Picture ing Photo 2 3 4 2 1 Confidential 5-7 P5270/P5270...
Acer P5270 Projector Series Service Guide
Page 82
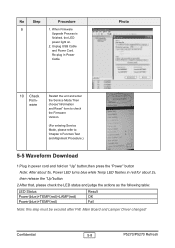
Confidential 5-8 P5270/P5270 Refresh No Step Procedure 9 1. When Firmware Upgrade Process is finished, the LED power light on "Up" button,then press the "Power" button Note: After about ... excuted after FW, Main Board and Lamper Driver changed! Photo 10 Check Firmware Restart the unit and enter the Service Mode.Then choose"Information and Reset" item to check the Firmware Version. (For entering Service Mode, please refer to Chapter 4 Function Test and Alignment Procedure.) 5-5 Waveform Download 1.Plug in power cord...
Confidential 5-8 P5270/P5270 Refresh No Step Procedure 9 1. When Firmware Upgrade Process is finished, the LED power light on "Up" button,then press the "Power" button Note: After about ... excuted after FW, Main Board and Lamper Driver changed! Photo 10 Check Firmware Restart the unit and enter the Service Mode.Then choose"Information and Reset" item to check the Firmware Version. (For entering Service Mode, please refer to Chapter 4 Function Test and Alignment Procedure.) 5-5 Waveform Download 1.Plug in power cord...

Acer P5270 Projector Series Service Guide
Page 83
... its main board, the display device will show no image while the input source is digital signal. 2.P5270 Refresh is used to pin) Power Cord for P5270 VGA Cable DVI Cable EDID Fixture (JP3 must be closed) Power Adapter and Power Cord for configuration purposes...color characteristics, factory pre-set timings, frequency range limits, and character strings for the P5270/P5270 Refresh and serial number. The information is stored in the display and is the same as P5270,here we take P5270 for example. 3.After EDID upgrading,please "Default Language Reset" 6-1 Equipment Needed Software - -
... its main board, the display device will show no image while the input source is digital signal. 2.P5270 Refresh is used to pin) Power Cord for P5270 VGA Cable DVI Cable EDID Fixture (JP3 must be closed) Power Adapter and Power Cord for configuration purposes...color characteristics, factory pre-set timings, frequency range limits, and character strings for the P5270/P5270 Refresh and serial number. The information is stored in the display and is the same as P5270,here we take P5270 for example. 3.After EDID upgrading,please "Default Language Reset" 6-1 Equipment Needed Software - -
Acer P5270 Projector Series Service Guide
Page 94
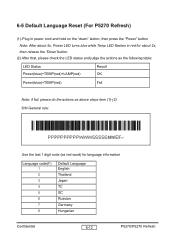
6-5 Default Language Reset (For P5270 Refresh) (1).Plug in power cord and hold on the "down" button, then press the "Power" button Note: After about 5s, Power LED turns blue while ...: Use the last 1 digit code (as red word) for language information Language code(F) 1 2 3 4 5 6 7 8 Default Language English Thailand Japan TC SC Russian Germany Hungarian Confidential 6-12 P5270/P5270 Refresh
6-5 Default Language Reset (For P5270 Refresh) (1).Plug in power cord and hold on the "down" button, then press the "Power" button Note: After about 5s, Power LED turns blue while ...: Use the last 1 digit code (as red word) for language information Language code(F) 1 2 3 4 5 6 7 8 Default Language English Thailand Japan TC SC Russian Germany Hungarian Confidential 6-12 P5270/P5270 Refresh


