
Acer P5000 Series Projector Quick Start Guide
Page 2
...;線 7 Jack/Jack 8. connect the other end to an electrical outlet. connect the other end to the VGA connector on the projector first and then the computer. 3. Press the power button twice. 2. USB 信號線 5. VGA to a Computer 1. RS232 Cable 10. English Quick Start INSTALLATION 1. HDMI 纜線 Note 1 2. 將VGA 示「VGA IN VGA 3 AC 1 2 源。 3 4 1 2 1 2 1 AC S-Video Cable 7. Adjust the position, focus and zoom. 4.
...;線 7 Jack/Jack 8. connect the other end to an electrical outlet. connect the other end to the VGA connector on the projector first and then the computer. 3. Press the power button twice. 2. USB 信號線 5. VGA to a Computer 1. RS232 Cable 10. English Quick Start INSTALLATION 1. HDMI 纜線 Note 1 2. 將VGA 示「VGA IN VGA 3 AC 1 2 源。 3 4 1 2 1 2 1 AC S-Video Cable 7. Adjust the position, focus and zoom. 4.
Acer P5000 Series Projector User's Guide
Page 5
... not attempt to service this product from walls and free flow of air around the projector is necessary. • Locations where temperatures may become excessively high, such as opening or removing covers may expose you to qualified service personnel. For safety reasons, do not use non-compliant parts when adding or changing components. Consult your projector. Refer all windows rolled up. • Locations where excessive humidity, dust...
... not attempt to service this product from walls and free flow of air around the projector is necessary. • Locations where temperatures may become excessively high, such as opening or removing covers may expose you to qualified service personnel. For safety reasons, do not use non-compliant parts when adding or changing components. Consult your projector. Refer all windows rolled up. • Locations where excessive humidity, dust...
Acer P5000 Series Projector User's Guide
Page 6
... and contact your dealer. • Do not keep using this case contact your eyes. • Always open the lens shutter or remove the lens cap when the projector is showing warning message. • When changing the lamp, please allow unit to cool down, and follow all changing instructions. • Reset the "Lamp Hour Reset" function from the Onscreen display "Management" menu after replacing the lamp module. • Do not attempt to...
... and contact your dealer. • Do not keep using this case contact your eyes. • Always open the lens shutter or remove the lens cap when the projector is showing warning message. • When changing the lamp, please allow unit to cool down, and follow all changing instructions. • Reset the "Lamp Hour Reset" function from the Onscreen display "Management" menu after replacing the lamp module. • Do not attempt to...
Acer P5000 Series Projector User's Guide
Page 7
...data files or messages, this device requires a good quality connection to the network. Parts of the device are consistent with hearing aids should position the device the abovestated distance from your device when its normal operating positions. Switch off all wireless or radio transmitting devices when using... of data files or messages may be delayed until the transmission is prohibited or when it may be using wireless function (Optional) Warning! These recommendations are magnetic. For safety reasons, turn off your machine under the following : • Always keep the ...
...data files or messages, this device requires a good quality connection to the network. Parts of the device are consistent with hearing aids should position the device the abovestated distance from your device when its normal operating positions. Switch off all wireless or radio transmitting devices when using... of data files or messages may be delayed until the transmission is prohibited or when it may be using wireless function (Optional) Warning! These recommendations are magnetic. For safety reasons, turn off your machine under the following : • Always keep the ...
Acer P5000 Series Projector User's Guide
Page 10
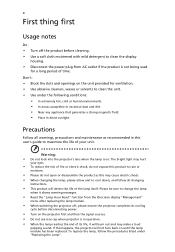
... disconnecting power. • Turn on the projector first and then the signal sources. • Do not use lens cap when projector is in this user's guide to maximize the life of your unit. Warning: • Do not look into the projector's lens when the lamp is not being used for ventilation. • Use abrasive cleaners, waxes or solvents to clean the unit. • Use under "Replacing the Lamp". Precautions Follow all changing instructions...
... disconnecting power. • Turn on the projector first and then the signal sources. • Do not use lens cap when projector is in this user's guide to maximize the life of your unit. Warning: • Do not look into the projector's lens when the lamp is not being used for ventilation. • Use abrasive cleaners, waxes or solvents to clean the unit. • Use under "Replacing the Lamp". Precautions Follow all changing instructions...

Acer P5000 Series Projector User's Guide
Page 11
... 4 Remote Control Layout 6 Getting Started 9 Connecting the Projector 9 Connecting the Projector for Wireless Function 10 Turning the Projector On/Off 11 Turning on the Projector 11 Turning off the Projector 12 Adjusting the Projected Image 13 Adjusting the Height of Projected Image 13 How to optimize image size and distance 14 How to get a preferred image size by adjusting distance and zoom 18 User Controls 22 Installation menu 22 Acer Empowering Technology 23 Onscreen Display (OSD) Menus 24 Color 25 Image 26 Management 28 Setting 28 Audio 31 Timer...
... 4 Remote Control Layout 6 Getting Started 9 Connecting the Projector 9 Connecting the Projector for Wireless Function 10 Turning the Projector On/Off 11 Turning on the Projector 11 Turning off the Projector 12 Adjusting the Projected Image 13 Adjusting the Height of Projected Image 13 How to optimize image size and distance 14 How to get a preferred image size by adjusting distance and zoom 18 User Controls 22 Installation menu 22 Acer Empowering Technology 23 Onscreen Display (OSD) Menus 24 Color 25 Image 26 Management 28 Setting 28 Audio 31 Timer...

Acer P5000 Series Projector User's Guide
Page 13
.../P5370W series: Equipped with DVI and HDMI™ connections supporting HDCP • Advanced digital keystone correction optimizes presentations • Multi-language onscreen display (OSD) menus • Full-function remote control • Manual focus projection lens zooms up to 1.1x • 2x digital zoom and pan function • Microsoft® Windows® 2000, XP, Vista® OS compliant English 1 Introduction Product Features This product is a single-chip DLP® projector.
.../P5370W series: Equipped with DVI and HDMI™ connections supporting HDCP • Advanced digital keystone correction optimizes presentations • Multi-language onscreen display (OSD) menus • Full-function remote control • Manual focus projection lens zooms up to 1.1x • 2x digital zoom and pan function • Microsoft® Windows® 2000, XP, Vista® OS compliant English 1 Introduction Product Features This product is a single-chip DLP® projector.

Acer P5000 Series Projector User's Guide
Page 14
English 2 Package Overview This projector comes with USB PnS (Wireless Quick Start Guide handy drive (P5260i Series) for P5260i Series) 2 x Quick start guide Battery Pack with all the items shown below. Projector with lens cap Power cord VGA cable Compostive video cable 2 x Batteries Carrying case DVI-D Cable (P5260i/P5270/P5280/ P5370W Series) #A #B Security card Acer Projector 2 x User's Guide (Wireless CD for P5260i Series) PgUp Quick Start Guide PgDn Remote control (#B for P5260i Series ) Wireless antenna (P5260i Series) Contact...
English 2 Package Overview This projector comes with USB PnS (Wireless Quick Start Guide handy drive (P5260i Series) for P5260i Series) 2 x Quick start guide Battery Pack with all the items shown below. Projector with lens cap Power cord VGA cable Compostive video cable 2 x Batteries Carrying case DVI-D Cable (P5260i/P5270/P5280/ P5370W Series) #A #B Security card Acer Projector 2 x User's Guide (Wireless CD for P5260i Series) PgUp Quick Start Guide PgDn Remote control (#B for P5260i Series ) Wireless antenna (P5260i Series) Contact...

Acer P5000 Series Projector User's Guide
Page 16
...Adjusts the image to compensate for 10/100M Ethernet) Control Panel 12 3 9 4 8 5 7 4 # Function 1 LAMP 2 Empowering key 3 TEMP 4 Keystone 6 Description Lamp Indicator LED Unique Acer functions: eOpening, eView, eTimer, ePower. English 4 # Description 1 Audio input connector (1) 2 RS232 connector 3 USB connector 4 S-Video input connector 5 Composite video input connector 6 Monitor loop-through output connector (VGA-Out) 7 PC analog signal/HDTV/component video input connector (1) 8 DVI input connector (for digital signal with HDCP function) 9 KensingtonTM lock port 10 Power...
...Adjusts the image to compensate for 10/100M Ethernet) Control Panel 12 3 9 4 8 5 7 4 # Function 1 LAMP 2 Empowering key 3 TEMP 4 Keystone 6 Description Lamp Indicator LED Unique Acer functions: eOpening, eView, eTimer, ePower. English 4 # Description 1 Audio input connector (1) 2 RS232 connector 3 USB connector 4 S-Video input connector 5 Composite video input connector 6 Monitor loop-through output connector (VGA-Out) 7 PC analog signal/HDTV/component video input connector (1) 8 DVI input connector (for digital signal with HDCP function) 9 KensingtonTM lock port 10 Power...
Acer P5000 Series Projector User's Guide
Page 18
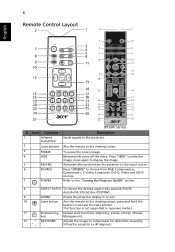
Auto/Full/4:3/16:9/L.Box (P5370W) 9 ZOOM Zooms the projector display in Japanese market. 11 Empowering Unique Acer functions: eOpening, eView, eTimer, ePower key Management. 12 KEYSTONE Adjusts the image to activate the laser pointer. This function is not supported in or out. 10 Laser button Aim the remote at the viewing screen. 3 FREEZE To pause the screen image. 4 HIDE Momentarily turns off the video. Press "HIDE" to hide the...
Auto/Full/4:3/16:9/L.Box (P5370W) 9 ZOOM Zooms the projector display in Japanese market. 11 Empowering Unique Acer functions: eOpening, eView, eTimer, ePower key Management. 12 KEYSTONE Adjusts the image to activate the laser pointer. This function is not supported in or out. 10 Laser button Aim the remote at the viewing screen. 3 FREEZE To pause the screen image. 4 HIDE Momentarily turns off the video. Press "HIDE" to hide the...

Acer P5000 Series Projector User's Guide
Page 19
... of image. This connection supports digital RGB, analog RGB, YPbPr (480p/576p/720p/1080i), YCbCr (480i/576i) and HDCP signals. the center button works as a multidirectional pointer stick. Note: "*" Only for true-color optimization. Press "COLOR" to the VGA connector. To change source to adjust the color temperature of the image. To change source to the projector via a USB cable. The main screen projection signal uses VGA input by default while the smaller PIP display uses a secondary video source. Use this function, an USB cable...
... of image. This connection supports digital RGB, analog RGB, YPbPr (480p/576p/720p/1080i), YCbCr (480i/576i) and HDCP signals. the center button works as a multidirectional pointer stick. Note: "*" Only for true-color optimization. Press "COLOR" to the VGA connector. To change source to adjust the color temperature of the image. To change source to the projector via a USB cable. The main screen projection signal uses VGA input by default while the smaller PIP display uses a secondary video source. Use this function, an USB cable...

Acer P5000 Series Projector User's Guide
Page 34
... settings and adjustments for screen size and distance, focus, keystone correction and more . 1 Turn on the projector by pressing "Power" button on the control pad. 2 Press the menu button on the screen. Use the OSD only when the message "No signal input" is displayed on the control pad to launch the OSD for projector installation and maintenance. 3 The background pattern acts as a guide to adjusting the calibration and alignment settings, such as screen size and distance, focus and more . 4 The Installation menu...
... settings and adjustments for screen size and distance, focus, keystone correction and more . 1 Turn on the projector by pressing "Power" button on the control pad. 2 Press the menu button on the screen. Use the OSD only when the message "No signal input" is displayed on the control pad to launch the OSD for projector installation and maintenance. 3 The background pattern acts as a guide to adjusting the calibration and alignment settings, such as screen size and distance, focus and more . 4 The Installation menu...
Acer P5000 Series Projector User's Guide
Page 40
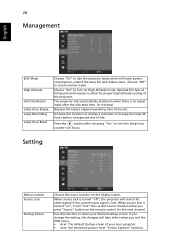
... display a reminder to change the setting, the changes will automatically shutdown when there is turned "off", the projector will lower power consumption, extend the lamp life and reduce noise. Activate this function to 0 hours. When source lock is no signal input after choosing "Yes" to turn on the remote control for the next channel. Operate the fans at full speed continuously to return normal mode. Setting Menu Location Source Lock Startup Screen Choose the menu location on the display screen...
... display a reminder to change the setting, the changes will automatically shutdown when there is turned "off", the projector will lower power consumption, extend the lamp life and reduce noise. Activate this function to 0 hours. When source lock is no signal input after choosing "Yes" to turn on the remote control for the next channel. Operate the fans at full speed continuously to return normal mode. Setting Menu Location Source Lock Startup Screen Choose the menu location on the display screen...
Acer P5000 Series Projector User's Guide
Page 41
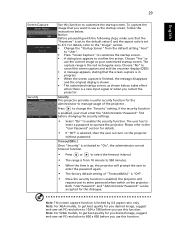
...-user set PC resolution to 1024 x 768 before you want to enter password when switch on the projector without password. English 29 Screen Capture Security Use this function to 4:3. For details, refer to the "Image" section. • Change the "Startup Screen" from 10 minute to 990 minutes. • When the time is up, the projector will prompt the user to enter the password again. • The factory default setting...
...-user set PC resolution to 1024 x 768 before you want to enter password when switch on the projector without password. English 29 Screen Capture Security Use this function to 4:3. For details, refer to the "Image" section. • Change the "Startup Screen" from 10 minute to 990 minutes. • When the time is up, the projector will prompt the user to enter the password again. • The factory default setting...

Acer P5000 Series Projector User's Guide
Page 45
... a problem with your local reseller or service center. Image Problems and Solutions # Problem Solution 1 No image appears • Connected as described in the "Getting Started" onscreen section. • Ensure none of the connector pins are bent or broken. • Check if the projector lamp has been securely installed. 33 Appendices English Troubleshooting If you have slid on the lens door and the projector is turned on...
... a problem with your local reseller or service center. Image Problems and Solutions # Problem Solution 1 No image appears • Connected as described in the "Getting Started" onscreen section. • Ensure none of the connector pins are bent or broken. • Check if the projector lamp has been securely installed. 33 Appendices English Troubleshooting If you have slid on the lens door and the projector is turned on...
Acer P5270 Projector Series Service Guide
Page 60
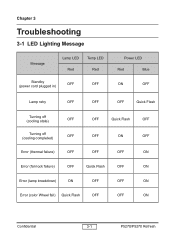
Chapter 3 Troubleshooting 3-1 LED Lighting Message Message Lamp LED Temp LED Red Red Standby (power cord plugged in) OFF OFF Power LED Red Blue ON OFF Lamp retry OFF OFF OFF Quick Flash Turning off (cooling state) Turning off (cooling completed) Error (thermal failure) OFF OFF OFF OFF Quick Flash OFF OFF OFF ON OFF OFF ON Error (fan lock failure) OFF Quick Flash OFF ON Error (lamp breakdown) ON OFF OFF ON Error (color Wheel fail) Quick Flash OFF OFF ON Confidential 3-1 P5270/P5270 Refresh
Chapter 3 Troubleshooting 3-1 LED Lighting Message Message Lamp LED Temp LED Red Red Standby (power cord plugged in) OFF OFF Power LED Red Blue ON OFF Lamp retry OFF OFF OFF Quick Flash Turning off (cooling state) Turning off (cooling completed) Error (thermal failure) OFF OFF OFF OFF Quick Flash OFF OFF OFF ON OFF OFF ON Error (fan lock failure) OFF Quick Flash OFF ON Error (lamp breakdown) ON OFF OFF ON Error (color Wheel fail) Quick Flash OFF OFF ON Confidential 3-1 P5270/P5270 Refresh
Acer P5270 Projector Series Service Guide
Page 62
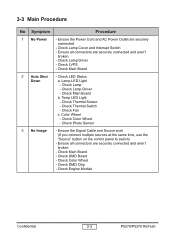
... and aren't broken - Temp LED Light - Check DMD Chip - Check LVPS - Check Color Wheel - Check Color Wheel - Check Lamp - Ensure the Signal Cable and Source work (If you connect multiple sources at the same time, use the "Source" button on the control panel to swtich) - 3-3 Main Procedure No Symptom Procedure 1 No Power - Check Photo Sensor 3 No Image - Ensure the Power Cord and AC Power Outlet are securely connected and aren't broken - Check Fan c. Check Lamp Cover and Interrupt Switch - Check Lamp Driver - Check Thermal Switch - Ensure all connectors...
... and aren't broken - Temp LED Light - Check DMD Chip - Check LVPS - Check Color Wheel - Check Color Wheel - Check Lamp - Ensure the Signal Cable and Source work (If you connect multiple sources at the same time, use the "Source" button on the control panel to swtich) - 3-3 Main Procedure No Symptom Procedure 1 No Power - Check Photo Sensor 3 No Image - Ensure the Power Cord and AC Power Outlet are securely connected and aren't broken - Check Fan c. Check Lamp Cover and Interrupt Switch - Check Lamp Driver - Check Thermal Switch - Ensure all connectors...
Acer P5270 Projector Series Service Guide
Page 75
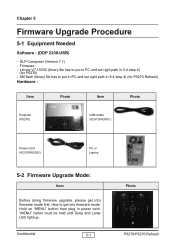
... Projector (P5270) USB Cable (42.87304G001) Power Cord (42.53506G002) PC or Laptop 5-2 Firmware Upgrade Mode: Item Before doing firmware upgrade, please get into firmware mode: Hold on "MENU" button then plug in 5-4 step 4) (for P5270) - 8M flash (library file has to get into firmware mode first. Chapter 5 Firmware Upgrade Procedure 5-1 Equipment Needed Software : (DDP 2230-USB) - Confidential 5-1 Photo P5270/P5270 Refresh How to put in PC and set right path in power cord. "MENU" button must be held until Temp and Lamp LED light...
... Projector (P5270) USB Cable (42.87304G001) Power Cord (42.53506G002) PC or Laptop 5-2 Firmware Upgrade Mode: Item Before doing firmware upgrade, please get into firmware mode: Hold on "MENU" button then plug in 5-4 step 4) (for P5270) - 8M flash (library file has to get into firmware mode first. Chapter 5 Firmware Upgrade Procedure 5-1 Equipment Needed Software : (DDP 2230-USB) - Confidential 5-1 Photo P5270/P5270 Refresh How to put in PC and set right path in power cord. "MENU" button must be held until Temp and Lamp LED light...
Acer P5270 Projector Series Service Guide
Page 82
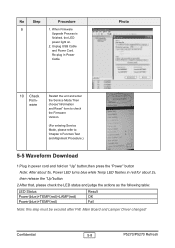
..., Power LED turns blue while Temp LED flashes in Power Cable. Confidential 5-8 P5270/P5270 Refresh Photo 10 Check Firmware Restart the unit and enter the Service Mode.Then choose"Information and Reset" item to check the Firmware Version. (For entering Service Mode, please refer to Chapter 4 Function Test and Alignment Procedure.) 5-5 Waveform Download 1.Plug in power cord and hold on . 2. Unplug USB Cable and Power Cord. When Firmware Upgrade Process is finished, the LED power light on "Up" button,then press the "Power" button Note...
..., Power LED turns blue while Temp LED flashes in Power Cable. Confidential 5-8 P5270/P5270 Refresh Photo 10 Check Firmware Restart the unit and enter the Service Mode.Then choose"Information and Reset" item to check the Firmware Version. (For entering Service Mode, please refer to Chapter 4 Function Test and Alignment Procedure.) 5-5 Waveform Download 1.Plug in power cord and hold on . 2. Unplug USB Cable and Power Cord. When Firmware Upgrade Process is finished, the LED power light on "Up" button,then press the "Power" button Note...
Acer P5270 Projector Series Service Guide
Page 94
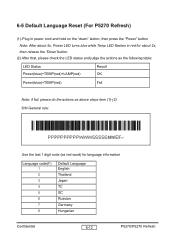
... "Power" button Note: After about 5s, Power LED turns blue while Temp LED flashes in red for about 2s, then release the "Down"button. (2) After that, please check the LED status and judge the actions as the following table: LED Status Power(blue)+TEMP(red)+LAMP(red) Result OK Power(blue)+TEMP(red) Fail Note: if fail, please do the actions as above steps item (1)-(2) S/N General rule: Use the last 1 digit code (as red word) for language information Language code(F) 1 2 3 4 5 6 7 8 Default Language...
... "Power" button Note: After about 5s, Power LED turns blue while Temp LED flashes in red for about 2s, then release the "Down"button. (2) After that, please check the LED status and judge the actions as the following table: LED Status Power(blue)+TEMP(red)+LAMP(red) Result OK Power(blue)+TEMP(red) Fail Note: if fail, please do the actions as above steps item (1)-(2) S/N General rule: Use the last 1 digit code (as red word) for language information Language code(F) 1 2 3 4 5 6 7 8 Default Language...


