
User Manual
Page 1
TABLE OF CONTENTS Special notes on LCD monitors 1 Information for your safety and comfort 2 Unpacking 5 Attaching/Removing the base 6 Screen position adjustment 6 Connecting the power cord 7 Safety precaution 7 Cleaning your monitor 7 Power saving 8 DDC 8 Connector Pin Assignment 9 Standard Timing Table 11 Installation 12 User controls 13 Troubleshooting 19
TABLE OF CONTENTS Special notes on LCD monitors 1 Information for your safety and comfort 2 Unpacking 5 Attaching/Removing the base 6 Screen position adjustment 6 Connecting the power cord 7 Safety precaution 7 Cleaning your monitor 7 Power saving 8 DDC 8 Connector Pin Assignment 9 Standard Timing Table 11 Installation 12 User controls 13 Troubleshooting 19

User Manual
Page 2
... light, the screen may flicker during initial use . • The LCD screen has effective pixels of the previous screen may find slightly uneven brightness on the screen depending on again to the nature of the LCD screen, an afterimage of 99.99% or more. Turn off the Power Switch for hours. In this case, the screen is recovered slowly by changing the image or turning off the Power Switch and then turn...
... light, the screen may flicker during initial use . • The LCD screen has effective pixels of the previous screen may find slightly uneven brightness on the screen depending on again to the nature of the LCD screen, an afterimage of 99.99% or more. Turn off the Power Switch for hours. In this case, the screen is recovered slowly by changing the image or turning off the Power Switch and then turn...
User Manual
Page 3
Keep this product on an unstable cart, stand or table. If the product falls, it could result in a fire or electric shock. These openings must not be blocked by hearing experts,to protect your safety and comfort Safety instructions Read these instructions, suggested by placing... setting the volume level, do not increase it afteryour ears adjust. • Limit the amount of time listening to music at high volume. • Avoid turning up the volume to block out noisy surroundings. • Turn the volume down if you can't hear people speaking near you plug the power cord...
Keep this product on an unstable cart, stand or table. If the product falls, it could result in a fire or electric shock. These openings must not be blocked by hearing experts,to protect your safety and comfort Safety instructions Read these instructions, suggested by placing... setting the volume level, do not increase it afteryour ears adjust. • Limit the amount of time listening to music at high volume. • Avoid turning up the volume to block out noisy surroundings. • Turn the volume down if you can't hear people speaking near you plug the power cord...

User Manual
Page 4
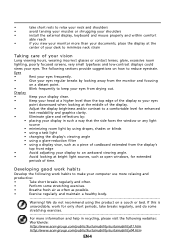
... monitor, using a footrest, or raising your sitting height to computer use . Long work periods, bad posture, poor work by the operating instructions, since improper adjustment of working conditions, personal health and other risks. Incorrect computer usage may lead to remove the strain on the recorded image and does not constitute a malfunction. Tips and information for comfortable use . nel when: • the power cord or plug...
... monitor, using a footrest, or raising your sitting height to computer use . Long work periods, bad posture, poor work by the operating instructions, since improper adjustment of working conditions, personal health and other risks. Incorrect computer usage may lead to remove the strain on the recorded image and does not constitute a malfunction. Tips and information for comfortable use . nel when: • the power cord or plug...
User Manual
Page 5
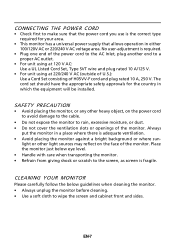
... display. • Adjust the display brightness and/or contrast to a comfortable level for enhanced text readability and graphics clarity. • Eliminate glare and reflections by: • placing your computer use more information and help in such a way that the side faces the window or any light source • minimizing room light by looking at the center of your eyes. Developing good work...
... display. • Adjust the display brightness and/or contrast to a comfortable level for enhanced text readability and graphics clarity. • Eliminate glare and reflections by: • placing your computer use more information and help in such a way that the side faces the window or any light source • minimizing room light by looking at the center of your eyes. Developing good work...

User Manual
Page 6
UNPACKING Please check the following items are present when you unpack the box, and save the packing materials in case you will need to ship or transport the monitor in future. • LCD Monitor • DP Cable (Opti onal) • AC Power Cord • D-Sub Cable (Optional) • DVI Cable (Optional) • HDMI Cabel (Optional) • Audio Cable (Optional) • User Manual • Quick Start Guide EN-5
UNPACKING Please check the following items are present when you unpack the box, and save the packing materials in case you will need to ship or transport the monitor in future. • LCD Monitor • DP Cable (Opti onal) • AC Power Cord • D-Sub Cable (Optional) • DVI Cable (Optional) • HDMI Cabel (Optional) • Audio Cable (Optional) • User Manual • Quick Start Guide EN-5

User Manual
Page 7
... / Removing the Base Note: Remove the monitor and monitor base from its packaging. EN-6 Install: Align the base with the stand and push the base towards the top of the monitor as indicated first before removing the base and follow the arrow direction to 15 degrees up or 5 degrees down on a stable surface -- SCREEN POSITION ADJUSTMENT In oder to optimize the best viewing position, you can be adjusted to remove it. use a cloth...
... / Removing the Base Note: Remove the monitor and monitor base from its packaging. EN-6 Install: Align the base with the stand and push the base towards the top of the monitor as indicated first before removing the base and follow the arrow direction to 15 degrees up or 5 degrees down on a stable surface -- SCREEN POSITION ADJUSTMENT In oder to optimize the best viewing position, you can be adjusted to remove it. use a cloth...
User Manual
Page 8
... cleaning. • Use a soft cloth to wipe the screen and cabinet front and sides. SAFETY PRECAUTION • Avoid placing the monitor, or any other light sources may reflect on the power cord to avoid damage to the cable. • Do not expose the monitor to rain, excessive moisture, or dust. • Do not cover the ventilation slots or openings of H05VV-F cord and plug rated...
... cleaning. • Use a soft cloth to wipe the screen and cabinet front and sides. SAFETY PRECAUTION • Avoid placing the monitor, or any other light sources may reflect on the power cord to avoid damage to the cable. • Do not expose the monitor to rain, excessive moisture, or dust. • Do not cover the ventilation slots or openings of H05VV-F cord and plug rated...
User Manual
Page 9
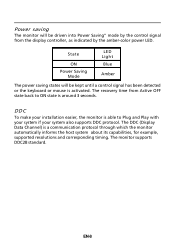
... host system about its capabilities, for example, supported resolutions and corresponding timing. The monitor supports DDC2B standard. DDC To make your system also supports DDC protocol. Power saving The monitor will be driven into Power Saving" mode by the control signal from Active OFF state back to Plug and Play with your system if your installation easier, the monitor is able to ON state is around 3 seconds...
... host system about its capabilities, for example, supported resolutions and corresponding timing. The monitor supports DDC2B standard. DDC To make your system also supports DDC protocol. Power saving The monitor will be driven into Power Saving" mode by the control signal from Active OFF state back to Plug and Play with your system if your installation easier, the monitor is able to ON state is around 3 seconds...
User Manual
Page 10
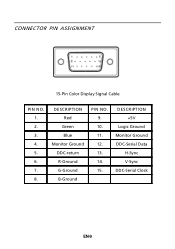
DESCRIPTION +5V Logic Ground Monitor Ground DDC-Serial Data H-Sync V-Sync DDC-Serial Clock EN-9 DESCRIPTION Red Green Blue Monitor Ground DDC-return R-Ground G-Ground B-Ground PIN NO. 9. 10. 11. 12. 13. 14. 15. CONNECTOR PIN ASSIGNMENT 15-Pin Color Display Signal Cable PIN NO. 1. 2. 3. 4. 5. 6. 7. 8.
DESCRIPTION +5V Logic Ground Monitor Ground DDC-Serial Data H-Sync V-Sync DDC-Serial Clock EN-9 DESCRIPTION Red Green Blue Monitor Ground DDC-return R-Ground G-Ground B-Ground PIN NO. 9. 10. 11. 12. 13. 14. 15. CONNECTOR PIN ASSIGNMENT 15-Pin Color Display Signal Cable PIN NO. 1. 2. 3. 4. 5. 6. 7. 8.

User Manual
Page 11
... Data0+ TMDS Data 0/5 Shield NC NC TMDS Clock Shield TMDS Clock+ DDC TMDS Clock- 19-Pin color display signal cable* PIN Meaning PIN 1. TMDS Data1+ 13. 5. on device) SCL SDA DDC/CEC Ground +5V Power Hot Plug Detect DDC Data 19. 8. TMDS Data 1/3 Shield 23. 12. TMDS Data1- 15. 7. TMDS ...Data0- 18. 19. * only for certain models EN-10 Meaning TMDS Clock+ TMDS Clock Shield TMDS Clock- NC 16. 5. TMDS...
... Data0+ TMDS Data 0/5 Shield NC NC TMDS Clock Shield TMDS Clock+ DDC TMDS Clock- 19-Pin color display signal cable* PIN Meaning PIN 1. TMDS Data1+ 13. 5. on device) SCL SDA DDC/CEC Ground +5V Power Hot Plug Detect DDC Data 19. 8. TMDS Data 1/3 Shield 23. 12. TMDS Data1- 15. 7. TMDS ...Data0- 18. 19. * only for certain models EN-10 Meaning TMDS Clock+ TMDS Clock Shield TMDS Clock- NC 16. 5. TMDS...

User Manual
Page 12
DisplayPort Connector Pin Number 1 2 3 4 5 6 7 8 9 10 20-pin Side of the Connected Signal Cable ML0(p) GND ML0(n) ML1(p) GND ML1(n) ML2(p) GND ML2(n) ML3(p) Pin Number 11 12 13 14 15 16 17 18 19 20 20-pin Side of the Connected Signal Cable GND ML3(n) GND GND AUX(p) GND AUX(n) HPD DP_PWR Return +3.3V DP_PWR Standard Timing Table Mode Resolution 1 2 MAC 3 VESA 4 SVGA 5 SVGA...
DisplayPort Connector Pin Number 1 2 3 4 5 6 7 8 9 10 20-pin Side of the Connected Signal Cable ML0(p) GND ML0(n) ML1(p) GND ML1(n) ML2(p) GND ML2(n) ML3(p) Pin Number 11 12 13 14 15 16 17 18 19 20 20-pin Side of the Connected Signal Cable GND ML3(n) GND GND AUX(p) GND AUX(n) HPD DP_PWR Return +3.3V DP_PWR Standard Timing Table Mode Resolution 1 2 MAC 3 VESA 4 SVGA 5 SVGA...
User Manual
Page 13
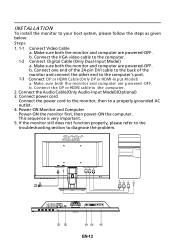
... b. Connect power cord Connect the power cord to the monitor, then to diagnose the problem. If the monitor still does not function properly, please refer to the troubleshooting section to a properly grounded AC outlet. 4. Power-ON Monitor and Computer Power-ON the monitor first, then power-ON the computer. Connect the Audio Cable(Only Audio-Input Model)(Optional) 3. Connect the VGA video cable to the computer's port. 1-3 Connect DP or HDMI Ca ble (O nly DP or HDMI-Input M odel) a. Make sure...
... b. Connect power cord Connect the power cord to the monitor, then to diagnose the problem. If the monitor still does not function properly, please refer to the troubleshooting section to a properly grounded AC outlet. 4. Power-ON Monitor and Computer Power-ON the monitor first, then power-ON the computer. Connect the Audio Cable(Only Audio-Input Model)(Optional) 3. Connect the VGA video cable to the computer's port. 1-3 Connect DP or HDMI Ca ble (O nly DP or HDMI-Input M odel) a. Make sure...
User Manual
Page 14
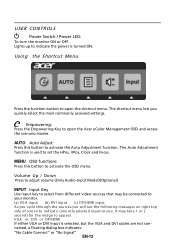
... VGA and DVI cables are not connected, a floating dialog box indicates: "No Cable Connect" or "No Signal" EN-13 The Auto Adjustment function is turned ON. Volume Up / Down Press to adjust volume (Only Audio-Input Model)(Optional) INPUT Input Key Use Input key to select from different video sources that may ta k e 1 or 2 seco nd s for the ima ge to open the Acer eColor Management OSD and access the scenario modes. V GA or DV I input (c) DP/HDMI input...
... VGA and DVI cables are not connected, a floating dialog box indicates: "No Cable Connect" or "No Signal" EN-13 The Auto Adjustment function is turned ON. Volume Up / Down Press to adjust volume (Only Audio-Input Model)(Optional) INPUT Input Key Use Input key to select from different video sources that may ta k e 1 or 2 seco nd s for the ima ge to open the Acer eColor Management OSD and access the scenario modes. V GA or DV I input (c) DP/HDMI input...
User Manual
Page 15
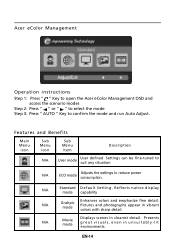
... Main Menu icon Sub Menu icon Sub Menu item Description N/A User mode User defined. N/A Movie mode Displays scenes in vibrant colors with sharp detail. Acer eColor Management Operation instructions Step 1: Press " " Key to open the Acer eColor Management OSD and access the scenario modes Step 2: Press " " or " " to select the mode Step 3: Press " AUTO " Key to reduce power consumption. Presents great visuals, even in unsuitably-lit environments. Settings can...
... Main Menu icon Sub Menu icon Sub Menu item Description N/A User mode User defined. N/A Movie mode Displays scenes in vibrant colors with sharp detail. Acer eColor Management Operation instructions Step 1: Press " " Key to open the Acer eColor Management OSD and access the scenario modes Step 2: Press " " or " " to select the mode Step 3: Press " AUTO " Key to reduce power consumption. Presents great visuals, even in unsuitably-lit environments. Settings can...
User Manual
Page 16
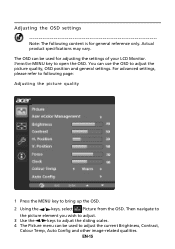
... for adjusting the settings of your LCD Monitor. Actual product specifications may vary. Adjusting the OSD settings Note: The following page: Adjusting the picture quality 1 Press the MENU key to bring up the OSD. 2 Using the / keys, select Picture from the OSD. Pressthe MENU key to adjust the sliding scales. 4 The Picture menu can be used to adjust the current Brightness, Contrast, Colour Temp, Auto Config and other image-related qualities. You can be used for...
... for adjusting the settings of your LCD Monitor. Actual product specifications may vary. Adjusting the OSD settings Note: The following page: Adjusting the picture quality 1 Press the MENU key to bring up the OSD. 2 Using the / keys, select Picture from the OSD. Pressthe MENU key to adjust the sliding scales. 4 The Picture menu can be used to adjust the current Brightness, Contrast, Colour Temp, Auto Config and other image-related qualities. You can be used for...
User Manual
Page 18
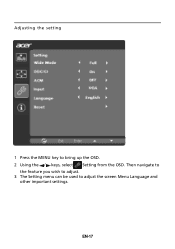
EN-17 Then navigate to the feature you wish to adjust. 3 The Setting menu can be used to bring up the OSD. 2 Using the / keys, select Setting from the OSD. Adjusting the setting 1 Press the MENU key to adjust the screen Menu Language and other important settings.
EN-17 Then navigate to the feature you wish to adjust. 3 The Setting menu can be used to bring up the OSD. 2 Using the / keys, select Setting from the OSD. Adjusting the setting 1 Press the MENU key to adjust the screen Menu Language and other important settings.
User Manual
Page 20
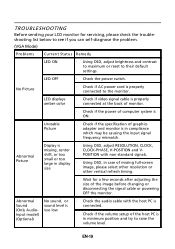
... power cord is properly connected to their default settings. LED displays amber color · Check if video signal cable is properly connected at the back of monitor. · Check if the power of graphics adapter and monitor is in minimum position and try to raise the volume level. Unstable Picture · Check if the specification of computer system is ON. EN-19 small or too large in display · Using OSD, in case of missing full-screen size image...
... power cord is properly connected to their default settings. LED displays amber color · Check if video signal cable is properly connected at the back of monitor. · Check if the power of graphics adapter and monitor is in minimum position and try to raise the volume level. Unstable Picture · Check if the specification of computer system is ON. EN-19 small or too large in display · Using OSD, in case of missing full-screen size image...

User Manual
Page 21
... ON. No Picture · Check if AC power cord is in minimum position and try to raise the volume level. LED displays amber color · Check if video signal cable is properly connected at the back of monitor. · Check if the power of the host PC is properly connected to their default settings. EN-20 LED OFF · Check the power switch. (DVI Mode) Problems Current Status Remedy LED ON · Using OSD, adjust brightness and contrast to maximum or reset to the...
... ON. No Picture · Check if AC power cord is in minimum position and try to raise the volume level. LED displays amber color · Check if video signal cable is properly connected at the back of monitor. · Check if the power of the host PC is properly connected to their default settings. EN-20 LED OFF · Check the power switch. (DVI Mode) Problems Current Status Remedy LED ON · Using OSD, adjust brightness and contrast to maximum or reset to the...
User Manual
Page 22
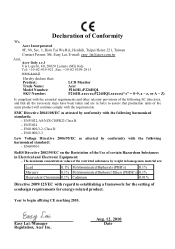
... product. Year to establishing a framework for the setting of the restricted substances by conformity with the following harmonized standard: -. EN55022, AS/NZS CISPR22 Class B. -. Easy Lai /Manager Regulation, Acer Inc. Aug. 12, 2010 Date EN55024 -. EN61000-3-2, Class D -. it Hereby declare that: Product: Trade Name: Model Number: SKU Number: LCD Monitor Acer P216HL;P226HQL P216HLxxxxxx;P226HQLxxxxxx("x" = 0~9, a ~ z, or A ~ Z) Is compliant with...
... product. Year to establishing a framework for the setting of the restricted substances by conformity with the following harmonized standard: -. EN55022, AS/NZS CISPR22 Class B. -. Easy Lai /Manager Regulation, Acer Inc. Aug. 12, 2010 Date EN55024 -. EN61000-3-2, Class D -. it Hereby declare that: Product: Trade Name: Model Number: SKU Number: LCD Monitor Acer P216HL;P226HQL P216HLxxxxxx;P226HQLxxxxxx("x" = 0~9, a ~ z, or A ~ Z) Is compliant with...


