
Quick Start Guide
Page 1
.... · Place the monitor on and functioning properly. No Video - Connect the Audio Cable.(optional) 3. If the monitor still does not function properly, please refer to the troubleshooting section to user's guide in CD-ROM packaged with the AC power available in a working electrical device such as a lamp. The monitor's power indicator is electrically rated to unplug the monitor first. The screen can clean the exterior of...
.... · Place the monitor on and functioning properly. No Video - Connect the Audio Cable.(optional) 3. If the monitor still does not function properly, please refer to the troubleshooting section to user's guide in CD-ROM packaged with the AC power available in a working electrical device such as a lamp. The monitor's power indicator is electrically rated to unplug the monitor first. The screen can clean the exterior of...

Quick Start Guide
Page 2
...a la norme NMB-003 du Canada. LCD Monitor Quick Setup Guide tion. Operation conditions This device complies with Part 15 of the FCC rules. Notice: Canadian users This Class B digital apparatus complies with EMC regulations. Notice: Shielded cables All connections to other relevant provisions of EMC Directive ...Acer Inc., declares that may cause harmful interference to radio communica- Notice: Peripheral devices Only peripherals (input/output devices, terminals, printers, etc.) certified to comply with the Class B limits may be attached to this device must be determined by turning...
...a la norme NMB-003 du Canada. LCD Monitor Quick Setup Guide tion. Operation conditions This device complies with Part 15 of the FCC rules. Notice: Canadian users This Class B digital apparatus complies with EMC regulations. Notice: Shielded cables All connections to other relevant provisions of EMC Directive ...Acer Inc., declares that may cause harmful interference to radio communica- Notice: Peripheral devices Only peripherals (input/output devices, terminals, printers, etc.) certified to comply with the Class B limits may be attached to this device must be determined by turning...

User Manual
Page 1
TABLE OF CONTENTS Special notes on LCD monitors 1 Information for your safety and comfort 2 Unpacking 5 Attaching/Removing the base 6 Screen position adjustment 6 Connecting the power cord 7 Safety precaution 7 Cleaning your monitor 7 Power saving 8 DDC 8 Connector Pin Assignment 9 Standard Timing Table 11 Installation 12 User controls 13 Troubleshooting 19
TABLE OF CONTENTS Special notes on LCD monitors 1 Information for your safety and comfort 2 Unpacking 5 Attaching/Removing the base 6 Screen position adjustment 6 Connecting the power cord 7 Safety precaution 7 Cleaning your monitor 7 Power saving 8 DDC 8 Connector Pin Assignment 9 Standard Timing Table 11 Installation 12 User controls 13 Troubleshooting 19
User Manual
Page 2
... LCD screen, an afterimage of the previous screen may remain after switching the image, when the same image is recovered slowly by changing the image or turning off the Power Switch and then turn it on again to make sure the flicker disappears. · You may find slightly uneven brightness on the screen depending on the desktop pattern you use. · The LCD screen has effective pixels of the fluorescent light...
... LCD screen, an afterimage of the previous screen may remain after switching the image, when the same image is recovered slowly by changing the image or turning off the Power Switch and then turn it on again to make sure the flicker disappears. · You may find slightly uneven brightness on the screen depending on the desktop pattern you use. · The LCD screen has effective pixels of the fluorescent light...
User Manual
Page 3
... turning up the volume to the equipment operator as they may touch dangerous voltage points or short-out parts that the power outlet you plug the power cord into is provided. • Never push objects of any kind onto or into this product through cabinet slots as possible. EN-2 Follow all warnings and instructions marked on an unstable cart, stand...
... turning up the volume to the equipment operator as they may touch dangerous voltage points or short-out parts that the power outlet you plug the power cord into is provided. • Never push objects of any kind onto or into this product through cabinet slots as possible. EN-2 Follow all warnings and instructions marked on an unstable cart, stand...
User Manual
Page 4
...; stand up and walk around regularly to remove the strain on the recorded image and does not constitute a malfunction. LCD Pixel Statement The LCD unit is damaged, cut or frayed liquid was spilled into the product • the product was exposed to qualified service person- Observe the following the operating instructions Note: Adjust only those controls that are covered by adjusting the viewing...
...; stand up and walk around regularly to remove the strain on the recorded image and does not constitute a malfunction. LCD Pixel Statement The LCD unit is damaged, cut or frayed liquid was spilled into the product • the product was exposed to qualified service person- Observe the following the operating instructions Note: Adjust only those controls that are covered by adjusting the viewing...
User Manual
Page 5
... the side faces the window or any light source • minimizing room light by looking at the middle of the display. • Adjust the display brightness and/or contrast to reduce eyestrain. Warning! Eyes • Rest your eyes frequently. • Give your eyes regular breaks by using drapes, shades or blinds • using a task light • changing the display's viewing angle • using a glare-reduction filter...
... the side faces the window or any light source • minimizing room light by looking at the middle of the display. • Adjust the display brightness and/or contrast to reduce eyestrain. Warning! Eyes • Rest your eyes frequently. • Give your eyes regular breaks by using drapes, shades or blinds • using a task light • changing the display's viewing angle • using a glare-reduction filter...

User Manual
Page 6
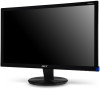
UNPACKING Please check the following items are present when you unpack the box, and save the packing materials in case you will need to ship or transport the monitor in future. · LCD Monitor · AC Power Cord · D-Sub Cable (Optional) · DVI Cable (Optional) · Audio Cable (Optional) · User Manual · Quick Start Guide P206HL LCD monitor EN-5
UNPACKING Please check the following items are present when you unpack the box, and save the packing materials in case you will need to ship or transport the monitor in future. · LCD Monitor · AC Power Cord · D-Sub Cable (Optional) · DVI Cable (Optional) · Audio Cable (Optional) · User Manual · Quick Start Guide P206HL LCD monitor EN-5

User Manual
Page 7
... before removing the base and follow the arrow direction to remove it. The monitor can adjust the tilt of the monitor. use a cloth to 15 degrees up or 5 degrees down on a stable surface -- Remove: Depress the release hooks as shown in the figure below . EN-6 SCREEN POSITION ADJUSTMENT In oder to optimize the best viewing position, you can be adjusted to avoid scratching the screen. Install: Align the base with the stand...
... before removing the base and follow the arrow direction to remove it. The monitor can adjust the tilt of the monitor. use a cloth to 15 degrees up or 5 degrees down on a stable surface -- Remove: Depress the release hooks as shown in the figure below . EN-6 SCREEN POSITION ADJUSTMENT In oder to optimize the best viewing position, you can be adjusted to avoid scratching the screen. Install: Align the base with the stand...
User Manual
Page 8
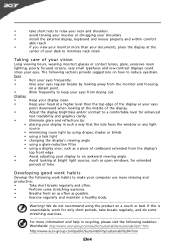
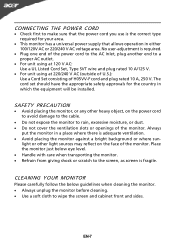
... (outside of U.S.): Use a Cord Set consisting of H05VV-F cord and plug rated 10 A, 250 V. SAFETY PRECAUTION · Avoid placing the monitor, or any other light sources may reflect on the power cord to avoid damage to the cable. · Do not expose the monitor to rain, excessive moisture, or dust. · Do not cover the ventilation slots or openings of the monitor. EN-7 The cord set should have...
... (outside of U.S.): Use a Cord Set consisting of H05VV-F cord and plug rated 10 A, 250 V. SAFETY PRECAUTION · Avoid placing the monitor, or any other light sources may reflect on the power cord to avoid damage to the cable. · Do not expose the monitor to rain, excessive moisture, or dust. · Do not cover the ventilation slots or openings of the monitor. EN-7 The cord set should have...
User Manual
Page 9
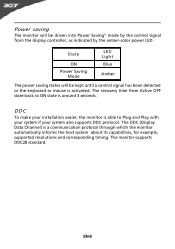
... back to Plug and Play with your system if your installation easier, the monitor is able to ON state is around 3 seconds. State ON Power Saving Mode LED Light Blue Amber The power saving states will be kept until a control signal has been detected or the keyboard or mouse is activated. Power saving The monitor will be driven into Power Saving" mode by the amber-color power LED. The DDC (Display Data Channel...
... back to Plug and Play with your system if your installation easier, the monitor is able to ON state is around 3 seconds. State ON Power Saving Mode LED Light Blue Amber The power saving states will be kept until a control signal has been detected or the keyboard or mouse is activated. Power saving The monitor will be driven into Power Saving" mode by the amber-color power LED. The DDC (Display Data Channel...
User Manual
Page 10
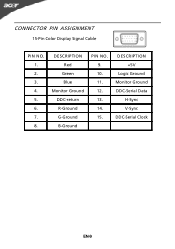
DESCRIPTION +5V Logic Ground Monitor Ground DDC-Serial Data H-Sync V-Sync DDC-Serial Clock EN-9 DESCRIPTION Red Green Blue Monitor Ground DDC-return R-Ground G-Ground B-Ground PIN NO. 9. 10. 11. 12. 13. 14. 15. CONNECTOR PIN ASSIGNMENT 15-Pin Color Display Signal Cable PIN NO. 1. 2. 3. 4. 5. 6. 7. 8.
DESCRIPTION +5V Logic Ground Monitor Ground DDC-Serial Data H-Sync V-Sync DDC-Serial Clock EN-9 DESCRIPTION Red Green Blue Monitor Ground DDC-return R-Ground G-Ground B-Ground PIN NO. 9. 10. 11. 12. 13. 14. 15. CONNECTOR PIN ASSIGNMENT 15-Pin Color Display Signal Cable PIN NO. 1. 2. 3. 4. 5. 6. 7. 8.

User Manual
Page 11
Logic Ground 4. DDC Clock 18. DDC Data 19. TMDS Data 0/5 Shield 8. NC 20. TMDS Data1+ 22. DDC TMDS Clock- * only for certain models EN-10 TMDS Data2+ 14. +5V Power 3. NC 9. TMDS Data2- 13. NC 17. NC 10. TMDS Clock+ 12. TMDS Data0+ 7. TMDS Clock Shield 11. NC 16. Hot Plug Detect 5. TMDS Data 2/4 Shield 15. TMDS Data0- 6. NC 24. TMDS Data 1/3 Shield 23. NC 2. TMDS Data1- 21. 24-Pin Color Display Signal Cable* PIN Meaning PIN Meaning 1.
Logic Ground 4. DDC Clock 18. DDC Data 19. TMDS Data 0/5 Shield 8. NC 20. TMDS Data1+ 22. DDC TMDS Clock- * only for certain models EN-10 TMDS Data2+ 14. +5V Power 3. NC 9. TMDS Data2- 13. NC 17. NC 10. TMDS Clock+ 12. TMDS Data0+ 7. TMDS Clock Shield 11. NC 16. Hot Plug Detect 5. TMDS Data 2/4 Shield 15. TMDS Data0- 6. NC 24. TMDS Data 1/3 Shield 23. NC 2. TMDS Data1- 21. 24-Pin Color Display Signal Cable* PIN Meaning PIN Meaning 1.

User Manual
Page 13
Connect the VGA video cable to a properly grounded AC outlet. 4. Power-ON Monitor and Computer Power-ON the monitor first, then power-ON the computer. Connect power cord Connect the power cord to the monitor, then to the computer. b. Connect one end of the 24-pin DVI cable to the back of the monitor and connect the other end to diagnose the problem. Connect the Audio Cable(Only Audio-Input Model)(Optional) 3. Make sure both the monitor and computer are powered-OFF...
Connect the VGA video cable to a properly grounded AC outlet. 4. Power-ON Monitor and Computer Power-ON the monitor first, then power-ON the computer. Connect power cord Connect the power cord to the monitor, then to the computer. b. Connect one end of the 24-pin DVI cable to the back of the monitor and connect the other end to diagnose the problem. Connect the Audio Cable(Only Audio-Input Model)(Optional) 3. Make sure both the monitor and computer are powered-OFF...

User Manual
Page 14
... Cable Connect" or "No Signal" EN-13 VGA or DVI If either VGA or DVI input is turned ON. AUTO Auto Adjust: Press this botton to appear. USER CONTROLS Power Switch / Power LED: To turn the monitor ON or OFF. The shortcut menu lets you will see the following messages on right top side of screen to activate the Auto Adjustment function. Lights up to open the Acer eColor Management OSD and access the scenario modes. MENU OSD functions Press this button...
... Cable Connect" or "No Signal" EN-13 VGA or DVI If either VGA or DVI input is turned ON. AUTO Auto Adjust: Press this botton to appear. USER CONTROLS Power Switch / Power LED: To turn the monitor ON or OFF. The shortcut menu lets you will see the following messages on right top side of screen to activate the Auto Adjustment function. Lights up to open the Acer eColor Management OSD and access the scenario modes. MENU OSD functions Press this button...
User Manual
Page 15
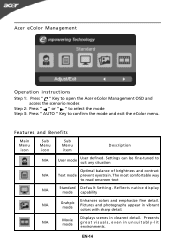
... Optimal balance of brightness and contrast N/A Text mode prevent eyestrain. Acer eColor Management Operation instructions Step 1: Press " " Key to open the Acer eColor Management OSD and access the scenario modes Step 2: Press " " or " " to select the mode Step 3: Press " AUTO " Key to confirm the mode and exit the eColor menu. Pictures and photographs appear in vibrant colors with sharp detail. Features and Benefits Main Menu icon Sub Menu...
... Optimal balance of brightness and contrast N/A Text mode prevent eyestrain. Acer eColor Management Operation instructions Step 1: Press " " Key to open the Acer eColor Management OSD and access the scenario modes Step 2: Press " " or " " to select the mode Step 3: Press " AUTO " Key to confirm the mode and exit the eColor menu. Pictures and photographs appear in vibrant colors with sharp detail. Features and Benefits Main Menu icon Sub Menu...
User Manual
Page 16
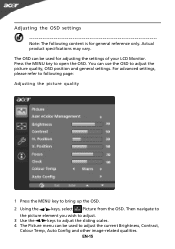
... picture element you wish to adjust. 3 Use the / keys to adjust the sliding scales. 4 The Picture menu can be used to adjust the picture quality, OSD position and general settings. You can be used for general reference only. The OSD can use the OSD to adjust the current Brightness, Contrast, Colour Temp, Auto Config and other image-related qualities. Adjusting the OSD settings Note: The following page: Adjusting the picture quality 1 Press the MENU key to open the OSD...
... picture element you wish to adjust. 3 Use the / keys to adjust the sliding scales. 4 The Picture menu can be used to adjust the picture quality, OSD position and general settings. You can be used for general reference only. The OSD can use the OSD to adjust the current Brightness, Contrast, Colour Temp, Auto Config and other image-related qualities. Adjusting the OSD settings Note: The following page: Adjusting the picture quality 1 Press the MENU key to open the OSD...
User Manual
Page 18
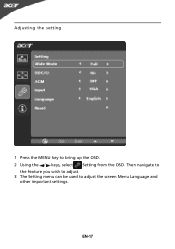
EN-17 Adjusting the setting 1 Press the MENU key to adjust the screen Menu Language and other important settings. Then navigate to the feature you wish to adjust. 3 The Setting menu can be used to bring up the OSD. 2 Using the / keys, select Setting from the OSD.
EN-17 Adjusting the setting 1 Press the MENU key to adjust the screen Menu Language and other important settings. Then navigate to the feature you wish to adjust. 3 The Setting menu can be used to bring up the OSD. 2 Using the / keys, select Setting from the OSD.
User Manual
Page 20
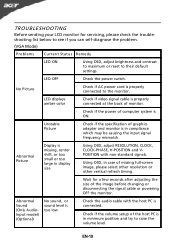
...; Using OSD, adjust brightness and contrast to maximum or reset to the monitor. LED displays amber color · Check if video signal cable is properly connected at the back of monitor. · Check if the power of the host PC is in minimum position and try to raise the volume level. Abnormal Sound (Only AudioInput model) (Optional) No sound, or sound level is too low · Check the audio cable with non-standard signals. LED OFF · Check the power switch. Abnormal Picture Display...
...; Using OSD, adjust brightness and contrast to maximum or reset to the monitor. LED displays amber color · Check if video signal cable is properly connected at the back of monitor. · Check if the power of the host PC is in minimum position and try to raise the volume level. Abnormal Sound (Only AudioInput model) (Optional) No sound, or sound level is too low · Check the audio cable with non-standard signals. LED OFF · Check the power switch. Abnormal Picture Display...
User Manual
Page 21
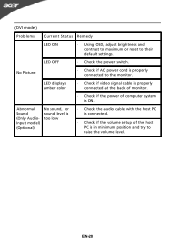
... is properly connected to the monitor. (DVI mode) Problems Current Status Remedy LED ON · Using OSD, adjust brightness and contrast to maximum or reset to raise the volume level. LED displays amber color · Check if video signal cable is properly connected at the back of monitor. · Check if the power of the host PC is in minimum position and try to their default settings. LED OFF · Check the power switch. EN-20 No Picture · Check if AC power cord is...
... is properly connected to the monitor. (DVI mode) Problems Current Status Remedy LED ON · Using OSD, adjust brightness and contrast to maximum or reset to raise the volume level. LED displays amber color · Check if video signal cable is properly connected at the back of monitor. · Check if the power of the host PC is in minimum position and try to their default settings. LED OFF · Check the power switch. EN-20 No Picture · Check if AC power cord is...


