User Manual
Page 3
... messages 33 Receiving multimedia messages 33 Going online 34 Browsing the internet 34 Using the browser 34 Setting up Email 35 Google services 35 Setting up your Google email 36 Voice search 36 Play Store 37 Google Hangouts 38 Maps 39 Using the Camera 40 Camera/camcorder icons and indicators 40 Mode selector 42 Settings 43 Taking a photo 44 Using the Dual Shot feature 45 Taking a panoramic photo 45 Shooting a video 46 Supported formats 46 Viewing photos and videos...
... messages 33 Receiving multimedia messages 33 Going online 34 Browsing the internet 34 Using the browser 34 Setting up Email 35 Google services 35 Setting up your Google email 36 Voice search 36 Play Store 37 Google Hangouts 38 Maps 39 Using the Camera 40 Camera/camcorder icons and indicators 40 Mode selector 42 Settings 43 Taking a photo 44 Using the Dual Shot feature 45 Taking a panoramic photo 45 Shooting a video 46 Supported formats 46 Viewing photos and videos...

User Manual
Page 4
... 70 Using a Bluetooth headset 70 Creating a new access point 70 Inserting a microSD card 71 Managing your SIM cards 72 SIM Management 72 Appendix 75 FAQ and troubleshooting 75 Other sources of help 77 Warnings and precautions 78 Medical devices 79 Vehicles 80 Potentially explosive environments........... 80 Emergency calls 81 Taking care of your smartphone 81 Specifications 83 Performance 83 Display 83 Multimedia 83 USB connector 83 Connectivity 84 Camera...
... 70 Using a Bluetooth headset 70 Creating a new access point 70 Inserting a microSD card 71 Managing your SIM cards 72 SIM Management 72 Appendix 75 FAQ and troubleshooting 75 Other sources of help 77 Warnings and precautions 78 Medical devices 79 Vehicles 80 Potentially explosive environments........... 80 Emergency calls 81 Taking care of your smartphone 81 Specifications 83 Performance 83 Display 83 Multimedia 83 USB connector 83 Connectivity 84 Camera...
User Manual
Page 6
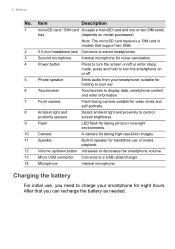
... to control screen brightness. 9 Flash LED flash for taking photos in low-light environments. 10 Camera A camera for taking high-resolution images. 11 Speaker Built-in speaker for holding to turn the smartphone on model purchased). Charging the battery For initial use or media playback. 12 Volume up No. Note: The microSD card replaces a SIM card in models that you need to a USB cable/charger. 14 Microphone Internal microphone. Setting up /down button Increases...
... to control screen brightness. 9 Flash LED flash for taking photos in low-light environments. 10 Camera A camera for taking high-resolution images. 11 Speaker Built-in speaker for holding to turn the smartphone on model purchased). Charging the battery For initial use or media playback. 12 Volume up No. Note: The microSD card replaces a SIM card in models that you need to a USB cable/charger. 14 Microphone Internal microphone. Setting up /down button Increases...
User Manual
Page 10
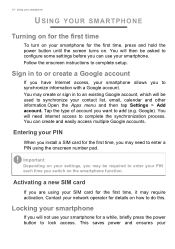
... to enter a PIN using your smartphone. Google). Entering your PIN When you install a SIM card for the first time, you may create or sign in to or create a Google account If you will need to enter your smartphone If you have Internet access, your Follow the onscreen instructions to add (e.g. You may need internet access to do this. You can use your contact list, email, calendar and other information.Open the Apps menu and then tap Settings > Add account...
... to enter a PIN using your smartphone. Google). Entering your PIN When you install a SIM card for the first time, you may create or sign in to or create a Google account If you will need to enter your smartphone If you have Internet access, your Follow the onscreen instructions to add (e.g. You may need internet access to do this. You can use your contact list, email, calendar and other information.Open the Apps menu and then tap Settings > Add account...

User Manual
Page 14
... the forward slash key. You can enable or disable the following: Function Description How to Swype Learn how to use Swype gestures. Then tap the Settings button Gestures Use how to enter text. Personalization Change keyboard theme, edit your personal dictionary and personalize your dictionary. Updates Check for app and dictionary updates. 14 - Preferences Change your smartphone To change the input method, open the Apps menu and then tap Settings > Language & input. Language Options Set the language used...
... the forward slash key. You can enable or disable the following: Function Description How to Swype Learn how to use Swype gestures. Then tap the Settings button Gestures Use how to enter text. Personalization Change keyboard theme, edit your personal dictionary and personalize your dictionary. Updates Check for app and dictionary updates. 14 - Preferences Change your smartphone To change the input method, open the Apps menu and then tap Settings > Language & input. Language Options Set the language used...

User Manual
Page 17
... activated Quick Mode you want to prevent unauthorized changes. 1. Turning Quick Mode on To turn Quick Mode off To turn Quick Mode on the Internet, tap the Google icon. Open the Apps menu > Quick Mode. 2. Set a passcode for information on : 1. Tap the Settings icon in the lower right-hand corner of the screen. 6. Simply enter the text you have not previously set the widgets. Choose whether you would like to younger and/or inexperienced smartphone users. Tap the Settings icon...
... activated Quick Mode you want to prevent unauthorized changes. 1. Turning Quick Mode on To turn Quick Mode off To turn Quick Mode on the Internet, tap the Google icon. Open the Apps menu > Quick Mode. 2. Set a passcode for information on : 1. Tap the Settings icon in the lower right-hand corner of the screen. 6. Simply enter the text you have not previously set the widgets. Choose whether you would like to younger and/or inexperienced smartphone users. Tap the Settings icon...

User Manual
Page 27
... contacts. 2. The Notification area with the missed call details. 3. On your contacts. 2. Tap the People icon the Apps menu to call them . Tap on a contact to view your smartphone's lock screen. By the phone icon (the number in the following three areas: 1. Tap Phone from the Contacts app 1. Tap the All contacts to directly display the missed call icon. Calling a contact from either the Home screen or the Apps menu to view your contacts Calling a contact from the Contacts tab 1. Tap on a contact to enter...
... contacts. 2. The Notification area with the missed call details. 3. On your contacts. 2. Tap the People icon the Apps menu to call them . Tap on a contact to view your smartphone's lock screen. By the phone icon (the number in the following three areas: 1. Tap Phone from the Contacts app 1. Tap the All contacts to directly display the missed call icon. Calling a contact from either the Home screen or the Apps menu to view your contacts Calling a contact from the Contacts tab 1. Tap on a contact to enter...

User Manual
Page 28
... onscreen number pad until + appears onscreen. Important International call rates with your network provider, to associate with that particular widget on your network provider. We suggest you will apply. Once placed, you check all call rates can minimize the call screen. Direct dial widget You may add a direct dial widget for roaming rates specific to display more Quick Settings options(see Notification and status area on your Home screen.
... onscreen number pad until + appears onscreen. Important International call rates with your network provider, to associate with that particular widget on your network provider. We suggest you will apply. Once placed, you check all call rates can minimize the call screen. Direct dial widget You may add a direct dial widget for roaming rates specific to display more Quick Settings options(see Notification and status area on your Home screen.

User Manual
Page 30
30 - After the first call . From the Call History contacts . , tap the number and then tap Add to start the conference call is established, tap to 2. Tap See Adding a contact on line, you have dialed to add a second call . Conference calls If you can save a number you have one call on hold and another on page 23. Making calls Saving a dialed number to contacts You can combine both calls to create a conference call . Tap Create new contact and enter the information. to your contacts for future use. 1.
30 - After the first call . From the Call History contacts . , tap the number and then tap Add to start the conference call is established, tap to 2. Tap See Adding a contact on line, you have dialed to add a second call . Conference calls If you can save a number you have one call on hold and another on page 23. Making calls Saving a dialed number to contacts You can combine both calls to create a conference call . Tap Create new contact and enter the information. to your contacts for future use. 1.
User Manual
Page 33
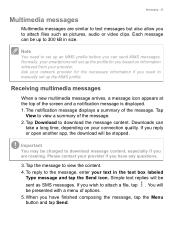
... wish to view the content. 4. Tap Download to the message, enter your network provider for you reply or open another app, the download will be charged to manually set up to view a summary of options. 5. To reply to download the message content. Downloads can send MMS messages. When you have finished composing the message, tap the Menu button and tap Send. Ask your text in size. The notification message displays a summary of the screen and a notification message is displayed. 1. Important...
... wish to view the content. 4. Tap Download to the message, enter your network provider for you reply or open another app, the download will be charged to manually set up to view a summary of options. 5. To reply to download the message content. Downloads can send MMS messages. When you have finished composing the message, tap the Menu button and tap Send. Ask your text in size. The notification message displays a summary of the screen and a notification message is displayed. 1. Important...
User Manual
Page 35
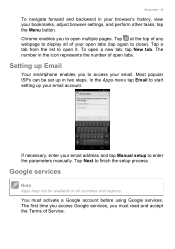
..., tap the Menu button. Most popular ISPs can be available in all of Service. In the Apps menu tap Email to start setting up in two steps. Tap a tab from the list to open a new tab, tap New tab. Google services Note Apps may not be set up your email address and tap Manual setup to enter the parameters manually. Going online - 35 To navigate forward and backward in your browser's history, view your open tabs (tap...
..., tap the Menu button. Most popular ISPs can be available in all of Service. In the Apps menu tap Email to start setting up in two steps. Tap a tab from the list to open a new tab, tap New tab. Google services Note Apps may not be set up your email address and tap Manual setup to enter the parameters manually. Going online - 35 To navigate forward and backward in your browser's history, view your open tabs (tap...

User Manual
Page 36
... message. 5. Tap Voice Search from the Apps menu, or tap the microphone icon on the Home screen. Composing an email 1. Voice search With voice actions, you can send text messages, place calls, send emails, find directions of establishments, automatically call establishments, search the internet and even send a note to yourself using your Google email 1. Going online Setting up your voice. 36 - Tap . 4. When you first started your message, tap . If you did not enter your Gmail account address and password...
... message. 5. Tap Voice Search from the Apps menu, or tap the microphone icon on the Home screen. Composing an email 1. Voice search With voice actions, you can send text messages, place calls, send emails, find directions of establishments, automatically call establishments, search the internet and even send a note to yourself using your Google email 1. Going online Setting up your voice. 36 - Tap . 4. When you first started your message, tap . If you did not enter your Gmail account address and password...

User Manual
Page 55
... the AcerEXTEND software keyboard to remain as the default keyboard input method. Open Settings from the Applications menu. 2. Why does my AcerEXTEND screen keep freezing after connecting to a wireless network? • The problem may need to first disable AcerEXTEND on your antivirus and try rebooting the smartphone first before disabling AcerEXTEND. • If you may have followed the instructions above and still see a blank wireless button in the...
... the AcerEXTEND software keyboard to remain as the default keyboard input method. Open Settings from the Applications menu. 2. Why does my AcerEXTEND screen keep freezing after connecting to a wireless network? • The problem may need to first disable AcerEXTEND on your antivirus and try rebooting the smartphone first before disabling AcerEXTEND. • If you may have followed the instructions above and still see a blank wireless button in the...

User Manual
Page 60
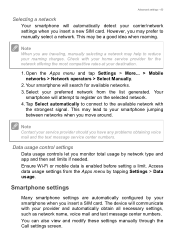
... mobile data used for particular functions (such as voice calling or messaging), turn the data connection on or off, set roaming preferences and associate contacts with a SIM. Item SIM management Wi-Fi Bluetooth Data usage Call Settings Description Set a default SIM for each SIM. Turn the Bluetooth function on or off . Turn Flip Mute on or off . Set Proximity Sensor. Change Internet Call settings. Turn Float Caller on or off . Turn the Wi-Fi function on or off . 60 - Advanced settings Adjusting settings Activating or deactivating connections Open...
... mobile data used for particular functions (such as voice calling or messaging), turn the data connection on or off, set roaming preferences and associate contacts with a SIM. Item SIM management Wi-Fi Bluetooth Data usage Call Settings Description Set a default SIM for each SIM. Turn the Bluetooth function on or off . Turn Flip Mute on or off . Set Proximity Sensor. Change Internet Call settings. Turn Float Caller on or off . Turn the Wi-Fi function on or off . 60 - Advanced settings Adjusting settings Activating or deactivating connections Open...
User Manual
Page 63
However, you monitor total usage by network type and app and then set limits if needed. Check with your home service provider for available networks. 3. The device will communicate with the strongest signal. This may help to reduce your roaming charges. Open the Apps menu and tap Settings > More... > Mobile networks > Network operators > Select Manually. 2. Select your provider and automatically obtain all necessary settings, such as network name, voice mail and text message center numbers. Your smartphone will attempt to...
However, you monitor total usage by network type and app and then set limits if needed. Check with your home service provider for available networks. 3. The device will communicate with the strongest signal. This may help to reduce your roaming charges. Open the Apps menu and tap Settings > More... > Mobile networks > Network operators > Select Manually. 2. Select your provider and automatically obtain all necessary settings, such as network name, voice mail and text message center numbers. Your smartphone will attempt to...

User Manual
Page 65
... the Apps menu tap Settings > Display. Pairing your smartphone to set the date and time, open the Apps menu and tap Settings > Date & time. Tap Clock in the Apps menu, and then tap may require a dongle. Item Theme Brightness Auto-rotate screen Sleep Daydream Font size Wireless Display Description Change the Home screen's theme. See the instructions that uses daylight saving time, activate Automatic date & time > Use network-provided time from the network. Setting the date and time To set the date and time based...
... the Apps menu tap Settings > Display. Pairing your smartphone to set the date and time, open the Apps menu and tap Settings > Date & time. Tap Clock in the Apps menu, and then tap may require a dongle. Item Theme Brightness Auto-rotate screen Sleep Daydream Font size Wireless Display Description Change the Home screen's theme. See the instructions that uses daylight saving time, activate Automatic date & time > Use network-provided time from the network. Setting the date and time To set the date and time based...

User Manual
Page 66
Changing language and text options Set your device to Settings > Language & input. Synchronization You can connect your location and language input preferences by opening the Apps menu and going to a PC using the supplied USB cable. 1. Plug the USB sync cable into an available USB port on USB storage, you will now be able to repeat the alarm. • Set a ringtone. • Enable or disable vibrate. • Give it as a drive in your device or the device's internal memory), you...
Changing language and text options Set your device to Settings > Language & input. Synchronization You can connect your location and language input preferences by opening the Apps menu and going to a PC using the supplied USB cable. 1. Plug the USB sync cable into an available USB port on USB storage, you will now be able to repeat the alarm. • Set a ringtone. • Enable or disable vibrate. • Give it as a drive in your device or the device's internal memory), you...
User Manual
Page 72
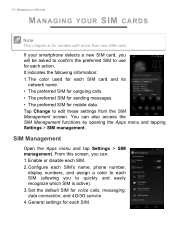
... SIM for sending messages. • The preferred SIM for each action. Enable or disable each SIM (allowing you can also access the SIM Management functions by opening the Apps menu and tapping Settings > SIM management. Tap Change to use for mobile data. SIM Management Open the Apps menu and tap Settings > SIM management. 72 - If your SIM cards MANAGING YOUR SIM CARDS Note This chapter is active). 3. Configure each SIM's name, phone number, display numbers, and assign a color to each SIM. 2. From this screen, you to quickly...
... SIM for sending messages. • The preferred SIM for each action. Enable or disable each SIM (allowing you can also access the SIM Management functions by opening the Apps menu and tapping Settings > SIM management. Tap Change to use for mobile data. SIM Management Open the Apps menu and tap Settings > SIM management. 72 - If your SIM cards MANAGING YOUR SIM CARDS Note This chapter is active). 3. Configure each SIM's name, phone number, display numbers, and assign a color to each SIM. 2. From this screen, you to quickly...

User Manual
Page 73
tap the SIM to use and the message will be sent. A dialog opens; Managing your SIM cards - 73 Selecting which SIM to use when making a call If you have set Voice call to Always ask, you will be asked which SIM to use each time you make call will be connected. A dialog opens; tap the SIM to use each time you send a text message. Selecting which SIM to use when sending a text message If you have set Messaging to Always ask, you will be asked which SIM to use and the call . Enter the number, then tap . Enter the message and recipient information, then tap Send.
tap the SIM to use and the message will be sent. A dialog opens; Managing your SIM cards - 73 Selecting which SIM to use when making a call If you have set Voice call to Always ask, you will be asked which SIM to use each time you make call will be connected. A dialog opens; tap the SIM to use each time you send a text message. Selecting which SIM to use when sending a text message If you have set Messaging to Always ask, you will be asked which SIM to use and the call . Enter the number, then tap . Enter the message and recipient information, then tap Send.

User Manual
Page 74
... SIM cards Identifying calls Whenever you make or receive a call, or send or receive a text message on another SIM, the first SIM's data connection will be shown the name of the SIM will be shown using the color defined for that the call is : Other SIM cannot: In a call Dial out Ringing Receive a call (caller will get a "number not available" message) Sending or receiving a message Send or receive a message Using a data connection Use a data connection Note If you are using multiple SIMs When a SIM is being received on one SIM and you receive a call, the caller's number...
... SIM cards Identifying calls Whenever you make or receive a call, or send or receive a text message on another SIM, the first SIM's data connection will be shown the name of the SIM will be shown using the color defined for that the call is : Other SIM cannot: In a call Dial out Ringing Receive a call (caller will get a "number not available" message) Sending or receiving a message Send or receive a message Using a data connection Use a data connection Note If you are using multiple SIMs When a SIM is being received on one SIM and you receive a call, the caller's number...


