Acer Projector H6510BD, P1340W, X1140, X1240 Service Guide
Page 110
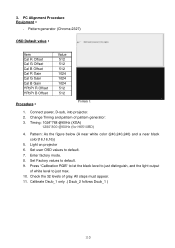
...,240,240) and a near black color(16,16,16)} 5. Press "Calibration RGB" to let the black level to just max. 10. Calibrate Dsub_1 only .( Dsub_2 follows Dsub_1 ) 110 3. Set Factory values to default. 7. Check the 32 levels of white level to ...just distinguish, and the light output of gray. Enter factory mode. 8. Connect power, D-sub, into projector. 2. All steps must appear. 11. Timing: 1024*768 @60Hz (XGA) 1280*800 @60Hz (for H6510BD...
...,240,240) and a near black color(16,16,16)} 5. Press "Calibration RGB" to let the black level to just max. 10. Calibrate Dsub_1 only .( Dsub_2 follows Dsub_1 ) 110 3. Set Factory values to default. 7. Check the 32 levels of white level to ...just distinguish, and the light output of gray. Enter factory mode. 8. Connect power, D-sub, into projector. 2. All steps must appear. 11. Timing: 1024*768 @60Hz (XGA) 1280*800 @60Hz (for H6510BD...
Acer Projector H6510BD, P1340W, X1140, X1240 Service Guide
Page 111
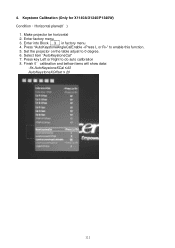
Keystone Calibration (Only for X1140A/X1240/P1340W) Condition:Horizontal plane(0∘) 1. Finish 0∘calibration and bellow items will show data: -5≤ AutoKeystoneXCal ≤43 AutoKeystoneXOffset ≤ 20 111 Enter factory menu 3. Set the projector on the table adjust to enable this function. 5. Enter into Block 3 in factory menu 4. 4. Make projector be horizontal 2. Select item "AutoKeystoneCal" 7. Press "AutoKeystoneAngleCalEnable " to 0 degree. 6. Press key Left or Right to do auto calibration 8.
Keystone Calibration (Only for X1140A/X1240/P1340W) Condition:Horizontal plane(0∘) 1. Finish 0∘calibration and bellow items will show data: -5≤ AutoKeystoneXCal ≤43 AutoKeystoneXOffset ≤ 20 111 Enter factory menu 3. Set the projector on the table adjust to enable this function. 5. Enter into Block 3 in factory menu 4. 4. Make projector be horizontal 2. Select item "AutoKeystoneCal" 7. Press "AutoKeystoneAngleCalEnable " to 0 degree. 6. Press key Left or Right to do auto calibration 8.
User Manual
Page 29
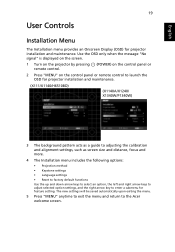
...control panel or remote control to launch the OSD for projector installation and maintenance. (X111/X1140/H6510BD) (X1140A/X1240/ X1340W/P1340W) 3 The background pattern acts as a guide to adjusting the calibration and alignment settings, such as screen size and distance, focus and more. 4 The Installation menu includes the ...up and down arrow keys to select an option, the left and right arrow keys to adjust selected option settings, and the right arrow key to the Acer welcome screen. English 19 User Controls Installation Menu The Installation menu provides an Onscreen Display (OSD) for ...
...control panel or remote control to launch the OSD for projector installation and maintenance. (X111/X1140/H6510BD) (X1140A/X1240/ X1340W/P1340W) 3 The background pattern acts as a guide to adjusting the calibration and alignment settings, such as screen size and distance, focus and more. 4 The Installation menu includes the ...up and down arrow keys to select an option, the left and right arrow keys to adjust selected option settings, and the right arrow key to the Acer welcome screen. English 19 User Controls Installation Menu The Installation menu provides an Onscreen Display (OSD) for ...


