User Manual
Page 3
... switching the image, when the same image is recovered slowly by changing the image or turning off the power switch and then turn it on again to make sure the flicker disappears. • You may flicker during initial use . • The LCD screen has 99.99% or more effective pixels. Cleaning your safety and comfort Safety instructions Read these guidelines when cleaning the monitor: • Always unplug the monitor before cleaning. • Use...
... switching the image, when the same image is recovered slowly by changing the image or turning off the power switch and then turn it on again to make sure the flicker disappears. • You may flicker during initial use . • The LCD screen has 99.99% or more effective pixels. Cleaning your safety and comfort Safety instructions Read these guidelines when cleaning the monitor: • Always unplug the monitor before cleaning. • Use...
User Manual
Page 4
... these instructions. • Gradually increase the volume until you . iv Accessibility Be sure that the power outlet you need to disconnect power from the type of power indicated on the marking label. When you plug the power cord into ...uses one of the following power supplies: Manufacturer: Delta Electronics Inc., Model: ADP-40PH BB Manufacturer: TPV Electronics ( Fujian)CO.,LTD, Model: ADPC1940 Using electrical power • This product should never be operated from the equipment, be blocked or covered. The openings should be blocked by placing the product on the power cord...
... these instructions. • Gradually increase the volume until you . iv Accessibility Be sure that the power outlet you need to disconnect power from the type of power indicated on the marking label. When you plug the power cord into ...uses one of the following power supplies: Manufacturer: Delta Electronics Inc., Model: ADP-40PH BB Manufacturer: TPV Electronics ( Fujian)CO.,LTD, Model: ADPC1940 Using electrical power • This product should never be operated from the equipment, be blocked or covered. The openings should be blocked by placing the product on the power cord...
User Manual
Page 5
... also provides good protection from the wall outlet and refer servicing to qualified service personnel when: • the power cord or plug is not properly grounded may expose you need for details. If power strips are used, the load should not exceed 80% of the power strip's input rating. • This product's power cord is equipped with the supplied power supply cord set , make sure that is damaged, cut or...
... also provides good protection from the wall outlet and refer servicing to qualified service personnel when: • the power cord or plug is not properly grounded may expose you need for details. If power strips are used, the load should not exceed 80% of the power strip's input rating. • This product's power cord is equipped with the supplied power supply cord set , make sure that is damaged, cut or...
User Manual
Page 6
... Electrical and Electronics Equipment (WEEE) regulations, visit http://www.acer-group.com/public/Sustainability/sustainability01.htm Switch off your device in damage and will often require extensive work by the operating instructions, since improper adjustment of used equipment, as grain, dust or metal powders. chemical plants; Keep them out of the reach of the global environment, please...
... Electrical and Electronics Equipment (WEEE) regulations, visit http://www.acer-group.com/public/Sustainability/sustainability01.htm Switch off your device in damage and will often require extensive work by the operating instructions, since improper adjustment of used equipment, as grain, dust or metal powders. chemical plants; Keep them out of the reach of the global environment, please...
User Manual
Page 7
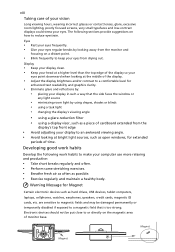
.... Users are also at risk of the monitor, using a footrest, or raising your comfort zone by pushing the power button. The following tips: • refrain from Sleep mode by adjusting the viewing angle of physical injury after prolonged use , consult a physician immediately and inform your leg muscles Finding your comfort zone Find your sitting height to remove the strain on the recorded image...
.... Users are also at risk of the monitor, using a footrest, or raising your comfort zone by pushing the power button. The following tips: • refrain from Sleep mode by adjusting the viewing angle of physical injury after prolonged use , consult a physician immediately and inform your leg muscles Finding your comfort zone Find your sitting height to remove the strain on the recorded image...
User Manual
Page 8
... lighting, poorly focused screens, very small typefaces and low-contrast displays could stress your eyes from the display's top front edge • Avoid adjusting your eyes regular breaks by using drapes, shades or blinds • using a task light • changing the display's viewing angle • using a glare-reduction filter • using a display visor, such as hard drives, USB devices, tablet computers, laptops, cellphones, watches, earphones, speakers, credit cards...
... lighting, poorly focused screens, very small typefaces and low-contrast displays could stress your eyes from the display's top front edge • Avoid adjusting your eyes regular breaks by using drapes, shades or blinds • using a task light • changing the display's viewing angle • using a glare-reduction filter • using a display visor, such as hard drives, USB devices, tablet computers, laptops, cellphones, watches, earphones, speakers, credit cards...
User Manual
Page 9
TABLE OF CONTENTS UNPACKING 1 ATTACHING / REMOVING THE BASE 2 SCREEN POSITION ADJUSTMENT 2 CONNECTING THE POWER CORD 3 SAFETY PRECAUTION 3 CLEANING YOUR MONITOR 3 POWER SAVING 4 DDC...4 CONNECTOR PIN ASSIGNMENT 5 STANDARD TIMING TABLE 7 INSTALLATION 8 USER CONTROLS 10 TROUBLESHOOTING 16
TABLE OF CONTENTS UNPACKING 1 ATTACHING / REMOVING THE BASE 2 SCREEN POSITION ADJUSTMENT 2 CONNECTING THE POWER CORD 3 SAFETY PRECAUTION 3 CLEANING YOUR MONITOR 3 POWER SAVING 4 DDC...4 CONNECTOR PIN ASSIGNMENT 5 STANDARD TIMING TABLE 7 INSTALLATION 8 USER CONTROLS 10 TROUBLESHOOTING 16
User Manual
Page 10
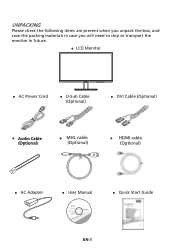
...; Register your product WWW.acer.com z Quick Start Guide H236HL/H226HQL EN-1 All rights reserved. UNPACKING Please check the following items are present when you unpack the box, and save the packing materials in case you will need to ship or transport the monitor in future. z LCD Monitor z AC Power Cord z D-Sub Cable (Optional) z DVI Cable (Optional) z Audio Cable (Optional) z MHL cable (Optional) MHL z HDMI cable (Optional) z AC Adapter z User Manual ©2012, Acer Inc.
...; Register your product WWW.acer.com z Quick Start Guide H236HL/H226HQL EN-1 All rights reserved. UNPACKING Please check the following items are present when you unpack the box, and save the packing materials in case you will need to ship or transport the monitor in future. z LCD Monitor z AC Power Cord z D-Sub Cable (Optional) z DVI Cable (Optional) z Audio Cable (Optional) z MHL cable (Optional) MHL z HDMI cable (Optional) z AC Adapter z User Manual ©2012, Acer Inc.
User Manual
Page 11
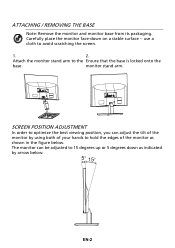
... monitor stand arm to avoid scratching the screen. 1. 2. SCREEN POSITION ADJUSTMENT In order to optimize the best viewing position, you can be adjusted to hold the edges of the monitor as indicated by using both of your hands to 15 degrees up or 5 degrees down on a stable surface -- EN-2 monitor stand arm. The monitor can adjust the tilt of the monitor by arrow below . ATTACHING / REMOVING THE BASE Note: Remove the monitor and monitor base...
... monitor stand arm to avoid scratching the screen. 1. 2. SCREEN POSITION ADJUSTMENT In order to optimize the best viewing position, you can be adjusted to hold the edges of the monitor as indicated by using both of your hands to 15 degrees up or 5 degrees down on a stable surface -- EN-2 monitor stand arm. The monitor can adjust the tilt of the monitor by arrow below . ATTACHING / REMOVING THE BASE Note: Remove the monitor and monitor base...
User Manual
Page 12
... when transporting the monitor. z Use a soft cloth to the cable. z Plug one end of the monitor. z For unit using at 120 V AC: Use a UL Listed Cord Set, Type SVT wire and plug rated 10 A/125 V. z Do not cover the ventilation slots or openings of the AC power cord to the adapter, and plug the other light sources may reflect on the power cord to avoid damage to wipe the screen and cabinet...
... when transporting the monitor. z Use a soft cloth to the cable. z Plug one end of the monitor. z For unit using at 120 V AC: Use a UL Listed Cord Set, Type SVT wire and plug rated 10 A/125 V. z Do not cover the ventilation slots or openings of the AC power cord to the adapter, and plug the other light sources may reflect on the power cord to avoid damage to wipe the screen and cabinet...
User Manual
Page 13
...) is around 3 seconds. The monitor supports DDC2B standard. The recovery time from the display controller, as indicated by the amber-color power LED. POWER SAVING The monitor will be driven into Power Saving" mode by the control signal from Active OFF state back to Plug and Play with your system if your system also supports DDC protocol. EN-4 DDC To make your installation easier, the monitor is able to ON...
...) is around 3 seconds. The monitor supports DDC2B standard. The recovery time from the display controller, as indicated by the amber-color power LED. POWER SAVING The monitor will be driven into Power Saving" mode by the control signal from Active OFF state back to Plug and Play with your system if your system also supports DDC protocol. EN-4 DDC To make your installation easier, the monitor is able to ON...
User Manual
Page 14
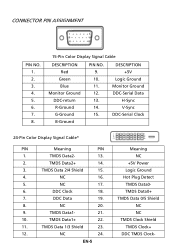
... Shield 15. 4. DDC Clock 18. 7. NC 17. 6. EN-5 Meaning NC +5V Power Logic Ground Hot Plug Detect TMDS Data0TMDS Data0+ TMDS Data 0/5 Shield NC NC TMDS Clock Shield TMDS Clock+ DDC .... 10. TMDS Data2- 13. 2. CONNECTOR PIN ASSIGNMENT PIN NO. 1. 2. 3. 4. 5. 6. 7. 8. 15-Pin Color Display Signal Cable DESCRIPTION Red Green Blue Monitor Ground DDC-return R-Ground G-Ground B-Ground PIN NO. 9. 10. 11. 12. 13. 14. 15. DESCRIPTION +5V Logic Ground Monitor Ground DDC-Serial Data H-Sync V-Sync DDC-Serial Clock 24-Pin Color Display Signal Cable* PIN Meaning PIN 1.
... Shield 15. 4. DDC Clock 18. 7. NC 17. 6. EN-5 Meaning NC +5V Power Logic Ground Hot Plug Detect TMDS Data0TMDS Data0+ TMDS Data 0/5 Shield NC NC TMDS Clock Shield TMDS Clock+ DDC .... 10. TMDS Data2- 13. 2. CONNECTOR PIN ASSIGNMENT PIN NO. 1. 2. 3. 4. 5. 6. 7. 8. 15-Pin Color Display Signal Cable DESCRIPTION Red Green Blue Monitor Ground DDC-return R-Ground G-Ground B-Ground PIN NO. 9. 10. 11. 12. 13. 14. 15. DESCRIPTION +5V Logic Ground Monitor Ground DDC-Serial Data H-Sync V-Sync DDC-Serial Clock 24-Pin Color Display Signal Cable* PIN Meaning PIN 1.
User Manual
Page 17
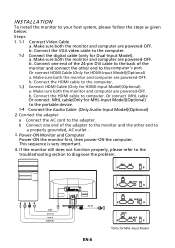
... VGA video cable to diagnose the problem. Connect the HDMI cable to a properly grounded, AC outlet . 3. b Connect one end of the 24-pin DVI cable to the back of the adapter to the monitor and the other end to the portable device. 1-4 Connect the Audio Cable (Only Audio-Input Model)(Optional) 2. Connect a. Connect one end of the monitor and connect the other end to computer. b. b. Or connect MHL cable Or connect MHL cable(Only for HDMI-Input Model)(Optional) a. INSTALLATION...
... VGA video cable to diagnose the problem. Connect the HDMI cable to a properly grounded, AC outlet . 3. b Connect one end of the 24-pin DVI cable to the back of the adapter to the monitor and the other end to the portable device. 1-4 Connect the Audio Cable (Only Audio-Input Model)(Optional) 2. Connect a. Connect one end of the monitor and connect the other end to computer. b. b. Or connect MHL cable Or connect MHL cable(Only for HDMI-Input Model)(Optional) a. INSTALLATION...
User Manual
Page 18
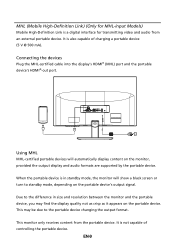
... display's HDMI® (MHL) port and the portable device's HDMI®-out port. When the portable device is also capable of controlling the portable device. It is a digital interface for MHL-input Models) Mobile High-Definition Link is not capable of charging a portable device (5 V @ 500 mA). MHL Using MHL MHL-certified portable devices will show a black screen or turn to the portable device changing...
... display's HDMI® (MHL) port and the portable device's HDMI®-out port. When the portable device is also capable of controlling the portable device. It is a digital interface for MHL-input Models) Mobile High-Definition Link is not capable of charging a portable device (5 V @ 500 mA). MHL Using MHL MHL-certified portable devices will show a black screen or turn to the portable device changing...
User Manual
Page 19
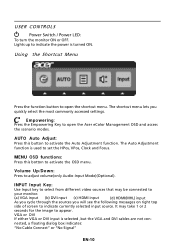
... be connected to appear. USER CONTROLS Power Switch / Power LED: To turn the monitor ON or OFF. Using the Shortcut Menu Press the function button to activate the Auto Adjustment function. MENU OSD functions: Press this button to open the Acer eColor Management OSD and access the scenario modes. VGA or DVI If either VGA or DVI input is turned ON. nected, a floating dialog box indicates: "No Cable Connect" or "No Signal" EN-10 The Auto Adjustment function is used to adjust volume(only Audio-Input Mode)(Optional...
... be connected to appear. USER CONTROLS Power Switch / Power LED: To turn the monitor ON or OFF. Using the Shortcut Menu Press the function button to activate the Auto Adjustment function. MENU OSD functions: Press this button to open the Acer eColor Management OSD and access the scenario modes. VGA or DVI If either VGA or DVI input is turned ON. nected, a floating dialog box indicates: "No Cable Connect" or "No Signal" EN-10 The Auto Adjustment function is used to adjust volume(only Audio-Input Mode)(Optional...

User Manual
Page 20
... Main Sub Menu Sub Menu Menu icon icon item Description N/A User mode User defined. Acer eColor Management Operation instructions Step 1: Press " " Key to open the Acer eColor Management OSD and access the scenario modes Step 2: Press "W" or "X" to select the mode Step 3: Press " AUTO " Key to reduce power consumption. Settings can be fine-tuned to suit any situation N/A ECO mode Adjusts the settings to confirm the mode and run Auto Adjust. Pictures and...
... Main Sub Menu Sub Menu Menu icon icon item Description N/A User mode User defined. Acer eColor Management Operation instructions Step 1: Press " " Key to open the Acer eColor Management OSD and access the scenario modes Step 2: Press "W" or "X" to select the mode Step 3: Press " AUTO " Key to reduce power consumption. Settings can be fine-tuned to suit any situation N/A ECO mode Adjusts the settings to confirm the mode and run Auto Adjust. Pictures and...
User Manual
Page 21
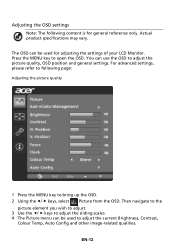
... be used to adjust the picture quality, OSD position and general settings. Then navigate to the picture element you wish to adjust. 3 Use the e/ f keys to adjust the sliding scales. 4 The Picture menu can use the OSD to adjust the current Brightness, Contrast, Colour Temp, Auto Config and other image-related qualities. Press the MENU key to bring up the OSD. 2 Using the e/ f keys, select Picture from the OSD. EN-12 The OSD can be used...
... be used to adjust the picture quality, OSD position and general settings. Then navigate to the picture element you wish to adjust. 3 Use the e/ f keys to adjust the sliding scales. 4 The Picture menu can use the OSD to adjust the current Brightness, Contrast, Colour Temp, Auto Config and other image-related qualities. Press the MENU key to bring up the OSD. 2 Using the e/ f keys, select Picture from the OSD. EN-12 The OSD can be used...

User Manual
Page 23
Adjusting the setting 1 Press the MENU key to adjust the screen Menu Language and other important settings. EN-14 Then navigate to the feature you wish to adjust. 3 The Setting menu can be used to bring up the OSD. 2 Using the e/ f keys, select Setting from the OSD.
Adjusting the setting 1 Press the MENU key to adjust the screen Menu Language and other important settings. EN-14 Then navigate to the feature you wish to adjust. 3 The Setting menu can be used to bring up the OSD. 2 Using the e/ f keys, select Setting from the OSD.
User Manual
Page 25
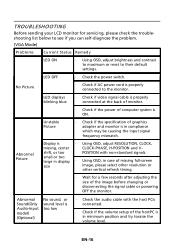
...; Using OSD, in minimum position and try toraise the volume level. Abnormal Picture Display is in compliance which may be causing the input signal frequency mismatch. Abnormal Sound(Only Audio-Input model) (Optional) No sound, or sound level is properly connected to their default settings. No Picture · Check if AC power cord is too low · Check the audio cable with non-standard signals. TROUBLESHOOTING Before sending your LCD monitor for a few seconds after adjusting the size of the image before changing...
...; Using OSD, in minimum position and try toraise the volume level. Abnormal Picture Display is in compliance which may be causing the input signal frequency mismatch. Abnormal Sound(Only Audio-Input model) (Optional) No sound, or sound level is properly connected to their default settings. No Picture · Check if AC power cord is too low · Check the audio cable with non-standard signals. TROUBLESHOOTING Before sending your LCD monitor for a few seconds after adjusting the size of the image before changing...

User Manual
Page 26
... volume setup of computer system is in minimum position and try toraise the volume level. (DVI/HDMI/MHL cable) Problems Current Status Remedy LED ON · Using OSD, adjust brightness and contrast to maximum or reset to the monitor. · Check if video signal cable is properly connected at the back of monitor. · Check if the power of the hostPC is ON. No Picture LED OFF LED displays blinking blue · Check the power switch. · Check if AC power cord is properly connected to their default settings...
... volume setup of computer system is in minimum position and try toraise the volume level. (DVI/HDMI/MHL cable) Problems Current Status Remedy LED ON · Using OSD, adjust brightness and contrast to maximum or reset to the monitor. · Check if video signal cable is properly connected at the back of monitor. · Check if the power of the hostPC is ON. No Picture LED OFF LED displays blinking blue · Check the power switch. · Check if AC power cord is properly connected to their default settings...


