

User Manual
Page 2
... in the space provided below. Acer LCD Monitor User Guide Model number Serial number Date of purchase Place of purchase Acer and the Acer logo are registered trademarks of this manual or supplementary documents and publications. All Rights Reserved. Acer LCD Monitor User Guide Original Issue: 03.../2014 Changes may be made periodically to the information in this publication may be incorporated in new editions of Acer Incorporated. This company makes no representations or ...
... in the space provided below. Acer LCD Monitor User Guide Model number Serial number Date of purchase Place of purchase Acer and the Acer logo are registered trademarks of this manual or supplementary documents and publications. All Rights Reserved. Acer LCD Monitor User Guide Original Issue: 03.../2014 Changes may be made periodically to the information in this publication may be incorporated in new editions of Acer Incorporated. This company makes no representations or ...

User Manual
Page 3
... the screen is displayed for a few hours. Cleaning your safety and comfort Safety instructions Read these guidelines when cleaning the monitor: • Always unplug the monitor before cleaning. • Use a soft cloth to wipe the screen and cabinet front and sides. iii Information for future... reference. Turn off the power switch for hours. In this document for your monitor Please carefully follow these instructions carefully. It may include blemishes of the fluorescent light, the screen may find slightly uneven brightness...
... the screen is displayed for a few hours. Cleaning your safety and comfort Safety instructions Read these guidelines when cleaning the monitor: • Always unplug the monitor before cleaning. • Use a soft cloth to wipe the screen and cabinet front and sides. iii Information for future... reference. Turn off the power switch for hours. In this document for your monitor Please carefully follow these instructions carefully. It may include blemishes of the fluorescent light, the screen may find slightly uneven brightness...

User Manual
Page 4
... is used for other similar surface. iv Accessibility Be sure that the power outlet you plug the power cord into is only used for this monitor ,do not be used with this product, make sure that could be seriously damaged. • Slots and openings are not sure of the type of...
... is used for other similar surface. iv Accessibility Be sure that the power outlet you plug the power cord into is only used for this monitor ,do not be used with this product, make sure that could be seriously damaged. • Slots and openings are not sure of the type of...
User Manual
Page 7
... any other recurring or persistent discomfort and/or pain related to carpal tunnel syndrome, tendonitis, tenosynovitis or other factors greatly increase the risk of the monitor, using a footrest, or raising your leg muscles Finding your comfort zone Find your company's health and safety department. The following symptoms may complain of eyestrain...
... any other recurring or persistent discomfort and/or pain related to carpal tunnel syndrome, tendonitis, tenosynovitis or other factors greatly increase the risk of the monitor, using a footrest, or raising your leg muscles Finding your comfort zone Find your company's health and safety department. The following symptoms may complain of eyestrain...

User Manual
Page 8
... clean. • Keep your head at a higher level than the top edge of the display so your eyes point downward when looking away from the monitor and focusing on how to make your eyes from the display's top front edge • Avoid adjusting your eyes. viii Taking care of your vision...
... clean. • Keep your head at a higher level than the top edge of the display so your eyes point downward when looking away from the monitor and focusing on how to make your eyes from the display's top front edge • Avoid adjusting your eyes. viii Taking care of your vision...

User Manual
Page 9
TABLE OF CONTENTS UNPACKING 1 ATTACHING / REMOVING THE BASE 2 SCREEN POSITION ADJUSTMENT 2 CONNECTING THE POWER CORD 3 SAFETY PRECAUTION 3 CLEANING YOUR MONITOR 3 POWER SAVING 4 DDC...4 CONNECTOR PIN ASSIGNMENT 5 STANDARD TIMING TABLE 8 INSTALLATION 10 MHL (Mobile High-Definition Link) (Only for MHL-input Models)... 11 USER CONTROLS 12 TROUBLESHOOTING 18
TABLE OF CONTENTS UNPACKING 1 ATTACHING / REMOVING THE BASE 2 SCREEN POSITION ADJUSTMENT 2 CONNECTING THE POWER CORD 3 SAFETY PRECAUTION 3 CLEANING YOUR MONITOR 3 POWER SAVING 4 DDC...4 CONNECTOR PIN ASSIGNMENT 5 STANDARD TIMING TABLE 8 INSTALLATION 10 MHL (Mobile High-Definition Link) (Only for MHL-input Models)... 11 USER CONTROLS 12 TROUBLESHOOTING 18

User Manual
Page 10
UNPACKING Please check the following items are present when you unpack the box, and save the packing materials in case you will need to ship or transport the monitor in future. LCD Monitor Quick Start Guide Audio Cable (Optional) AC Power Cord AC Adapter D-Sub Cable (Optional) DVI Cable (Optional) HDMI Cable (Optional) MHL Cable (Optional) EN-1
UNPACKING Please check the following items are present when you unpack the box, and save the packing materials in case you will need to ship or transport the monitor in future. LCD Monitor Quick Start Guide Audio Cable (Optional) AC Power Cord AC Adapter D-Sub Cable (Optional) DVI Cable (Optional) HDMI Cable (Optional) MHL Cable (Optional) EN-1

User Manual
Page 11
... Note: Remove the monitor and monitor base from its packaging. Attach the monitor stand arm to avoid scratching the screen. 1. 2. The monitor can adjust the tilt of the monitor as shown in the figure below . use a cloth to the Ensure that the base is locked onto the base. monitor stand arm. Carefully... place the monitor face-down as indicated by using both of your hands to 15 degrees up or 5 degrees down on a stable surface -- SCREEN ...
... Note: Remove the monitor and monitor base from its packaging. Attach the monitor stand arm to avoid scratching the screen. 1. 2. The monitor can adjust the tilt of the monitor as shown in the figure below . use a cloth to the Ensure that the base is locked onto the base. monitor stand arm. Carefully... place the monitor face-down as indicated by using both of your hands to 15 degrees up or 5 degrees down on a stable surface -- SCREEN ...

User Manual
Page 12
...to the screen, as screen is fragile. No user-adjustment is required. Plug one end of the monitor. Place the monitor just below guidelines when cleaning the monitor. Always unplug the monitor before cleaning. Use a soft cloth to make sure that allows operation in which the equipment will ...be installed. CONNECTING THE POWER CORD Check first to wipe the screen and cabinet front and sides. Always put the monitor in a place where there is the correct type required for the country in either 100/120V AC or 220/240 V AC voltage area. ...
...to the screen, as screen is fragile. No user-adjustment is required. Plug one end of the monitor. Place the monitor just below guidelines when cleaning the monitor. Always unplug the monitor before cleaning. Use a soft cloth to make sure that allows operation in which the equipment will ...be installed. CONNECTING THE POWER CORD Check first to wipe the screen and cabinet front and sides. Always put the monitor in a place where there is the correct type required for the country in either 100/120V AC or 220/240 V AC voltage area. ...

User Manual
Page 13
...the display controller, as indicated by the amber-color power LED. DDC To make your system also supports DDC protocol. The monitor supports DDC2B standard. POWER SAVING The monitor will be driven into "Power Saving" mode by the control signal from Active OFF state back to Plug and Play with your... system if your installation easier, the monitor is able to ON state is around 3 seconds. The DDC (Display Data Channel) is activated. EN-4 State ON Power Saving Mode LED Light ...
...the display controller, as indicated by the amber-color power LED. DDC To make your system also supports DDC protocol. The monitor supports DDC2B standard. POWER SAVING The monitor will be driven into "Power Saving" mode by the control signal from Active OFF state back to Plug and Play with your... system if your installation easier, the monitor is able to ON state is around 3 seconds. The DDC (Display Data Channel) is activated. EN-4 State ON Power Saving Mode LED Light ...

User Manual
Page 14
DESCRIPTION +5V Logic Ground Monitor Ground DDC-Serial Data H-Sync V-Sync DDC-Serial Clock EN-5 CONNECTOR PIN ASSIGNMENT 15-Pin Color Display Signal Cable PIN NO. 1. 2. 3. 4. 5. 6. 7. 8. DESCRIPTION Red Green Blue Monitor Ground DDC-return R-Ground G-Ground B-Ground PIN NO. 9. 10. 11. 12. 13. 14. 15.
DESCRIPTION +5V Logic Ground Monitor Ground DDC-Serial Data H-Sync V-Sync DDC-Serial Clock EN-5 CONNECTOR PIN ASSIGNMENT 15-Pin Color Display Signal Cable PIN NO. 1. 2. 3. 4. 5. 6. 7. 8. DESCRIPTION Red Green Blue Monitor Ground DDC-return R-Ground G-Ground B-Ground PIN NO. 9. 10. 11. 12. 13. 14. 15.

User Manual
Page 19
...-D IN VGA IN DC D-Sub DVI HDMI DC IN AUDIO-IN HDMI DVI D-Sub DC IN HDMI DVI D-Sub 2 EN-10 Make sure both the monitor and computer are powered-OFF. Or connect the MHL cable (Only for MHL-Input Model)(Optional) to the computer. 1-2 Connect Digital Cable (Only Dual-input...'s port. 1-3 Connect HDMI Cable (Only HDMI-input model) a. Connect one end of the 24-pin DVI cable to the back of the adapter to the monitor and the other end to a properly grounded, AC outlet. 4. Connect the VGA video cable to the portable device. 2. Connect the AC cord to your host...
...-D IN VGA IN DC D-Sub DVI HDMI DC IN AUDIO-IN HDMI DVI D-Sub DC IN HDMI DVI D-Sub 2 EN-10 Make sure both the monitor and computer are powered-OFF. Or connect the MHL cable (Only for MHL-Input Model)(Optional) to the computer. 1-2 Connect Digital Cable (Only Dual-input...'s port. 1-3 Connect HDMI Cable (Only HDMI-input model) a. Connect one end of the 24-pin DVI cable to the back of the adapter to the monitor and the other end to a properly grounded, AC outlet. 4. Connect the VGA video cable to the portable device. 2. Connect the AC cord to your host...

User Manual
Page 20
...a digital interface for transmitting video and audio from the portable device. This may find the display quality not as crisp as it appears on the monitor, provided the output display and audio formats are supported by the portable device. It is not capable of charging a portable device (5 V @ 500...VGA IN MHL DC MHL Using MHL MHL-certified portable devices will show a black screen or turn to the difference in standby mode, the monitor will automatically display content on the portable device. MHL (Mobile High-Definition Link) (Only for MHL-input Models) Mobile High-Definition Link is...
...a digital interface for transmitting video and audio from the portable device. This may find the display quality not as crisp as it appears on the monitor, provided the output display and audio formats are supported by the portable device. It is not capable of charging a portable device (5 V @ 500...VGA IN MHL DC MHL Using MHL MHL-certified portable devices will show a black screen or turn to the difference in standby mode, the monitor will automatically display content on the portable device. MHL (Mobile High-Definition Link) (Only for MHL-input Models) Mobile High-Definition Link is...

User Manual
Page 21
The Auto Adjustment function is active, press the Minus or Plus buttons to open the Acer eColor Management OSD and access the scenario modes. MENU OSD functions Press this button to activate the Auto Adjustment function. EN-12 Lights up to ... the OSD menu. Empowering: Press the Empowering Key to toggle between the OSD options. USER CONTROLS Base Controls Power Switch / Power LED: To turn the monitor ON or OFF. AUTO Auto Adjust: Press this button to set the HPos, VPos, Clock and Focus.
The Auto Adjustment function is active, press the Minus or Plus buttons to open the Acer eColor Management OSD and access the scenario modes. MENU OSD functions Press this button to activate the Auto Adjustment function. EN-12 Lights up to ... the OSD menu. Empowering: Press the Empowering Key to toggle between the OSD options. USER CONTROLS Base Controls Power Switch / Power LED: To turn the monitor ON or OFF. AUTO Auto Adjust: Press this button to set the HPos, VPos, Clock and Focus.

User Manual
Page 23
... adjust the picture quality, OSD position and general settings. For advanced settings, please refer to following content is for adjusting the settings of your LCD Monitor. Actual product specifications may vary. EN-14 You can be used for general reference only. Then navigate to the picture element you wish to adjust...
... adjust the picture quality, OSD position and general settings. For advanced settings, please refer to following content is for adjusting the settings of your LCD Monitor. Actual product specifications may vary. EN-14 You can be used for general reference only. Then navigate to the picture element you wish to adjust...

User Manual
Page 26
Then the basic information of LCD monitor will show up the OSD. 2 Using the / keys, select Information from the OSD. EN-17 Product information 1 Press the MENU key to bring up for current input.
Then the basic information of LCD monitor will show up the OSD. 2 Using the / keys, select Information from the OSD. EN-17 Product information 1 Press the MENU key to bring up for current input.
User Manual
Page 27
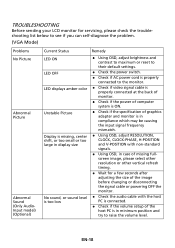
...default settings. Check the power switch. Check if AC power cord is properly connected to the monitor. Check if video signal cable is properly connected at the back of monitor. Check if the power of computer system is ON. Check if the specification of graphics ...refresh timing. Wait for a few seconds after adjusting the size of the image before changing or disconnecting the signal cable or powering OFF the monitor. Check the audio cable with the host PC is connected. Check if the volume setup of the host PC is in minimum...
...default settings. Check the power switch. Check if AC power cord is properly connected to the monitor. Check if video signal cable is properly connected at the back of monitor. Check if the power of computer system is ON. Check if the specification of graphics ...refresh timing. Wait for a few seconds after adjusting the size of the image before changing or disconnecting the signal cable or powering OFF the monitor. Check the audio cable with the host PC is connected. Check if the volume setup of the host PC is in minimum...

User Manual
Page 28
... try to raise the volume level. EN-19 LED displays amber color Check if video signal cable is properly connected at the back of monitor. Check if the power of the host PC is ON. LED OFF Check the power switch. Check if AC power cord is... Abnormal Sound (Only Audio-Input model) (Optional) Current Status Remedy LED ON Using OSD, adjust brightness and contrast to maximum or reset to the monitor.
... try to raise the volume level. EN-19 LED displays amber color Check if video signal cable is properly connected at the back of monitor. Check if the power of the host PC is ON. LED OFF Check the power switch. Check if AC power cord is... Abnormal Sound (Only Audio-Input model) (Optional) Current Status Remedy LED ON Using OSD, adjust brightness and contrast to maximum or reset to the monitor.

User Manual
Page 30
... any interference received, including interference that may not cause harmful interference, and (2) this declaration: Product: LCD Monitor Model Number: G247HL SKU Number: G247HL xxxxxx ("x" = 0~9, a ~ z, or A ~ Z) Name of Responsible Party: Address of the FCC Rules. Suite 1500 San Jose, CA 95110 U. S. Acer America Corporation 333 West San Carlos St., Suite 1500 San Jose, CA 95110 U. S.
... any interference received, including interference that may not cause harmful interference, and (2) this declaration: Product: LCD Monitor Model Number: G247HL SKU Number: G247HL xxxxxx ("x" = 0~9, a ~ z, or A ~ Z) Name of Responsible Party: Address of the FCC Rules. Suite 1500 San Jose, CA 95110 U. S. Acer America Corporation 333 West San Carlos St., Suite 1500 San Jose, CA 95110 U. S.

User Manual
Page 31
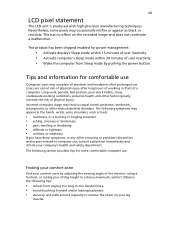
...http:// www.energystar.gov/powermangement Acer ENERGY STAR qualified products: • Produce less heat and reduce cooling loads, and warmer climates. • Automatically go into "display sleep" and "computer sleep" mode after 15 and 30 minute of inactivity respectively. • Wake the monitor when it is ENERGY STAR?... guidelines set by reducing energy costs and helps protect the environment without sacrificing features or performance. 㕐 ENERGY STAR® Acer's ENERGY STAR qualified products save through energy efficiency, the more we can save you money by the U.S.
...http:// www.energystar.gov/powermangement Acer ENERGY STAR qualified products: • Produce less heat and reduce cooling loads, and warmer climates. • Automatically go into "display sleep" and "computer sleep" mode after 15 and 30 minute of inactivity respectively. • Wake the monitor when it is ENERGY STAR?... guidelines set by reducing energy costs and helps protect the environment without sacrificing features or performance. 㕐 ENERGY STAR® Acer's ENERGY STAR qualified products save through energy efficiency, the more we can save you money by the U.S.


