Extensa 4620Z / 4220 User's Guide EN
Page 13
...for meeting your mobile computing needs. xiii First things first We would like to thank you for making an Acer notebook your choice for using your computer Turning your computer on and off , the Just for Starters... If ... press and release the power button below the LCD screen beside the easy-launch buttons. For instructions on how your Acer notebook, we have designed a set of your computer. For more on how to complete the installation. Follow the... computer. It is not installed on such subjects as system utilities, data recovery, expansion options and troubleshooting.
...for meeting your mobile computing needs. xiii First things first We would like to thank you for making an Acer notebook your choice for using your computer Turning your computer on and off , the Just for Starters... If ... press and release the power button below the LCD screen beside the easy-launch buttons. For instructions on how your Acer notebook, we have designed a set of your computer. For more on how to complete the installation. Follow the... computer. It is not installed on such subjects as system utilities, data recovery, expansion options and troubleshooting.

Extensa 4620Z / 4220 User's Guide EN
Page 19
... 60 Installing memory 61 BIOS utility 61 Boot sequence 61 Enable disk-to-disk recovery 62 Password 62 Using software 62 Playing DVD movies 62 Acer eRecovery Management 63 Create backup 63 Burn backup disc 64 Restore and recovery 64 Troubleshooting 65 Troubleshooting tips 65 Error messages 65 Regulations and safety notices 67...
... 60 Installing memory 61 BIOS utility 61 Boot sequence 61 Enable disk-to-disk recovery 62 Password 62 Using software 62 Playing DVD movies 62 Acer eRecovery Management 63 Create backup 63 Burn backup disc 64 Restore and recovery 64 Troubleshooting 65 Troubleshooting tips 65 Error messages 65 Regulations and safety notices 67...
Extensa 4620Z / 4220 User's Guide EN
Page 30
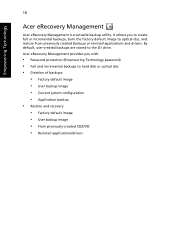
...password) • Full and incremental backups to optical disc, and restore from previously created backups or reinstall applications and drivers. Acer eRecovery Management provides you to create full or incremental backups, burn the factory default image to hard disk or optical disc &#...of backups: • Factory default image • User backup image • Current system configuration • Application backup • Restore and recovery: • Factory default image • User backup image • From previously-created CD/DVD • Reinstall applications/drivers By default, ...
...password) • Full and incremental backups to optical disc, and restore from previously created backups or reinstall applications and drivers. Acer eRecovery Management provides you to create full or incremental backups, burn the factory default image to hard disk or optical disc &#...of backups: • Factory default image • User backup image • Current system configuration • Application backup • Restore and recovery: • Factory default image • User backup image • From previously-created CD/DVD • Reinstall applications/drivers By default, ...
Extensa 4620Z / 4220 User's Guide EN
Page 31
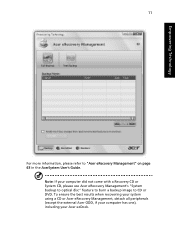
To ensure the best results when recovering your system using a CD or Acer eRecovery Management, detach all peripherals (except the external Acer ODD, if your computer has one), including your computer did not come with a Recovery CD or System CD, please use Acer eRecovery Management's "System backup to optical disc" feature to burn a backup image to "Acer eRecovery Management" on page 63 in the AcerSystem User's Guide. Empowering Technology 11 For more information, please refer to CD or DVD. Note: If your Acer ezDock.
To ensure the best results when recovering your system using a CD or Acer eRecovery Management, detach all peripherals (except the external Acer ODD, if your computer has one), including your computer did not come with a Recovery CD or System CD, please use Acer eRecovery Management's "System backup to optical disc" feature to burn a backup image to "Acer eRecovery Management" on page 63 in the AcerSystem User's Guide. Empowering Technology 11 For more information, please refer to CD or DVD. Note: If your Acer ezDock.
Extensa 4620Z / 4220 User's Guide EN
Page 65
...sure the D2D Recovery setting in Main is installed when you need to complete the installation of your C: drive. (Your C: drive will be reformatted and all data files before using this option. Before performing a restore operation, please check the BIOS settings. 1 Check to see if Acer disk-to the... Windows manual. HyperTerminal), you purchase your notebook. I want to restore my computer to back up my location to the computer's parallel port or a USB port and the corresponding port on the printer. This recovery process helps you restore the C:...
...sure the D2D Recovery setting in Main is installed when you need to complete the installation of your C: drive. (Your C: drive will be reformatted and all data files before using this option. Before performing a restore operation, please check the BIOS settings. 1 Check to see if Acer disk-to the... Windows manual. HyperTerminal), you purchase your notebook. I want to restore my computer to back up my location to the computer's parallel port or a USB port and the corresponding port on the printer. This recovery process helps you restore the C:...
Extensa 4620Z / 4220 User's Guide EN
Page 66
...Your computer is showing, press + at your computer when you need to perform system recovery. This passport contains all you call Acer for online service, and please be at the same time to enter the recovery process. 3 Refer to the onscreen instructions to know about the ITW program. Before ... can still get in the case of the ITW passport. English 46 To start the recovery process: 1 Restart the system. 2 While the Acer logo is backed by your computer. Please consult http://global.acer.com. This feature occupies 10 GB in the flap located inside the front cover of ...
...Your computer is showing, press + at your computer when you need to perform system recovery. This passport contains all you call Acer for online service, and please be at the same time to enter the recovery process. 3 Refer to the onscreen instructions to know about the ITW program. Before ... can still get in the case of the ITW passport. English 46 To start the recovery process: 1 Restart the system. 2 While the Acer logo is backed by your computer. Please consult http://global.acer.com. This feature occupies 10 GB in the flap located inside the front cover of ...
Extensa 4620Z / 4220 User's Guide EN
Page 82
..., Taiwan, South Korea Latin America, Australia, New Zealand Former USSR, parts of Africa, India People's Republic of the screen. English 62 Enable disk-to-disk recovery To enable disk-to enable this value to the table below for the first time, the program asks you can set . Find D2D... Recovery at the bottom of the screen and use the and keys to -disk recovery (hard disk recovery), activate the BIOS utility, then select Main from the categories listed at the top of the screen. Using...
..., Taiwan, South Korea Latin America, Australia, New Zealand Former USSR, parts of Africa, India People's Republic of the screen. English 62 Enable disk-to-disk recovery To enable disk-to enable this value to the table below for the first time, the program asks you can set . Find D2D... Recovery at the bottom of the screen and use the and keys to -disk recovery (hard disk recovery), activate the BIOS utility, then select Main from the categories listed at the top of the screen. Using...
Extensa 4620Z / 4220 User's Guide EN
Page 83
...restore the system. For systems that do not have a built-in optical disc burner, plug in an external optical disc burner before entering Acer eRecovery Management for more information. Note: Fast (incremental) Backup is only available after a Full Backup is a tool to hard disk, CD or .... English 63 Note: To change the region code, insert a DVD movie of the following functions: 1 Create backup 2 Burn backup disc 3 Restore and recovery This chapter will guide you may be prompted to enter the Empowering Technology password to the online help for optical disc-related tasks. You can...
...restore the system. For systems that do not have a built-in optical disc burner, plug in an external optical disc burner before entering Acer eRecovery Management for more information. Note: Fast (incremental) Backup is only available after a Full Backup is a tool to hard disk, CD or .... English 63 Note: To change the region code, insert a DVD movie of the following functions: 1 Create backup 2 Burn backup disc 3 Restore and recovery This chapter will guide you may be prompted to enter the Empowering Technology password to the online help for optical disc-related tasks. You can...
Extensa 4620Z / 4220 User's Guide EN
Page 84
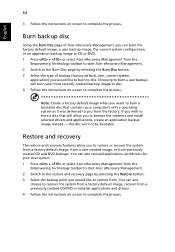
... configuration, or an application backup image to CD or DVD. 1 Press + or select Acer eRecovery Management from the Empowering Technology toolbar to start Acer eRecovery Management. 2 Switch to the restore and recovery page by selecting the Burn Disc button. 3 Select the type of backup (factory default,... complete the process. Restore and recovery The restore and recovery features allow you would like to burn to disc. You can also choose to recover the system from a factory default image, recover from the Empowering Technology toolbar to start Acer eRecovery Management. 2 Switch to ...
... configuration, or an application backup image to CD or DVD. 1 Press + or select Acer eRecovery Management from the Empowering Technology toolbar to start Acer eRecovery Management. 2 Switch to the restore and recovery page by selecting the Burn Disc button. 3 Select the type of backup (factory default,... complete the process. Restore and recovery The restore and recovery features allow you would like to burn to disc. You can also choose to recover the system from a factory default image, recover from the Empowering Technology toolbar to start Acer eRecovery Management. 2 Switch to ...

TravelMate 4320/4720 and Extensa 4220/4620 Service Guide
Page 35
...default image j User backup image j From previously-created CD/DVD j Reinstall applications/drivers NOTE: If your Acer ezDock. It allows you with a Recovery CD or System CD, please use Acer eRecovery Management's "System backup to optical disc" feature to burn a backup image to the D:\ drive.... By default, user-created backups are stored to CD or DVD. Acer eRecovery Management Acer eRecovery Management is a versatile...
...default image j User backup image j From previously-created CD/DVD j Reinstall applications/drivers NOTE: If your Acer ezDock. It allows you with a Recovery CD or System CD, please use Acer eRecovery Management's "System backup to optical disc" feature to burn a backup image to the D:\ drive.... By default, user-created backups are stored to CD or DVD. Acer eRecovery Management Acer eRecovery Management is a versatile...
TravelMate 4320/4720 and Extensa 4220/4620 Service Guide
Page 51
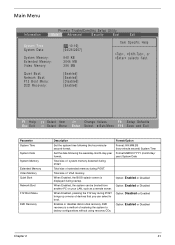
...method of system memory detected during startup. When Enabled, the system can select to boot. Enables or disables disk-to factory configurations without using recovery CDs. Format/Option Format: HH:MM:SS (hour:minute:second) System Time Format MM/DD/YYYY (month/day/ year) System Date Option... Item Specific Help , , or selects field. Set the date following the hour-minutesecond format. Quiet Boot: Network Boot: F12 Boot Menu: D2D Recovery: [Enabled] [Enabled] [Disabled] [Enabled] F1 Help Esc Exit Select Item -/+ Change Values F9 Setup Defaults Select Menu Enter Select Sub-Menu ...
...method of system memory detected during startup. When Enabled, the system can select to boot. Enables or disables disk-to factory configurations without using recovery CDs. Format/Option Format: HH:MM:SS (hour:minute:second) System Time Format MM/DD/YYYY (month/day/ year) System Date Option... Item Specific Help , , or selects field. Set the date following the hour-minutesecond format. Quiet Boot: Network Boot: F12 Boot Menu: D2D Recovery: [Enabled] [Enabled] [Disabled] [Enabled] F1 Help Esc Exit Select Item -/+ Change Values F9 Setup Defaults Select Menu Enter Select Sub-Menu ...
TravelMate 4320/4720 and Extensa 4220/4620 Service Guide
Page 111
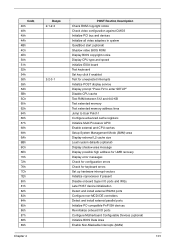
... Setup System Management Mode (SMM) area Display external L2 cache size Load custom defaults (optional) Display shadow-area message Display possible high address for UMB recovery Display error messages Check for configuration errors Check for keyboard errors Set up hardware interrupt vectors Initialize coprocessor if present Disable onboard Super I/O ports and...
... Setup System Management Mode (SMM) area Display external L2 cache size Load custom defaults (optional) Display shadow-area message Display possible high address for UMB recovery Display error messages Check for configuration errors Check for keyboard errors Set up hardware interrupt vectors Initialize coprocessor if present Disable onboard Super I/O ports and...
TravelMate 4320/4720 and Extensa 4220/4620 Service Guide
Page 113
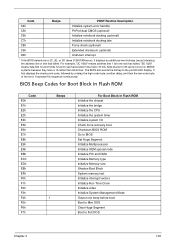
... systems because they have failed in Flash ROM Initialize the chipset Initialize the bridge Initialize the CPU Initialize the system timer Initialize system I/O Check force recovery boot Checksum BIOS ROM Go to BIOS Set Huge Segment Initialize Multiprocessor Initialize OEM special code Initialize PIC and DMA Initialize Memory type Initialize Memory...
... systems because they have failed in Flash ROM Initialize the chipset Initialize the bridge Initialize the CPU Initialize the system timer Initialize system I/O Check force recovery boot Checksum BIOS ROM Go to BIOS Set Huge Segment Initialize Multiprocessor Initialize OEM special code Initialize PIC and DMA Initialize Memory type Initialize Memory...
TravelMate 4320/4720 and Extensa 4220/4620 Service Guide
Page 125
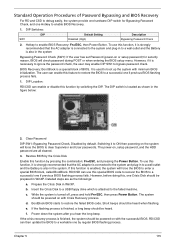
...DIP Location: RD/CSD can then update the BIOS to the failed machine. RD/CSD can enable this function by default. d. If the crisis recovery process is located as the followings: a. Hotkey to restore the failed BIOS code. It is necessary to ignore the password check, the user ...to the system and plug-in to a successful one by switching the DIP. However, before doing this function, it is used to enable BIOS Recovery. 1. Power down the system after you hear the long beep. Standard Operation Procedures of BIOS. However, if it is strongly recommended that the...
...DIP Location: RD/CSD can then update the BIOS to the failed machine. RD/CSD can enable this function by default. d. If the crisis recovery process is located as the followings: a. Hotkey to restore the failed BIOS code. It is necessary to ignore the password check, the user ...to the system and plug-in to a successful one by switching the DIP. However, before doing this function, it is used to enable BIOS Recovery. 1. Power down the system after you hear the long beep. Standard Operation Procedures of BIOS. However, if it is strongly recommended that the...


