
User Manual
Page 2
... date and place of such revisions or changes. Other companies' product names or trademarks are used herein for a particular purpose. Acer LCD Monitor User Guide Original Issue: 10/2017 Changes may be incorporated in any form or by any person of purchase information in the ... number and model number are registered trademarks of Acer Incorporated. No part of this manual or supplementary documents and publications. Acer LCD Monitor User Guide Model number Serial number Date of purchase Place of purchase Acer and the Acer logo are recorded on the label affixed to the...
... date and place of such revisions or changes. Other companies' product names or trademarks are used herein for a particular purpose. Acer LCD Monitor User Guide Original Issue: 10/2017 Changes may be incorporated in any form or by any person of purchase information in the ... number and model number are registered trademarks of Acer Incorporated. No part of this manual or supplementary documents and publications. Acer LCD Monitor User Guide Model number Serial number Date of purchase Place of purchase Acer and the Acer logo are recorded on the label affixed to the...

User Manual
Page 3
... when cleaning the monitor: • Always unplug the monitor before connecting aMnaykceabsulereorbuontphluthggeinLgCDthme poonwiteorr aadnadpttehre. er outlet. • • Make sure both the LCD monitor and the computer are turned off the power switch for a few hours. • Acer monitor is displayed for ...when the same image is purposed for hours. Information for future reference. iii Special notes on LCD monitors The following are normal with the LCD monitor and do not indicate a problem. • Due to tchoerdACtoptohweeAr oCuptloewt. Turn off before •...
... when cleaning the monitor: • Always unplug the monitor before connecting aMnaykceabsulereorbuontphluthggeinLgCDthme poonwiteorr aadnadpttehre. er outlet. • • Make sure both the LCD monitor and the computer are turned off the power switch for a few hours. • Acer monitor is displayed for ...when the same image is purposed for hours. Information for future reference. iii Special notes on LCD monitors The following are normal with the LCD monitor and do not indicate a problem. • Due to tchoerdACtoptohweeAr oCuptloewt. Turn off before •...
User Manual
Page 8
..., stress, Tinaidpesquaatne wdorikninfgocornmditiaontsi,openrsofnoal rhecalothmandfootrhterafabctloers ugresaetly increase the risk of user inactivity. viii • • Activate computer's Sleep mode within 30 minutes of the monitor, using a Tfohoetfroesllto, worinrgaisseincgtioynouprrosivttidinegs thiepisgfhotrtmo oarcehiceovme fmoratxaimbleumcocmopmuftoerrt.uOseb.serve the following symptoms may Ia••fpypoeuncaourhlmaidnvnbetenhsteeshsoesh,sraeownrsdeyasam,bkwpnutreroinssmstinss,g,aoorrmr atsin,nysgholoitnuhgledsreerrnes,scanuterirociknngorobr apcekr:sistent discomfort...
..., stress, Tinaidpesquaatne wdorikninfgocornmditiaontsi,openrsofnoal rhecalothmandfootrhterafabctloers ugresaetly increase the risk of user inactivity. viii • • Activate computer's Sleep mode within 30 minutes of the monitor, using a Tfohoetfroesllto, worinrgaisseincgtioynouprrosivttidinegs thiepisgfhotrtmo oarcehiceovme fmoratxaimbleumcocmopmuftoerrt.uOseb.serve the following symptoms may Ia••fpypoeuncaourhlmaidnvnbetenhsteeshsoesh,sraeownrsdeyasam,bkwpnutreroinssmstinss,g,aoorrmr atsin,nysgholoitnuhgledsreerrnes,scanuterirociknngorobr apcekr:sistent discomfort...
User Manual
Page 9
... edge • Avoid adjusting your display to make your eyes. Developing good work habits to an awkward viewing angle. • Avoid looking away from the monitor and focusing on how to a comfortable level for extended periods of your vision Long viewing hours, wearing incorrect glasses or contact lenses, glare, excessive room...
... edge • Avoid adjusting your display to make your eyes. Developing good work habits to an awkward viewing angle. • Avoid looking away from the monitor and focusing on how to a comfortable level for extended periods of your vision Long viewing hours, wearing incorrect glasses or contact lenses, glare, excessive room...
User Manual
Page 11
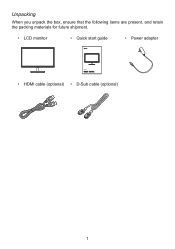
Unpacking When you unpack the box, ensure that the following items are present, and retain the packing materials for future shipment. • LCD monitor • Quick start guide • Power adapter LCD Monitor USER GUIDE • HDMI cable (optional) • D-Sub cable (optional) 1
Unpacking When you unpack the box, ensure that the following items are present, and retain the packing materials for future shipment. • LCD monitor • Quick start guide • Power adapter LCD Monitor USER GUIDE • HDMI cable (optional) • D-Sub cable (optional) 1
User Manual
Page 12
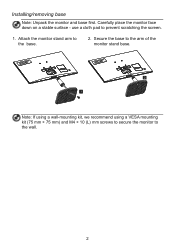
Secure the base to prevent scratching the screen. 1. use a cloth pad to the arm of the monitor stand base. Attach the monitor stand arm to the wall. 2 Note: If using a wall-mounting kit, we recommend using a VESA mounting kit (75 mm × 75 mm) and M4 × 10 (L) mm screws to secure the monitor to the base. 2. Installing/removing base Note: Unpack the monitor and base first. Carefully place the monitor face down on a stable surface -
Secure the base to prevent scratching the screen. 1. use a cloth pad to the arm of the monitor stand base. Attach the monitor stand arm to the wall. 2 Note: If using a wall-mounting kit, we recommend using a VESA mounting kit (75 mm × 75 mm) and M4 × 10 (L) mm screws to secure the monitor to the base. 2. Installing/removing base Note: Unpack the monitor and base first. Carefully place the monitor face down on a stable surface -
User Manual
Page 13
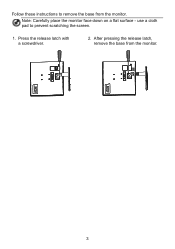
Press the release latch with a screwdriver. 2. Note: Carefully place the monitor face down on a flat surface - use a cloth pad to remove the base from the monitor. 3 After pressing the release latch, remove the base from the monitor. Follow these instructions to prevent scratching the screen. 1.
Press the release latch with a screwdriver. 2. Note: Carefully place the monitor face down on a flat surface - use a cloth pad to remove the base from the monitor. 3 After pressing the release latch, remove the base from the monitor. Follow these instructions to prevent scratching the screen. 1.

User Manual
Page 15
... used: Use a UL-compliant power cord kit, including SVT-type leads and a 10-amp/125volt plug. • Areas using the stand. Place the monitor in a well-ventilated location. • Avoid placing the display in your line of sight when staring straight ahead. • Use extreme caution when handling ...input, and plug the other heavy objects on the power adapter, as this may cause fire or electric shock. • Do not expose the monitor to facilitate normal heat dissipation. Cleaning the display When you are installing the device. (II) DC power supply • Use the power adapter ...
... used: Use a UL-compliant power cord kit, including SVT-type leads and a 10-amp/125volt plug. • Areas using the stand. Place the monitor in a well-ventilated location. • Avoid placing the display in your line of sight when staring straight ahead. • Use extreme caution when handling ...input, and plug the other heavy objects on the power adapter, as this may cause fire or electric shock. • Do not expose the monitor to facilitate normal heat dissipation. Cleaning the display When you are installing the device. (II) DC power supply • Use the power adapter ...

User Manual
Page 16
or alcohol-based cleaners on the LCD monitor screen or case. • Acer is not responsible for damage caused by the use any ammonia or alcohol based cleaners. 6 • Do not use of any ammonia-
or alcohol-based cleaners on the LCD monitor screen or case. • Acer is not responsible for damage caused by the use any ammonia or alcohol based cleaners. 6 • Do not use of any ammonia-
User Manual
Page 17
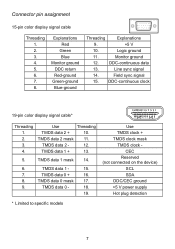
... 1 mask 14. 6. TMDS data 1 - 15. 7. TMDS data 0 - 18. 19. TMDS data 2 - 12. Explanations Red Green Blue Monitor ground DDC return Red-ground Green-ground Blue-ground Threading Explanations 9. +5 V 10. TMDS data 1 + 13. 5. TMDS data 2 mask 11. ...Connector pin assignment 15-pin color display signal cable Threading 1. 2. 3. 4. 5. 6. 7. 8. Monitor ground 12. Line sync signal 14. DDC-continuous clock 19-pin color display signal cable* Threading 1. 2. 3. 4. Use Threading TMDS data 2 + 10. TMDS data...
... 1 mask 14. 6. TMDS data 1 - 15. 7. TMDS data 0 - 18. 19. TMDS data 2 - 12. Explanations Red Green Blue Monitor ground DDC return Red-ground Green-ground Blue-ground Threading Explanations 9. +5 V 10. TMDS data 1 + 13. 5. TMDS data 2 mask 11. ...Connector pin assignment 15-pin color display signal cable Threading 1. 2. 3. 4. 5. 6. 7. 8. Monitor ground 12. Line sync signal 14. DDC-continuous clock 19-pin color display signal cable* Threading 1. 2. 3. 4. Use Threading TMDS data 2 + 10. TMDS data...
User Manual
Page 19
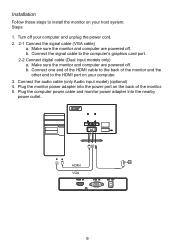
... Connect the signal cable to the HDMI port on your computer. 3. HHDDMMII VVGGAA 9 Make sure the monitor and computer are powered off. Plug the computer power cable and monitor power adapter into the power port on your computer and unplug the power cord. 2. 2-1 Connect the ...cable (VGA cable) a. Turn off . Connect the audio cable (only Audio input model) (optional) 4. b. Installation Follow these steps to install the monitor on the back of the monitor and the other end to the computer's graphics card port. 2-2 Connect digital cable (Dual input models only) a. Make sure the...
... Connect the signal cable to the HDMI port on your computer. 3. HHDDMMII VVGGAA 9 Make sure the monitor and computer are powered off. Plug the computer power cable and monitor power adapter into the power port on your computer and unplug the power cord. 2. 2-1 Connect the ...cable (VGA cable) a. Turn off . Connect the audio cable (only Audio input model) (optional) 4. b. Installation Follow these steps to install the monitor on the back of the monitor and the other end to the computer's graphics card port. 2-2 Connect digital cable (Dual input models only) a. Make sure the...
User Manual
Page 27
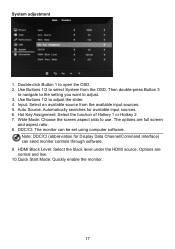
Input: Select an available source from the OSD. The options are normal and low. 10.Quick Start Mode: Quickly enable the monitor. 17 Then double-press Button 3 to navigate to the setting you want to adjust the slider. 4. Use Buttons 1/2 to adjust. 3. ...available input sources. 6. Double-click Button 1 to use. HDMI Black Level: Select the black level under the HDMI source. DDC/CI: The monitor can send monitor controls through software. 9. System adjustment 1. Auto Source: Automatically searches for Display Data Channel/Command Interface) can be set using computer software. Wide ...
Input: Select an available source from the OSD. The options are normal and low. 10.Quick Start Mode: Quickly enable the monitor. 17 Then double-press Button 3 to navigate to the setting you want to adjust the slider. 4. Use Buttons 1/2 to adjust. 3. ...available input sources. 6. Double-click Button 1 to use. HDMI Black Level: Select the black level under the HDMI source. DDC/CI: The monitor can send monitor controls through software. 9. System adjustment 1. Auto Source: Automatically searches for Display Data Channel/Command Interface) can be set using computer software. Wide ...
User Manual
Page 29
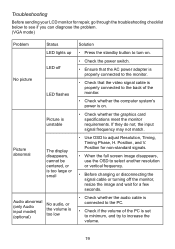
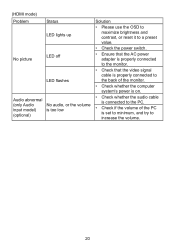
... the troubleshooting checklist below to see if you can diagnose the problem. (VGA mode) Problem No picture Status LED lights up LED off the monitor, resize the image and wait for non-standard signals. • When the full screen image disappears, use the OSD to select another resolution ... the volume is too low Solution • Press the standby button to turn on . • Check whether the graphics card specifications meet the monitor requirements. If they do not, the input signal frequency may not match. • Use OSD to adjust Resolution, Timing, Timing Phase, H. Position, and...
... the troubleshooting checklist below to see if you can diagnose the problem. (VGA mode) Problem No picture Status LED lights up LED off the monitor, resize the image and wait for non-standard signals. • When the full screen image disappears, use the OSD to select another resolution ... the volume is too low Solution • Press the standby button to turn on . • Check whether the graphics card specifications meet the monitor requirements. If they do not, the input signal frequency may not match. • Use OSD to adjust Resolution, Timing, Timing Phase, H. Position, and...
User Manual
Page 30
... value. • Check the power switch. • Ensure that the AC power adapter is properly connected to the monitor. • Check that the video signal cable is properly connected to the back of the monitor. • Check whether the computer system's power is on. • Check whether the audio cable is connected...
... value. • Check the power switch. • Ensure that the AC power adapter is properly connected to the monitor. • Check that the video signal cable is properly connected to the back of the monitor. • Check whether the computer system's power is on. • Check whether the audio cable is connected...


