CE DoC
Page 1
... Radio Equipment Model: AX201D2W, Operation frequency and radio-frequency power are listed as below: [Bluetooth] 2402-2480MHz < 10 dBm [WLAN] 2412MHz-2462MHz < 20dBm, 5180-5320MHz < 23dBm, 5500-5700MHz < 23dBm Year to begin affixing CE marking:2021 RU Jan, Sr.Manager 2021-02-09 Note: Open the Start Menu and search for 'Acer Documents' for help with setting up a network connection, using the touchpad, and other...
... Radio Equipment Model: AX201D2W, Operation frequency and radio-frequency power are listed as below: [Bluetooth] 2402-2480MHz < 10 dBm [WLAN] 2412MHz-2462MHz < 20dBm, 5180-5320MHz < 23dBm, 5500-5700MHz < 23dBm Year to begin affixing CE marking:2021 RU Jan, Sr.Manager 2021-02-09 Note: Open the Start Menu and search for 'Acer Documents' for help with setting up a network connection, using the touchpad, and other...

Lifecycle Extension Guide
Page 3
...;Battery pack HDD / SSD module DIMM module(s) WLAN module LTE module If a particular key component is not described in the chapter "Disassembly Procedures". Prior performing self-repair, familiarize yourself with the Safety Guidelines and Recommended Equipment sections first as a result of the product. Disassembly Procedures 0 Please refer to replace other components than those listed...
...;Battery pack HDD / SSD module DIMM module(s) WLAN module LTE module If a particular key component is not described in the chapter "Disassembly Procedures". Prior performing self-repair, familiarize yourself with the Safety Guidelines and Recommended Equipment sections first as a result of the product. Disassembly Procedures 0 Please refer to replace other components than those listed...
Lifecycle Extension Guide
Page 4
... enter the model name or product serial number, or select the product from Acer: Select the Start button Go to create a Factory Default recovery media. Press Download to start the download of the respective driver Installation of charge service. 1-2 Self-Repair For more information about the software recovery options, how to perform a software recovery or creating a Factory Default recovery media, please refer to get the latest drivers from the list of suggested models in the User Manual of a progress indicator...
... enter the model name or product serial number, or select the product from Acer: Select the Start button Go to create a Factory Default recovery media. Press Download to start the download of the respective driver Installation of charge service. 1-2 Self-Repair For more information about the software recovery options, how to perform a software recovery or creating a Factory Default recovery media, please refer to get the latest drivers from the list of suggested models in the User Manual of a progress indicator...

Lifecycle Extension Guide
Page 5
..., check that you are removing it . if you acknowledge that any of cable, press in the way. When you disconnect a cable, pull on its connector or on its pull-tab, not on the locking tabs before opening the computer cover or panels. To avoid electrostatic discharge, ground yourself by using a wrist grounding strap or...
..., check that you are removing it . if you acknowledge that any of cable, press in the way. When you disconnect a cable, pull on its connector or on its pull-tab, not on the locking tabs before opening the computer cover or panels. To avoid electrostatic discharge, ground yourself by using a wrist grounding strap or...

Lifecycle Extension Guide
Page 7
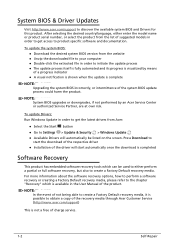
A Figure 1-1. Remove the microSD card from the USB-C port (B) as shown in Figure 1-2. 3. B C Figure 1-2. Place the system on a stable work surface. 2. AC Adapter Outlet 4. Remove the power adapter from the USB Type-C port (A) as shown in Figure 1-1 or from the microSD card slot (C) (Figure 1-2). MicroSD Card Removal Disassembly Procedures 1-5 Pre-disassembly Instructions 0 Do the following prior to starting any maintenance procedures: 1. Remove all cables from system.
A Figure 1-1. Remove the microSD card from the USB-C port (B) as shown in Figure 1-2. 3. B C Figure 1-2. Place the system on a stable work surface. 2. AC Adapter Outlet 4. Remove the power adapter from the USB Type-C port (A) as shown in Figure 1-1 or from the microSD card slot (C) (Figure 1-2). MicroSD Card Removal Disassembly Procedures 1-5 Pre-disassembly Instructions 0 Do the following prior to starting any maintenance procedures: 1. Remove all cables from system.

Lifecycle Extension Guide
Page 15
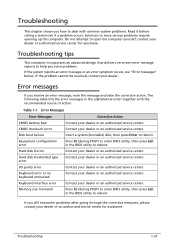
Figure 1-13. Using the screwdriver, push the guide pins (F) firmly to disengage it from the bottom latches (G), and then remove the touchpad module (H) from the top assembly (Figure 1-14). 7. Touchpad Module Removal Disassembly Procedures 1-13 Remove three (3) screws securing the touchpad module in place (Figure 1-13). Touchpad Module Removal 6. F F F H WEEE Annex VII Component: Touchpad Module G G Figure 1-14. 5. Slide the touchpad module slightly to release them from the top assembly (Figure 1-14).
Figure 1-13. Using the screwdriver, push the guide pins (F) firmly to disengage it from the bottom latches (G), and then remove the touchpad module (H) from the top assembly (Figure 1-14). 7. Touchpad Module Removal Disassembly Procedures 1-13 Remove three (3) screws securing the touchpad module in place (Figure 1-13). Touchpad Module Removal 6. F F F H WEEE Annex VII Component: Touchpad Module G G Figure 1-14. 5. Slide the touchpad module slightly to release them from the top assembly (Figure 1-14).

Lifecycle Extension Guide
Page 18
LCD Module Removal 1-16 Disassembly Procedures Remove six (6) screws securing the LCD hinges in place (Figure 1-18). Open the top assembly. Figure 1-18. Then remove the LCD module away from the top assembly (Figure 1-19). LCD Module Removal 5. 4. Figure 1-19.
LCD Module Removal 1-16 Disassembly Procedures Remove six (6) screws securing the LCD hinges in place (Figure 1-18). Open the top assembly. Figure 1-18. Then remove the LCD module away from the top assembly (Figure 1-19). LCD Module Removal 5. 4. Figure 1-19.

Lifecycle Extension Guide
Page 19
Disconnect the keyboard FPC from the opening on the keyboard compartment (for keyboard FPC routing) (Figure 1-21). 3. B Figure 1-21. Detach the adhesive tape (B) from the mainboard connector (A) (Figure 1-20). Remove one (1) screw securing the keyboard in place (Figure 1-21). Keyboard Removal 2. Keyboard Removal Disassembly Procedures 1-17 Keyboard Removal 0 Prerequisite: Battery Removal 1. A Figure 1-20.
Disconnect the keyboard FPC from the opening on the keyboard compartment (for keyboard FPC routing) (Figure 1-21). 3. B Figure 1-21. Detach the adhesive tape (B) from the mainboard connector (A) (Figure 1-20). Remove one (1) screw securing the keyboard in place (Figure 1-21). Keyboard Removal 2. Keyboard Removal Disassembly Procedures 1-17 Keyboard Removal 0 Prerequisite: Battery Removal 1. A Figure 1-20.

Lifecycle Extension Guide
Page 20
4. Keyboard Removal 1-18 Disassembly Procedures Carefully lift the bottom of the keyboard to release the keyboard from the top assembly (Figure 1-22). Unroute the keyboard FPC from the top assembly. 6. E D Figure 1-23. Using a pointed tool, push the screw hole (C) firmly to release it from the opening (D) on the keyboard compartment. Then remove the keyboard (E) (Figure 1-23). Keyboard Removal 5. C Figure 1-22.
4. Keyboard Removal 1-18 Disassembly Procedures Carefully lift the bottom of the keyboard to release the keyboard from the top assembly (Figure 1-22). Unroute the keyboard FPC from the top assembly. 6. E D Figure 1-23. Using a pointed tool, push the screw hole (C) firmly to release it from the opening (D) on the keyboard compartment. Then remove the keyboard (E) (Figure 1-23). Keyboard Removal 5. C Figure 1-22.
Lifecycle Extension Guide
Page 29
..., contact your dealer or an authorized service center for assistance. Troubleshooting 1-27 Solutions to open the computer yourself; The following table lists the error messages in the BIOS utility to reboot. Equipment configuration error Press F2 (during POST) to enter BIOS utility, then press Exit in the alphabetical order together with common system problems. Read it before calling a technician if a problem occurs. contact your dealer or...
..., contact your dealer or an authorized service center for assistance. Troubleshooting 1-27 Solutions to open the computer yourself; The following table lists the error messages in the BIOS utility to reboot. Equipment configuration error Press F2 (during POST) to enter BIOS utility, then press Exit in the alphabetical order together with common system problems. Read it before calling a technician if a problem occurs. contact your dealer or...

User Manual
Page 2
... Products" page. The information contained in this manual. All Rights Reserved. Acer Chromebook Spin 512 Covers: R853TA / R853TNA This revision: February 2022 Important This manual contains proprietary information that do not apply to your Acer product Go to www.acer.com/register-product, and sign in this manual is done, you can review it is subject to register your product. Register...
... Products" page. The information contained in this manual. All Rights Reserved. Acer Chromebook Spin 512 Covers: R853TA / R853TNA This revision: February 2022 Important This manual contains proprietary information that do not apply to your Acer product Go to www.acer.com/register-product, and sign in this manual is done, you can review it is subject to register your product. Register...
User Manual
Page 3
... started 4 Turn on your Chromebook 4 Select your language settings 4 Connect to a network 4 Accept the Terms of Service 4 First-time sign-in 4 Create a new Google Account 4 Browse as a guest 4 Enterprise enrollment (optional 5 Sign in to your Google Account 5 Your Acer Chromebook tour 6 Front view 6 Keyboard view 7 Function keys 8 Common keyboard shortcuts 8 Touchpad 9 Right view 10 Left view 11 USB 3.2 Gen 1 information 11 USB Type-C information 12 Bottom view 13 Rechargeable Active Stylus...
... started 4 Turn on your Chromebook 4 Select your language settings 4 Connect to a network 4 Accept the Terms of Service 4 First-time sign-in 4 Create a new Google Account 4 Browse as a guest 4 Enterprise enrollment (optional 5 Sign in to your Google Account 5 Your Acer Chromebook tour 6 Front view 6 Keyboard view 7 Function keys 8 Common keyboard shortcuts 8 Touchpad 9 Right view 10 Left view 11 USB 3.2 Gen 1 information 11 USB Type-C information 12 Bottom view 13 Rechargeable Active Stylus...
User Manual
Page 4
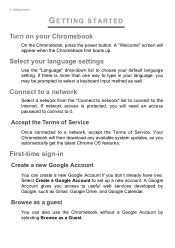
... of Service. If network access is more than one . First-time sign-in your language, you automatically get the latest Chrome OS features. Select Create a Google Account to useful web services developed by selecting Browse as Gmail, Google Drive, and Google Calendar. Getting started GETTING STARTED Turn on your default language setting. A Google Account gives you will need an access password to connect to type in Create a new Google...
... of Service. If network access is more than one . First-time sign-in your language, you automatically get the latest Chrome OS features. Select Create a Google Account to useful web services developed by selecting Browse as Gmail, Google Drive, and Google Calendar. Getting started GETTING STARTED Turn on your default language setting. A Google Account gives you will need an access password to connect to type in Create a new Google...

User Manual
Page 8
... screen. Full-screen Open the page in full-screen mode. Volume down Decreases the screen brightness. Next Go to complete some hardware and software controls, such as screen brightness and volume. Mute Turns off audio output. Search Search from the Apps panel. Note: For a complete list of keyboard shortcuts, press Ctrl + Alt + / The dedicated function keys each have a specific function. Reload Reload the current page. Next window Switch to the next window. 8 - Brightness up Increases the volume. Lock screen Locks the screen...
... screen. Full-screen Open the page in full-screen mode. Volume down Decreases the screen brightness. Next Go to complete some hardware and software controls, such as screen brightness and volume. Mute Turns off audio output. Search Search from the Apps panel. Note: For a complete list of keyboard shortcuts, press Ctrl + Alt + / The dedicated function keys each have a specific function. Reload Reload the current page. Next window Switch to the next window. 8 - Brightness up Increases the volume. Lock screen Locks the screen...

User Manual
Page 11
... Acer Chromebook tour - 11 1 2 3 4 56 # Icon 1 2 3 4 Item USB Type-C port with DC-in AC mode. MicroSD card slot Insert a microSD card into this slot. Indicates the computer's battery status. 6 Battery indicator Charging: The light shows amber when the battery is charging. Headset/speaker jack Connects to USB devices. USB 3.2 Gen 1 information • USB 3.2 Gen 1 compatible ports are blue. • Compatible with USB 3.2 Gen 1 and earlier devices. • For optimal performance, use USB 3.2 Gen 1-certified devices. • Defined by the USB 3.2 Gen 1 specification...
... Acer Chromebook tour - 11 1 2 3 4 56 # Icon 1 2 3 4 Item USB Type-C port with DC-in AC mode. MicroSD card slot Insert a microSD card into this slot. Indicates the computer's battery status. 6 Battery indicator Charging: The light shows amber when the battery is charging. Headset/speaker jack Connects to USB devices. USB 3.2 Gen 1 information • USB 3.2 Gen 1 compatible ports are blue. • Compatible with USB 3.2 Gen 1 and earlier devices. • For optimal performance, use USB 3.2 Gen 1-certified devices. • Defined by the USB 3.2 Gen 1 specification...

User Manual
Page 18
... display a box with more options. Tap the Status area to see vital computer information at a glance, such as the time, Wi-Fi signal strength, and battery life. 18 - Select Pin to shelf. Locate and two-finger tap the desired app icon from the shelf 1. Icon Description Icon Description Notifications Shut down Lock screen Volume control Bluetooth status Settings Wireless network connection Battery status Night light Keyboard Brightness control...
... display a box with more options. Tap the Status area to see vital computer information at a glance, such as the time, Wi-Fi signal strength, and battery life. 18 - Select Pin to shelf. Locate and two-finger tap the desired app icon from the shelf 1. Icon Description Icon Description Notifications Shut down Lock screen Volume control Bluetooth status Settings Wireless network connection Battery status Night light Keyboard Brightness control...

User Manual
Page 19
... features and functionality for Android™ (Play Store apps). Updates may add new categories or change how to select All Apps (or type "Web Store"). 3. Chrome apps work like to add, select it and then select Add to download and install the app, or select Cancel. Managing apps Note ...would like regular software programs for desktop computers, except they run entirely on Chromebooks. Click to navigate the Web Store at any time. A verification window will pop up, select Add to Chrome. 6. To open your new app, select the Launcher, then All Apps (or type the name of...
... features and functionality for Android™ (Play Store apps). Updates may add new categories or change how to select All Apps (or type "Web Store"). 3. Chrome apps work like to add, select it and then select Add to download and install the app, or select Cancel. Managing apps Note ...would like regular software programs for desktop computers, except they run entirely on Chromebooks. Click to navigate the Web Store at any time. A verification window will pop up, select Add to Chrome. 6. To open your new app, select the Launcher, then All Apps (or type the name of...

User Manual
Page 21
... a web-based storage service offered by using the Files app on your Chromebook. Enable offline access to Google Drive files You can easily access files both from Downloads to My Drive. Select the file(s) you want to select All Apps (or type "Files"). 3. Select the Files icon. 4. Click to access offline. This user manual uses Google Drive and Files interchangeably when giving instructions regarding accessing files. Select...
... a web-based storage service offered by using the Files app on your Chromebook. Enable offline access to Google Drive files You can easily access files both from Downloads to My Drive. Select the file(s) you want to select All Apps (or type "Files"). 3. Select the Files icon. 4. Click to access offline. This user manual uses Google Drive and Files interchangeably when giving instructions regarding accessing files. Select...

User Manual
Page 29
... you open the document from Google Drive on another computer or device. Select Save Changes. 6. Press the Search key on this document while not connected to the internet. For more information see Creating a new document on to the internet. Use the app like you are saved locally on your settings, such as you log on page 21. Google Drive Important Any changes you make to...
... you open the document from Google Drive on another computer or device. Select Save Changes. 6. Press the Search key on this document while not connected to the internet. For more information see Creating a new document on to the internet. Use the app like you are saved locally on your settings, such as you log on page 21. Google Drive Important Any changes you make to...
User Manual
Page 34
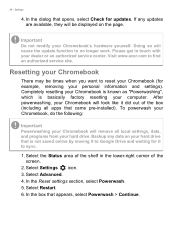
... the following: Important Powerwashing your hard drive that came pre-installed). Select Advanced. 4. Backup any updates are available, they will look like it did out of the screen. 2. Select the Status area of the shelf in touch with your Chromebook There may be displayed on your Chromebook will cause the update function to sync. 1. In the Reset settings section, select Powerwash. 5. Important Do not...
... the following: Important Powerwashing your hard drive that came pre-installed). Select Advanced. 4. Backup any updates are available, they will look like it did out of the screen. 2. Select the Status area of the shelf in touch with your Chromebook There may be displayed on your Chromebook will cause the update function to sync. 1. In the Reset settings section, select Powerwash. 5. Important Do not...


