User Manual
Page 3
... on LCD monitors The following are normal with the LCD monitor and do not indicate a problem. • Due to the nature of the fluorescent light, the screen may remain after switching the image, when the same image is recovered slowly by changing the image or turning off the power switch and then turn it on again to make sure the flicker disappears. • You may find slightly uneven brightness...
... on LCD monitors The following are normal with the LCD monitor and do not indicate a problem. • Due to the nature of the fluorescent light, the screen may remain after switching the image, when the same image is recovered slowly by changing the image or turning off the power switch and then turn it on again to make sure the flicker disappears. • You may find slightly uneven brightness...
User Manual
Page 4
..., stand or table. Warnings • Do not use this product near water. • Do not place this product through cabinet slots as they may touch dangerous voltage points or short-out parts that the power outlet you plug the power cord into the product. • To avoid dmage of time listening to music at high volume. • Avoid turning up...
..., stand or table. Warnings • Do not use this product near water. • Do not place this product through cabinet slots as they may touch dangerous voltage points or short-out parts that the power outlet you plug the power cord into the product. • To avoid dmage of time listening to music at high volume. • Avoid turning up...
User Manual
Page 5
... branch circuit rating. English • If an extension cord is used , the load should not exceed 80% of the power strip's input rating. • This product's power cord is equipped with the supplied power supply cord set , make sure that is not properly grounded may expose you need for details. The grounding pin is properly grounded before inserting the power cord plug. Product servicing Do not attempt to service this product...
... branch circuit rating. English • If an extension cord is used , the load should not exceed 80% of the power strip's input rating. • This product's power cord is equipped with the supplied power supply cord set , make sure that is not properly grounded may expose you need for details. The grounding pin is properly grounded before inserting the power cord plug. Product servicing Do not attempt to service this product...

User Manual
Page 6
...the best working procedures to turn off your device in any area with a potentially explosive atmosphere are in progress. Disposal instructions Do not throw this website: http://www.acer-group.com/public/Sustainability/sustainability01.htm Visit www.acer-...controls may contain small parts. Potentially explosive environments Switch off the device near depots, storage and distribution areas; For more information and help when recycling, please go to normal condition. chemical plants; IT Equipment Recycling Information Acer is strongly committed to environmental protection and views...
...the best working procedures to turn off your device in any area with a potentially explosive atmosphere are in progress. Disposal instructions Do not throw this website: http://www.acer-group.com/public/Sustainability/sustainability01.htm Visit www.acer-...controls may contain small parts. Potentially explosive environments Switch off the device near depots, storage and distribution areas; For more information and help when recycling, please go to normal condition. chemical plants; IT Equipment Recycling Information Acer is strongly committed to environmental protection and views...
User Manual
Page 7
... fixed posture • avoid slouching forward and/or leaning backward • stand up and walk around regularly to remove the strain on the recorded image and does not constitute a malfunction. Long work periods, bad posture, poor work habits, stress, inadequate working in front of user inactivity. • Wake the monitor when it is produced with high-precision manufacturing techniques. English LCD pixel...
... fixed posture • avoid slouching forward and/or leaning backward • stand up and walk around regularly to remove the strain on the recorded image and does not constitute a malfunction. Long work periods, bad posture, poor work habits, stress, inadequate working in front of user inactivity. • Wake the monitor when it is produced with high-precision manufacturing techniques. English LCD pixel...
User Manual
Page 8
... room lighting, poorly focused screens, very small typefaces and low-contrast displays could stress your eyes regular breaks by using drapes, shades or blinds • using a task light • changing the display's viewing angle • using a glare-reduction filter • using a display visor, such as possible. • Exercise regularly and maintain a healthy body. English Taking care of cardboard extended from drying out. Developing good work...
... room lighting, poorly focused screens, very small typefaces and low-contrast displays could stress your eyes regular breaks by using drapes, shades or blinds • using a task light • changing the display's viewing angle • using a glare-reduction filter • using a display visor, such as possible. • Exercise regularly and maintain a healthy body. English Taking care of cardboard extended from drying out. Developing good work...
User Manual
Page 11
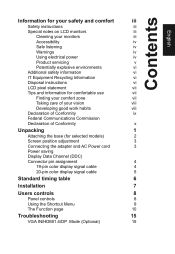
... Developing good work habits viii Declaration of Conformity ix Federal Communications Commission Declaration of Conformity x Unpacking 1 Attaching the base (for selected models) 2 Screen position adjustment 3 Connecting the adapter and AC Power cord 3 Power saving Display Data Channel (DDC) Connector pin assignment 4 19-pin color display signal cable 4 20-pin color display signal cable 5 Standard timing table 6 Installation 7 Users controls 8 Panel controls 8 Using the Shortcut Menu 9 The Function page 10 Troubleshooting 15 VGA IN/HDMI1.4/DP Mode (Optional...
... Developing good work habits viii Declaration of Conformity ix Federal Communications Commission Declaration of Conformity x Unpacking 1 Attaching the base (for selected models) 2 Screen position adjustment 3 Connecting the adapter and AC Power cord 3 Power saving Display Data Channel (DDC) Connector pin assignment 4 19-pin color display signal cable 4 20-pin color display signal cable 5 Standard timing table 6 Installation 7 Users controls 8 Panel controls 8 Using the Shortcut Menu 9 The Function page 10 Troubleshooting 15 VGA IN/HDMI1.4/DP Mode (Optional...
User Manual
Page 13
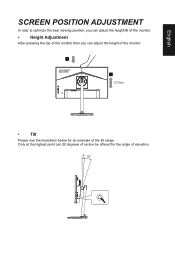
Only at the highest point can adjust the height of the monitor. 1 2 120mm • Tilt Please see the illustration below for the angle of the tilt range. English SCREEN POSITION ADJUSTMENT In oder to optimize the best viewing position, you can adjust the height/tilt of the monitor. • Height Adjustment After pressing the top of the monitor then you can 20 degrees of recline be offered for an example of elevation. -5° 20°
Only at the highest point can adjust the height of the monitor. 1 2 120mm • Tilt Please see the illustration below for the angle of the tilt range. English SCREEN POSITION ADJUSTMENT In oder to optimize the best viewing position, you can adjust the height/tilt of the monitor. • Height Adjustment After pressing the top of the monitor then you can 20 degrees of recline be offered for an example of elevation. -5° 20°
User Manual
Page 15
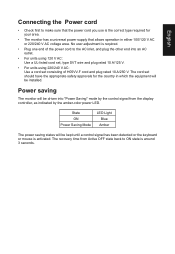
... V AC: Use a cord set should have the appropriate safety approvals for your area. • The monitor has a universal power supply that allows operation in which the equipment will be installed. The recovery time from the display controller, as indicated by the amber-color power LED. The cord set consisting of H05VV-F cord and plug rated 10 A/250 V. State ON Power Saving Mode LED Light Blue Amber The power saving states will be kept until a control signal has...
... V AC: Use a cord set should have the appropriate safety approvals for your area. • The monitor has a universal power supply that allows operation in which the equipment will be installed. The recovery time from the display controller, as indicated by the amber-color power LED. The cord set consisting of H05VV-F cord and plug rated 10 A/250 V. State ON Power Saving Mode LED Light Blue Amber The power saving states will be kept until a control signal has...
User Manual
Page 16
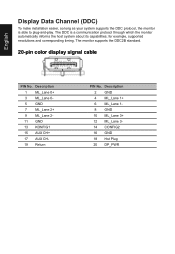
for example, supported resolutions and corresponding timing. The monitor supports the DDC2B standard. 20-pin color display signal cable PIN No. Description 1 ML_Lane 0+ 3 ML_Lane 05 GND 7 ML_Lane 2+ 9 ML_Lane 211 GND 13 KONFIG1 15 AUX CH+ 17 AUX CH19 Return PIN No. English Display Data Channel (DDC) To make installation easier, so long as your system supports the DDC protocol, the monitor is a communication protocol through...
for example, supported resolutions and corresponding timing. The monitor supports the DDC2B standard. 20-pin color display signal cable PIN No. Description 1 ML_Lane 0+ 3 ML_Lane 05 GND 7 ML_Lane 2+ 9 ML_Lane 211 GND 13 KONFIG1 15 AUX CH+ 17 AUX CH19 Return PIN No. English Display Data Channel (DDC) To make installation easier, so long as your system supports the DDC protocol, the monitor is a communication protocol through...
User Manual
Page 19
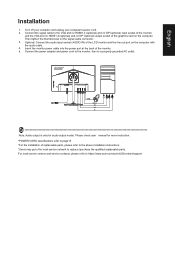
... more instruction. *POWER CORD specifications refer to page15 *For the installation of the LCD monitor and the line-out port on the signal cable connector. 3. Connect the power adapter and power cord to the monitor, then to https://www.acer.com/ac/en/US/content/support Then tighten the thumbscrews on the computer with the audio cable. 4. Please check user manual for audio output model. Optional: Connect the audio input socket (AUDIO IN) of replaceable parts, please refer to the above installation instructions. *Users may...
... more instruction. *POWER CORD specifications refer to page15 *For the installation of the LCD monitor and the line-out port on the signal cable connector. 3. Connect the power adapter and power cord to the monitor, then to https://www.acer.com/ac/en/US/content/support Then tighten the thumbscrews on the computer with the audio cable. 4. Please check user manual for audio output model. Optional: Connect the audio input socket (AUDIO IN) of replaceable parts, please refer to the above installation instructions. *Users may...
User Manual
Page 20
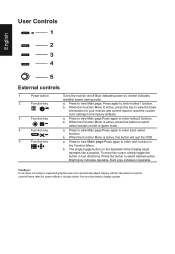
... a FreeSync supported graphics source to view the basic information for power efficient, virtually stutter free and low-latency display update. Press to view Main page.Press again to enter hotkey1 function. Amber indicates standby/ power saving mode. b. User Controls 1 English 2 3 4 5 External controls 1 Power button 2 Function key / 3 Function key / 4 Function key /X 5 Function key / Turns the monitor on/off.Blue indicates power on. When the Function Menu is active, this key to dynamically adjust display refresh rate based on...
... a FreeSync supported graphics source to view the basic information for power efficient, virtually stutter free and low-latency display update. Press to view Main page.Press again to enter hotkey1 function. Amber indicates standby/ power saving mode. b. User Controls 1 English 2 3 4 5 External controls 1 Power button 2 Function key / 3 Function key / 4 Function key /X 5 Function key / Turns the monitor on/off.Blue indicates power on. When the Function Menu is active, this key to dynamically adjust display refresh rate based on...

User Manual
Page 21
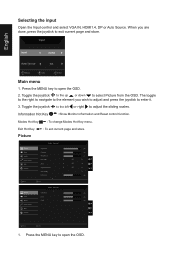
... Mode Standard Brightness 80 Input HDMI Menu 1. Main Menu Hot key1 (default: Standard mode) To choose scenario mode(sRGB,Reading,Darkroom,User, Standard, ECO, Graphics, Movie) Modes sRGB Reading Darkroom User Standard Move ECO OK Graphics Movie Hot key2 (default: Brightness) Open the Brightness control and select your LCD monitor. Hot Key1 Modes, Brightness, Volume, Gamma, Contrast, Blue Light, Over Drive 2. Brightness 80 Adjust OK Press the MENU key to quit current page and store. The OSD (onscreen display) can use...
... Mode Standard Brightness 80 Input HDMI Menu 1. Main Menu Hot key1 (default: Standard mode) To choose scenario mode(sRGB,Reading,Darkroom,User, Standard, ECO, Graphics, Movie) Modes sRGB Reading Darkroom User Standard Move ECO OK Graphics Movie Hot key2 (default: Brightness) Open the Brightness control and select your LCD monitor. Hot Key1 Modes, Brightness, Volume, Gamma, Contrast, Blue Light, Over Drive 2. Brightness 80 Adjust OK Press the MENU key to quit current page and store. The OSD (onscreen display) can use...
User Manual
Page 22
... or Auto Source. Information Hot Key : Show Monitor Information and Reset control function. Exit Hot Key X : To exit current page and store. Standard V.Position Focus Clock 50 50 50 X Move Enter 1. Toggle the joystick to the up or down to adjust the sliding scales. Picture Picture Color Audio Performance OSD System Mode - Press the MENU key to exit current page and store. Standard Brightness Contrast Black Boost Blue Light...
... or Auto Source. Information Hot Key : Show Monitor Information and Reset control function. Exit Hot Key X : To exit current page and store. Standard V.Position Focus Clock 50 50 50 X Move Enter 1. Toggle the joystick to the up or down to adjust the sliding scales. Picture Picture Color Audio Performance OSD System Mode - Press the MENU key to exit current page and store. Standard Brightness Contrast Black Boost Blue Light...

User Manual
Page 23
... left or right to make images sharper and clearer.. Stamdard Gamma Color Temp. English 2. Super Sharpness technology can be based on or off Note: Set to "On", will be used to enter it. 3. Color Picture Color Audio Performance OSD System Move Mode - The Picture menu can simulate high-resolution images by boosting the pixel density of TÜV Rheinland's "Low Blue Light Content" standard. 9. Contrast: Adjust the contrast from the OSD.Then toggle to the...
... left or right to make images sharper and clearer.. Stamdard Gamma Color Temp. English 2. Super Sharpness technology can be based on or off Note: Set to "On", will be used to enter it. 3. Color Picture Color Audio Performance OSD System Move Mode - The Picture menu can simulate high-resolution images by boosting the pixel density of TÜV Rheinland's "Low Blue Light Content" standard. 9. Contrast: Adjust the contrast from the OSD.Then toggle to the...
User Manual
Page 24
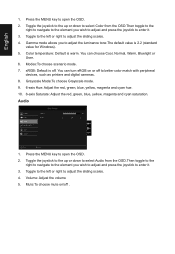
Gamma mode allows you to adjust the sliding scales. 4. Color temperature: Default is off . You can turn sRGB on /off . Press the MENU key to enter it . 3. Grayscale Mode:To choose Grayscale mode. 9. 6-axis Hue: Adjust the red, green, blue, yellow, magenta and cyan hue. 10. 6-axis Saturate: Adjust the red, green, blue, yellow, magenta and cyan saturation. Audio Picture Color Audio Performance OSD System Mode - Stardard Volume Mute 70 Off X Move Enter 1. Toggle...
Gamma mode allows you to adjust the sliding scales. 4. Color temperature: Default is off . You can turn sRGB on /off . Press the MENU key to enter it . 3. Grayscale Mode:To choose Grayscale mode. 9. 6-axis Hue: Adjust the red, green, blue, yellow, magenta and cyan hue. 10. 6-axis Saturate: Adjust the red, green, blue, yellow, magenta and cyan saturation. Audio Picture Color Audio Performance OSD System Mode - Stardard Volume Mute 70 Off X Move Enter 1. Toggle...
User Manual
Page 25
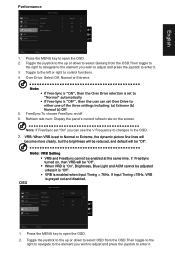
... more clearly, but the brightness will be reduced, and default will be enabled at the same time. When VRB is "On", Brightness, Blue Light and ACM cannot be "Off". Standard Picture Color Audio Performance OSD System Over Drive F reeSync V RB Refresh Rate Num Normal Off Off Off X Move Enter 1. Press the MENU key to control functions. 4. Refresh rate num: Display the panel's current refresh rate on /off. 6. Toggle the...
... more clearly, but the brightness will be reduced, and default will be enabled at the same time. When VRB is "On", Brightness, Blue Light and ACM cannot be "Off". Standard Picture Color Audio Performance OSD System Over Drive F reeSync V RB Refresh Rate Num Normal Off Off Off X Move Enter 1. Press the MENU key to control functions. 4. Refresh rate num: Display the panel's current refresh rate on /off. 6. Toggle the...
User Manual
Page 26
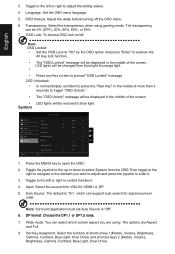
OSD Lock: To choose OSD lock on/off the OSD menu. 6. Standard Picture Color Audio Performance OSD System Input Auto Source DP Format Wide Mode Hot Key Assignment DDC/CI HDMI On DP1 . 2 Full On X HDMI Black Level Normal Quick Start Mode Off Move Enter Quick Start Mode 1. Auto Source: The default is "Off". 6. DP format: Choose the DP1.1 or DP1.2 rules. 7. Transparency: Select the transparency when using . OSD Unlocked: • In normal display condition to press the "Navi Key" in the...
OSD Lock: To choose OSD lock on/off the OSD menu. 6. Standard Picture Color Audio Performance OSD System Input Auto Source DP Format Wide Mode Hot Key Assignment DDC/CI HDMI On DP1 . 2 Full On X HDMI Black Level Normal Quick Start Mode Off Move Enter Quick Start Mode 1. Auto Source: The default is "Off". 6. DP format: Choose the DP1.1 or DP1.2 rules. 7. Transparency: Select the transparency when using . OSD Unlocked: • In normal display condition to press the "Navi Key" in the...
User Manual
Page 27
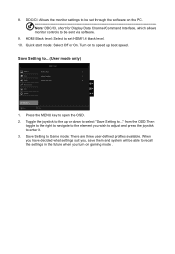
... select "Save Setting to the up boot speed. User Picture Mode: sRGB Color Mode: Reading Audio Mode: Darkroom Performance OSD System X Save setting to Game mode: There are three user-defined profiles available. Save Setting to ... from the OSD.Then toggle to the right to navigate to be sent via software. 9. DDC/CI: Allows the monitor settings to the element you turn on the PC Note: DDC/CI, short for Display Data...
... select "Save Setting to the up boot speed. User Picture Mode: sRGB Color Mode: Reading Audio Mode: Darkroom Performance OSD System X Save setting to Game mode: There are three user-defined profiles available. Save Setting to ... from the OSD.Then toggle to the right to navigate to be sent via software. 9. DDC/CI: Allows the monitor settings to the element you turn on the PC Note: DDC/CI, short for Display Data...
User Manual
Page 28
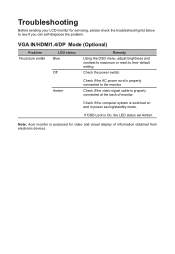
... from electronic devices. Amber Check if the AC power cord is On, the LED status set Amber. If OSD Lock is properly connected to their default setting. Troubleshooting Before sending your LCD monitor for video and visual display of monitor. Check if the computer system is switched on and in power saving/standby mode. Check the power switch. VGA IN/HDMI1.4/DP Mode (Optional) Problem No picture visible LED status Blue Off Remedy Using the OSD menu, adjust brightness and contrast to maximum or reset to the...
... from electronic devices. Amber Check if the AC power cord is On, the LED status set Amber. If OSD Lock is properly connected to their default setting. Troubleshooting Before sending your LCD monitor for video and visual display of monitor. Check if the computer system is switched on and in power saving/standby mode. Check the power switch. VGA IN/HDMI1.4/DP Mode (Optional) Problem No picture visible LED status Blue Off Remedy Using the OSD menu, adjust brightness and contrast to maximum or reset to the...


