Quick Start Guide
Page 1
1 INSTALLATION Notebook/PC Speakers USB 1 3 2 • Connecting to power source: using the power adapter DC IN USB RWY USB A USB B AUDIO OUT AUDIO IN /AV IN iPod/iPhone DC IN DVD player, Set-top box, HDTV receiver 4 5 6 • Connecting to power source: attaching to a projector battery (optional) 2 INTERFACE CONNECTOR USB A USB B AUDIO OUT AUDIO IN /AV IN DC IN Note: Connector interface and cable are subject to model's specifications.
1 INSTALLATION Notebook/PC Speakers USB 1 3 2 • Connecting to power source: using the power adapter DC IN USB RWY USB A USB B AUDIO OUT AUDIO IN /AV IN iPod/iPhone DC IN DVD player, Set-top box, HDTV receiver 4 5 6 • Connecting to power source: attaching to a projector battery (optional) 2 INTERFACE CONNECTOR USB A USB B AUDIO OUT AUDIO IN /AV IN DC IN Note: Connector interface and cable are subject to model's specifications.
Quick Start Guide
Page 2
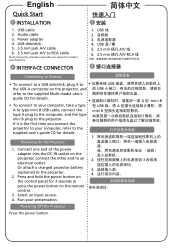
... B • To connect to your presentation. Press and hold the power button on the control panel for 3 seconds or 2 3 3 4 press the power button on the projector; Connect one end of the power adapter into the DC IN socket on the remote control. 3. Powering Off the... adapter 4. connect the other end to model's specifications. 2 INTERFACE CONNECTOR 1. If it to USB the USB A connector on the projector, and 的 USB A refer to the supplied user's guide CD for details. Run your computer, take a type 型 USB 线,将 A A to type mini B ...
... B • To connect to your presentation. Press and hold the power button on the control panel for 3 seconds or 2 3 3 4 press the power button on the projector; Connect one end of the power adapter into the DC IN socket on the remote control. 3. Powering Off the... adapter 4. connect the other end to model's specifications. 2 INTERFACE CONNECTOR 1. If it to USB the USB A connector on the projector, and 的 USB A refer to the supplied user's guide CD for details. Run your computer, take a type 型 USB 线,将 A A to type mini B ...
User Manual
Page 2
Acer Projector C112/LB100/LK-WV20 Series Model number Serial number Date of purchase Place of purchase Acer and the Acer logo are used herein for a particular purpose. Other companies' product names or trademarks are registered trademarks of this manual or...stored in a retrieval system, or transmitted, in any form or by photocopy, recording or otherwise, without obligation to their respective companies. Acer Projector C112/LB100/LK-WV20 Series User's Guide Original Issue: 12/2010 Changes may be made periodically to the information in this publication may be incorporated...
Acer Projector C112/LB100/LK-WV20 Series Model number Serial number Date of purchase Place of purchase Acer and the Acer logo are used herein for a particular purpose. Other companies' product names or trademarks are registered trademarks of this manual or...stored in a retrieval system, or transmitted, in any form or by photocopy, recording or otherwise, without obligation to their respective companies. Acer Projector C112/LB100/LK-WV20 Series User's Guide Original Issue: 12/2010 Changes may be made periodically to the information in this publication may be incorporated...
User Manual
Page 3
... is easily accessible and located as close to the AC power outlet. • Unplug the power cord before removing the power supply unit from the projector. • If the system has multiple sources of any kind onto or into is provided. • Never push objects of power, disconnect power from the...
... is easily accessible and located as close to the AC power outlet. • Unplug the power cord before removing the power supply unit from the projector. • If the system has multiple sources of any kind onto or into is provided. • Never push objects of power, disconnect power from the...
User Manual
Page 5
...adding or changing components. v Product servicing Do not attempt to service this product from walls and free flow of air around the projector are necessary. • Locations where temperatures may become excessively high, such as opening or removing covers may contaminate optical components, shorten...186;C/104 ºF. • Locations where the altitudes are covered by the operating instructions, since improper adjustment of a car with your projector. It At least 50cm clearance from the wall outlet and refer servicing to qualified service personnel when: • the power cord or...
...adding or changing components. v Product servicing Do not attempt to service this product from walls and free flow of air around the projector are necessary. • Locations where temperatures may become excessively high, such as opening or removing covers may contaminate optical components, shorten...186;C/104 ºF. • Locations where the altitudes are covered by the operating instructions, since improper adjustment of a car with your projector. It At least 50cm clearance from the wall outlet and refer servicing to qualified service personnel when: • the power cord or...
User Manual
Page 6
...become hot. • Clean the air filter frequently. Refer servicing only to suitable qualified professional service personnel. • Do not stand the projector on the remote control. • Do not attempt to disassemble this could cause the object to stop before disconnecting power. • Do ...not frequently turn off , please ensure the projector completes its own removable cover. The best way is the lamp which has its cooling cycle before turning main power off the main power...
...become hot. • Clean the air filter frequently. Refer servicing only to suitable qualified professional service personnel. • Do not stand the projector on the remote control. • Do not attempt to disassemble this could cause the object to stop before disconnecting power. • Do ...not frequently turn off , please ensure the projector completes its own removable cover. The best way is the lamp which has its cooling cycle before turning main power off the main power...
User Manual
Page 7
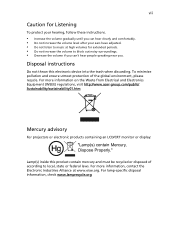
... local, state or federal laws. For more information on the Waste from Electrical and Electronics Equipment (WEEE) regulations, visit http://www.acer-group.com/public/ Sustainability/sustainability01.htm Mercury advisory For projectors or electronic products containing an LCD/CRT monitor or display: "Lamp(s) contain Mercury, Dispose Properly." Lamp(s) inside this electronic device...
... local, state or federal laws. For more information on the Waste from Electrical and Electronics Equipment (WEEE) regulations, visit http://www.acer-group.com/public/ Sustainability/sustainability01.htm Mercury advisory For projectors or electronic products containing an LCD/CRT monitor or display: "Lamp(s) contain Mercury, Dispose Properly." Lamp(s) inside this electronic device...
User Manual
Page 8
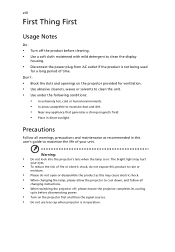
...that generates a strong magnetic field. • Place in direct sunlight. viii First Thing First Usage Notes Do: • Turn off , please ensure the projector completes its cooling cycle before cleaning. • Use a soft cloth moistened with mild detergent to clean the display housing. • Disconnect the power plug ...AC outlet if the product is in operation. The bright light may hurt your unit. Don't: • Block the slots and openings on the projector provided for a long period of your eyes. • To reduce the risk of fire or electric shock, do not expose this product to...
...that generates a strong magnetic field. • Place in direct sunlight. viii First Thing First Usage Notes Do: • Turn off , please ensure the projector completes its cooling cycle before cleaning. • Use a soft cloth moistened with mild detergent to clean the display housing. • Disconnect the power plug ...AC outlet if the product is in operation. The bright light may hurt your unit. Don't: • Block the slots and openings on the projector provided for a long period of your eyes. • To reduce the risk of fire or electric shock, do not expose this product to...
User Manual
Page 9
... First viii Usage Notes viii Precautions viii Introduction 1 Product Features 1 Package Overview 2 Projector Overview 3 Projector Outlook 3 Control Panel 4 Remote Control Layout 5 Using the projector battery 7 Getting Started 8 Connecting the Projector 8 Connecting a USB disk/stick (to the USB A connector) 8 Connecting a ...computer (to the USB B connector) 9 Turning the Projector On/Off 11 Turning On the Projector 11 Turning Off the Projector 12 Adjusting the Projected Image 13 Adjusting the Height of the Projected Image 13 How ...
... First viii Usage Notes viii Precautions viii Introduction 1 Product Features 1 Package Overview 2 Projector Overview 3 Projector Outlook 3 Control Panel 4 Remote Control Layout 5 Using the projector battery 7 Getting Started 8 Connecting the Projector 8 Connecting a USB disk/stick (to the USB A connector) 8 Connecting a ...computer (to the USB B connector) 9 Turning the Projector On/Off 11 Turning On the Projector 11 Turning Off the Projector 12 Adjusting the Projected Image 13 Adjusting the Height of the Projected Image 13 How ...
User Manual
Page 11
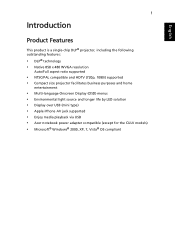
... Native 858 x 480 WVGA resolution Auto/Full aspect ratio supported • NTSC/PAL compatible and HDTV (720p, 1080i) supported • Compact size projector facilitates business purposes and home entertainment • Multi-language Onscreen Display (OSD) menus • Environmental light source and longer life by LED solution &#...8226; Display over USB (mini type) • Apple iPhone AV jack supported • Enjoy media playback via USB • Acer notebook power adapter compatible (except for the CULV models) • Microsoft® Windows® 2000, XP, 7, Vista® OS compliant
... Native 858 x 480 WVGA resolution Auto/Full aspect ratio supported • NTSC/PAL compatible and HDTV (720p, 1080i) supported • Compact size projector facilitates business purposes and home entertainment • Multi-language Onscreen Display (OSD) menus • Environmental light source and longer life by LED solution &#...8226; Display over USB (mini type) • Apple iPhone AV jack supported • Enjoy media playback via USB • Acer notebook power adapter compatible (except for the CULV models) • Microsoft® Windows® 2000, XP, 7, Vista® OS compliant
User Manual
Page 12
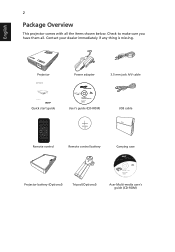
Check to make sure you have them all the items shown below. Contact your dealer immediately if any thing is missing. Projector Acer Projector Power adapter 3.5 mm jack A/V cable Quick start guide User's guide (CD-ROM) USB cable XXXXXX 3V Remote control Remote control battery Carrying case Projector battery (Optional) Tripod (Optional) Acer Multi-media user's guide (CD-ROM) English 2 Package Overview This projector comes with all .
Check to make sure you have them all the items shown below. Contact your dealer immediately if any thing is missing. Projector Acer Projector Power adapter 3.5 mm jack A/V cable Quick start guide User's guide (CD-ROM) USB cable XXXXXX 3V Remote control Remote control battery Carrying case Projector battery (Optional) Tripod (Optional) Acer Multi-media user's guide (CD-ROM) English 2 Package Overview This projector comes with all .
User Manual
Page 13
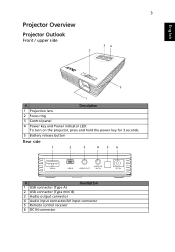
English 3 Projector Overview Projector Outlook Front / upper side 34 2 5 1 # Description 1 Projection lens 2 Focus ring 3 Control panel 4 Power key and Power indicator LED: To turn on the projector, press and hold the power key for 3 seconds. 5 Battery release button Rear side 1 2 3 4 5 6 USB A USB B AUDIO OUT AUDIO IN /AV IN DC IN # Description 1 USB connector (Type A) 2 USB connector (Type mini B) 3 Audio output connector 4 Audio input connector/AV input connector 5 Remote control receiver 6 DC IN connector
English 3 Projector Overview Projector Outlook Front / upper side 34 2 5 1 # Description 1 Projection lens 2 Focus ring 3 Control panel 4 Power key and Power indicator LED: To turn on the projector, press and hold the power key for 3 seconds. 5 Battery release button Rear side 1 2 3 4 5 6 USB A USB B AUDIO OUT AUDIO IN /AV IN DC IN # Description 1 USB connector (Type A) 2 USB connector (Type mini B) 3 Audio output connector 4 Audio input connector/AV input connector 5 Remote control receiver 6 DC IN connector

User Manual
Page 14
Selects items or makes adjustments to the previous step for the OSD menu operation or exits the OSD menu. Chooses composite video, USB A or USB B source. Launches the Onscreen Display (OSD) menu, returns to your selection. 4 Control Panel English 3 4 1 2 # Function 1 Power key and Power indicator LED 2 SOURCE 3 MENU 4 Four directional select keys Description Refer to the "Turning the Projector On/ Off" section.
Selects items or makes adjustments to the previous step for the OSD menu operation or exits the OSD menu. Chooses composite video, USB A or USB B source. Launches the Onscreen Display (OSD) menu, returns to your selection. 4 Control Panel English 3 4 1 2 # Function 1 Power key and Power indicator LED 2 SOURCE 3 MENU 4 Four directional select keys Description Refer to the "Turning the Projector On/ Off" section.

User Manual
Page 15
To pause the screen image. 3 POWER Refer to the "Turning the Projector On/Off" section. 4 HIDE Press "HIDE" to an upper data folder. 9 Enter/Play/Pause Plays/pauses a media file. 10 Pre./Rewind Not applicable. press again ... hide screen image; English 5 Remote Control Layout 1 2 3 4 6 5 7 8 9 11 10 12 17 13 14 15 16 # icon Function 1 Infrared transmitter 2 FREEZE Description Sends signals to the projector.
To pause the screen image. 3 POWER Refer to the "Turning the Projector On/Off" section. 4 HIDE Press "HIDE" to an upper data folder. 9 Enter/Play/Pause Plays/pauses a media file. 10 Pre./Rewind Not applicable. press again ... hide screen image; English 5 Remote Control Layout 1 2 3 4 6 5 7 8 9 11 10 12 17 13 14 15 16 # icon Function 1 Infrared transmitter 2 FREEZE Description Sends signals to the projector.
User Manual
Page 17
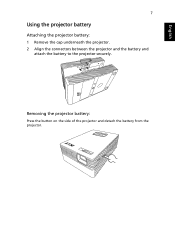
English 7 Using the projector battery Attaching the projector battery: 1 Remove the cap underneath the projector. 2 Align the connectors between the projector and the battery and attach the battery to the projector securely. 1 2 Removing the projector battery: Press the button on the side of the projector and detach the battery from the projector.
English 7 Using the projector battery Attaching the projector battery: 1 Remove the cap underneath the projector. 2 Align the connectors between the projector and the battery and attach the battery to the projector securely. 1 2 Removing the projector battery: Press the button on the side of the projector and detach the battery from the projector.

User Manual
Page 18
English 8 Getting Started Connecting the Projector USB Notebook/PC Speakers 1 3 2 USB RWY USB A USB B AUDIO OUT AUDIO IN /AV IN iPod/iPhone DC IN 4 5 6 DVD player, Set-top box, HDTV receiver # Description 1 USB cable 2 Audio cable 3 Power adapter # Description 4 USB disk/stick 5 3.5 mm jack A/V cable 6 3.5 mm jack A/V to RCA cable Connecting a USB disk/stick (to the USB A connector) For details, please refer to the Multi-media user's guide CD supplied with your projector.
English 8 Getting Started Connecting the Projector USB Notebook/PC Speakers 1 3 2 USB RWY USB A USB B AUDIO OUT AUDIO IN /AV IN iPod/iPhone DC IN 4 5 6 DVD player, Set-top box, HDTV receiver # Description 1 USB cable 2 Audio cable 3 Power adapter # Description 4 USB disk/stick 5 3.5 mm jack A/V cable 6 3.5 mm jack A/V to RCA cable Connecting a USB disk/stick (to the USB A connector) For details, please refer to the Multi-media user's guide CD supplied with your projector.
User Manual
Page 19
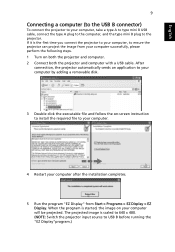
...a removable disk. 3 Double-click the executable file and follow the on-screen instruction to install the required file to the projector. English 9 Connecting a computer (to the USB B connector) To connect the projector to your computer, take a type A to type mini B USB cable, connect the type A plug to the computer..., please perform the following steps. 1 Turn on your computer will be projected. If it is started, the image on both the projector and computer. 2 Connect both the projector and computer with a USB cable. The projected image is scaled to 640 x 480. (NOTE: Switch the...
...a removable disk. 3 Double-click the executable file and follow the on-screen instruction to install the required file to the projector. English 9 Connecting a computer (to the USB B connector) To connect the projector to your computer, take a type A to type mini B USB cable, connect the type A plug to the computer..., please perform the following steps. 1 Turn on your computer will be projected. If it is started, the image on both the projector and computer. 2 Connect both the projector and computer with a USB cable. The projected image is scaled to 640 x 480. (NOTE: Switch the...

User Manual
Page 20
English 10 6 You can select the display area of your computer. • Full Screen: Displays the full screen of your computer, please make sure the timing of the computer will be displayed. • To stop projecting the computer screen, click Exit. That is only partial screen of the display mode is compatible with your computer from the projector. • Compatible mode: Sets the computer screen to 640 x 480. Note: To ensure the projector works well with the projector.
English 10 6 You can select the display area of your computer. • Full Screen: Displays the full screen of your computer, please make sure the timing of the computer will be displayed. • To stop projecting the computer screen, click Exit. That is only partial screen of the display mode is compatible with your computer from the projector. • Compatible mode: Sets the computer screen to 640 x 480. Note: To ensure the projector works well with the projector.
User Manual
Page 21
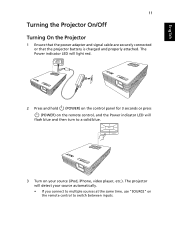
... a solid blue. 3 Turn on the remote control to multiple sources at the same time, use "SOURCE" on your source (iPod, iPhone, video player, etc.). The projector will light red. The Power indicator LED will detect your source automatically. • If you connect to switch between inputs. English 11 Turning the...
... a solid blue. 3 Turn on the remote control to multiple sources at the same time, use "SOURCE" on your source (iPod, iPhone, video player, etc.). The projector will light red. The Power indicator LED will detect your source automatically. • If you connect to switch between inputs. English 11 Turning the...

User Manual
Page 22
English 12 Turning Off the Projector 1 To turn the projector off, press remote control. (POWER) on the projector or 2 The LED power indicator will turn RED. 3 If the projector will not be used for an extended period, unplug the power cord from the power outlet. Note: Whenever the projector automatically shuts down, contact your local reseller or service center.
English 12 Turning Off the Projector 1 To turn the projector off, press remote control. (POWER) on the projector or 2 The LED power indicator will turn RED. 3 If the projector will not be used for an extended period, unplug the power cord from the power outlet. Note: Whenever the projector automatically shuts down, contact your local reseller or service center.


