Quick Start Guide
Page 1
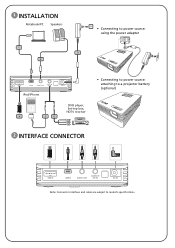
1 INSTALLATION Notebook/PC Speakers USB 1 3 2 • Connecting to power source: using the power adapter DC IN USB RWY USB A USB B AUDIO OUT AUDIO IN /AV IN iPod/iPhone DC IN DVD player, Set-top box, HDTV receiver 4 5 6 • Connecting to power source: attaching to a projector battery (optional) 2 INTERFACE CONNECTOR USB A USB B AUDIO OUT AUDIO IN /AV IN DC IN Note: Connector interface and cable are subject to model's specifications.
1 INSTALLATION Notebook/PC Speakers USB 1 3 2 • Connecting to power source: using the power adapter DC IN USB RWY USB A USB B AUDIO OUT AUDIO IN /AV IN iPod/iPhone DC IN DVD player, Set-top box, HDTV receiver 4 5 6 • Connecting to power source: attaching to a projector battery (optional) 2 INTERFACE CONNECTOR USB A USB B AUDIO OUT AUDIO IN /AV IN DC IN Note: Connector interface and cable are subject to model's specifications.
Quick Start Guide
Page 2
... subject to the projector. 2. Powering Off the Projector Press the power button. USB cable 2. If it to USB the USB A connector on the projector, and 的 USB A refer to an electrical outlet. connect the other end to the supplied Multi-media user's guide CD for 3 seconds or 2 3 3 4 press the power button on the projector; Press and hold the power button on the control panel for details. Connect one end of the power adapter into the...
... subject to the projector. 2. Powering Off the Projector Press the power button. USB cable 2. If it to USB the USB A connector on the projector, and 的 USB A refer to an electrical outlet. connect the other end to the supplied Multi-media user's guide CD for 3 seconds or 2 3 3 4 press the power button on the projector; Press and hold the power button on the control panel for details. Connect one end of the power adapter into the...
User Manual
Page 2
... and publications. Acer Projector C112/LB100/LK-WV20 Series Model number Serial number Date of purchase Place of purchase Acer and the Acer logo are recorded on the label affixed to the contents hereof and specifically disclaims the implied warranties of this publication may be incorporated in the space provided below. "HDMI™, the HDMI logo and High-Definition Multimedia Interface are used herein for...
... and publications. Acer Projector C112/LB100/LK-WV20 Series Model number Serial number Date of purchase Place of purchase Acer and the Acer logo are recorded on the label affixed to the contents hereof and specifically disclaims the implied warranties of this publication may be incorporated in the space provided below. "HDMI™, the HDMI logo and High-Definition Multimedia Interface are used herein for...
User Manual
Page 3
... when connecting and disconnecting power to the external power supply unit: • Install the power supply unit before connecting the power cord to the AC power outlet. • Unplug the power cord before cleaning. Caution for future reference. The openings should never be sure to ensure reliable operation of power, disconnect power from overheating. Caution for ventilation to unplug the power cord from the power supplies. This product should never be blocked or covered...
... when connecting and disconnecting power to the external power supply unit: • Install the power supply unit before connecting the power cord to the AC power outlet. • Unplug the power cord before cleaning. Caution for future reference. The openings should never be sure to ensure reliable operation of power, disconnect power from overheating. Caution for ventilation to unplug the power cord from the power supplies. This product should never be blocked or covered...

User Manual
Page 4
... place the product on the cord. • If an extension cord is used , the load should be operated from unexpected noise produced by plugging in electric shock and/or injury. Using a power outlet that is not properly grounded may interfere with the performance of this product. • Use the product only with the supplied power supply cord set. Also, make sure that...
... place the product on the cord. • If an extension cord is used , the load should be operated from unexpected noise produced by plugging in electric shock and/or injury. Using a power outlet that is not properly grounded may interfere with the performance of this product. • Use the product only with the supplied power supply cord set. Also, make sure that...
User Manual
Page 5
... small children. It v Product servicing Do not attempt to service this product from walls and free flow of air around the projector are necessary. • Locations where temperatures may become excessively high, such as opening or removing covers may expose you to dangerous voltage points or other controls may result in the following the operating instructions Note: Adjust only those controls that is poorly ventilated or...
... small children. It v Product servicing Do not attempt to service this product from walls and free flow of air around the projector are necessary. • Locations where temperatures may become excessively high, such as opening or removing covers may expose you to dangerous voltage points or other controls may result in the following the operating instructions Note: Adjust only those controls that is poorly ventilated or...
User Manual
Page 6
... the fan to fire. • When switching the projector off, please ensure the projector completes its own removable cover. It can lead to stop before disconnecting power. • Do not frequently turn off the main power abruptly or unplug the projector during operation. To temporarily turn off the lamp, press HIDE on the remote control. • Do not attempt to become hot. • Clean the air filter frequently...
... the fan to fire. • When switching the projector off, please ensure the projector completes its own removable cover. It can lead to stop before disconnecting power. • Do not frequently turn off the main power abruptly or unplug the projector during operation. To temporarily turn off the lamp, press HIDE on the remote control. • Do not attempt to become hot. • Clean the air filter frequently...
User Manual
Page 8
... detergent to clean the display housing. • Disconnect the power plug from AC outlet if the product is on. The bright light may cause electric shock. • When changing the lamp, please allow the projector to maximize the life of your eyes. • To reduce the risk of time. Warning: • Do not look into the projector's lens when the lamp is not...
... detergent to clean the display housing. • Disconnect the power plug from AC outlet if the product is on. The bright light may cause electric shock. • When changing the lamp, please allow the projector to maximize the life of your eyes. • To reduce the risk of time. Warning: • Do not look into the projector's lens when the lamp is not...
User Manual
Page 9
... 3 Control Panel 4 Remote Control Layout 5 Using the projector battery 7 Getting Started 8 Connecting the Projector 8 Connecting a USB disk/stick (to the USB A connector) 8 Connecting a computer (to the USB B connector) 9 Turning the Projector On/Off 11 Turning On the Projector 11 Turning Off the Projector 12 Adjusting the Projected Image 13 Adjusting the Height of the Projected Image 13 How to Optimize Image Size and Distance 14 User Controls 15 Onscreen Display (OSD) Menus 15 Display Mode 16 Projection 16 Aspect Ratio 17 Language 17 Management 18 Audio...
... 3 Control Panel 4 Remote Control Layout 5 Using the projector battery 7 Getting Started 8 Connecting the Projector 8 Connecting a USB disk/stick (to the USB A connector) 8 Connecting a computer (to the USB B connector) 9 Turning the Projector On/Off 11 Turning On the Projector 11 Turning Off the Projector 12 Adjusting the Projected Image 13 Adjusting the Height of the Projected Image 13 How to Optimize Image Size and Distance 14 User Controls 15 Onscreen Display (OSD) Menus 15 Display Mode 16 Projection 16 Aspect Ratio 17 Language 17 Management 18 Audio...
User Manual
Page 11
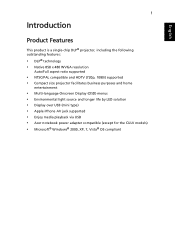
... and HDTV (720p, 1080i) supported • Compact size projector facilitates business purposes and home entertainment • Multi-language Onscreen Display (OSD) menus • Environmental light source and longer life by LED solution • Display over USB (mini type) • Apple iPhone AV jack supported • Enjoy media playback via USB • Acer notebook power adapter compatible (except for the CULV models) • Microsoft® Windows® 2000, XP...
... and HDTV (720p, 1080i) supported • Compact size projector facilitates business purposes and home entertainment • Multi-language Onscreen Display (OSD) menus • Environmental light source and longer life by LED solution • Display over USB (mini type) • Apple iPhone AV jack supported • Enjoy media playback via USB • Acer notebook power adapter compatible (except for the CULV models) • Microsoft® Windows® 2000, XP...
User Manual
Page 13
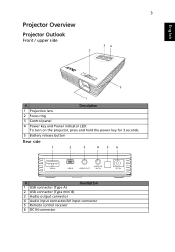
English 3 Projector Overview Projector Outlook Front / upper side 34 2 5 1 # Description 1 Projection lens 2 Focus ring 3 Control panel 4 Power key and Power indicator LED: To turn on the projector, press and hold the power key for 3 seconds. 5 Battery release button Rear side 1 2 3 4 5 6 USB A USB B AUDIO OUT AUDIO IN /AV IN DC IN # Description 1 USB connector (Type A) 2 USB connector (Type mini B) 3 Audio output connector 4 Audio input connector/AV input connector 5 Remote control receiver 6 DC IN connector
English 3 Projector Overview Projector Outlook Front / upper side 34 2 5 1 # Description 1 Projection lens 2 Focus ring 3 Control panel 4 Power key and Power indicator LED: To turn on the projector, press and hold the power key for 3 seconds. 5 Battery release button Rear side 1 2 3 4 5 6 USB A USB B AUDIO OUT AUDIO IN /AV IN DC IN # Description 1 USB connector (Type A) 2 USB connector (Type mini B) 3 Audio output connector 4 Audio input connector/AV input connector 5 Remote control receiver 6 DC IN connector

User Manual
Page 14
Selects items or makes adjustments to the previous step for the OSD menu operation or exits the OSD menu. Launches the Onscreen Display (OSD) menu, returns to your selection. Chooses composite video, USB A or USB B source. 4 Control Panel English 3 4 1 2 # Function 1 Power key and Power indicator LED 2 SOURCE 3 MENU 4 Four directional select keys Description Refer to the "Turning the Projector On/ Off" section.
Selects items or makes adjustments to the previous step for the OSD menu operation or exits the OSD menu. Launches the Onscreen Display (OSD) menu, returns to your selection. Chooses composite video, USB A or USB B source. 4 Control Panel English 3 4 1 2 # Function 1 Power key and Power indicator LED 2 SOURCE 3 MENU 4 Four directional select keys Description Refer to the "Turning the Projector On/ Off" section.

User Manual
Page 18
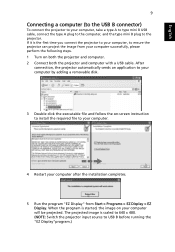
English 8 Getting Started Connecting the Projector USB Notebook/PC Speakers 1 3 2 USB RWY USB A USB B AUDIO OUT AUDIO IN /AV IN iPod/iPhone DC IN 4 5 6 DVD player, Set-top box, HDTV receiver # Description 1 USB cable 2 Audio cable 3 Power adapter # Description 4 USB disk/stick 5 3.5 mm jack A/V cable 6 3.5 mm jack A/V to RCA cable Connecting a USB disk/stick (to the USB A connector) For details, please refer to the Multi-media user's guide CD supplied with your projector.
English 8 Getting Started Connecting the Projector USB Notebook/PC Speakers 1 3 2 USB RWY USB A USB B AUDIO OUT AUDIO IN /AV IN iPod/iPhone DC IN 4 5 6 DVD player, Set-top box, HDTV receiver # Description 1 USB cable 2 Audio cable 3 Power adapter # Description 4 USB disk/stick 5 3.5 mm jack A/V cable 6 3.5 mm jack A/V to RCA cable Connecting a USB disk/stick (to the USB A connector) For details, please refer to the Multi-media user's guide CD supplied with your projector.
User Manual
Page 19
... Display. The projected image is started, the image on both the projector and computer. 2 Connect both the projector and computer with a USB cable. When the program is scaled to 640 x 480. (NOTE: Switch the projector input source to USB B before running the "EZ Display"program.) After connection, the projector automatically sends an application to your computer by adding a removable disk. 3 Double-click the executable file and follow the on-screen instruction...
... Display. The projected image is started, the image on both the projector and computer. 2 Connect both the projector and computer with a USB cable. When the program is scaled to 640 x 480. (NOTE: Switch the projector input source to USB B before running the "EZ Display"program.) After connection, the projector automatically sends an application to your computer by adding a removable disk. 3 Double-click the executable file and follow the on-screen instruction...
User Manual
Page 21
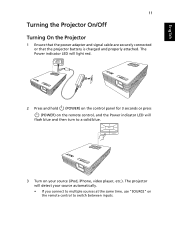
... the control panel for 3 seconds or press (POWER) on the remote control, and the Power indicator LED will detect your source automatically. • If you connect to switch between inputs. The projector will flash blue and then turn to a solid blue. 3 Turn on the remote control to multiple sources at the same time, use "SOURCE" on your source (iPod, iPhone, video player, etc.). The Power indicator LED will light red. English 11 Turning the Projector On/Off Turning On the Projector 1 Ensure that the power adapter and signal cable...
... the control panel for 3 seconds or press (POWER) on the remote control, and the Power indicator LED will detect your source automatically. • If you connect to switch between inputs. The projector will flash blue and then turn to a solid blue. 3 Turn on the remote control to multiple sources at the same time, use "SOURCE" on your source (iPod, iPhone, video player, etc.). The Power indicator LED will light red. English 11 Turning the Projector On/Off Turning On the Projector 1 Ensure that the power adapter and signal cable...
User Manual
Page 24
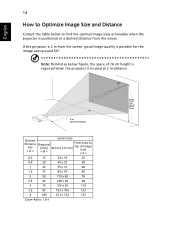
... required when the projector is located at a desired distance from the screen, good image quality is positioned at 2 m distance. Note: Remind as below to W (cm) x H (cm) top of image C Desired Distance (m) < A > Diagonal (inch) < B > Screen Size From base to find the optimal image sizes achievable when the projector is possible for the image sizes around 50". If the projector is 2 m from the screen. A 2m Desired distance 50" B Height: 76...
... required when the projector is located at a desired distance from the screen, good image quality is positioned at 2 m distance. Note: Remind as below to W (cm) x H (cm) top of image C Desired Distance (m) < A > Diagonal (inch) < B > Screen Size From base to find the optimal image sizes achievable when the projector is possible for the image sizes around 50". If the projector is 2 m from the screen. A 2m Desired distance 50" B Height: 76...
User Manual
Page 29
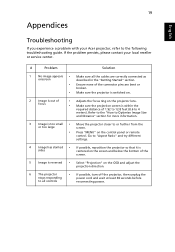
... your Acer projector, refer to "Aspect Ratio" and try different settings. 4 Image has slanted • If possible, reposition the projector so that it is sides centered on the screen and below the bottom of the screen. 5 Image is within the required distance of focus • Adjusts the focus ring on the projector lens. • Make sure the projection screen is reversed • Select "Projection" on the control panel or remote control.
... your Acer projector, refer to "Aspect Ratio" and try different settings. 4 Image has slanted • If possible, reposition the projector so that it is sides centered on the screen and below the bottom of the screen. 5 Image is within the required distance of focus • Adjusts the focus ring on the projector lens. • Make sure the projection screen is reversed • Select "Projection" on the control panel or remote control.
User Manual
Page 30
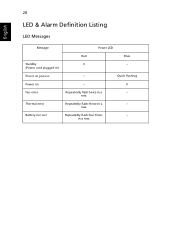
Repeatedly flash thrice in a row. 20 LED & Alarm Definition Listing LED Messages English Message Standby (Power cord plugged in) Power on process Power on Fan error Thermal error Battery run out Power LED Red Blue V -- --Repeatedly flash twice in a row. Repeatedly flash four times in a row. Quick flashing V ----
Repeatedly flash thrice in a row. 20 LED & Alarm Definition Listing LED Messages English Message Standby (Power cord plugged in) Power on process Power on Fan error Thermal error Battery run out Power LED Red Blue V -- --Repeatedly flash twice in a row. Repeatedly flash four times in a row. Quick flashing V ----
User Manual
Page 31
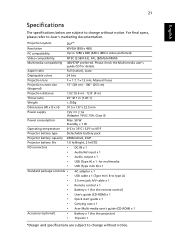
... II) Power consumption Max. 50 W Standby < 1 W Operating temperature 0ºC to 35ºC / 32ºF to 95ºF Projector battery type Detachable battery pack Projector battery capacity 2800mAhx6, 3S2P Projector battery life 1.6 hr/Bright, 2 hr/STD I /M/N) Multimedia compatibility 480/576P preferred. Please check the Multi-media user's guide CD for the projector) • Tripod x 1 *Design and specifications are subject to change without notice. Projection system DLP™ Resolution WVGA...
... II) Power consumption Max. 50 W Standby < 1 W Operating temperature 0ºC to 35ºC / 32ºF to 95ºF Projector battery type Detachable battery pack Projector battery capacity 2800mAhx6, 3S2P Projector battery life 1.6 hr/Bright, 2 hr/STD I /M/N) Multimedia compatibility 480/576P preferred. Please check the Multi-media user's guide CD for the projector) • Tripod x 1 *Design and specifications are subject to change without notice. Projection system DLP™ Resolution WVGA...
User Manual
Page 34
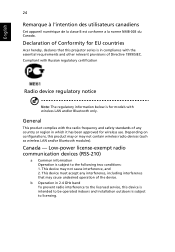
... operated indoors and installation outdoors is in compliance with wireless LAN and/or Bluetooth only. This device must accept any country or region in 2.4 GHz band To prevent radio interference to the following two conditions: 1. b Operation in which it has been approved for EU countries Acer ... Cet appareil numérique de la classe B est conforme a la norme NMB-003 du Canada. Low-power license-exempt radio communication devices (RSS-210) a Common information Operation is for models with the essential requirements and other relevant provisions of Conformity for wireless use.
... operated indoors and installation outdoors is in compliance with wireless LAN and/or Bluetooth only. This device must accept any country or region in 2.4 GHz band To prevent radio interference to the following two conditions: 1. b Operation in which it has been approved for EU countries Acer ... Cet appareil numérique de la classe B est conforme a la norme NMB-003 du Canada. Low-power license-exempt radio communication devices (RSS-210) a Common information Operation is for models with the essential requirements and other relevant provisions of Conformity for wireless use.


