Acer V5-571 Series Notebook Touch Service Guide
Page 6
... 3-12 Removing the ODD Module 3-15 Main Unit Disassembly Process 3-18 Main Unit Disassembly Flowchart 3-18 Removing the Palmrest Module/Upper Case 3-19 Removing the Touchpad Board 3-22 Removing the Power Button Board 3-25 Removing the SATA Board 3-27 Removing the HDD Module 3-28 Removing the WLAN Module 3-29 Removing the... the Camera Board 3-48 Removing the Microphone 3-50 Removing the LCD FPC Cable 3-52 vi Removing the HDD Password 2-15 Removing the BIOS Passwords 2-17 Using DMI Utility in DOS Mode 2-18 Using DMI Utility in Windows Mode 2-20 Chapter 3 -
... 3-12 Removing the ODD Module 3-15 Main Unit Disassembly Process 3-18 Main Unit Disassembly Flowchart 3-18 Removing the Palmrest Module/Upper Case 3-19 Removing the Touchpad Board 3-22 Removing the Power Button Board 3-25 Removing the SATA Board 3-27 Removing the HDD Module 3-28 Removing the WLAN Module 3-29 Removing the... the Camera Board 3-48 Removing the Microphone 3-50 Removing the LCD FPC Cable 3-52 vi Removing the HDD Password 2-15 Removing the BIOS Passwords 2-17 Using DMI Utility in DOS Mode 2-18 Using DMI Utility in Windows Mode 2-20 Chapter 3 -

Acer V5-571 Series Notebook Touch Service Guide
Page 19
... called liquid crystal display (LCD), displays computer output, supports multi-touch input. Touchpad Touch-sensitive pointing device which functions like a computer mouse. Integrated microphone Internal microphone for your computer. Keyboard For entering data into your hands when you use the computer. Hardware Specifications and Configurations 1-11 Palmrest Comfortable support area for sound...
... called liquid crystal display (LCD), displays computer output, supports multi-touch input. Touchpad Touch-sensitive pointing device which functions like a computer mouse. Integrated microphone Internal microphone for your computer. Keyboard For entering data into your hands when you use the computer. Hardware Specifications and Configurations 1-11 Palmrest Comfortable support area for sound...
Acer V5-571 Series Notebook Touch Service Guide
Page 24
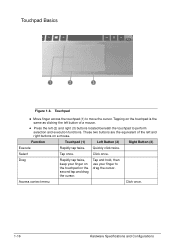
...left button of the left (2) and right (3) buttons located beneath the touchpad to drag the cursor. Click once. Function Touchpad (1) Left Button (2) Right Button (3) Execute Rapidly tap twice. Tap and hold, then use your finger on the touchpad on a mouse. Touchpad Basics 0 Figure 1-6. Quickly click twice. Access context menu Click once. ... the second tap and drag the cursor. Drag Rapidly tap twice, keep your finger to perform selection and execution functions. Touchpad Move finger across the touchpad (1) to move the cursor. Select Tap once.
...left button of the left (2) and right (3) buttons located beneath the touchpad to drag the cursor. Click once. Function Touchpad (1) Left Button (2) Right Button (3) Execute Rapidly tap twice. Tap and hold, then use your finger on the touchpad on a mouse. Touchpad Basics 0 Figure 1-6. Quickly click twice. Access context menu Click once. ... the second tap and drag the cursor. Drag Rapidly tap twice, keep your finger to perform selection and execution functions. Touchpad Move finger across the touchpad (1) to move the cursor. Select Tap once.
Acer V5-571 Series Notebook Touch Service Guide
Page 27
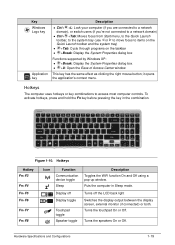
... Ctrl+ +Tab: Moves focus from Start menu, to the Quick Launch toolbar, to the system tray (use or to move focus to access most computer controls. Hotkeys 0 The computer uses hotkeys or key combinations to items on the Quick Launch toolbar and the system tray) +Tab: Cycle...display output between the display screen, external monitor (if connected) or both. Turns the touchpad On or Off. Turns off Display toggle Touchpad toggle Speaker toggle Description Toggles the WiFi function On and Off using a pop-up window. To activate hotkeys, press and hold the Fn key before ...
... Ctrl+ +Tab: Moves focus from Start menu, to the Quick Launch toolbar, to the system tray (use or to move focus to access most computer controls. Hotkeys 0 The computer uses hotkeys or key combinations to items on the Quick Launch toolbar and the system tray) +Tab: Cycle...display output between the display screen, external monitor (if connected) or both. Turns the touchpad On or Off. Turns off Display toggle Touchpad toggle Speaker toggle Description Toggles the WiFi function On and Off using a pop-up window. To activate hotkeys, press and hold the Fn key before ...

Acer V5-571 Series Notebook Touch Service Guide
Page 180
Screws Step Touchpad Module Reassembly Screw M2 × L3 Quantity 3 Screw Type 4. Figure 3-143. Touchpad Adhesive Tape 3-88 Machine Maintenance Secure the touchpad board to the board using three screws. Place the touchpad cable into the touchpad board, then secure the cable to the upper case assembly using adhesive tape. 3. Figure 3-142. Touchpad Screws Table 3-141.
Screws Step Touchpad Module Reassembly Screw M2 × L3 Quantity 3 Screw Type 4. Figure 3-143. Touchpad Adhesive Tape 3-88 Machine Maintenance Secure the touchpad board to the board using three screws. Place the touchpad cable into the touchpad board, then secure the cable to the upper case assembly using adhesive tape. 3. Figure 3-142. Touchpad Screws Table 3-141.

Acer V5-571 Series Notebook Touch Service Guide
Page 183
Figure 3-148. Screws Step Upper Case Reassembly Screw M2.5 × 6 Quantity 16 Screw Type Machine Maintenance 3-91 Touchpad Cable 4. Base Side Table 3-148. Secure the upper case to access the base side of the lower case assembly. 5. 3. Upper Case Screws - Figure 3-147. Turn the computer over to the lower case assembly using sixteen screws. Connect the touchpad cable to the mainboard (1), then press the connector latch (2) until it locks into place.
Figure 3-148. Screws Step Upper Case Reassembly Screw M2.5 × 6 Quantity 16 Screw Type Machine Maintenance 3-91 Touchpad Cable 4. Base Side Table 3-148. Secure the upper case to access the base side of the lower case assembly. 5. 3. Upper Case Screws - Figure 3-147. Turn the computer over to the lower case assembly using sixteen screws. Connect the touchpad cable to the mainboard (1), then press the connector latch (2) until it locks into place.


