
User Manual
Page 3
... keyboard 30 Battery-low warning 66 Lock keys and embedded numeric keypad...... 30 Hotkeys 31 Installing and removing the battery pack 67 Windows keys 33 Traveling with your computer 69 Touchpad 34 Disconnecting from the desktop 69 Touchpad basics 34 Moving around 69 Preparing the computer 70 Recovery 36 What to bring to meetings 70 Creating a recovery backup 36 Taking the computer home 71 Creating a drivers and applications backup...
... keyboard 30 Battery-low warning 66 Lock keys and embedded numeric keypad...... 30 Hotkeys 31 Installing and removing the battery pack 67 Windows keys 33 Traveling with your computer 69 Touchpad 34 Disconnecting from the desktop 69 Touchpad basics 34 Moving around 69 Preparing the computer 70 Recovery 36 What to bring to meetings 70 Creating a recovery backup 36 Taking the computer home 71 Creating a drivers and applications backup...
User Manual
Page 4
... hints for Windows updates 102 Playing DVD movies 88 Where can I get to Start 96 Connecting to a network 77 Built-in the way that I'm used to the Internet 78 Wireless networks 78 How do I unlock my computer 98 How do I turn off my computer 97 Why is there a new interface 97 Wireless networks 78 Connecting to - Table of contents Traveling with the computer 72 Enable disk-to-disk recovery 89...
... hints for Windows updates 102 Playing DVD movies 88 Where can I get to Start 96 Connecting to a network 77 Built-in the way that I'm used to the Internet 78 Wireless networks 78 How do I unlock my computer 98 How do I turn off my computer 97 Why is there a new interface 97 Wireless networks 78 Connecting to - Table of contents Traveling with the computer 72 Enable disk-to-disk recovery 89...
User Manual
Page 8
... damaged. - Note: Adjust only those controls that are covered by a qualified technician to restore the product to normal condition. Failure to follow these guidelines may result in a humid, wet or corrosive environment. Safety and comfort The product does not operate normally after following the operating instructions. - Guidelines for service. - Do not pierce, open or disassemble the battery. Do not use it to...
... damaged. - Note: Adjust only those controls that are covered by a qualified technician to restore the product to normal condition. Failure to follow these guidelines may result in a humid, wet or corrosive environment. Safety and comfort The product does not operate normally after following the operating instructions. - Guidelines for service. - Do not pierce, open or disassemble the battery. Do not use it to...
User Manual
Page 17
...; Use the Windows shutdown command: Open the Charms bar, click Settings > Power then click Shut Down. The Quick Guide introduces you to the basic features and functions of your notebook. In addition it contains general regulations and safety notices for your new computer. Basic care and tips for using your computer Turning your mobile computing needs. For more productive, please refer to the User's Manual...
...; Use the Windows shutdown command: Open the Charms bar, click Settings > Power then click Shut Down. The Quick Guide introduces you to the basic features and functions of your notebook. In addition it contains general regulations and safety notices for your new computer. Basic care and tips for using your computer Turning your mobile computing needs. For more productive, please refer to the User's Manual...
User Manual
Page 23
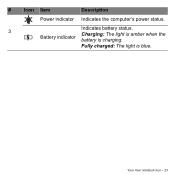
# Icon Item Description Power indicator Indicates the computer's power status. 3 Indicates battery status. Your Acer notebook tour - 23 Battery indicator Charging: The light is amber when the battery is blue. Fully charged: The light is charging.
# Icon Item Description Power indicator Indicates the computer's power status. 3 Indicates battery status. Your Acer notebook tour - 23 Battery indicator Charging: The light is amber when the battery is blue. Fully charged: The light is charging.

User Manual
Page 26
...Only one card can operate at any given time. Information on USB 3.0 • Compatible with microphone. Connects to remove/install the card. Your Acer notebook tour # Icon 4 Item HDMI port 5 USB port 6 Multi-in-1 card reader 7 Headset/speaker jack Description Supports high-definition digital video connections. Push to USB devices. Connects to audio devices (e.g., speakers, headphones) or a headset with USB 3.0 and earlier devices. • For optimal performance, use USB 3.0-certified devices. • Defined by the USB 3.0 specification (SuperSpeed USB). 26 - Accepts...
...Only one card can operate at any given time. Information on USB 3.0 • Compatible with microphone. Connects to remove/install the card. Your Acer notebook tour # Icon 4 Item HDMI port 5 USB port 6 Multi-in-1 card reader 7 Headset/speaker jack Description Supports high-definition digital video connections. Push to USB devices. Connects to audio devices (e.g., speakers, headphones) or a headset with USB 3.0 and earlier devices. • For optimal performance, use USB 3.0-certified devices. • Defined by the USB 3.0 specification (SuperSpeed USB). 26 - Accepts...

User Manual
Page 27
... eject hole Ejects the optical drive tray when the computer is also USB 3.0 compatible (see below). Right view # Icon 1 2 3 4 5 6 Item Description USB ports Connects to eject the optical drive tray. Optical drive Internal optical drive; External display (VGA) port Connects to a display device (e.g., external monitor, LCD projector). If a port is black it is USB 2.0 compatible, if it is blue it is turned off. Your Acer notebook tour - 27 Optical disk access Lights up when the optical drive is indicator active.
... eject hole Ejects the optical drive tray when the computer is also USB 3.0 compatible (see below). Right view # Icon 1 2 3 4 5 6 Item Description USB ports Connects to eject the optical drive tray. Optical drive Internal optical drive; External display (VGA) port Connects to a display device (e.g., external monitor, LCD projector). If a port is black it is USB 2.0 compatible, if it is blue it is turned off. Your Acer notebook tour - 27 Optical disk access Lights up when the optical drive is indicator active.

User Manual
Page 31
...'s controls like screen brightness and volume output. Puts the computer in the hotkey combination. To simplify the keyboard legend, cursor-control key symbols are not printed on embedded keypad. Hold while using cursor-control keys. Network devices vary by configuration. Type the letters in a normal embedded keypad manner. Desired access Num Lock on Type numbers in a normal manner. Hotkey + + Icon Function Airplane mode Sleep Description Turns on / off Number keys on Num Lock off the computer's network devices. keycaps...
...'s controls like screen brightness and volume output. Puts the computer in the hotkey combination. To simplify the keyboard legend, cursor-control key symbols are not printed on embedded keypad. Hold while using cursor-control keys. Network devices vary by configuration. Type the letters in a normal embedded keypad manner. Desired access Num Lock on Type numbers in a normal manner. Hotkey + + Icon Function Airplane mode Sleep Description Turns on / off Number keys on Num Lock off the computer's network devices. keycaps...

User Manual
Page 32
... the screen brightness. Play or pause a selected media file. 32 - Press any key to save power. Speaker toggle Turns the speakers on and off . Selected models only. Touchpad toggle Turns the built-in touchpad on and off . Using the keyboard Brightness down Play/Pause Decreases the sound volume. Brightness up Increases the sound volume. Volume down Decreases the screen brightness. Hotkey + + + + + + < > + < > + < > + < > + Icon Function Description Display toggle Switches display output between the display screen, external monitor (if...
... the screen brightness. Play or pause a selected media file. 32 - Press any key to save power. Speaker toggle Turns the speakers on and off . Selected models only. Touchpad toggle Turns the built-in touchpad on and off . Using the keyboard Brightness down Play/Pause Decreases the sound volume. Brightness up Increases the sound volume. Volume down Decreases the screen brightness. Hotkey + + + + + + < > + < > + < > + < > + Icon Function Description Display toggle Switches display output between the display screen, external monitor (if...
User Manual
Page 42
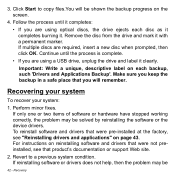
... reinstall software and drivers that product's documentation or support Web site. 2. For instructions on reinstalling software and drivers that were not preinstalled, see that were pre-installed at the factory, see "Reinstalling drivers and applications" on each disc as it completes burning it. Make sure you keep the backup in a safe place that you are required, insert a new disc when prompted, then click OK. Click Start...
... reinstall software and drivers that product's documentation or support Web site. 2. For instructions on reinstalling software and drivers that were not preinstalled, see that were pre-installed at the factory, see "Reinstalling drivers and applications" on each disc as it completes burning it. Make sure you keep the backup in a safe place that you are required, insert a new disc when prompted, then click OK. Click Start...
User Manual
Page 43
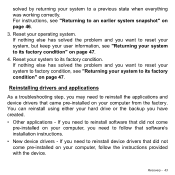
... can reinstall using either your hard drive or the backup you want to reset your system to factory condition, see "Returning your system to follow the instructions provided with the device. Reset your system to reinstall the applications and device drivers that did not come pre-installed on your computer, follow that software's installation instructions. • New device drivers - Reinstalling drivers and applications As a troubleshooting step, you need to reinstall software that...
... can reinstall using either your hard drive or the backup you want to reset your system to factory condition, see "Returning your system to follow the instructions provided with the device. Reset your system to reinstall the applications and device drivers that did not come pre-installed on your computer, follow that software's installation instructions. • New device drivers - Reinstalling drivers and applications As a troubleshooting step, you need to reinstall software that...
User Manual
Page 48
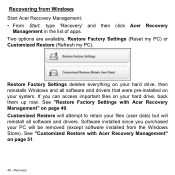
... were pre-installed on your files (user data) but will be removed (except software installed from Windows Start Acer Recovery Management: • From Start, type 'Recovery' and then click Acer Recovery Management in the list of apps. Two options are available, Restore Factory Settings (Reset my PC) or Customized Restore (Refresh my PC). Software installed since you can access important files on your hard drive, back them up now. Restore Factory Settings deletes everything on your hard drive, then reinstalls Windows and all software and drivers.
... were pre-installed on your files (user data) but will be removed (except software installed from Windows Start Acer Recovery Management: • From Start, type 'Recovery' and then click Acer Recovery Management in the list of apps. Two options are available, Restore Factory Settings (Reset my PC) or Customized Restore (Refresh my PC). Software installed since you can access important files on your hard drive, back them up now. Restore Factory Settings deletes everything on your hard drive, then reinstalls Windows and all software and drivers.
User Manual
Page 52
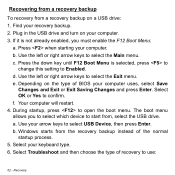
... device to Enabled. a. Your computer will restart. 4. d. Recovery Use the left or right arrow keys to open the boot menu. Plug in the USB drive and turn on the type of BIOS your computer. 3. Use your keyboard type. 6. Find your computer. b. e. Select your arrow keys to select the Exit menu. Select Troubleshoot and then choose the type of the normal startup process. 5. If it is selected, press to change this setting to start from a recovery backup...
... device to Enabled. a. Your computer will restart. 4. d. Recovery Use the left or right arrow keys to open the boot menu. Plug in the USB drive and turn on the type of BIOS your computer. 3. Use your keyboard type. 6. Find your computer. b. e. Select your arrow keys to select the Exit menu. Select Troubleshoot and then choose the type of the normal startup process. 5. If it is selected, press to change this setting to start from a recovery backup...
User Manual
Page 75
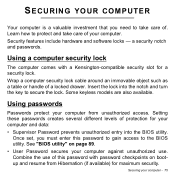
... BIOS utility. Some keyless models are also available. Setting these passwords creates several different levels of . Combine the use . Using passwords Passwords protect your computer - 75 Once set, you need to take care of your computer and data: • Supervisor Password prevents unauthorized entry into the notch and turn the key to secure the lock. Using a computer security lock The computer comes with password checkpoints on page 89. • User Password...
... BIOS utility. Some keyless models are also available. Setting these passwords creates several different levels of . Combine the use . Using passwords Passwords protect your computer - 75 Once set, you need to take care of your computer and data: • Supervisor Password prevents unauthorized entry into the notch and turn the key to secure the lock. Using a computer security lock The computer comes with password checkpoints on page 89. • User Password...

User Manual
Page 76
... . • When the User Password is enabled, a prompt appears at boot-up . • Type the User Password and press to use . If you enter the password incorrectly, a warning message appears. Press and hold the power button for maximum security. Then turn on boot parameter is set , a prompt appears when you press to enter the BIOS utility at boot-up . • Type the Supervisor Password and press to access the BIOS utility. If you forget...
... . • When the User Password is enabled, a prompt appears at boot-up . • Type the User Password and press to use . If you enter the password incorrectly, a warning message appears. Press and hold the power button for maximum security. Then turn on boot parameter is set , a prompt appears when you press to enter the BIOS utility at boot-up . • Type the Supervisor Password and press to access the BIOS utility. If you forget...
User Manual
Page 89
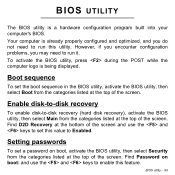
... displayed. Enable disk-to-disk recovery To enable disk-to-disk recovery (hard disk recovery), activate the BIOS utility, then select Main from the categories listed at the bottom of the screen. Find D2D Recovery at the top of the screen and use the and keys to run this feature. Find Password on boot, activate the BIOS utility, then select Security from the categories listed at the top of the screen. However, if you encounter configuration problems, you do not need...
... displayed. Enable disk-to-disk recovery To enable disk-to-disk recovery (hard disk recovery), activate the BIOS utility, then select Main from the categories listed at the bottom of the screen. Find D2D Recovery at the top of the screen and use the and keys to run this feature. Find Password on boot, activate the BIOS utility, then select Security from the categories listed at the top of the screen. However, if you encounter configuration problems, you do not need...
User Manual
Page 90
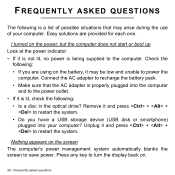
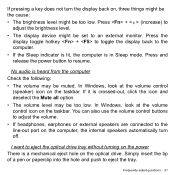
... have a USB storage device (USB disk or smartphone) plugged into the computer and to the power outlet. • If it and press + + to save power. Press any key to turn the display back on the screen The computer's power management system automatically blanks the screen to restart the system. • Do you are provided for each one. Frequently asked questions Connect the AC adapter to...
... have a USB storage device (USB disk or smartphone) plugged into the computer and to the power outlet. • If it and press + + to save power. Press any key to turn the display back on the screen The computer's power management system automatically blanks the screen to restart the system. • Do you are provided for each one. Frequently asked questions Connect the AC adapter to...
User Manual
Page 91
... cause: • The brightness level might be too low. In Windows, look at the volume control icon on the power There is in Sleep mode. Press + < > (increase) to adjust the brightness level. • The display device might be set to eject the optical drive tray without turning on the taskbar. If pressing a key does not turn off. Press the display toggle hotkey + to toggle the display back to resume.
... cause: • The brightness level might be too low. In Windows, look at the volume control icon on the power There is in Sleep mode. Press + < > (increase) to adjust the brightness level. • The display device might be set to eject the optical drive tray without turning on the taskbar. If pressing a key does not turn off. Press the display toggle hotkey + to toggle the display back to resume.
User Manual
Page 98
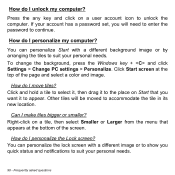
... suit your personal needs. Can I make tiles bigger or smaller? Frequently asked questions You can personalize Start with a different image or to show you want it to the place on Start that appears at the top of the screen. To change the background, press the Windows key + and click Settings > Change PC settings > Personalize. Other tiles will need to enter the password to suit...
... suit your personal needs. Can I make tiles bigger or smaller? Frequently asked questions You can personalize Start with a different image or to show you want it to the place on Start that appears at the top of the screen. To change the background, press the Windows key + and click Settings > Change PC settings > Personalize. Other tiles will need to enter the password to suit...

User Manual
Page 101
..., press the Windows key + and click Settings > Change PC settings > Users > Switch to using a Microsoft ID. Internet Explorer 10 doesn't have traditional favorites, instead you can pin shortcuts to open , right-click anywhere on the page to Start. How do I need a Microsoft ID to use to sign in to a Microsoft account, and follow the onscreen instructions. Once you have the page open the menu at the...
..., press the Windows key + and click Settings > Change PC settings > Users > Switch to using a Microsoft ID. Internet Explorer 10 doesn't have traditional favorites, instead you can pin shortcuts to open , right-click anywhere on the page to Start. How do I need a Microsoft ID to use to sign in to a Microsoft account, and follow the onscreen instructions. Once you have the page open the menu at the...


