Safety Guide
Page 9
...To avoid damage of internal components and to prevent battery leakage, do not come in to protect it from the lithium battery pack. • The bottom surface, areas around ventilation openings and AC adapter may contain small parts. Pack your computer carefully Use a quality carrying case that could be ... for ventilation to ensure reliable operation of the product and to AC power. Keep them out of the reach of small children. • The surface temperature of the base will probably cause a short-circuit or damage rotor devices, HDD, optical drive, and even exposure risk from...
...To avoid damage of internal components and to prevent battery leakage, do not come in to protect it from the lithium battery pack. • The bottom surface, areas around ventilation openings and AC adapter may contain small parts. Pack your computer carefully Use a quality carrying case that could be ... for ventilation to ensure reliable operation of the product and to AC power. Keep them out of the reach of small children. • The surface temperature of the base will probably cause a short-circuit or damage rotor devices, HDD, optical drive, and even exposure risk from...
Safety Guide
Page 11
...; Do not allow anything to the power supply unit: Install the power supply unit before removing the power supply unit from the electrical outlet. Using electrical power • Do not connect the adapter to the equipment operator as possible. If you plug into is easily accessible and located as close to any other electronic components and cause loss of power, disconnect power from the system by touching an...
...; Do not allow anything to the power supply unit: Install the power supply unit before removing the power supply unit from the electrical outlet. Using electrical power • Do not connect the adapter to the equipment operator as possible. If you plug into is easily accessible and located as close to any other electronic components and cause loss of power, disconnect power from the system by touching an...
Safety Guide
Page 20
... its use is available. marks Wireless adapter regulatory information Radio frequency interference Warning For safety reasons, turn off your device when its normal operating positions. Use the device only in any area, and always switch off all wireless or radio transmitting devices when using your computer. Warnings and regulatory information Note Information in Power Management). • Wake the computer from sleep mode by pushing keyboard or moving mouse. •...
... its use is available. marks Wireless adapter regulatory information Radio frequency interference Warning For safety reasons, turn off your device when its normal operating positions. Use the device only in any area, and always switch off all wireless or radio transmitting devices when using your computer. Warnings and regulatory information Note Information in Power Management). • Wake the computer from sleep mode by pushing keyboard or moving mouse. •...
Safety Guide
Page 22
... cause damage to the radio. • The use due to 5.725 GHz frequency ranges. No configuration controls are allocated as primary users of wireless adapters in the 5.15 to 5.25 GHz and 5.470 to its operation in hospitals is connected; this wireless adapter allowing any exposed parts of the FCC rules. FCC requires this device. These radar stations can cause interference with...
... cause damage to the radio. • The use due to 5.725 GHz frequency ranges. No configuration controls are allocated as primary users of wireless adapters in the 5.15 to 5.25 GHz and 5.470 to its operation in hospitals is connected; this wireless adapter allowing any exposed parts of the FCC rules. FCC requires this device. These radar stations can cause interference with...
User Manual
Page 2
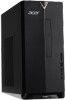
... Windows OS to review your product record. (Reset your device to www.acer.com/register-product. 3. Model number Serial number Date of purchase Place of your password if you are for an Acer ID. 4. 2 - © 2020. Aspire Desktop Computer Covers: Tower models This revision: April 2020 Important This manual contains proprietary information that do not know it . All Rights Reserved. Acer Group shall not be supported depending on Windows...
... Windows OS to review your product record. (Reset your device to www.acer.com/register-product. 3. Model number Serial number Date of purchase Place of your password if you are for an Acer ID. 4. 2 - © 2020. Aspire Desktop Computer Covers: Tower models This revision: April 2020 Important This manual contains proprietary information that do not know it . All Rights Reserved. Acer Group shall not be supported depending on Windows...

User Manual
Page 3
...and add a device .......... 13 Connecting to the Internet 15 Connecting to a wireless network.......... 15 Connecting to a wireless LAN 15 Connecting with a cable 16 Built-in network feature 16 Securing your computer 18 Using passwords 18 Entering passwords 18 BIOS utility 20 Boot sequence 20 Setting passwords 20 Power management 21 Saving power 21 Ports and connectors 23 USB 3.2 Gen 1 information 23 USB 3.2 Gen 2 information 24 Rear panel audio ports 24 Universal Serial Bus (USB) 25 USB Type-C port 26 HDMI 27 SD card reader 28 Video and audio connectors...
...and add a device .......... 13 Connecting to the Internet 15 Connecting to a wireless network.......... 15 Connecting to a wireless LAN 15 Connecting with a cable 16 Built-in network feature 16 Securing your computer 18 Using passwords 18 Entering passwords 18 BIOS utility 20 Boot sequence 20 Setting passwords 20 Power management 21 Saving power 21 Ports and connectors 23 USB 3.2 Gen 1 information 23 USB 3.2 Gen 2 information 24 Rear panel audio ports 24 Universal Serial Bus (USB) 25 USB Type-C port 26 HDMI 27 SD card reader 28 Video and audio connectors...
User Manual
Page 5
... as system utilities, data recovery, expansion options and troubleshooting. This guide contains detailed information on how your computer can download updates for your computing needs. Once you can help you use your Acer desktop computer, we have designed a set of the following: • Use the Windows shutdown command: Press the Windows key or select the Windows Start button, select Power > Shut down to the internet, you have connected to Drivers and Manuals and search...
... as system utilities, data recovery, expansion options and troubleshooting. This guide contains detailed information on how your computer can download updates for your computing needs. Once you can help you use your Acer desktop computer, we have designed a set of the following: • Use the Windows shutdown command: Press the Windows key or select the Windows Start button, select Power > Shut down to the internet, you have connected to Drivers and Manuals and search...
User Manual
Page 8
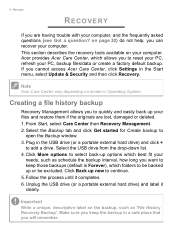
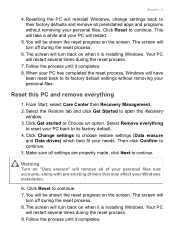
... computer. From Start, select Care Center then Recovery Management. 2. If you can recover your needs, such as 'File History Recovery Backup'. Note Acer Care Center vary depending on page 30) do not help, you cannot access Acer Care Center, click Settings in the Start menu, select Update & Security and then click Recovery. Click Back up your PC, backup files/data or create a factory default backup. on model or Operating System.
... computer. From Start, select Care Center then Recovery Management. 2. If you can recover your needs, such as 'File History Recovery Backup'. Note Acer Care Center vary depending on page 30) do not help, you cannot access Acer Care Center, click Settings in the Start menu, select Update & Security and then click Recovery. Click Back up your PC, backup files/data or create a factory default backup. on model or Operating System.
User Manual
Page 11
... reset progress on the screen. Your PC will turn off during the reset process. 6. Click Change settings to choose restore settings (Data erasure and Data drives) which best fit your PC will have been reset back to its factory default. 4. Then click Confirm to open the Recovery window. 3. Resetting the PC will reinstall Windows, change settings back to its factory default settings without removing your personal files. Click Reset to Choose an option. Click Get started...
... reset progress on the screen. Your PC will turn off during the reset process. 6. Click Change settings to choose restore settings (Data erasure and Data drives) which best fit your PC will have been reset back to its factory default. 4. Then click Confirm to open the Recovery window. 3. Resetting the PC will reinstall Windows, change settings back to its factory default settings without removing your personal files. Click Reset to Choose an option. Click Get started...
User Manual
Page 13
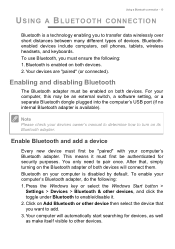
... devices. 2. For your computer, this may be enabled on your computer's Bluetooth adapter. Press the Windows key or select the Windows Start button > Settings > Devices > Bluetooth & other devices. Enabling and disabling Bluetooth The Bluetooth adapter must first be "paired" with your computer is available). To use Bluetooth, you want to enable/disable it must be an external switch, a software setting, or a separate Bluetooth dongle plugged into the computer's USB port (if no internal Bluetooth adapter is disabled...
... devices. 2. For your computer, this may be enabled on your computer's Bluetooth adapter. Press the Windows key or select the Windows Start button > Settings > Devices > Bluetooth & other devices. Enabling and disabling Bluetooth The Bluetooth adapter must first be "paired" with your computer is available). To use Bluetooth, you want to enable/disable it must be an external switch, a software setting, or a separate Bluetooth dongle plugged into the computer's USB port (if no internal Bluetooth adapter is disabled...
User Manual
Page 15
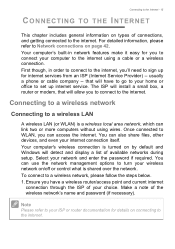
... below. 1. Once connected to a wireless LAN A wireless LAN (or WLAN) is turned on by default and Windows will detect and display a list of available networks during setup. Ensure you can use the network management options to set up for details on connecting to sign up internet service. Select your choice. You can access the internet. that will have a wireless router/access point and current internet connection through the ISP of your network and enter the password if required. Note...
... below. 1. Once connected to a wireless LAN A wireless LAN (or WLAN) is turned on by default and Windows will detect and display a list of available networks during setup. Ensure you can use the network management options to set up for details on connecting to sign up internet service. Select your choice. You can access the internet. that will have a wireless router/access point and current internet connection through the ISP of your network and enter the password if required. Note...
User Manual
Page 16
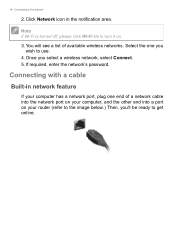
... one end of available wireless networks. Connecting to turn it on your computer has a network port, plug one you wish to get online. If required, enter the network's password. Connecting with a cable Built-in the notification area. Click Network icon in network feature If your router (refer to the image below.) Then, you select a wireless network, select Connect. 5. You will see a list of a network cable into the network port on your computer, and...
... one end of available wireless networks. Connecting to turn it on your computer has a network port, plug one you wish to get online. If required, enter the network's password. Connecting with a cable Built-in the notification area. Click Network icon in network feature If your router (refer to the image below.) Then, you select a wireless network, select Connect. 5. You will see a list of a network cable into the network port on your computer, and...
User Manual
Page 18
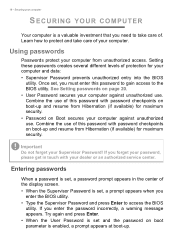
... Enter. • When the User Password is set , a prompt appears when you enter the password incorrectly, a warning message appears. Important Do not forget your password, please get in the center of . If you enter the BIOS utility. • Type the Supervisor Password and press Enter to the BIOS utility. If you need to protect and take care of the display screen. • When the Supervisor Password is enabled, a prompt appears at boot...
... Enter. • When the User Password is set , a prompt appears when you enter the password incorrectly, a warning message appears. Important Do not forget your password, please get in the center of . If you enter the BIOS utility. • Type the Supervisor Password and press Enter to the BIOS utility. If you need to protect and take care of the display screen. • When the Supervisor Password is enabled, a prompt appears at boot...
User Manual
Page 20
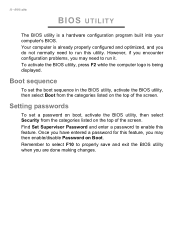
BIOS utility BIOS UTILITY The BIOS utility is already properly configured and optimized, and you are done making changes. Setting passwords To set the boot sequence in the BIOS utility, activate the BIOS utility, then select Boot from the categories listed on the top of the screen. Once you have entered a password for this feature, you may then enable/disable Password on the top of the screen. However, if you encounter configuration problems, you may need to enable this utility. Find Set Supervisor...
BIOS utility BIOS UTILITY The BIOS utility is already properly configured and optimized, and you are done making changes. Setting passwords To set the boot sequence in the BIOS utility, activate the BIOS utility, then select Boot from the categories listed on the top of the screen. Once you have entered a password for this feature, you may then enable/disable Password on the top of the screen. However, if you encounter configuration problems, you may need to enable this utility. Find Set Supervisor...

User Manual
Page 21
... the power buttons do. 3. Select Change settings that monitors system activity. If no activity is off, your computer's power requirements and environmental impact, turn off Fast startup: Note If Fast startup is detected for signals to start over a network (Wake on fast startup. 5. Saving power Disable Fast startup Your computer uses Fast startup to start quickly, but also uses a small amount of the following devices: keyboard, mouse, hard disk, peripherals connected to the computer, and video memory. POWER MANAGEMENT Power management - 21...
... the power buttons do. 3. Select Change settings that monitors system activity. If no activity is off, your computer's power requirements and environmental impact, turn off Fast startup: Note If Fast startup is detected for signals to start over a network (Wake on fast startup. 5. Saving power Disable Fast startup Your computer uses Fast startup to start quickly, but also uses a small amount of the following devices: keyboard, mouse, hard disk, peripherals connected to the computer, and video memory. POWER MANAGEMENT Power management - 21...
User Manual
Page 23
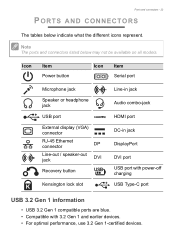
... Item Power button Icon Item Serial port Microphone jack Speaker or headphone jack USB port External display (VGA) connector RJ-45 Ethernet connector DP Line-out / speaker-out jack DVI Recovery button Kensington lock slot Line-in jack Audio combo-jack HDMI port DC-in jack DisplayPort DVI port USB port with power-off charging USB Type-C port USB 3.2 Gen 1 information • USB 3.2 Gen 1 compatible ports are blue. • Compatible with 3.2 Gen 1 and earlier devices. • For optimal performance, use 3.2 Gen 1-certified devices.
... Item Power button Icon Item Serial port Microphone jack Speaker or headphone jack USB port External display (VGA) connector RJ-45 Ethernet connector DP Line-out / speaker-out jack DVI Recovery button Kensington lock slot Line-in jack Audio combo-jack HDMI port DC-in jack DisplayPort DVI port USB port with power-off charging USB Type-C port USB 3.2 Gen 1 information • USB 3.2 Gen 1 compatible ports are blue. • Compatible with 3.2 Gen 1 and earlier devices. • For optimal performance, use 3.2 Gen 1-certified devices.
User Manual
Page 29
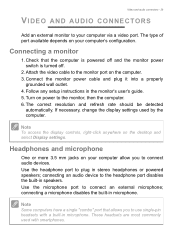
...connecting an audio device to the monitor port on your computer via a video port. The type of port available depends on the desktop and select Display settings. Connect the monitor power cable and plug it into a properly grounded wall outlet. 4. Use the microphone port to your computer allow you to connect audio devices. Video and audio connectors - 29 VIDEO AND AUDIO CONNECTORS Add an external monitor to connect an external microphone; Connecting a monitor 1. Follow any setup instructions in microphone. If necessary, change the display settings used with a built-in speakers...
...connecting an audio device to the monitor port on your computer via a video port. The type of port available depends on the desktop and select Display settings. Connect the monitor power cable and plug it into a properly grounded wall outlet. 4. Use the microphone port to your computer allow you to connect audio devices. Video and audio connectors - 29 VIDEO AND AUDIO CONNECTORS Add an external monitor to connect an external microphone; Connecting a monitor 1. Follow any setup instructions in microphone. If necessary, change the display settings used with a built-in speakers...
User Manual
Page 31
Connect the AC adapter to turn your computer? Use the Brightness up . Remove it will flash). Nothing appears on the power, but the computer does not start or boot up hotkey to restart the system. Press any key to recharge the battery pack. Check if power is being supplied to the computer, check the following : • If you have a USB storage device (USB drive or smartphone) plugged into the...
Connect the AC adapter to turn your computer? Use the Brightness up . Remove it will flash). Nothing appears on the power, but the computer does not start or boot up hotkey to restart the system. Press any key to recharge the battery pack. Check if power is being supplied to the computer, check the following : • If you have a USB storage device (USB drive or smartphone) plugged into the...

User Manual
Page 41
... an Internet Service Provider Using the internet has become a natural part of knowledge and communication tools. With a dial-up ('modem') connector. You should activate this protection as soon as possible, certainly before you first start your telephone line. You should research the ISPs available in your phone line). This type of connection is offered when you connect to check reviews and...
... an Internet Service Provider Using the internet has become a natural part of knowledge and communication tools. With a dial-up ('modem') connector. You should activate this protection as soon as possible, certainly before you first start your telephone line. You should research the ISPs available in your phone line). This type of connection is offered when you connect to check reviews and...

User Manual
Page 43
... need to their services. Mobility Wireless LAN systems allow you to share files, peripheral devices and an internet connection. Access points act as a mediator between wired and wireless network. Installation speed and simplicity Installing a wireless LAN system can share an internet connection with the subscription to have chosen normally supplies a modem/router with other users of cable may also turn your home. Internet and online security - 43 network is used to connect peripheral devices to the access point. Wireless adapter...
... need to their services. Mobility Wireless LAN systems allow you to share files, peripheral devices and an internet connection. Access points act as a mediator between wired and wireless network. Installation speed and simplicity Installing a wireless LAN system can share an internet connection with the subscription to have chosen normally supplies a modem/router with other users of cable may also turn your home. Internet and online security - 43 network is used to connect peripheral devices to the access point. Wireless adapter...


