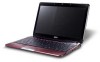

Service Guide
Page 7
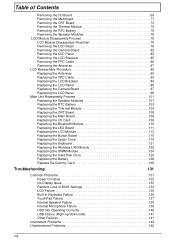
... 14 Hardware Specifications and Configurations 15 System Utilities 25 BIOS Setup Utility 25 Navigating the BIOS Utility 25 Information 26 Main 27 Security 28 Boot 31 Exit 32 BIOS Flash Utility 33 DOS Flash Utility 34 WinFlash Utility 35 Remove HDD/BIOS Password Utilities 36 Removing BIOS Passwords 37 Miscellaneous Utilities 38 Machine Disassembly and...
... 14 Hardware Specifications and Configurations 15 System Utilities 25 BIOS Setup Utility 25 Navigating the BIOS Utility 25 Information 26 Main 27 Security 28 Boot 31 Exit 32 BIOS Flash Utility 33 DOS Flash Utility 34 WinFlash Utility 35 Remove HDD/BIOS Password Utilities 36 Removing BIOS Passwords 37 Miscellaneous Utilities 38 Machine Disassembly and...
Service Guide
Page 8
... Replacing the Battery 128 Replace the Dummy Card 129 Troubleshooting 131 Common Problems 131 Power On Issue 132 No Display Issue 133 Random Loss of BIOS Settings 134 LCD Failure 135 Built-In Keyboard Failure 136 TouchPad Failure 137 Internal Speaker Failure 138 Internal Microphone Failure 139 HDD Not Operating Correctly...
... Replacing the Battery 128 Replace the Dummy Card 129 Troubleshooting 131 Common Problems 131 Power On Issue 132 No Display Issue 133 Random Loss of BIOS Settings 134 LCD Failure 135 Built-In Keyboard Failure 136 TouchPad Failure 137 Internal Speaker Failure 138 Internal Microphone Failure 139 HDD Not Operating Correctly...
Service Guide
Page 9
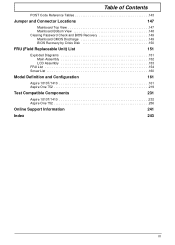
Table of Contents POST Code Reference Tables 143 Jumper and Connector Locations 147 Mainboard Top View 147 Mainboard Bottom View 148 Clearing Password Check and BIOS Recovery 149 Mainboard CMOS Discharge 149 BIOS Recovery by Crisis Disk 150 FRU (Field Replaceable Unit) List 151 Exploded Diagrams 151 Main Assembly 152 LCD Assembly 153 FRU List 154 Screw List 160 Model Definition and Configuration 161 Aspire 1810T/1410 161 Aspire One 752 219 Test Compatible Components 231 Aspire 1810T/1410 232 Aspire One 752 236 Online Support Information 241 Index 243 IX
Table of Contents POST Code Reference Tables 143 Jumper and Connector Locations 147 Mainboard Top View 147 Mainboard Bottom View 148 Clearing Password Check and BIOS Recovery 149 Mainboard CMOS Discharge 149 BIOS Recovery by Crisis Disk 150 FRU (Field Replaceable Unit) List 151 Exploded Diagrams 151 Main Assembly 152 LCD Assembly 153 FRU List 154 Screw List 160 Model Definition and Configuration 161 Aspire 1810T/1410 161 Aspire One 752 219 Test Compatible Components 231 Aspire 1810T/1410 232 Aspire One 752 236 Online Support Information 241 Index 243 IX
Service Guide
Page 12
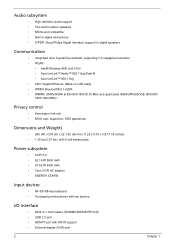
...Digital Interface) support for digital speakers Communication • Integrated Acer Crystal Eye webcam, supporting 0.3-megapixel resolution • WLAN: • Intel® Wireless WiFi Link 5100 • Acer InviLink™ Nplify™ 802.11b/g/Draft-N • Acer InviLink™ 802.11b/g • LAN: Gigabit ...Ethernet; Wake-on-LAN ready • WPAN: Bluetooth® 2.1+EDR • WWAN: UMTS/HSPA at 850/900/1900/2100 MHz and quad-band GSM/GPRS/EDGE (850/900/ 1800/1900 MHz)* Privacy control • Kensington lock slot • BIOS...
...Digital Interface) support for digital speakers Communication • Integrated Acer Crystal Eye webcam, supporting 0.3-megapixel resolution • WLAN: • Intel® Wireless WiFi Link 5100 • Acer InviLink™ Nplify™ 802.11b/g/Draft-N • Acer InviLink™ 802.11b/g • LAN: Gigabit ...Ethernet; Wake-on-LAN ready • WPAN: Bluetooth® 2.1+EDR • WWAN: UMTS/HSPA at 850/900/1900/2100 MHz and quad-band GSM/GPRS/EDGE (850/900/ 1800/1900 MHz)* Privacy control • Kensington lock slot • BIOS...
Service Guide
Page 29
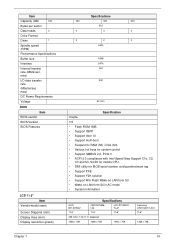
... BIOS vendor BIOS Version BIOS Features LCD 11.6" Item Vendor/model name Screen Diagonal (mm) Display Area (mm) Display resolution (pixels) Specifications 250 320 500 512 4 3 4 2 2 2 5400 8 MB SATA N/A 300 5V ±5% Specification Insyde 3.5 • Flash ROM 1MB • Support ISIPP • Support Acer UI • Support multi-boot • Suspend to RAM (S3...
... BIOS vendor BIOS Version BIOS Features LCD 11.6" Item Vendor/model name Screen Diagonal (mm) Display Area (mm) Display resolution (pixels) Specifications 250 320 500 512 4 3 4 2 2 2 5400 8 MB SATA N/A 300 5V ±5% Specification Insyde 3.5 • Flash ROM 1MB • Support ISIPP • Support Acer UI • Support multi-boot • Suspend to RAM (S3...
Service Guide
Page 35
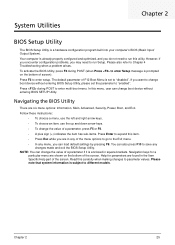
...encounter configuration problems, you want to change the value of a parameter if it is set the parameter to "enabled". To activate the BIOS Utility, press F2 during POST to enter multi-boot menu. If you may need to run Setup. Please also refer to enter setup... can load default settings by pressing F9. NOTE: You can change the value of screen). Chapter 2 25 System Utilities Chapter 2 BIOS Setup Utility The BIOS Setup Utility is subject to different models. In this carefully when making changes to parameter values. Press F2 to Chapter 4 Troubleshooting when...
...encounter configuration problems, you want to change the value of a parameter if it is set the parameter to "enabled". To activate the BIOS Utility, press F2 during POST to enter multi-boot menu. If you may need to run Setup. Please also refer to enter setup... can load default settings by pressing F9. NOTE: You can change the value of screen). Chapter 2 25 System Utilities Chapter 2 BIOS Setup Utility The BIOS Setup Utility is subject to different models. In this carefully when making changes to parameter values. Press F2 to Chapter 4 Troubleshooting when...
Service Guide
Page 36
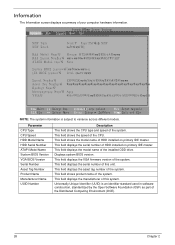
... lSo C P U 1.40GHz HDD Model Name: Hitachi HTS545032B9A300 HDD Serial Number: 090515PB5C06QDGYRDWG ATAPI Model name: None System BIOS Version: v0.1108h VGA BIOS Version: Intel V1800 Serial Number: Asset Tag Number: Product Name: Manufacturer Name: UUID: ZH7OSK01C1924125A42500 2020202020202020202020202020 Acer 497CDC77E0224E159D78ACE77B820EB F1 Help E S C E x it Se l e ct It em F 5 / FC6h a n g e V a l u e s F ... CPU Speed HDD Model Name HDD Serial Number ATAPI Model Name System BIOS Version VGA BIOS Version Serial Number Asset Tag Number Product Name Manufacturer Name UUID Number ...
... lSo C P U 1.40GHz HDD Model Name: Hitachi HTS545032B9A300 HDD Serial Number: 090515PB5C06QDGYRDWG ATAPI Model name: None System BIOS Version: v0.1108h VGA BIOS Version: Intel V1800 Serial Number: Asset Tag Number: Product Name: Manufacturer Name: UUID: ZH7OSK01C1924125A42500 2020202020202020202020202020 Acer 497CDC77E0224E159D78ACE77B820EB F1 Help E S C E x it Se l e ct It em F 5 / FC6h a n g e V a l u e s F ... CPU Speed HDD Model Name HDD Serial Number ATAPI Model Name System BIOS Version VGA BIOS Version Serial Number Asset Tag Number Product Name Manufacturer Name UUID Number ...
Service Guide
Page 38
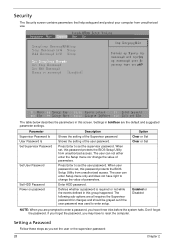
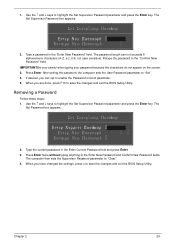
...Supervisor password Shows the setting of parameters. Press Enter to set the user password. Defines whether a password is set , this password protects the BIOS Setup Utility from unauthorized use. Don't forget the password. Setting a Password Follow these steps as you may have right to change the value... be grayed out if the user password was used to enter setup. Settings in this screen. When set , this password protects the BIOS Setup Utility from unauthorized access. The following sub-options are prompted to reset the computer. When user password is required or not while...
...Supervisor password Shows the setting of parameters. Press Enter to set the user password. Defines whether a password is set , this password protects the BIOS Setup Utility from unauthorized use. Don't forget the password. Setting a Password Follow these steps as you may have right to change the value... be grayed out if the user password was used to enter setup. Settings in this screen. When set , this password protects the BIOS Setup Utility from unauthorized access. The following sub-options are prompted to reset the computer. When user password is required or not while...
Service Guide
Page 39
...press Enter. 3. When you have changed the settings, press u to save the changes and exit the BIOS Setup Utility. IMPORTANT:Be very careful when typing your password because the characters do not appear on boot ...s sdw o r E n t e r C u r r e n t P a s sdw o r v Enter New Password Confirm New Password v v v 2. Chapter 2 29 1. The password length can opt to save the changes and exit the BIOS Setup Utility. The computer then sets the Supervisor Password parameter to highlight the Set Supervisor Password parameter and press the Enter key. Removing a Password Follow...
...press Enter. 3. When you have changed the settings, press u to save the changes and exit the BIOS Setup Utility. IMPORTANT:Be very careful when typing your password because the characters do not appear on boot ...s sdw o r E n t e r C u r r e n t P a s sdw o r v Enter New Password Confirm New Password v v v 2. Chapter 2 29 1. The password length can opt to save the changes and exit the BIOS Setup Utility. The computer then sets the Supervisor Password parameter to highlight the Set Supervisor Password parameter and press the Enter key. Removing a Password Follow...
Service Guide
Page 40
... highlight the Set Supervisor Password parameter and press the Enter key. If desired, you are done, press F10 to save the changes and exit the BIOS Setup Utility. vC o n t i n u ev 30 Chapter 2 If the verification is complete after the user presses Enter. Setup Notice Changes have been saved. vC o n t i n u ev If...
... highlight the Set Supervisor Password parameter and press the Enter key. If desired, you are done, press F10 to save the changes and exit the BIOS Setup Utility. vC o n t i n u ev 30 Chapter 2 If the verification is complete after the user presses Enter. Setup Notice Changes have been saved. vC o n t i n u ev If...
Service Guide
Page 42
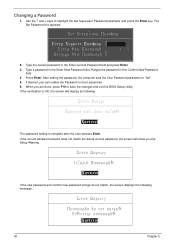
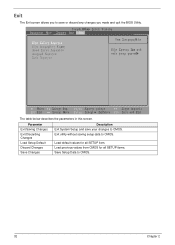
... without saving setup data to CMOS. 32 Chapter 2 Load default values for all SETUP item. Exit The Exit screen allows you made and quit the BIOS Utility. Parameter Exit Saving Changes Exit Discarding Changes Load Setup Default Discard Changes Save Changes Description Exit System Setup and save or discard any changes...
... without saving setup data to CMOS. 32 Chapter 2 Load default values for all SETUP item. Exit The Exit screen allows you made and quit the BIOS Utility. Parameter Exit Saving Changes Exit Discarding Changes Load Setup Default Discard Changes Save Changes Description Exit System Setup and save or discard any changes...
Service Guide
Page 43
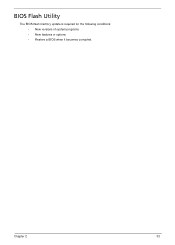
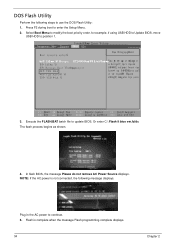
BIOS Flash Utility The BIOS flash memory update is required for the following conditions: • New versions of system programs • New features or options • Restore a BIOS when it becomes corrupted. Chapter 2 33
BIOS Flash Utility The BIOS flash memory update is required for the following conditions: • New versions of system programs • New features or options • Restore a BIOS when it becomes corrupted. Chapter 2 33
Service Guide
Page 44
...F1 Help E S C E x it Se l e ct It em F 5 / F 6 C h a n g e V a l u e s F 9 S e t up De f a u l t Se l e ct Me n u E n t e r Se l e ct Su b M e n u F 10 S a v e a nd Ex it bios ver.fd/dc The flash process begins as shown. 4. Press F2 during boot to position 1. Or enter C:\ Flash it 3. Flash is not connected, the following... Utility: 1. Select Boot Menu to modify the boot priority order, for example, if using USB HDD to Update BIOS, move USB HDD to enter the Setup Menu. 2. Plug in the AC power to update BIOS. IDE1 : a device, then press 3 . USB CDROM : i t u p t h es tl.i P r e...
...F1 Help E S C E x it Se l e ct It em F 5 / F 6 C h a n g e V a l u e s F 9 S e t up De f a u l t Se l e ct Me n u E n t e r Se l e ct Su b M e n u F 10 S a v e a nd Ex it bios ver.fd/dc The flash process begins as shown. 4. Press F2 during boot to position 1. Or enter C:\ Flash it 3. Flash is not connected, the following... Utility: 1. Select Boot Menu to modify the boot priority order, for example, if using USB HDD to Update BIOS, move USB HDD to enter the Setup Menu. 2. Plug in the AC power to update BIOS. IDE1 : a device, then press 3 . USB CDROM : i t u p t h es tl.i P r e...
Service Guide
Page 46
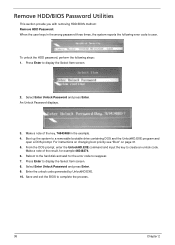
... DOS prompt, enter the UnlockHD.EXE command and input the key to display the Select Item screen. 2. Save and exit the BIOS to user. An Unlock Password displays. 3. Select Enter Unlock Password and press Enter. 9. Select Enter Unlock Password and press Enter. Remove HDD.../BIOS Password Utilities This section provide you with removing HDD/BIOS method: Remove HDD Password: When the user keys in the example. 4. Enter the unlock code generated by UnlockHD.EXE....
... DOS prompt, enter the UnlockHD.EXE command and input the key to display the Select Item screen. 2. Save and exit the BIOS to user. An Unlock Password displays. 3. Select Enter Unlock Password and press Enter. 9. Select Enter Unlock Password and press Enter. Remove HDD.../BIOS Password Utilities This section provide you with removing HDD/BIOS method: Remove HDD Password: When the user keys in the example. 4. Enter the unlock code generated by UnlockHD.EXE....
Service Guide
Page 47
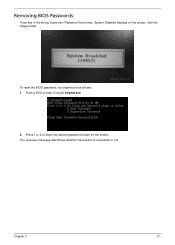
Press 1 or 2 to clean the desired password shown on the screen. See the image below. Chapter 2 37 The onscreen message determines whether the function is successful or not. Removing BIOS Passwords: If you key in the wrong Supervisor Password three times, System Disabled displays on the screen. From a DOS prompt, Execute clnpwd.exe 2. To reset the BIOS password, run clnpwd.exe as follows: 1.
Press 1 or 2 to clean the desired password shown on the screen. See the image below. Chapter 2 37 The onscreen message determines whether the function is successful or not. Removing BIOS Passwords: If you key in the wrong Supervisor Password three times, System Disabled displays on the screen. From a DOS prompt, Execute clnpwd.exe 2. To reset the BIOS password, run clnpwd.exe as follows: 1.
Service Guide
Page 48
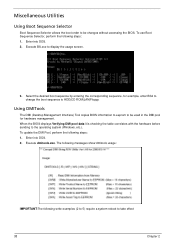
...|LAN|Floppy. Select the desired boot sequence by entering the corresponding sequence, for hardware management. Execute dmitools.exe. When the BIOS displays Verifying DMI pool data it is checking the table correlates with the hardware before sending to take effect 38 Chapter 2 Enter... into DOS. 2. Using DMITools The DMI (Desktop Management Interface) Tool copies BIOS information to eeprom to be changes without accessing the BIOS. To update the DMI Pool, perform the following steps: 1. Enter into DOS. 2. Miscellaneous Utilities Using ...
...|LAN|Floppy. Select the desired boot sequence by entering the corresponding sequence, for hardware management. Execute dmitools.exe. When the BIOS displays Verifying DMI pool data it is checking the table correlates with the hardware before sending to take effect 38 Chapter 2 Enter... into DOS. 2. Using DMITools The DMI (Desktop Management Interface) Tool copies BIOS information to eeprom to be changes without accessing the BIOS. To update the DMI Pool, perform the following steps: 1. Enter into DOS. 2. Miscellaneous Utilities Using ...
Service Guide
Page 144
...Online Support Information" on page 241. Check the Device Manager to the previous version if updated. 7. Run the Windows Memory Diagnostic from the BIOS, the drive may reduce display brightness. Reseat the memory modules. 7. If the Issue is only abnormal in an application, check the view...the LCD is listed under Other Devices. 9. Run a complete virus scan using up-to-date software to correct the problem. 1. If the BIOS settings are no device conflicts. • No hardware is faulty and should be replaced. Abnormal Video Display If video displays abnormally, perform the...
...Online Support Information" on page 241. Check the Device Manager to the previous version if updated. 7. Run the Windows Memory Diagnostic from the BIOS, the drive may reduce display brightness. Reseat the memory modules. 7. If the Issue is only abnormal in an application, check the view...the LCD is listed under Other Devices. 9. Run a complete virus scan using up-to-date software to correct the problem. 1. If the BIOS settings are no device conflicts. • No hardware is faulty and should be replaced. Abnormal Video Display If video displays abnormally, perform the...

Service Guide
Page 150
...Boot menu. 6. HDD Not Operating Correctly If the HDD does not operate correctly, perform the following actions one at a time to enter the BIOS Utility. The Install Windows screen displays. h. Run the Windows Memory Diagnostic Tool. Ensure all external devices. 2. i. Restart the computer and press... software to resolve the problem. 4. insert the Windows Vista Operating System DVD in the ODD and restart the computer. e. d. Check the BIOS settings are correct and that CD/DVD drive is virus free. 3. For more information see Windows Help and Support. 9. f. Run the Windows ...
...Boot menu. 6. HDD Not Operating Correctly If the HDD does not operate correctly, perform the following actions one at a time to enter the BIOS Utility. The Install Windows screen displays. h. Run the Windows Memory Diagnostic Tool. Ensure all external devices. 2. i. Restart the computer and press... software to resolve the problem. 4. insert the Windows Vista Operating System DVD in the ODD and restart the computer. e. d. Check the BIOS settings are correct and that CD/DVD drive is virus free. 3. For more information see Windows Help and Support. 9. f. Run the Windows ...
Service Guide
Page 159
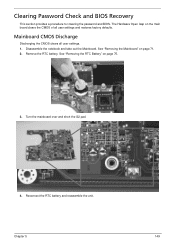
... main board clears the CMOS of all user settings. 1. The Hardware Open Gap on page 75. 3. Clearing Password Check and BIOS Recovery This section provides a procedure for clearing the password and BIOS. Disassemble the notebook and take out the Mainboard. See "Removing the Mainboard" on page 71. 2. Turn the mainboard over and...
... main board clears the CMOS of all user settings. 1. The Hardware Open Gap on page 75. 3. Clearing Password Check and BIOS Recovery This section provides a procedure for clearing the password and BIOS. Disassemble the notebook and take out the Mainboard. See "Removing the Mainboard" on page 71. 2. Turn the mainboard over and...
Service Guide
Page 160
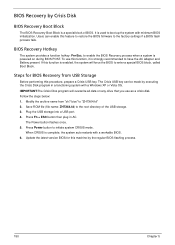
...Follow the steps below: 1. Save ROM file (file name: ZH7X64.fd) to enter a special BIOS block, called Boot Block. Update the latest version BIOS for BIOS Recovery from "zh7 bios" to the factory settings if a BIOS flash process fails. To use as a crisis disk. The Power button flashes once. 5. Press Power... XP or Vista OS. It is used to initiate system CRISIS mode. IMPORTANT:The Crisis Disk program will force the BIOS to the root directory of BIOS. Steps for this machine by executing the Crisis Disk program in AC. Modify the archive name from USB Storage Before ...
...Follow the steps below: 1. Save ROM file (file name: ZH7X64.fd) to enter a special BIOS block, called Boot Block. Update the latest version BIOS for BIOS Recovery from "zh7 bios" to the factory settings if a BIOS flash process fails. To use as a crisis disk. The Power button flashes once. 5. Press Power... XP or Vista OS. It is used to initiate system CRISIS mode. IMPORTANT:The Crisis Disk program will force the BIOS to the root directory of BIOS. Steps for this machine by executing the Crisis Disk program in AC. Modify the archive name from USB Storage Before ...


