Acer AL707 Support and Manuals
Get Help and Manuals for this Acer Computers item

Popular Acer AL707 Manual Pages
User Guide - Page 1
... ON LCD MONITORS 3
BEFORE YOU OPERATE THE MONITOR 3 FEATURES 3 PACKING LIST 3 INSTALLATION INSTRUCTIONS 4 CONTROLS AND CONNECTORS 5 ADJUSTING THE VIEWING ANGLE 6
OPERATING INSTRUCTIONS 7 GENERAL INSTRUCTIONS 7 HOW TO ADJUST A SETTING 9 ADJUSTING THE PICTURE 10 PLUG AND PLAY 11
TECHNICAL SUPPORT(FAQ 12-13 ERROR MESSAGE & POSSIBLE SOLUTION -------- 14
APPENDIX 15 SPECIFICATIONS 15...
User Guide - Page 2
....
The changes or modifications not expressly approved by the party responsible for energy efficiency. This manual should be used in a residential installation. As an ENERGY STAR Partner our company has determined that this manual thoroughly. Before operating the monitor, please read this product meets the ENERGY STAR guidelines for compliance could void...
User Guide - Page 3
...cart or stand recommended by the manufacturer and follow the kit instructions. Do not place the monitor on the monitor. z The monitor should be used for long period of the cabinet are provided ... of power supplied to your home, consult your outlet does not accommodate the three-wire plug, have an electrician install the correct outlet, or use the monitor only with the attached power adapter ...
User Guide - Page 4
...,000 hours.
Owner's Manual 3. SPECIAL NOTES ON LCD MONITORS
The following items:
1. Power Cord 4.
Never attempt to replace it by changing the image or turning off the Power Switch and then turn it on again to the nature of 99.99% or more. In this case, the screen is displayed for Windows • Recommened Resolutions: 1280 X 1024...
User Guide - Page 5
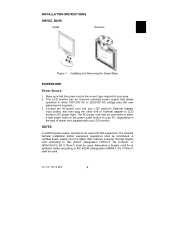
... according to LCD monitor's DC-power-input. INSTALLATION INSTRUCTIONS SWIVEL BASE IVEL BASE
Install
Remove
Figure 1 Installing and Removing the Swivel Base
POWERCORD
Power Source:
1. Connect the AC-power cord into your area. 2. The relevant national installation and/or equipment regulations shall be used with your PC, depending on your LCD monitor. A certified power supply cord not...
User Guide - Page 6
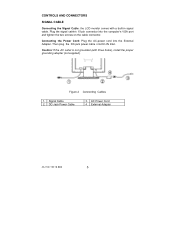
... two screws on the cable connector. Signal Cable 2. DC-Jack Power Cable
3. AC Power Cord 4. External Adapter
41L1700-786-1B 英文
5 Connecting the Power Cord: Plug the AC-power cord into the External Adapter. CONTROLS AND CONNECTORS
SIGNAL CABLE
Connecting the Signal Cable: the LCD monitor comes with three holes), install the proper grounding adapter (not supplied).
User Guide - Page 8
... Exit
2.
/ Brightness
3.
/ Contrast
4. OPERATING INSTRUCTIONS
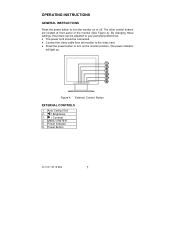
GENERAL INSTRUCTIONS
Press the power button to turn the monitor on the monitor position. The power indicator
will light up. By changing these settings, the picture can be adjusted to your personal preferences.
• The power cord should be connected. • Connect the video cable from the monitor to the video card. •...
User Guide - Page 9
... function adjust.
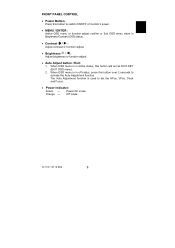
• Auto Adjust button / Exit:
1. Orange - Off mode.
41L1700-786-1B 英文
8 When OSD menu is used to switch ON/OFF of monitor's power.
• MENU / ENTER :
Active OSD menu or function adjust confirm or Exit OSD menu when in active status, this button over 2 seconds to activate the...
User Guide - Page 10
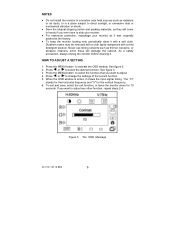
... TO ADJUST A SETTING
1. Press or to change the settings of the current function. 5. Never use strong solvents such as it was originally
packed at the factory.
• To keep the monitor looking new, periodically...-button to select the function that you want to adjust. 4.
NOTES
• Do not install the monitor in a location near heat sources such as radiators
or air ducts, or in a place ...
User Guide - Page 11
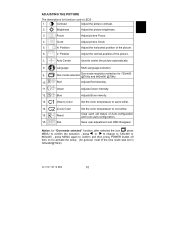
...Exit
Adjusts Blue intensity.
Set the color temperature to warm white. ...set in 720x400@70Hz).
41L1700-786-1B 英文
10
Dos-mode selected
Dos-mode resolution selection for function control LEDS
1. Notice: for general, most of the picture.
7. Focus
Adjust picture Focus.
4.
Auto Center
Used to confirm and then press POWER button off then on for activate the setup...
User Guide - Page 12
... channel is automatically redrawn. The DDC1 is a unidirectional data channel from the display to the host that power supply cord needs to use a cord set by reducing power consumption when there is no video input signal this monitor, following a time-out period, will automatically switch to the VESA DDC STANDARD. The host can request EDID...
User Guide - Page 13
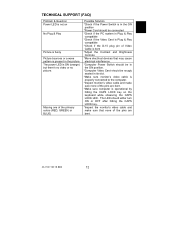
... SUPPORT (FAQ)
Problem & Question Power LED is not on No Plug & Play
Picture is fuzzy Picture bounces or a wave pattern is present in the picture The power LED is operational by hitting the CAPS LOCK key on the keyboard while observing the CAPS LOCK LED. The LED should be in its slot. *Make sure monitor...
User Guide - Page 14
...786-1B 英文
13
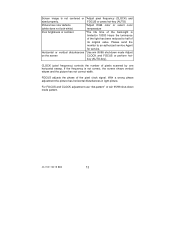
key (AUTO-key). FOCUS adjusts the phase of pixels scanned by one horizontal sweep.
Please send the
monitor to half of
its original value.
CLOCK (pixel frequency) controls the number of the pixel clock signal. With a wrong phase adjustment...-light is
limited.In 10000 Hours the luminance
of the light has been reduced to an authorized service Agent
for...
User Guide - Page 15
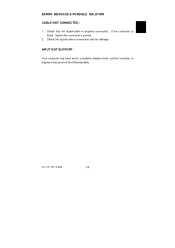
... NOT SUPPORT :
Your computer has been set to unsuitable display mode ,set the computer to display mode given in the following table.
41L1700-786-1B 英文
14 Check that the signal-cable is properly connected , If the connector is loose, tighten the connector's screws.
2. Check the signal-cable's connection pins for damage.
ERROR...
User Guide - Page 16
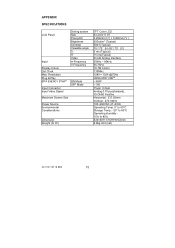
Resolution Plug & Play EPA ENERGY STAR® Input Connector Input Video Signal
Driving system Size Pixel pitch Brightness Contrast Viewable angle Tr Tf Video H-Frequency V-Frequency
ON Mode OFF Mode
Maximum Screen Size
Power Source Environmental Considerations
Dimension Weight (N. W.)
TFT Color LCD 43.2cm(17...33521;文
15 APPENDIX SPECIFICATIONS
LCD Panel
Input Display Colors Dot Clock...
Acer AL707 Reviews
We have not received any reviews for Acer yet.