
User Guide
Page 1
TABLE OF CONTENTS FOR YOUR SAFETY 1 SAFETY PRECAUTIONS 2 SPECIAL NOTES ON LCD MONITORS 3 BEFORE YOU OPERATE THE MONITOR 3 FEATURES 3 PACKING LIST 3 CONTROLS AND CONNECTORS 5 ADJUSTING THE VIEWING ANGLE 6 OPERATING INSTRUCTIONS 7 GENERAL INSTRUCTIONS 7 HOW TO ADJUST A SETTING 9 ADJUSTING THE PICTURE 10-11 PLUG AND ...-17 FACTORY PRESET TIMING TABLE 18 CONNECTOR PIN ASSIGNMENT 19 For more information and help in recycling, please visit the following websites: Worldwide: http://global.acer.com/about/sustainability.htm
TABLE OF CONTENTS FOR YOUR SAFETY 1 SAFETY PRECAUTIONS 2 SPECIAL NOTES ON LCD MONITORS 3 BEFORE YOU OPERATE THE MONITOR 3 FEATURES 3 PACKING LIST 3 CONTROLS AND CONNECTORS 5 ADJUSTING THE VIEWING ANGLE 6 OPERATING INSTRUCTIONS 7 GENERAL INSTRUCTIONS 7 HOW TO ADJUST A SETTING 9 ADJUSTING THE PICTURE 10-11 PLUG AND ...-17 FACTORY PRESET TIMING TABLE 18 CONNECTOR PIN ASSIGNMENT 19 For more information and help in recycling, please visit the following websites: Worldwide: http://global.acer.com/about/sustainability.htm

User Guide
Page 2
... interference to correct the interference by the party responsible for help. Refer servicing to rain or moisture. Before operating the monitor, please read this equipment. However, there is the responsibilities of the FCC Rules. Increase the separation between the equipment ...instructions, may cause harmful interference to which the receiver is not responsible for future reference. These limits are present inside the monitor. This equipment generates, uses and can be determined by unauthorized modification to provide reasonable protection against harmful interference in a ...
... interference to correct the interference by the party responsible for help. Refer servicing to rain or moisture. Before operating the monitor, please read this equipment. However, there is the responsibilities of the FCC Rules. Increase the separation between the equipment ...instructions, may cause harmful interference to which the receiver is not responsible for future reference. These limits are present inside the monitor. This equipment generates, uses and can be determined by unauthorized modification to provide reasonable protection against harmful interference in a ...

User Guide
Page 3
...sure of the type of power source indicated on a wall or shelf, use a mounting kit approved by the manufacturer or sold with the monitor. z The monitor is provided. If you are not blocked or covered. This will fit only into the slot on an unstable cart, stand, or table..., a plug with UL listed computers which have an electrician install the correct outlet, or ground the appliance safely. z Do not place the monitor on the monitor cabinet. z Unplug the unit during a lightening storm or when it from the type of power supplied to qualified service personnel. z To ensure...
...sure of the type of power source indicated on a wall or shelf, use a mounting kit approved by the manufacturer or sold with the monitor. z The monitor is provided. If you are not blocked or covered. This will fit only into the slot on an unstable cart, stand, or table..., a plug with UL listed computers which have an electrician install the correct outlet, or ground the appliance safely. z Do not place the monitor on the monitor cabinet. z Unplug the unit during a lightening storm or when it from the type of power supplied to qualified service personnel. z To ensure...

User Guide
Page 4
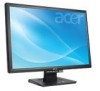
... the Power Switch and then turn it on again to the nature of the LCD screen, an afterimage of the fluorescent light, the screen may flicker during initial use . • The LCD screen has effective pixels of 99.99% or more. Quick Start Guide 3...THE PACKAGE The product package should include the following symptoms are normal with LCD monitor and do not indicate a problem. LCD Monitor 2. SPECIAL NOTES ON LCD MONITORS The following items: 1. BEFORE YOU OPERATE THE MONITOR FEATURES • 55.87cm(22") TFT Color LCD Monitor • Crisp, Clear Display for hours. DVI Cable (Only dual-...
... the Power Switch and then turn it on again to the nature of the LCD screen, an afterimage of the fluorescent light, the screen may flicker during initial use . • The LCD screen has effective pixels of 99.99% or more. Quick Start Guide 3...THE PACKAGE The product package should include the following symptoms are normal with LCD monitor and do not indicate a problem. LCD Monitor 2. SPECIAL NOTES ON LCD MONITORS The following items: 1. BEFORE YOU OPERATE THE MONITOR FEATURES • 55.87cm(22") TFT Color LCD Monitor • Crisp, Clear Display for hours. DVI Cable (Only dual-...

User Guide
Page 5
... the correct type required in either a wall power outlet or the power outlet socket on your LCD monitor. The AC-power cord may be connected to IEC 60245 (designation H05RR-F 3G 0.75mm2) shall be considered. This LCD monitor has an External universal power supply that the power cord is required.) 3. Make sure that allows...
... the correct type required in either a wall power outlet or the power outlet socket on your LCD monitor. The AC-power cord may be connected to IEC 60245 (designation H05RR-F 3G 0.75mm2) shall be considered. This LCD monitor has an External universal power supply that the power cord is required.) 3. Make sure that allows...

User Guide
Page 6
... of the power cord into a nearby outlet. Plug the other end to the back of the monitor and connect the other end of your monitor and computer. DVI Cable(Only dual-input model) 5 Turn on your monitor into the PC port. 2. Power Cable 2. Signal Cable 3. Connect one end of the 15-pin VGA... cable to the back of the monitor and connect the other end to the computer's D-Sub port. 3. (Only dual-input model)Connect one end of...
... of the power cord into a nearby outlet. Plug the other end to the back of the monitor and connect the other end of your monitor and computer. DVI Cable(Only dual-input model) 5 Turn on your monitor into the PC port. 2. Power Cable 2. Signal Cable 3. Connect one end of the 15-pin VGA... cable to the back of the monitor and connect the other end to the computer's D-Sub port. 3. (Only dual-input model)Connect one end of...
User Guide
Page 7
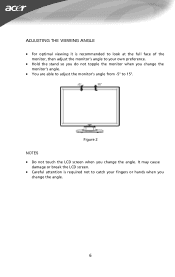
ADJUSTING THE VIEWING ANGLE • For optimal viewing it is required not to catch your own preference. • Hold the stand so you do not topple the monitor when you change the angle. 6 It may cause damage or break the LCD screen. • Careful attention is recommended to look at the full face of the monitor, then adjust the monitor's angle to 15°. Figure 2 NOTES • Do not touch the LCD screen when you change the monitor's angle. • You are able to adjust the monitor's angle from -5° to your fingers or hands when you change the angle.
ADJUSTING THE VIEWING ANGLE • For optimal viewing it is required not to catch your own preference. • Hold the stand so you do not topple the monitor when you change the angle. 6 It may cause damage or break the LCD screen. • Careful attention is recommended to look at the full face of the monitor, then adjust the monitor's angle to 15°. Figure 2 NOTES • Do not touch the LCD screen when you change the monitor's angle. • You are able to adjust the monitor's angle from -5° to your fingers or hands when you change the angle.

User Guide
Page 8
... these settings, the picture can be adjusted to your personal preferences. • The power cord should be connected. • Connect the video cable from the monitor to the video card. • Press the power button to turn on or off. Power Button 7 OPERATING INSTRUCTIONS GENERAL INSTRUCTIONS Press the power button to...
... these settings, the picture can be adjusted to your personal preferences. • The power cord should be connected. • Connect the video cable from the monitor to the video card. • Press the power button to turn on or off. Power Button 7 OPERATING INSTRUCTIONS GENERAL INSTRUCTIONS Press the power button to...

User Guide
Page 9
... OSD menu is in off status, press this button for 2 seconds to activate the Auto Adjustment function. NOTES • Do not install the monitor in a location near heat sources such as radiators or air ducts, or in a place subject to direct sunlight, or excessive dust or mechanical...8226; Save the original shipping carton and packing materials, as they will act as EXIT-KEY (EXIT OSD menu). 2. As a safety precaution, always unplug the monitor before cleaning it with a mild detergent solution. Off mode. • MENU / ENTER : Activate OSD menu when OSD is OFF or activate/de-activate adjustment...
... OSD menu is in off status, press this button for 2 seconds to activate the Auto Adjustment function. NOTES • Do not install the monitor in a location near heat sources such as radiators or air ducts, or in a place subject to direct sunlight, or excessive dust or mechanical...8226; Save the original shipping carton and packing materials, as they will act as EXIT-KEY (EXIT OSD menu). 2. As a safety precaution, always unplug the monitor before cleaning it with a mild detergent solution. Off mode. • MENU / ENTER : Activate OSD menu when OSD is OFF or activate/de-activate adjustment...
User Guide
Page 13
... Play DDC2B Feature This monitor is equipped with VESA DDC2B capabilities according to an OFF mode. When there is UL listed and CSA labeled. The display is a bidirectional data channel based on type connector body, rated 10A, 250V, having standard CEE-22 female configuration. Supplied with ...intended for the power cord shall be 125 volts AC. This reduces the monitor's internal power supply consumption. The other end terminates with a grounding type attachment plug, rated 10A, 250V, CEE-22 male configuration. The host can request EDID information over the DDC2B channel. The...
... Play DDC2B Feature This monitor is equipped with VESA DDC2B capabilities according to an OFF mode. When there is UL listed and CSA labeled. The display is a bidirectional data channel based on type connector body, rated 10A, 250V, having standard CEE-22 female configuration. Supplied with ...intended for the power cord shall be 125 volts AC. This reduces the monitor's internal power supply consumption. The other end terminates with a grounding type attachment plug, rated 10A, 250V, CEE-22 male configuration. The host can request EDID information over the DDC2B channel. The...

User Guide
Page 14
... make sure that may cause pattern is present in but there's no video or no the ON position. Missing one of the primary *Inspect the monitor's video cable and colors (RED, GREEN, or make sure none of the pins are BLUE) bent. 13 Picture bounces or a wave *Move electrical devices that...
... make sure that may cause pattern is present in but there's no video or no the ON position. Missing one of the primary *Inspect the monitor's video cable and colors (RED, GREEN, or make sure none of the pins are BLUE) bent. 13 Picture bounces or a wave *Move electrical devices that...


