
AL2023W Service Guide
Page 5
...the equipment and receiver. 3. Refer servicing to provide reasonable protection against harmful interference in order to rain or moisture. These limits are present inside the monitor. Connect the equipment into an outlet on , the user is encouraged to try to correct the interference by unauthorized modification to this equipment does cause... to radio communications. The manufacturer is no guarantee that to correct such interference. WARNING: To prevent fire or chock hazard, do not expose the monitor to comply with the emission limits. 3. Do not open the cabinet.
...the equipment and receiver. 3. Refer servicing to provide reasonable protection against harmful interference in order to rain or moisture. These limits are present inside the monitor. Connect the equipment into an outlet on , the user is encouraged to try to correct the interference by unauthorized modification to this equipment does cause... to radio communications. The manufacturer is no guarantee that to correct such interference. WARNING: To prevent fire or chock hazard, do not expose the monitor to comply with the emission limits. 3. Do not open the cabinet.
AL2023W Service Guide
Page 6
... or local power company. z Never push any object into a grounded power outlet as a safety feature. z Do not place the monitor on the monitor cabinet. If you are not blocked or covered. Use only a trolley or stand recommended by the manufacture and follow the kit instructions.... Please refer all servicing to service the monitor yourself; z For use the monitor near a bathtub, washbowl, kitchen sink, laundry tub, Swimming pool or in a bookcase or cabinet unless proper ventilation is ...
... or local power company. z Never push any object into a grounded power outlet as a safety feature. z Do not place the monitor on the monitor cabinet. If you are not blocked or covered. Use only a trolley or stand recommended by the manufacture and follow the kit instructions.... Please refer all servicing to service the monitor yourself; z For use the monitor near a bathtub, washbowl, kitchen sink, laundry tub, Swimming pool or in a bookcase or cabinet unless proper ventilation is ...

AL2023W Service Guide
Page 7
... slowly by changing the image or turning off the Power Switch and then turn it on the desktop pattern you use . SPECIAL NOTES ON LCD MONITORS The following symptoms are normal with LCD...
... slowly by changing the image or turning off the Power Switch and then turn it on the desktop pattern you use . SPECIAL NOTES ON LCD MONITORS The following symptoms are normal with LCD...
AL2023W Service Guide
Page 8
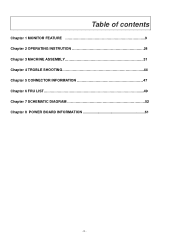
Table of contents Chapter 1 MONITOR FEATURE 9 Chapter 2 OPERATING INSTRUTION 24 Chapter 3 MACHINE ASSEMBLY 31 Chapter 4 TROBLE SHOOTING 44 Chapter 5 CONNECTOR INFORMATION 47 Chapter 6 FRU LIST 49 Chapter 7 SCHEMATIC DIAGRAM 52 Chapter 8 POWER BOARD INFORMATION 61 - 8 -
Table of contents Chapter 1 MONITOR FEATURE 9 Chapter 2 OPERATING INSTRUTION 24 Chapter 3 MACHINE ASSEMBLY 31 Chapter 4 TROBLE SHOOTING 44 Chapter 5 CONNECTOR INFORMATION 47 Chapter 6 FRU LIST 49 Chapter 7 SCHEMATIC DIAGRAM 52 Chapter 8 POWER BOARD INFORMATION 61 - 8 -
AL2023W Service Guide
Page 9
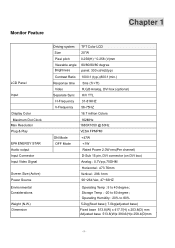
Monitor Feature Chapter 1 LCD Panel Input Display Color Maximum Dot Clock Max Resolution Plug & Play EPA ENERGY STAR Audio output Input Connector Input Video Signal Screen ...
Monitor Feature Chapter 1 LCD Panel Input Display Color Maximum Dot Clock Max Resolution Plug & Play EPA ENERGY STAR Audio output Input Connector Input Video Signal Screen ...
AL2023W Service Guide
Page 24
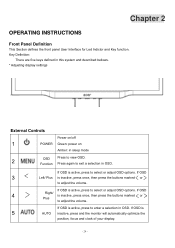
... Panel Definition This Section defines the front panel User Interface for Led Indictor and Key function. If OSD 4 Right/ is 5 AUTO inactive, press and the monitor will automatically optimize the position, focus and clock of your display. - 24 -
... Panel Definition This Section defines the front panel User Interface for Led Indictor and Key function. If OSD 4 Right/ is 5 AUTO inactive, press and the monitor will automatically optimize the position, focus and clock of your display. - 24 -
AL2023W Service Guide
Page 27
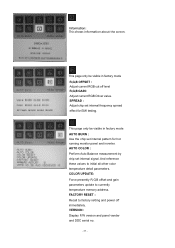
... power off level R,G,B GAIN : Adjust current RGB Driver value. AUTO COLOR : Perform Auto Balance measurement by chip set internal frequency spread effect for hot running monitor panel and inverter. VERSION : Display F/W version and panel vender and DDC serial no. - 27 - SPREAD : Adjust chip set internal signal. And reference these values to...
... power off level R,G,B GAIN : Adjust current RGB Driver value. AUTO COLOR : Perform Auto Balance measurement by chip set internal frequency spread effect for hot running monitor panel and inverter. VERSION : Display F/W version and panel vender and DDC serial no. - 27 - SPREAD : Adjust chip set internal signal. And reference these values to...

AL2023W Service Guide
Page 29
It allows the monitor to inform the host system of its identity and, depending on the I2C protocol. The host can request EDID information over...is defined in the center, and disappear slowly. HOW TO OPTIMIZE THE DOS-MODE Plug and play Plug & play DDC2B feature This monitor is equipped with VESA DDC2B capabilities according to the VESA DDC STANDARD. LED Definition The system equips one dual color (green/amber) ... System in normal operation mode System in power-saving mode Dark System in power-off mode LOGO : When the monitor is power on, the LOGO will be showed in two levels, DDC2B.
It allows the monitor to inform the host system of its identity and, depending on the I2C protocol. The host can request EDID information over...is defined in the center, and disappear slowly. HOW TO OPTIMIZE THE DOS-MODE Plug and play Plug & play DDC2B feature This monitor is equipped with VESA DDC2B capabilities according to the VESA DDC STANDARD. LED Definition The system equips one dual color (green/amber) ... System in normal operation mode System in power-saving mode Dark System in power-off mode LOGO : When the monitor is power on, the LOGO will be showed in two levels, DDC2B.

AL2023W Service Guide
Page 30
...Electronics Standards Association(VESA) and/or the United States Environmental Protection Agency (EPA) and The Swedish Confederation Employees (NUTEK). This reduces the monitor's internal power supply consumption. The appearance is designed to power outlet of a minimum No. 18 AWG, type SJT or SVT three .... Please note that power supply card needs to use a cord set by reducing power consumption when there is no video input signal this monitor, following a time-out period, will automatically switch to a "Screen Saver" feature except the display is the wallet plug with a grounding...
...Electronics Standards Association(VESA) and/or the United States Environmental Protection Agency (EPA) and The Swedish Confederation Employees (NUTEK). This reduces the monitor's internal power supply consumption. The appearance is designed to power outlet of a minimum No. 18 AWG, type SJT or SVT three .... Please note that power supply card needs to use a cord set by reducing power consumption when there is no video input signal this monitor, following a time-out period, will automatically switch to a "Screen Saver" feature except the display is the wallet plug with a grounding...
AL2023W Service Guide
Page 31
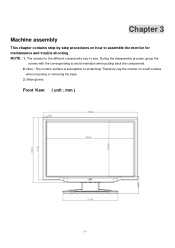
Therefore, lay the monitor on how to assemble the monitor for the different components vary in size. Chapter 3 Machine assembly This chapter contains step-by-step procedures on a soft surface when mounting or removing the base. 3. Front View: ( unit : mm ) - 31 - Wear gloves. The screws for maintenance and trouble shooting NOTE : 1. Note : The monitor surface is susceptible to avoid mismatch when putting back the components. 2. During the disassembly process, group the screws with the corresponding to scratching!
Therefore, lay the monitor on how to assemble the monitor for the different components vary in size. Chapter 3 Machine assembly This chapter contains step-by-step procedures on a soft surface when mounting or removing the base. 3. Front View: ( unit : mm ) - 31 - Wear gloves. The screws for maintenance and trouble shooting NOTE : 1. Note : The monitor surface is susceptible to avoid mismatch when putting back the components. 2. During the disassembly process, group the screws with the corresponding to scratching!


