
User Manual
Page 1
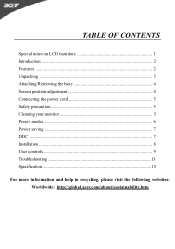
TABLE OF CONTENTS Special notes on LCD monitors 1 Introduction 2 Features ...2 Unpacking 3 Attaching/Removing the base 4 Screen position adjustment 4 Connecting the power cord 5 Safety precaution 5 Cleaning your monitor 5 Preset modes 6 Power saving 7 DDC ...7 Installation 8 User controls 9 Troubleshooting 13 Specification 15 For more information and help in recycling, please visit the following websites: Worldwide: http://global.acer.com/about/sustainability.htm
TABLE OF CONTENTS Special notes on LCD monitors 1 Introduction 2 Features ...2 Unpacking 3 Attaching/Removing the base 4 Screen position adjustment 4 Connecting the power cord 5 Safety precaution 5 Cleaning your monitor 5 Preset modes 6 Power saving 7 DDC ...7 Installation 8 User controls 9 Troubleshooting 13 Specification 15 For more information and help in recycling, please visit the following websites: Worldwide: http://global.acer.com/about/sustainability.htm
User Manual
Page 3
... Macintosh compatible color video cards. · The monitor is capable of the LCD monitor. In this user guide, we will introduce you will have a refreshing experience working with VGA, SVGA, XGA, SXGA (non-interlaced), SXGA, WSXGA and most analog RGB (Red, Green, Blue) and Digital display standards, including PS/V, PS/2, optional for purchasing model AL2202W , a high performance 22-inch color TFT LCD monitor. Surely you step-by-step all the features, functions and technical specifications of displaying...
... Macintosh compatible color video cards. · The monitor is capable of the LCD monitor. In this user guide, we will introduce you will have a refreshing experience working with VGA, SVGA, XGA, SXGA (non-interlaced), SXGA, WSXGA and most analog RGB (Red, Green, Blue) and Digital display standards, including PS/V, PS/2, optional for purchasing model AL2202W , a high performance 22-inch color TFT LCD monitor. Surely you step-by-step all the features, functions and technical specifications of displaying...
User Manual
Page 6
... power supply that allows operation in which the equipment will be installed. SAFETY PRECAUTION · Avoid placing the monitor, or any other light sources may reflect on the power cord to avoid damage to the cable. · Do not expose the monitor to rain, excessive moisture, or dust. · Do not cover the ventilation slots or openings of H05VV-F cord and plug rated 10 A, 250 V. CLEANING...
... power supply that allows operation in which the equipment will be installed. SAFETY PRECAUTION · Avoid placing the monitor, or any other light sources may reflect on the power cord to avoid damage to the cable. · Do not expose the monitor to rain, excessive moisture, or dust. · Do not cover the ventilation slots or openings of H05VV-F cord and plug rated 10 A, 250 V. CLEANING...
User Manual
Page 8
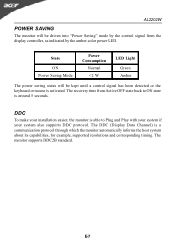
State ON Power Saving Mode Power Consumption Normal AL2202W POWER SAVING The monitor will be driven into "Power Saving" mode by the control signal from the display controller, as indicated by the amber-color power LED.
State ON Power Saving Mode Power Consumption Normal AL2202W POWER SAVING The monitor will be driven into "Power Saving" mode by the control signal from the display controller, as indicated by the amber-color power LED.
User Manual
Page 11
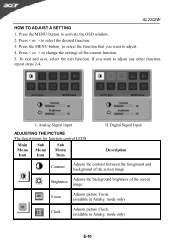
.... 5. Digital Signal Input Description Contrast Adjusts the contrast between the foreground and background of the screen image. Brightness Adjusts the background brightness of the screen image. Press < or > to select the desired function. 3. I. Focus Adjusts picture Focus. (available in Analog mode only) Clock Adjusts picture Clock. (available in Analog mode only) E-10 To exit and save, select the exit function. AL2202W HOW TO ADJUST A SETTING 1. Analog Signal Input ADJUSTING THE PICTURE The descriptions for function control LEDS Main Menu Icon Sub Menu Icon...
.... 5. Digital Signal Input Description Contrast Adjusts the contrast between the foreground and background of the screen image. Brightness Adjusts the background brightness of the screen image. Press < or > to select the desired function. 3. I. Focus Adjusts picture Focus. (available in Analog mode only) Clock Adjusts picture Clock. (available in Analog mode only) E-10 To exit and save, select the exit function. AL2202W HOW TO ADJUST A SETTING 1. Analog Signal Input ADJUSTING THE PICTURE The descriptions for function control LEDS Main Menu Icon Sub Menu Icon...
User Manual
Page 12
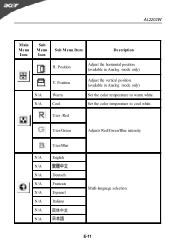
Position Adjust the horizontal position. (available in Analog mode only) Set the color temperature to cool white. E-11 User/Blue N/A English N/A N/A Deutsch N/A Francais N/A Espanol N/A Italiano N/A N/A Multi-language selection. User /Red User/Green Adjusts Red/Green/Blue intensity. Position N/A Warm N/A Cool Adjust the vertical position. (available in Analog mode only) V. AL2202W Main Menu Icon Sub Menu Icon Sub Menu Item Description H. Set the color temperature to warm white.
Position Adjust the horizontal position. (available in Analog mode only) Set the color temperature to cool white. E-11 User/Blue N/A English N/A N/A Deutsch N/A Francais N/A Espanol N/A Italiano N/A N/A Multi-language selection. User /Red User/Green Adjusts Red/Green/Blue intensity. Position N/A Warm N/A Cool Adjust the vertical position. (available in Analog mode only) V. AL2202W Main Menu Icon Sub Menu Icon Sub Menu Item Description H. Set the color temperature to warm white.
User Manual
Page 13
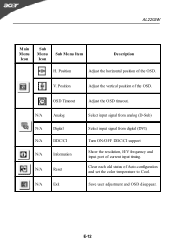
... Menu Icon Sub Menu Icon Sub Menu Item Description H. Position Adjust the vertical position of current input timing. E-12 V. N/A Analog N/A Digital N/A DDC/CI N/A Information N/A Reset N/A Exit Select input signal from analog (D-Sub) Select input signal from digital (DVI) Turn ON/OFF DDC/CI support Show the resolution, H/V frequency and input port of the OSD. Clear each old status of the OSD. Save user adjustment and OSD disappear. Position Adjust the horizontal position of Auto-configuration and set the color temperature to Cool. OSD Timeout Adjust the OSD...
... Menu Icon Sub Menu Icon Sub Menu Item Description H. Position Adjust the vertical position of current input timing. E-12 V. N/A Analog N/A Digital N/A DDC/CI N/A Information N/A Reset N/A Exit Select input signal from analog (D-Sub) Select input signal from digital (DVI) Turn ON/OFF DDC/CI support Show the resolution, H/V frequency and input port of the OSD. Clear each old status of the OSD. Save user adjustment and OSD disappear. Position Adjust the horizontal position of Auto-configuration and set the color temperature to Cool. OSD Timeout Adjust the OSD...
User Manual
Page 14
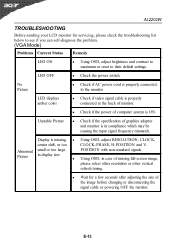
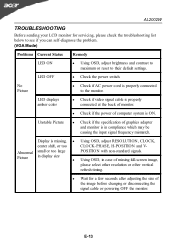
... No Picture · Check if AC power cord is properly connected to their default settings. Abnormal small or too large Picture in display size POSITION with non-standard signals. · Using OSD, in case of missing full-screen image, please select other resolution or other vertical refresh timing. · Wait for servicing, please check the troubleshooting list below to see if you can self-diagnose the problem. (VGA Mode) Problems Current Status Remedy LED ON · Using OSD, adjust brightness and contrast...
... No Picture · Check if AC power cord is properly connected to their default settings. Abnormal small or too large Picture in display size POSITION with non-standard signals. · Using OSD, in case of missing full-screen image, please select other resolution or other vertical refresh timing. · Wait for servicing, please check the troubleshooting list below to see if you can self-diagnose the problem. (VGA Mode) Problems Current Status Remedy LED ON · Using OSD, adjust brightness and contrast...
User Manual
Page 15
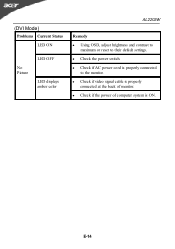
(DVI Mode) Problems Current Status LED ON No Picture LED OFF LED displays amber color AL2202W Remedy · Using OSD, adjust brightness and contrast to maximum or reset to their default settings. · Check the power switch. · Check if AC power cord is properly connected to the monitor. · Check if video signal cable is properly connected at the back of monitor. · Check if the power of computer system is ON. E-14
(DVI Mode) Problems Current Status LED ON No Picture LED OFF LED displays amber color AL2202W Remedy · Using OSD, adjust brightness and contrast to maximum or reset to their default settings. · Check the power switch. · Check if AC power cord is properly connected to the monitor. · Check if video signal cable is properly connected at the back of monitor. · Check if the power of computer system is ON. E-14

AL2002 User's Guide
Page 2
... CONTENTS Special notes on LCD monitors 1 Introduction ...2 Features ...2 Unpacking ...3 Attaching/Removing the Base 4 Screen position adjustment 4 Connecting the power cord 5 Safety precaution 5 Cleaning your monitor 5 Preset modes ...6 Power saving ...7 DDC ...7 Installation...8 User controls ...9 Front panel controls 9 Basic section of a OSD screen 10 Standard OSD operation 11 OSD function description 11 Troubleshooting 13 Specification ...15 For more information and help in recycling, please visit the following websites: Worldwide: http://global.acer.com/about/sustainability.htm
... CONTENTS Special notes on LCD monitors 1 Introduction ...2 Features ...2 Unpacking ...3 Attaching/Removing the Base 4 Screen position adjustment 4 Connecting the power cord 5 Safety precaution 5 Cleaning your monitor 5 Preset modes ...6 Power saving ...7 DDC ...7 Installation...8 User controls ...9 Front panel controls 9 Basic section of a OSD screen 10 Standard OSD operation 11 OSD function description 11 Troubleshooting 13 Specification ...15 For more information and help in recycling, please visit the following websites: Worldwide: http://global.acer.com/about/sustainability.htm
AL2002 User's Guide
Page 4
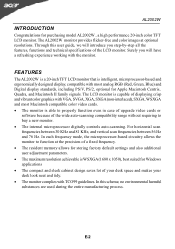
The AL2002W monitor provides flicker-free and color images at the precision-of a fixed frequency. · The resident memory allows for storing factory default settings and also additional user adjustment parameters. · The maximum resolution achievable is intelligent, microprocessor-based and ergonomically designed display, compatible with the monitor. FEATURES The AL2002W is a 20-inch TFT LCD monitor that is WSXGA(1680 x 1050), best suited for Windows applications · The compact and sleek cabinet design saves lot of...
The AL2002W monitor provides flicker-free and color images at the precision-of a fixed frequency. · The resident memory allows for storing factory default settings and also additional user adjustment parameters. · The maximum resolution achievable is intelligent, microprocessor-based and ergonomically designed display, compatible with the monitor. FEATURES The AL2002W is a 20-inch TFT LCD monitor that is WSXGA(1680 x 1050), best suited for Windows applications · The compact and sleek cabinet design saves lot of...

AL2002 User's Guide
Page 5
AL2002W UNPACKING Please check the following items are present when you unpack the box, and save the packing materials in case you will need to ship or transport the monitor in future. · LCD Monitor · AC Power · DVICable (Only Dual-Input Model) · DSUBCable · User Manual · Quick Start Guide Quick Start Guide E-3
AL2002W UNPACKING Please check the following items are present when you unpack the box, and save the packing materials in case you will need to ship or transport the monitor in future. · LCD Monitor · AC Power · DVICable (Only Dual-Input Model) · DSUBCable · User Manual · Quick Start Guide Quick Start Guide E-3

AL2002 User's Guide
Page 7
... not cover the slots or openings of the monitor. The cord set should have the appropriate safety approvals for proper heat dissipation. Always put the monitor in either 100/120V AC or 220/240 V AC voltage area. E-5 AL2002W CONNECTING THE POWER CORD · Check first to wipe the screen and cabinet front and sides. No user-adjustment is required. · Plug one end of the power cord...
... not cover the slots or openings of the monitor. The cord set should have the appropriate safety approvals for proper heat dissipation. Always put the monitor in either 100/120V AC or 220/240 V AC voltage area. E-5 AL2002W CONNECTING THE POWER CORD · Check first to wipe the screen and cabinet front and sides. No user-adjustment is required. · Plug one end of the power cord...

AL2002 User's Guide
Page 8
... Polarity HV E-6 Mode Resolution H. The monitor is the new display information must have 1 KHz difference for horizontal frequency or 1 Hz for different modes, the monitor has default setting modes that are different from the default modes. For optimum adjustment, the user is matched, the user can store their preferred modes in the user modes. AL2002W PRESET MODES To reduce the need for adjustment for vertical frequency or the sync signal polarities are most commonly used as a user mode is capable...
... Polarity HV E-6 Mode Resolution H. The monitor is the new display information must have 1 KHz difference for horizontal frequency or 1 Hz for different modes, the monitor has default setting modes that are different from the default modes. For optimum adjustment, the user is matched, the user can store their preferred modes in the user modes. AL2002W PRESET MODES To reduce the need for adjustment for vertical frequency or the sync signal polarities are most commonly used as a user mode is capable...

AL2002 User's Guide
Page 9
AL2002W POWER SAVING The monitor will be driven into "Power Saving" mode by the control signal from the display controller, as indicated by the amber-color power LED. State ON Power Saving Mode Power Consumption Normal
AL2002W POWER SAVING The monitor will be driven into "Power Saving" mode by the control signal from the display controller, as indicated by the amber-color power LED. State ON Power Saving Mode Power Consumption Normal

AL2002 User's Guide
Page 11
... selected for adjustment. + : Choose the next OSD MENU page. ACt as AUTO adjustment hot key when OSD is not displayed. E-9 Power LED : Lights up to indicate the power is not displayed.(Only Dual-Input Model) 5. - : To decrease the value of the parameter in the OSD Item. Power Switch: To turn ON or OFF the power. 2. Select MENU: To exit and enter OSD menu. 4. AUTO : Act as Digital and Analog switching hot key when OSD is turned ON. 3. USER CONTROLS AL2002W 3 4 5 6 1 2 Front Panel Controls 1.
... selected for adjustment. + : Choose the next OSD MENU page. ACt as AUTO adjustment hot key when OSD is not displayed. E-9 Power LED : Lights up to indicate the power is not displayed.(Only Dual-Input Model) 5. - : To decrease the value of the parameter in the OSD Item. Power Switch: To turn ON or OFF the power. 2. Select MENU: To exit and enter OSD menu. 4. AUTO : Act as Digital and Analog switching hot key when OSD is turned ON. 3. USER CONTROLS AL2002W 3 4 5 6 1 2 Front Panel Controls 1.

AL2002 User's Guide
Page 12
Basic Sections of a OSD Screen i Brightness Contrast Auto Contrast i Red Green B l ue 5000K 6500K 7500K 8200K 9300K - + 255 - + 255 - + 255 i Horizontal Size Fine Left/Right Down/Up Auto Adjust AL2002W i Language Factory Reset OSD Timeout OSD Left/Right OSD Down/Up i VGA 1024 x 768 60Hz Auto Adjusting Please Wait No VGA Signal Check VGA Cable E-10
Basic Sections of a OSD Screen i Brightness Contrast Auto Contrast i Red Green B l ue 5000K 6500K 7500K 8200K 9300K - + 255 - + 255 - + 255 i Horizontal Size Fine Left/Right Down/Up Auto Adjust AL2002W i Language Factory Reset OSD Timeout OSD Left/Right OSD Down/Up i VGA 1024 x 768 60Hz Auto Adjusting Please Wait No VGA Signal Check VGA Cable E-10
AL2002 User's Guide
Page 15
... the input signal frequency mismatch. Unstable Picture · Check if the specification of graphics adapter and monitor is properly connected to their default settings. No Picture · Check if AC power cord is in case of missing full-screen image, please select other resolution or other vertical refresh timing. · Wait for servicing, please check the troubleshooting list below to see if you can self-diagnose the problem. (VGA Mode) Problems Current Status Remedy LED ON · Using OSD, adjust brightness and contrast...
... the input signal frequency mismatch. Unstable Picture · Check if the specification of graphics adapter and monitor is properly connected to their default settings. No Picture · Check if AC power cord is in case of missing full-screen image, please select other resolution or other vertical refresh timing. · Wait for servicing, please check the troubleshooting list below to see if you can self-diagnose the problem. (VGA Mode) Problems Current Status Remedy LED ON · Using OSD, adjust brightness and contrast...

AL2002 User's Guide
Page 16
(DVI Mode) Problems Current Status LED ON No Picture LED OFF LED displays amber color AL2002W Remedy · Using OSD, adjust brightness and contrast to maximum or reset to their default settings. · Check the power switch. · Check if AC power cord is properly connected to the monitor. · Check if video signal cable is properly connected at the back of monitor. · Check if the power of computer system is ON. E-14
(DVI Mode) Problems Current Status LED ON No Picture LED OFF LED displays amber color AL2002W Remedy · Using OSD, adjust brightness and contrast to maximum or reset to their default settings. · Check the power switch. · Check if AC power cord is properly connected to the monitor. · Check if video signal cable is properly connected at the back of monitor. · Check if the power of computer system is ON. E-14
AL2002 User's Guide
Page 17
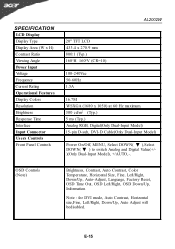
...) Brightness, Contrast, Auto Contrast, Color Temperature, Horizontal Size, Fine, Left/Right, Down/Up, Auto-Adjust, Language, Factory Reset, OSD Time Out, OSD Left/Right, OSD Down/Up, Information Note : for DVI mode, Auto Contrast, Horizontal size,Fine, Left/Right, Down/Up, Auto Adjust will bedisabled. SPECIFICATION LCD Display Display Type Display Area (W x H) Contrast Ratio Viewing Angle Power Input Voltage Frequency Current Rating Operational Features Display Colors Resolution Brightness Response Time Interface Input Connector Users Controls Front Panel Controls AL2002W 20" TFT LCD 433...
...) Brightness, Contrast, Auto Contrast, Color Temperature, Horizontal Size, Fine, Left/Right, Down/Up, Auto-Adjust, Language, Factory Reset, OSD Time Out, OSD Left/Right, OSD Down/Up, Information Note : for DVI mode, Auto Contrast, Horizontal size,Fine, Left/Right, Down/Up, Auto Adjust will bedisabled. SPECIFICATION LCD Display Display Type Display Area (W x H) Contrast Ratio Viewing Angle Power Input Voltage Frequency Current Rating Operational Features Display Colors Resolution Brightness Response Time Interface Input Connector Users Controls Front Panel Controls AL2002W 20" TFT LCD 433...

