
AL1716e Service Guide
Page 6
... not place the monitor on the monitor. z Do not overload power strips and extension cords. near water, e.g. Use only a trolley or stand recommended by the manufacture and follow the kit instructions. z Slots and openings in a wet basement. Do not place the monitor in fire or...causing a fire or electric shock. If you to service the monitor yourself; Overloading can expose you mount the monitor on an unstable trolley, stand, or table. z For use only with the attached power adapter (output 12V DC) which have appropriate configured receptacles marked between 100-240V AC...
... not place the monitor on the monitor. z Do not overload power strips and extension cords. near water, e.g. Use only a trolley or stand recommended by the manufacture and follow the kit instructions. z Slots and openings in a wet basement. Do not place the monitor in fire or...causing a fire or electric shock. If you to service the monitor yourself; Overloading can expose you mount the monitor on an unstable trolley, stand, or table. z For use only with the attached power adapter (output 12V DC) which have appropriate configured receptacles marked between 100-240V AC...
AL1716e Service Guide
Page 31
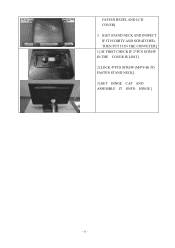
FASTEN BEZEL AND LCD COVER] 3. [GET STAND NECK AND INSPECT IF IT IS DIRTY AND SCRATCHED, THEN PUT IT IN THE CONVEYER] 1 [AT FIRST CHECK IF 2*PCS SCREW IN THE COVER IS LOST] 2 [LOCK 4*PCS SCREW (M4*8-B) TO FASTEN STAND NECK] 3 [GET HINGE CAP AND ASSEMBLE IT ONTO HINGE ] - 31 -
FASTEN BEZEL AND LCD COVER] 3. [GET STAND NECK AND INSPECT IF IT IS DIRTY AND SCRATCHED, THEN PUT IT IN THE CONVEYER] 1 [AT FIRST CHECK IF 2*PCS SCREW IN THE COVER IS LOST] 2 [LOCK 4*PCS SCREW (M4*8-B) TO FASTEN STAND NECK] 3 [GET HINGE CAP AND ASSEMBLE IT ONTO HINGE ] - 31 -
AL1716v Service Guide
Page 5
Use only a trolley or stand recommended by the manufacturer or sold with a third (grounding) pin. Do not place the monitor on the monitor. Unplug the unit during initial use. This ... unless proper ventilation is displayed for long periods of the previous screen may find slightly uneven brightness on the screen depending on an unstable trolley, stand, or table. Due to protect it can expose you use the monitor near the equipment and shall be used for hours. You may remain after...
Use only a trolley or stand recommended by the manufacturer or sold with a third (grounding) pin. Do not place the monitor on the monitor. Unplug the unit during initial use. This ... unless proper ventilation is displayed for long periods of the previous screen may find slightly uneven brightness on the screen depending on an unstable trolley, stand, or table. Due to protect it can expose you use the monitor near the equipment and shall be used for hours. You may remain after...
AL1716v Service Guide
Page 26
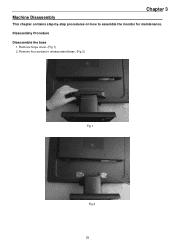
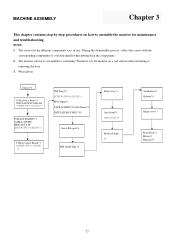
Disassembly Procedure Disassemble the base 1. Remove hinge cover. (Fig 1) 2. Remove four screws to assemble the monitor for maintenance. Chapter 3 Machine Disassembly This chapter contains step-by-step procedures on how to release stand base. (Fig 2) Fig 1 Fig 2 25
Disassembly Procedure Disassemble the base 1. Remove hinge cover. (Fig 1) 2. Remove four screws to assemble the monitor for maintenance. Chapter 3 Machine Disassembly This chapter contains step-by-step procedures on how to release stand base. (Fig 2) Fig 1 Fig 2 25
AL1716v Service Guide
Page 41
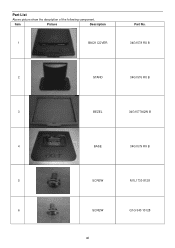
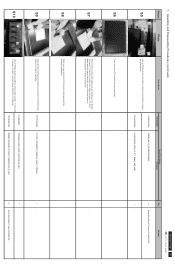
Part List Above picture show the description of the following component. Item Picture Description 1 BACK COVER Part No. 34G1578 RX B 2 STAND 34G1576 RX B 3 BEZEL 34G1577AQW B 4 BASE 34G1579 RX B 5 SCREW M1L1730 8128 6 SCREW Q1G 340 10128 40
Part List Above picture show the description of the following component. Item Picture Description 1 BACK COVER Part No. 34G1578 RX B 2 STAND 34G1576 RX B 3 BEZEL 34G1577AQW B 4 BASE 34G1579 RX B 5 SCREW M1L1730 8128 6 SCREW Q1G 340 10128 40
AL1716W Service Guide
Page 45
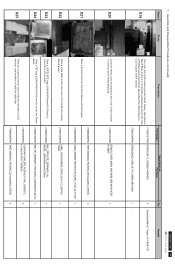
...the left . Line 1 Stick a Vista label on specific positions as photo left side of Front Bezel (nearby Stand Base). 7735431685P0A LABEL_VISTA(WORKS)_CMYK_25.4x11.2_LENOVO T15AN 1- S21 S22 Line 2 S23 S24 S25 Stick a Screen Card... screws. 7115240121P0A SCREW_M4*12_DOUBLE WASHIER 7740412200P0A STAND_BASE_ACER_AL1717_#6800_ABS 94HB ACER AL1716W 44 Go to cover the Stand Base. 7749003190P0A BAG_PE_ORDINARY_FOR ACER_L300xW300xT0.05 mm 1 - Use a Phillips-head screwdriver assembled the Stand base to LCD module with two tapes. 7749600200P0A TAPE_MASKING_PACKING_25mm(w)x45m_LITEON...
...the left . Line 1 Stick a Vista label on specific positions as photo left side of Front Bezel (nearby Stand Base). 7735431685P0A LABEL_VISTA(WORKS)_CMYK_25.4x11.2_LENOVO T15AN 1- S21 S22 Line 2 S23 S24 S25 Stick a Screen Card... screws. 7115240121P0A SCREW_M4*12_DOUBLE WASHIER 7740412200P0A STAND_BASE_ACER_AL1717_#6800_ABS 94HB ACER AL1716W 44 Go to cover the Stand Base. 7749003190P0A BAG_PE_ORDINARY_FOR ACER_L300xW300xT0.05 mm 1 - Use a Phillips-head screwdriver assembled the Stand base to LCD module with two tapes. 7749600200P0A TAPE_MASKING_PACKING_25mm(w)x45m_LITEON...
AL1716W Service Guide
Page 46
... Packinglabel 7735431685P0A LABEL_VISTA(WORKS)_CMYK_25.4x11.2_LENOVO T15AN 122- 7. Put accessories on the front and rear sides of carton. ACER AL1716W 45 Go to cover page Remark S27 S28 S29 Vista Labels Packing Labels Move previous assembled parts into the carton ...and stick Vista tables on the specific positions and fix the Stand Base and User's Manuals with two tapes as photo left. 6716004833P Power cable 1- 6715009019P00 DVI cable 1- Assembly and Disassembly Procedures ...
... Packinglabel 7735431685P0A LABEL_VISTA(WORKS)_CMYK_25.4x11.2_LENOVO T15AN 122- 7. Put accessories on the front and rear sides of carton. ACER AL1716W 45 Go to cover page Remark S27 S28 S29 Vista Labels Packing Labels Move previous assembled parts into the carton ...and stick Vista tables on the specific positions and fix the Stand Base and User's Manuals with two tapes as photo left. 6716004833P Power cable 1- 6715009019P00 DVI cable 1- Assembly and Disassembly Procedures ...
AL1716W Service Guide
Page 47
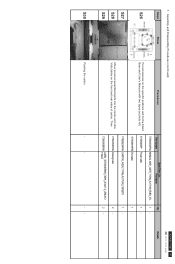
7. S4 2 Disassemble the stand cover. 1 7742612091P0A STAND_COVER_#6800_ABS 94HB_ABS 94HB_ACER R17BNW 7738001840P0A HINGE_STAND_WHT_SUS430 T=2.0mm_ACER_T17AN/BNHW 1 - 1 - S3 Move the returned LCD monitor to a working table, then remove cushion foams and LDPE+EPE bag. 7749003190P0A BAG_PE_ORDINARY_FOR ACER_L300xW300xT0.05 mm Tear off tapes to cover page Remark ACER AL1716W 46 Go to remove the screen protector...
7. S4 2 Disassemble the stand cover. 1 7742612091P0A STAND_COVER_#6800_ABS 94HB_ABS 94HB_ACER R17BNW 7738001840P0A HINGE_STAND_WHT_SUS430 T=2.0mm_ACER_T17AN/BNHW 1 - 1 - S3 Move the returned LCD monitor to a working table, then remove cushion foams and LDPE+EPE bag. 7749003190P0A BAG_PE_ORDINARY_FOR ACER_L300xW300xT0.05 mm Tear off tapes to cover page Remark ACER AL1716W 46 Go to remove the screen protector...
AL1716W Service Guide
Page 48
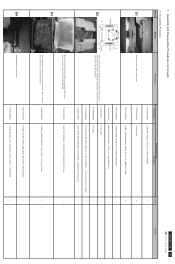
... ). - - Assembly and Disassembly Procedures (continued) Steps Photo Procedures Part Number Spare Parts Usage Part Name S5 Use a Phillips-head screwdriver unscrew 4 screws to release the stand base. 7115240121P0A 7740412200P0A SCREW_M4*12_DOUBLE WASHIER STAND_BASE_ACER_AL1717_#6800_ABS 94HB S6 Turn over the LCD monitor (screen faced up on to disengage all the locking mechanisms...
... ). - - Assembly and Disassembly Procedures (continued) Steps Photo Procedures Part Number Spare Parts Usage Part Name S5 Use a Phillips-head screwdriver unscrew 4 screws to release the stand base. 7115240121P0A 7740412200P0A SCREW_M4*12_DOUBLE WASHIER STAND_BASE_ACER_AL1717_#6800_ABS 94HB S6 Turn over the LCD monitor (screen faced up on to disengage all the locking mechanisms...
AL1716x Service Guide
Page 7
User only a trolley or stand recommended by the manufacturer and following symptoms are normal with UL listed computers which have an electrician install the correct outlet, or use the monitor ... ventilation. To ensure satisfactory operation, use . SPECIAL NOTES ON LCD MONITORS The following the kit instructions. Do not place the monitor on an unstable trolley, stand, or table. opening or removing covers can expose you are provide for long periods of 99.99% or more. Turn off the Power Switch and...
User only a trolley or stand recommended by the manufacturer and following symptoms are normal with UL listed computers which have an electrician install the correct outlet, or use the monitor ... ventilation. To ensure satisfactory operation, use . SPECIAL NOTES ON LCD MONITORS The following the kit instructions. Do not place the monitor on an unstable trolley, stand, or table. opening or removing covers can expose you are provide for long periods of 99.99% or more. Turn off the Power Switch and...
AL1716x Service Guide
Page 27
...)*4 FFC(30pin)*1 TAPE,ACE#LP1701(40x20mm)*1 INSULATOR PC#LE1710 Insert B/L jack*4 PCBA Control Board *1 SCREW (PW 3*4,M,ZN) *2 EMI shield Tape*2 Back cover*1 Arm Stand*1 (M4x10,ZN)*4 Bracket Finger *1 Stand plate*1 Rubber*4 Hinge cover*1 Front bezel*1 Button*1 Indicator*1 27 During the disassembly process, collect the screws with the corresponding components to scratching! MACHINE...
...)*4 FFC(30pin)*1 TAPE,ACE#LP1701(40x20mm)*1 INSULATOR PC#LE1710 Insert B/L jack*4 PCBA Control Board *1 SCREW (PW 3*4,M,ZN) *2 EMI shield Tape*2 Back cover*1 Arm Stand*1 (M4x10,ZN)*4 Bracket Finger *1 Stand plate*1 Rubber*4 Hinge cover*1 Front bezel*1 Button*1 Indicator*1 27 During the disassembly process, collect the screws with the corresponding components to scratching! MACHINE...
AL1716x Service Guide
Page 31
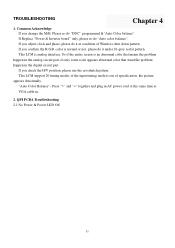
... input timing mode is an abnormal color that means the problem happen in the analog circuit part, if only some scale appears abnormal color that stand the problem happen in the digital circuit part. TROUBLESHOOTING Chapter 4 1. Common Acknowledge If you adjust clock and phase, please do it at condition of specification...
... input timing mode is an abnormal color that means the problem happen in the analog circuit part, if only some scale appears abnormal color that stand the problem happen in the digital circuit part. TROUBLESHOOTING Chapter 4 1. Common Acknowledge If you adjust clock and phase, please do it at condition of specification...
AL1716x Service Guide
Page 41
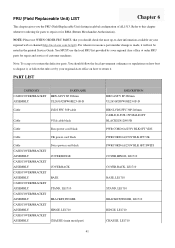
... CASE/COVER/BRACKET ASSEMBLY CASE/COVER/BRACKET ASSEMBLY CASE/COVER/BRACKET ASSEMBLY CASE/COVER/BRACKET ASSEMBLY Swiss power cord black COVER,HINGE COVER,BACK BASE STAND, LE1710 BRACKET,FINGER HINGE, LE1710 CHASSIS (main metal part) 41 DESCRIPTION HRN ASS'Y 8P 280mm UL2651#28FW08E23-0F-D HRN LVDS FFC 30P 240mm ...local government ordinance or regulations on how best to dispose it, or follow the rules set by your regional web or channel (http://aicsl.acer.com.tw/spl/). NOTE: Please not WHEN ORDER FRU PARTS, that you the FRU (Field Replaceable Unit) listing in the printed Service Guide.
... CASE/COVER/BRACKET ASSEMBLY CASE/COVER/BRACKET ASSEMBLY CASE/COVER/BRACKET ASSEMBLY CASE/COVER/BRACKET ASSEMBLY Swiss power cord black COVER,HINGE COVER,BACK BASE STAND, LE1710 BRACKET,FINGER HINGE, LE1710 CHASSIS (main metal part) 41 DESCRIPTION HRN ASS'Y 8P 280mm UL2651#28FW08E23-0F-D HRN LVDS FFC 30P 240mm ...local government ordinance or regulations on how best to dispose it, or follow the rules set by your regional web or channel (http://aicsl.acer.com.tw/spl/). NOTE: Please not WHEN ORDER FRU PARTS, that you the FRU (Field Replaceable Unit) listing in the printed Service Guide.


