
Intel Smart Response Installation Guide
Page 1
...Installation Guide This motherboard supports Intel Smart Response Technology. After clicking OK button, SRT will enable automatically, and the RST GUI will update the new version RST driver in RAID ROM. For the new version RST driver, please check our website for the latest information: http://www.asrock... RST storage driver version 10.5 or later. 2. Boot system to a RAID mode system, then install all performance testing, chose "Maximized" mode. 7. Complete initial system setup, including installing the OS to desktop, open , click on the "Enable Acceleration" button on the GUI panel....
...Installation Guide This motherboard supports Intel Smart Response Technology. After clicking OK button, SRT will enable automatically, and the RST GUI will update the new version RST driver in RAID ROM. For the new version RST driver, please check our website for the latest information: http://www.asrock... RST storage driver version 10.5 or later. 2. Boot system to a RAID mode system, then install all performance testing, chose "Maximized" mode. 7. Complete initial system setup, including installing the OS to desktop, open , click on the "Enable Acceleration" button on the GUI panel....
Intel Rapid Storage Guide
Page 1
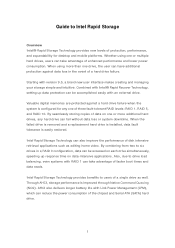
... data protection can reduce the power consumption of a single drive as editing home video. When the failed drive is removed and a replacement hard drive is installed, data fault tolerance is improved through Native Command Queuing (NCQ). Starting with Link Power Management (LPM), which can be accessed on data-intensive applications. Also...
... data protection can reduce the power consumption of a single drive as editing home video. When the failed drive is removed and a replacement hard drive is installed, data fault tolerance is improved through Native Command Queuing (NCQ). Starting with Link Power Management (LPM), which can be accessed on data-intensive applications. Also...
Intel Rapid Storage Guide
Page 2
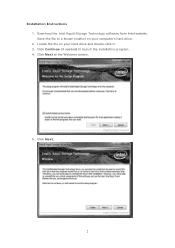
Save the file to launch the installation program. 4. Click Continue (if needed) to a known location on your computer's hard drive. 2. Click Next. 2 Download the Intel Rapid Storage Technology software from Intel website. Locate the file on your hard drive and double-click it. 3. Installation Instructions 1. Click Next at the Welcome screen. 5.
Save the file to launch the installation program. 4. Click Continue (if needed) to a known location on your computer's hard drive. 2. Click Next. 2 Download the Intel Rapid Storage Technology software from Intel website. Locate the file on your hard drive and double-click it. 3. Installation Instructions 1. Click Next at the Welcome screen. 5.
Intel Rapid Storage Guide
Page 3
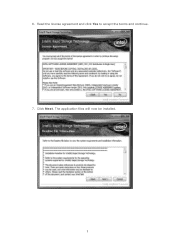
Click Next. Read the license agreement and click Yes to accept the terms and continue. 7. The application files will now be installed. 3 6.
Click Next. Read the license agreement and click Yes to accept the terms and continue. 7. The application files will now be installed. 3 6.

Intel Rapid Storage Guide
Page 12
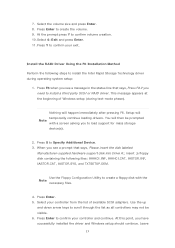
... press Enter. 4. Select the appropriate number of hard drives and press Space to select the strip size and press Enter. 5. The F6 installation method is not required for Microsoft Windows 7 or Note Microsoft Windows 8. Switch the SATA Operation Mode option to enter the option ROM user ...to select the physical disks. 6. Click the Storage Configuration menu. 4. Enetr the Advanced menu. 3. How to install an operating system onto a RAID volume (F6 install method) In order to install an operating system onto a RAID volume, the RAID option must be enabled in the system BIOS, a RAID...
... press Enter. 4. Select the appropriate number of hard drives and press Space to select the strip size and press Enter. 5. The F6 installation method is not required for Microsoft Windows 7 or Note Microsoft Windows 8. Switch the SATA Operation Mode option to enter the option ROM user ...to select the physical disks. 6. Click the Storage Configuration menu. 4. Enetr the Advanced menu. 3. How to install an operating system onto a RAID volume (F6 install method) In order to install an operating system onto a RAID volume, the RAID option must be enabled in the system BIOS, a RAID...
Intel Rapid Storage Guide
Page 13
7. Press F6 when you see a prompt that says, Press F6 if you have successfully installed the driver and Windows setup should continue. You will happen immediately after pressing F6. Press Enter. 5. At this point, you need to load support for ... volume creation. 10. Select 4: Exit and press Enter. 11. When you to install a third party SCSI or RAID driver. Press Enter to install the Intel Rapid Storage Technology driver during text-mode phase). Install the RAID Driver Using the F6 Installation Method Perform the following files: IAAHCI.INF, IAAHCI.CAT, IASTOR.INF, IASTOR.CAT...
7. Press F6 when you see a prompt that says, Press F6 if you have successfully installed the driver and Windows setup should continue. You will happen immediately after pressing F6. Press Enter. 5. At this point, you need to load support for ... volume creation. 10. Select 4: Exit and press Enter. 11. When you to install a third party SCSI or RAID driver. Press Enter to install the Intel Rapid Storage Technology driver during text-mode phase). Install the RAID Driver Using the F6 Installation Method Perform the following files: IAAHCI.INF, IAAHCI.CAT, IASTOR.INF, IASTOR.CAT...
Intel Rapid Storage Guide
Page 14
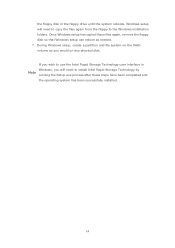
.... Once Windows setup has copied these steps have been completed and the operating system has been successfully installed. 14 the floppy disk in Windows, you will need to install Intel Rapid Storage Technology by Note running the Setup.exe process after these files again, remove the floppy disk so that Windows setup...
.... Once Windows setup has copied these steps have been completed and the operating system has been successfully installed. 14 the floppy disk in Windows, you will need to install Intel Rapid Storage Technology by Note running the Setup.exe process after these files again, remove the floppy disk so that Windows setup...
Intel Rapid Storage Guide
Page 15
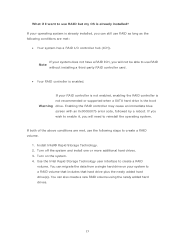
... Rapid Storage Technology. 2. Use the Intel Rapid Storage Technology user interface to use RAID Note without installing a third-party RAID controller card. • Your RAID controller is already installed? Turn on your system does not have a RAID ICH, you will need to use the following ...(ICH). If your RAID controller is not enabled, enabling the RAID controller is not recommended or supported when a SATA hard drive is already installed, you will not be able to create a RAID volume. Enabling the RAID controller may cause an immediate blue screen with an 0x0000007b error...
... Rapid Storage Technology. 2. Use the Intel Rapid Storage Technology user interface to use RAID Note without installing a third-party RAID controller card. • Your RAID controller is already installed? Turn on your system does not have a RAID ICH, you will need to use the following ...(ICH). If your RAID controller is not enabled, enabling the RAID controller is not recommended or supported when a SATA hard drive is already installed, you will not be able to create a RAID volume. Enabling the RAID controller may cause an immediate blue screen with an 0x0000007b error...
Intel Rapid Storage Guide
Page 16
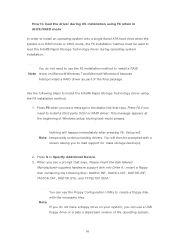
...happen immediately after pressing F6. You will then be used to load the Intel® Rapid Storage Technology driver during operating system installation. This message appears at the beginning of the final package. Nothing will Note temporarily continue loading drivers. Press F6 when you ... because Intel provided a RAID driver as part of Windows setup (during text-mode phase). How to load the driver during OS installation using the F6 installation method. 1. Note If you need to use the Floppy Configuration Utility to load support for mass storage device(s). 2. Use the ...
...happen immediately after pressing F6. You will then be used to load the Intel® Rapid Storage Technology driver during operating system installation. This message appears at the beginning of the final package. Nothing will Note temporarily continue loading drivers. Press F6 when you ... because Intel provided a RAID driver as part of Windows setup (during text-mode phase). How to load the driver during OS installation using the F6 installation method. 1. Note If you need to use the Floppy Configuration Utility to load support for mass storage device(s). 2. Use the ...
Intel Rapid Storage Guide
Page 17
... Rapid Storage Technology user interface Note within Windows. 17 Leave the floppy disk in the floppy drive until the system reboots. If you have successfully installed the Intel Rapid Storage Technology driver and Windows setup should continue. 4. Windows setup will need to copy the files again from the list of available...
... Rapid Storage Technology user interface Note within Windows. 17 Leave the floppy disk in the floppy drive until the system reboots. If you have successfully installed the Intel Rapid Storage Technology driver and Windows setup should continue. 4. Windows setup will need to copy the files again from the list of available...
RAID Installation Guide
Page 1
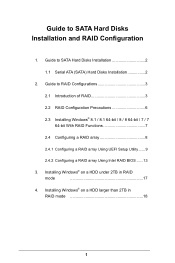
...; on a HDD under 2TB in RAID mode 18 1 Guide to SATA Hard Disks Installation and RAID Configuration 1. Installing Windows® on a HDD larger than 2TB in RAID mode 17 4. Guide to RAID Configurations 3 2.1 Introduction of RAID 3 2.2 RAID Configuration Precautions 6 2.3 Installing Windows® 8.1 / 8.1 64-bit / 8 / 8 64-bit / 7 / 7 64-bit With RAID Functions 7 2.4 Configuring a RAID...
...; on a HDD under 2TB in RAID mode 18 1 Guide to SATA Hard Disks Installation and RAID Configuration 1. Installing Windows® on a HDD larger than 2TB in RAID mode 17 4. Guide to RAID Configurations 3 2.1 Introduction of RAID 3 2.2 RAID Configuration Precautions 6 2.3 Installing Windows® 8.1 / 8.1 64-bit / 8 / 8 64-bit / 7 / 7 64-bit With RAID Functions 7 2.4 Configuring a RAID...
RAID Installation Guide
Page 2
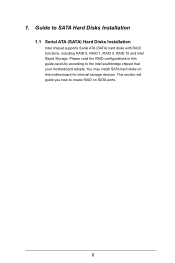
1. Please read the RAID configurations in this motherboard for internal storage devices. This section will guide you how to the Intel southbridge chipset that your motherboard adopts. You may install SATA hard disks on this guide carefully according to create RAID on SATA ports. 2 Guide to SATA Hard Disks Installation 1.1 Serial ATA (SATA) Hard Disks Installation Intel chipset supports Serial ATA (SATA) hard disks with RAID functions, including RAID 0, RAID 1, RAID 5, RAID 10 and Intel Rapid Storage.
1. Please read the RAID configurations in this motherboard for internal storage devices. This section will guide you how to the Intel southbridge chipset that your motherboard adopts. You may install SATA hard disks on this guide carefully according to create RAID on SATA ports. 2 Guide to SATA Hard Disks Installation 1.1 Serial ATA (SATA) Hard Disks Installation Intel chipset supports Serial ATA (SATA) hard disks with RAID functions, including RAID 0, RAID 1, RAID 5, RAID 10 and Intel Rapid Storage.
RAID Installation Guide
Page 3
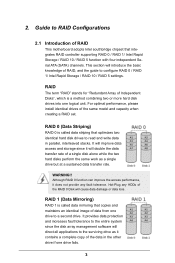
... will direct all applications to a second drive. Hot-Plug any fault tolerance. This section will cause data damage or data loss. For optimal performance, please install identical drives of RAID This motherboard adopts Intel southbridge chipset that optimizes two identical hard disk drives to read and write data in the other...
... will direct all applications to a second drive. Hot-Plug any fault tolerance. This section will cause data damage or data loss. For optimal performance, please install identical drives of RAID This motherboard adopts Intel southbridge chipset that optimizes two identical hard disk drives to read and write data in the other...
RAID Installation Guide
Page 7
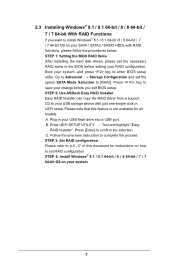
Boot your USB storage device with RAID functions, please follow the procedures below. STEP 2: Use ASRock Easy RAID Installer Easy RAID Installer can copy the RAID driver from a support CD to your system, and press key to enter BIOS setup utility. STEP 3: ... not available for instructions on your RAID configuration. Follow the onscreen instruction to confirm the selection C. Enter UEFI SETUP UTILITY Tool and highlight "Easy RAID Installer". 2.3 Installing Windows® 8.1 / 8.1 64-bit / 8 / 8 64-bit / 7 / 7 64-bit With RAID Functions If you exit BIOS setup. Plug in the...
Boot your USB storage device with RAID functions, please follow the procedures below. STEP 2: Use ASRock Easy RAID Installer Easy RAID Installer can copy the RAID driver from a support CD to your system, and press key to enter BIOS setup utility. STEP 3: ... not available for instructions on your RAID configuration. Follow the onscreen instruction to confirm the selection C. Enter UEFI SETUP UTILITY Tool and highlight "Easy RAID Installer". 2.3 Installing Windows® 8.1 / 8.1 64-bit / 8 / 8 64-bit / 7 / 7 64-bit With RAID Functions If you exit BIOS setup. Plug in the...
RAID Installation Guide
Page 8
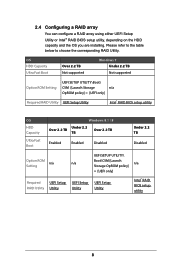
... configure a RAID array using either UEFI Setup Utility or Intel® RAID BIOS setup utility, depending on the HDD capacity and the OS you are installing.
... configure a RAID array using either UEFI Setup Utility or Intel® RAID BIOS setup utility, depending on the HDD capacity and the OS you are installing.

RAID Installation Guide
Page 12
STEP 8: Select Create Volume and press to delete a RAID volume, select the option Delete on the RAID volume info page and press . 12 If you want to start creating the RAID array. The actual screen may differ by model on the RAID volume info page and press . *Please note that the UEFI screenshots shown in this installation guide are for reference only.
STEP 8: Select Create Volume and press to delete a RAID volume, select the option Delete on the RAID volume info page and press . 12 If you want to start creating the RAID array. The actual screen may differ by model on the RAID volume info page and press . *Please note that the UEFI screenshots shown in this installation guide are for reference only.
RAID Installation Guide
Page 16
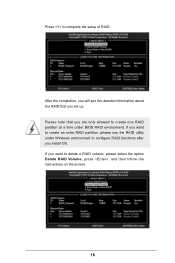
Press to delete a RAID volume, please select the option Delete RAID Volume, press , and then follow the instructions on the screen. 16 If you install OS. After the completion, you will see the detailed information about the RAID that you are only allowed to create one RAID partition at a time under Windows environment to configure RAID functions after you want to create an extra RAID partition, please use the RAID utility under BIOS RAID environment. Please note that you want to complete the setup of RAID. If you set up.
Press to delete a RAID volume, please select the option Delete RAID Volume, press , and then follow the instructions on the screen. 16 If you install OS. After the completion, you will see the detailed information about the RAID that you are only allowed to create one RAID partition at a time under Windows environment to configure RAID functions after you want to create an extra RAID partition, please use the RAID utility under BIOS RAID environment. Please note that you want to complete the setup of RAID. If you set up.
RAID Installation Guide
Page 17
3. Installing Windows® on a HDD under 2TB in RAID mode After the UEFI and RAID BIOS setup you may start installing Windows® 8.1 / 8.1 64-bit / 8 / 8 64-bit / 7 / 7 64-bit OS as usual. 17
3. Installing Windows® on a HDD under 2TB in RAID mode After the UEFI and RAID BIOS setup you may start installing Windows® 8.1 / 8.1 64-bit / 8 / 8 64-bit / 7 / 7 64-bit OS as usual. 17
RAID Installation Guide
Page 18
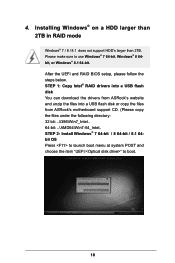
...into a USB flash disk or copy the files from ASRock's motherboard support CD. (Please copy the files under the following directory: 32 bit: ..\i386\Win7_Intel.. 64-bit: ..\AMD64\Win7-64_Intel.. After the UEFI and RAID BIOS setup, please follow the steps below. STEP 2: Install Windows® 7 64-bit / 8 64-bit /... menu at system POST and choose the item "UEFI:" to use Windows® 7 64-bit, Windows® 8 64bit, or Windows® 8.1 64-bit. 4. Installing Windows® on a HDD larger than 2TB in RAID mode Windows® 7 / 8 / 8.1 does not support HDD's larger than 2TB. Please make sure to ...
...into a USB flash disk or copy the files from ASRock's motherboard support CD. (Please copy the files under the following directory: 32 bit: ..\i386\Win7_Intel.. 64-bit: ..\AMD64\Win7-64_Intel.. After the UEFI and RAID BIOS setup, please follow the steps below. STEP 2: Install Windows® 7 64-bit / 8 64-bit /... menu at system POST and choose the item "UEFI:" to use Windows® 7 64-bit, Windows® 8 64bit, or Windows® 8.1 64-bit. 4. Installing Windows® on a HDD larger than 2TB in RAID mode Windows® 7 / 8 / 8.1 does not support HDD's larger than 2TB. Please make sure to ...
RAID Installation Guide
Page 19
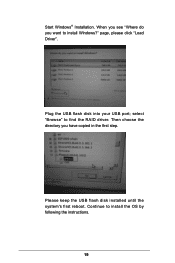
Start Windows® Installation. page, please click "Load Driver". select "Browse" to install the OS by following the instructions. 19 Continue to find the RAID driver. Plug the USB flash disk into your USB port; Then choose the directory you want to install Windows?" When you see "Where do you have copied in the first step. Please keep the USB flash disk installed until the system's first reboot.
Start Windows® Installation. page, please click "Load Driver". select "Browse" to install the OS by following the instructions. 19 Continue to find the RAID driver. Plug the USB flash disk into your USB port; Then choose the directory you want to install Windows?" When you see "Where do you have copied in the first step. Please keep the USB flash disk installed until the system's first reboot.


