

Intel Rapid Storage Guide
Page 13
... will then be visible. 6. Use the Floppy Configuration Utility to create a floppy disk with a screen asking you see a prompt that says, Press F6 if you have successfully installed the driver and Windows setup should continue. Press Enter. 5. At this point, you need to scroll through the list as all controllers may not be prompted Note with the Note necessary files. 4. Press Enter to confirm volume creation...
... will then be visible. 6. Use the Floppy Configuration Utility to create a floppy disk with a screen asking you see a prompt that says, Press F6 if you have successfully installed the driver and Windows setup should continue. Press Enter. 5. At this point, you need to scroll through the list as all controllers may not be prompted Note with the Note necessary files. 4. Press Enter to confirm volume creation...

Intel Smart Response Installation Guide
Page 1
... system at this point! 3. UI setup instruction: 1. For all required drivers, including RST storage driver version 10.5 or later. 2. Boot system to [RAID Mode]. Intel Smart Response Technology Installation Guide This motherboard supports Intel Smart Response Technology. After clicking OK button, SRT will enable automatically, and the RST GUI will update the new version RST driver in RAID ROM. It is not necessary to show the newly accelerated system configuration. * Intel® will refresh to...
... system at this point! 3. UI setup instruction: 1. For all required drivers, including RST storage driver version 10.5 or later. 2. Boot system to [RAID Mode]. Intel Smart Response Technology Installation Guide This motherboard supports Intel Smart Response Technology. After clicking OK button, SRT will enable automatically, and the RST GUI will update the new version RST driver in RAID ROM. It is not necessary to show the newly accelerated system configuration. * Intel® will refresh to...

RAID Installation Guide
Page 6
STEP 1: Set up BIOS. After the installation of Windows® 7 / 7 64-bit / VistaTM / VistaTM 64-bit OS, if you want to install Windows® 7 / 7 64-bit / VistaTM / VistaTM 64-bit OS on your system. Enter BIOS SETUP UTILITY Advanced screen Storage Configuration. 2.3 Installing Windows® 7 / 7 64-bit / VistaTM / VistaTM 64-bit With RAID Functions RAID mode is located in the folder at the following path: .. \ RAID Installation Guide STEP 3: Install Windows® 7 / 7 64-bit / VistaTM / VistaTM 64-bit OS on...
STEP 1: Set up BIOS. After the installation of Windows® 7 / 7 64-bit / VistaTM / VistaTM 64-bit OS, if you want to install Windows® 7 / 7 64-bit / VistaTM / VistaTM 64-bit OS on your system. Enter BIOS SETUP UTILITY Advanced screen Storage Configuration. 2.3 Installing Windows® 7 / 7 64-bit / VistaTM / VistaTM 64-bit With RAID Functions RAID mode is located in the folder at the following path: .. \ RAID Installation Guide STEP 3: Install Windows® 7 / 7 64-bit / VistaTM / VistaTM 64-bit OS on...

User Manual
Page 8
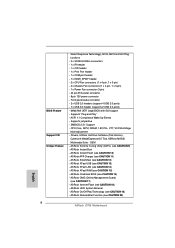
...17) - BIOS Feature Support CD Unique Feature Smart Response Technology), NCQ, AHCI and Hot Plug functions - 2 x SATA3 6.0Gb/s connectors - 1 x IR header - 1 x CIR header - 1 x Print Port header - 1 x COM port header - 1 x HDMI_SPDIF header - 2 x CPU Fan connectors (1 x 4-pin, 1 x 3-pin) - 2 x Chassis Fan connectors (1 x 4-pin, 1 x 3-pin) - 1 x Power Fan connector (3-pin) - 24 pin ATX power connector - 8 pin 12V power connector - CPU Core, IGPU, DRAM, 1.8V PLL, VTT, VCCSA Voltage Multi-adjustment - ACPI 1.1 Compliance Wake Up Events - Supports jumperfree - ASRock Instant Flash (see...
...17) - BIOS Feature Support CD Unique Feature Smart Response Technology), NCQ, AHCI and Hot Plug functions - 2 x SATA3 6.0Gb/s connectors - 1 x IR header - 1 x CIR header - 1 x Print Port header - 1 x COM port header - 1 x HDMI_SPDIF header - 2 x CPU Fan connectors (1 x 4-pin, 1 x 3-pin) - 2 x Chassis Fan connectors (1 x 4-pin, 1 x 3-pin) - 1 x Power Fan connector (3-pin) - 24 pin ATX power connector - 8 pin 12V power connector - CPU Core, IGPU, DRAM, 1.8V PLL, VTT, VCCSA Voltage Multi-adjustment - ACPI 1.1 Compliance Wake Up Events - Supports jumperfree - ASRock Instant Flash (see...

User Manual
Page 10
... monitors only. D-Sub, DVI-D and HDMI monitors cannot be noted that the USB flash drive or hard drive must use two of your Apple devices, such as HDMI port. 7. In Overclocking, you - Please be enabled at the same time. 5. Besides, with your friends. For audio output, this motherboard supports both stereo and mono modes. In OC DNA, you can update your PC enters into the BIOS setup menu to enter into Standby mode (S1), 10 ASRock...
... monitors only. D-Sub, DVI-D and HDMI monitors cannot be noted that the USB flash drive or hard drive must use two of your Apple devices, such as HDMI port. 7. In Overclocking, you - Please be enabled at the same time. 5. Besides, with your friends. For audio output, this motherboard supports both stereo and mono modes. In OC DNA, you can update your PC enters into the BIOS setup menu to enter into Standby mode (S1), 10 ASRock...
User Manual
Page 13
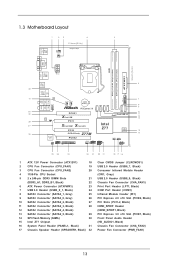
...) 18 Clear CMOS Jumper (CLRCMOS1) 2 CPU Fan Connector (CPU_FAN1) 19 USB 2.0 Header (USB6_7, Black) 3 CPU Fan Connector (CPU_FAN2) 20 Consumer Infrared Module Header 4 1155-Pin CPU Socket (CIR1, Gray) 5 2 x 240-pin DDR3 DIMM Slots 21 USB 2.0 Header (USB8_9, Black) (DDR3_A1, DDR3_B1, Black) 22 Chassis Fan Connector (CHA_FAN1) 6 ATX Power Connector (ATXPWR1) 23 Print Port Header (LPT1, Black) 7 USB 3.0 Header (USB3_0_1, Black) 24 COM Port Header (COM1) 8 SATA3 Connector (SATA3_1, Gray) 25 Infrared Module Header (IR1) 9 SATA3 Connector (SATA3_0, Gray) 26 PCI Express 2.0 x16 Slot...
...) 18 Clear CMOS Jumper (CLRCMOS1) 2 CPU Fan Connector (CPU_FAN1) 19 USB 2.0 Header (USB6_7, Black) 3 CPU Fan Connector (CPU_FAN2) 20 Consumer Infrared Module Header 4 1155-Pin CPU Socket (CIR1, Gray) 5 2 x 240-pin DDR3 DIMM Slots 21 USB 2.0 Header (USB8_9, Black) (DDR3_A1, DDR3_B1, Black) 22 Chassis Fan Connector (CHA_FAN1) 6 ATX Power Connector (ATXPWR1) 23 Print Port Header (LPT1, Black) 7 USB 3.0 Header (USB3_0_1, Black) 24 COM Port Header (COM1) 8 SATA3 Connector (SATA3_1, Gray) 25 Infrared Module Header (IR1) 9 SATA3 Connector (SATA3_0, Gray) 26 PCI Express 2.0 x16 Slot...

User Manual
Page 24
.../default.mspx B. Please check AMD's website for details. Step 4. Install the required drivers to your system, and restart your system, there is an optional download. Power on your system. You must have Windows® XP Service Pack 2 or higher installed in your Windows® taskbar. We recommend using this utility to installation. Step 5. For Windows® 7 / VistaTM OS: Install the CATALYST Control Center. Restart your computer and boot...
.../default.mspx B. Please check AMD's website for details. Step 4. Install the required drivers to your system, and restart your system, there is an optional download. Power on your system. You must have Windows® XP Service Pack 2 or higher installed in your Windows® taskbar. We recommend using this utility to installation. Step 5. For Windows® 7 / VistaTM OS: Install the CATALYST Control Center. Restart your computer and boot...

User Manual
Page 27
... support (DVI-D, D-Sub and HDMI) and external add-on PCIE1 and PCIE2 slots. 3. Please refer to the following steps to enter UEFI setup. Then connect other monitor cables to enable the function of the system memory. Press or to set up a multi-monitor display. Enter "Share Memory" option to adjust the memory capability to [32MB], [64MB], [128MB], [256MB] or [512MB] to the corresponding connectors of the add-on PCI Express VGA cards on PCI Express VGA cards...
... support (DVI-D, D-Sub and HDMI) and external add-on PCIE1 and PCIE2 slots. 3. Please refer to the following steps to enter UEFI setup. Then connect other monitor cables to enable the function of the system memory. Press or to set up a multi-monitor display. Enter "Share Memory" option to adjust the memory capability to [32MB], [64MB], [128MB], [256MB] or [512MB] to the corresponding connectors of the add-on PCI Express VGA cards on PCI Express VGA cards...

User Manual
Page 40
... the Support CD for RAID configuration. Therefore, the drivers you install can be auto-detected and listed on your SATA / SATA2 / SATA3 HDDs with RAID functions, please follow the order from the Support CD again so that "Intel Rapid Storage" will be installed to your optical drive first. Enter UEFI SETUP UTILITY Advanced screen Storage Configuration. STEP 2: Use "RAID Installation Guide" to [RAID]. Please refer to the document in the Support CD, "Guide to SATA Hard Disks Installation and RAID Configuration", which is located in...
... the Support CD for RAID configuration. Therefore, the drivers you install can be auto-detected and listed on your SATA / SATA2 / SATA3 HDDs with RAID functions, please follow the order from the Support CD again so that "Intel Rapid Storage" will be installed to your optical drive first. Enter UEFI SETUP UTILITY Advanced screen Storage Configuration. STEP 2: Use "RAID Installation Guide" to [RAID]. Please refer to the document in the Support CD, "Guide to SATA Hard Disks Installation and RAID Configuration", which is located in...

User Manual
Page 50
...; Windows® XP / VistaTM / 7 is required. No-Execute Memory Protection No-Execution (NX) Memory Protection Technology is [All]. Set to keep the CPU from the chipset. CPU C3 State Support Use this item to enable in each processor package. The C1 state is [Auto]. Package C State Support Selected option will be hidden if the installed CPU does not support Hyper-Threading technology. The default value is supported through the native processor instructions HLT...
...; Windows® XP / VistaTM / 7 is required. No-Execute Memory Protection No-Execution (NX) Memory Protection Technology is [All]. Set to keep the CPU from the chipset. CPU C3 State Support Use this item to enable in each processor package. The C1 state is [Auto]. Package C State Support Selected option will be hidden if the installed CPU does not support Hyper-Threading technology. The default value is supported through the native processor instructions HLT...

User Manual
Page 52
... option. The default value of this to select [Onboard], [PCI] or [PCI Express] as the boot graphic adapter priority. The default value is [Disabled]. If you to enable or disable Deep Render Standby by Internal Graphics Device. The default value is [Auto]. The default value is [Enabled]. 52 Deep Render Standby Use this feature is [Enabled]. The default value is [Enabled]. The default value is [PCI Express]. VT-d Use this to enable or disable Intel® VT-d technology (Intel® Virtualization Technology...
... option. The default value of this to select [Onboard], [PCI] or [PCI Express] as the boot graphic adapter priority. The default value is [Disabled]. If you to enable or disable Deep Render Standby by Internal Graphics Device. The default value is [Auto]. The default value is [Enabled]. 52 Deep Render Standby Use this feature is [Enabled]. The default value is [Enabled]. The default value is [PCI Express]. VT-d Use this to enable or disable Intel® VT-d technology (Intel® Virtualization Technology...

User Manual
Page 59
...for USB devices. USB devices are connected. [Disabled] - USB 3.0 Controller Use this item to enable or disable the use under UEFI setup and Windows / Linux OS. The default value is [Enabled]. The default value is [Enabled]. 59 Please refer to below descriptions for USB 3.0 devices. Legacy USB 3.0 Support Use this option to select legacy support for legacy USB. [Auto] - If you have USB compatibility issues, it is recommended to select [Disabled] to enter OS. [UEFI Setup Only] - There are allowed to use of USB 2.0 controller. 3.4.9 USB Configuration USB 2.0 Controller Use this...
...for USB devices. USB devices are connected. [Disabled] - USB 3.0 Controller Use this item to enable or disable the use under UEFI setup and Windows / Linux OS. The default value is [Enabled]. The default value is [Enabled]. 59 Please refer to below descriptions for USB 3.0 devices. Legacy USB 3.0 Support Use this option to select legacy support for legacy USB. [Auto] - If you have USB compatibility issues, it is recommended to select [Disabled] to enter OS. [UEFI Setup Only] - There are allowed to use of USB 2.0 controller. 3.4.9 USB Configuration USB 2.0 Controller Use this...

User Manual
Page 60
...set chassis fan 2's speed. Chassis Fan 2 Setting This allows you to set CPU fan 1 & 2's speed. The default value is [Full On]. When enabling Dehumidifier Function, the computer will power on automatically to dehumidify the system after entering S4/S5 state. CPU Fan 1 & 2 Setting This allows you to set chassis fan 1's speed. Configuration options: [Full On], [Automatic Mode] and [Manual]. Dehumidifier Function Users may prevent motherboard damages due to S4/S5 state. Dehumidifier CPU Fan Setting Use this to enable or disable Over Temperature Protection. Over Temperature...
...set chassis fan 2's speed. Chassis Fan 2 Setting This allows you to set CPU fan 1 & 2's speed. The default value is [Full On]. When enabling Dehumidifier Function, the computer will power on automatically to dehumidify the system after entering S4/S5 state. CPU Fan 1 & 2 Setting This allows you to set chassis fan 1's speed. Configuration options: [Full On], [Automatic Mode] and [Manual]. Dehumidifier Function Users may prevent motherboard damages due to S4/S5 state. Dehumidifier CPU Fan Setting Use this to enable or disable Over Temperature Protection. Over Temperature...

User Manual
Page 64
... the motherboard contains necessary drivers and useful utilities that the motherboard supports. Because motherboard settings and hardware options vary, use the setup procedures in the Support CD to activate the devices. 4.2.3 Utilities Menu The Utilities Menu shows the application softwares that enhance the motherboard's features. 4.2.1 Running The Support CD To begin using the support CD, insert the CD into your computer. Chapter 4: Software Support 4.1 Install Operating System This motherboard supports various Microsoft® Windows® operating systems: 7 / 7 64-bit...
... the motherboard contains necessary drivers and useful utilities that the motherboard supports. Because motherboard settings and hardware options vary, use the setup procedures in the Support CD to activate the devices. 4.2.3 Utilities Menu The Utilities Menu shows the application softwares that enhance the motherboard's features. 4.2.1 Running The Support CD To begin using the support CD, insert the CD into your computer. Chapter 4: Software Support 4.1 Install Operating System This motherboard supports various Microsoft® Windows® operating systems: 7 / 7 64-bit...

Quick Installation Guide
Page 2
...) 18 Clear CMOS Jumper (CLRCMOS1) 2 CPU Fan Connector (CPU_FAN1) 19 USB 2.0 Header (USB6_7, Black) 3 CPU Fan Connector (CPU_FAN2) 20 Consumer Infrared Module Header 4 1155-Pin CPU Socket (CIR1, Gray) 5 2 x 240-pin DDR3 DIMM Slots 21 USB 2.0 Header (USB8_9, Black) (DDR3_A1, DDR3_B1, Black) 22 Chassis Fan Connector (CHA_FAN1) 6 ATX Power Connector (ATXPWR1) 23 Print Port Header (LPT1, Black) 7 USB 3.0 Header (USB3_0_1, Black) 24 COM Port Header (COM1) 8 SATA3 Connector (SATA3_1, Gray) 25 Infrared Module Header (IR1) 9 SATA3 Connector (SATA3_0, Gray) 26 PCI Express 2.0 x16 Slot...
...) 18 Clear CMOS Jumper (CLRCMOS1) 2 CPU Fan Connector (CPU_FAN1) 19 USB 2.0 Header (USB6_7, Black) 3 CPU Fan Connector (CPU_FAN2) 20 Consumer Infrared Module Header 4 1155-Pin CPU Socket (CIR1, Gray) 5 2 x 240-pin DDR3 DIMM Slots 21 USB 2.0 Header (USB8_9, Black) (DDR3_A1, DDR3_B1, Black) 22 Chassis Fan Connector (CHA_FAN1) 6 ATX Power Connector (ATXPWR1) 23 Print Port Header (LPT1, Black) 7 USB 3.0 Header (USB3_0_1, Black) 24 COM Port Header (COM1) 8 SATA3 Connector (SATA3_1, Gray) 25 Infrared Module Header (IR1) 9 SATA3 Connector (SATA3_0, Gray) 26 PCI Express 2.0 x16 Slot...
Quick Installation Guide
Page 8
... - ASRock XFast USB (see CAUTION 12) - ACPI 1.1 Compliance Wake Up Events - SMBIOS 2.3.1 Support - CPU Core, IGPU, DRAM, 1.8V PLL, VTT, VCCSA Voltage Multi-adjustment - Drivers, Utilities, AntiVirus Software (Trial Version), CyberLink MediaEspresso 6.5 Trial, ASRock MAGIX Multimedia Suite - ASRock Crashless BIOS (see CAUTION 17) - ASRock OMG (Online Management Guard) (see CAUTION 16) - ASRock UEFI System Browser - OEM - BIOS Feature Support CD Unique Feature Smart Response Technology), NCQ, AHCI and Hot Plug functions - 2 x SATA3 6.0Gb/s connectors - 1 x IR header...
... - ASRock XFast USB (see CAUTION 12) - ACPI 1.1 Compliance Wake Up Events - SMBIOS 2.3.1 Support - CPU Core, IGPU, DRAM, 1.8V PLL, VTT, VCCSA Voltage Multi-adjustment - Drivers, Utilities, AntiVirus Software (Trial Version), CyberLink MediaEspresso 6.5 Trial, ASRock MAGIX Multimedia Suite - ASRock Crashless BIOS (see CAUTION 17) - ASRock OMG (Online Management Guard) (see CAUTION 16) - ASRock UEFI System Browser - OEM - BIOS Feature Support CD Unique Feature Smart Response Technology), NCQ, AHCI and Hot Plug functions - 2 x SATA3 6.0Gb/s connectors - 1 x IR header...

Quick Installation Guide
Page 10
... Standby mode (S1), 10 ASRock Z77M Motherboard English D-Sub, DVI-D and HDMI monitors cannot be enabled only if the display supports 12bpc in Flash ROM. HBR is a BIOS flash utility embedded in EDID. For audio output, this motherboard supports both stereo and mono modes. In Overclocking, you are allowed to your USB flash drive, floppy disk or hard drive, then you can update your BIOS only in a user-friendly interface, which includes Hardware Monitor, Fan Control, Overclocking...
... Standby mode (S1), 10 ASRock Z77M Motherboard English D-Sub, DVI-D and HDMI monitors cannot be enabled only if the display supports 12bpc in Flash ROM. HBR is a BIOS flash utility embedded in EDID. For audio output, this motherboard supports both stereo and mono modes. In Overclocking, you are allowed to your USB flash drive, floppy disk or hard drive, then you can update your BIOS only in a user-friendly interface, which includes Hardware Monitor, Fan Control, Overclocking...

Quick Installation Guide
Page 21
... for details. Restart your computer and boot into OS. English 21 ASRock Z77M Motherboard We recommend using this utility to uninstall any VGA drivers installed in your system, there is an optional download. For Windows® XP OS: A. AMD Catalyst Control Center Step 6. Please check AMD's website for details. Please check AMD's website for AMD driver updates. 2.7.2 Driver Installation and Setup Step 1. Step 5. Double-click "ATI Catalyst Control Center". Select "2 GPUs" and click...
... for details. Restart your computer and boot into OS. English 21 ASRock Z77M Motherboard We recommend using this utility to uninstall any VGA drivers installed in your system, there is an optional download. For Windows® XP OS: A. AMD Catalyst Control Center Step 6. Please check AMD's website for details. Please check AMD's website for AMD driver updates. 2.7.2 Driver Installation and Setup Step 1. Step 5. Double-click "ATI Catalyst Control Center". Select "2 GPUs" and click...

Quick Installation Guide
Page 35
... User Manual (PDF file) contained in your CD-ROM drive. The Support CD that will display the Main Menu automatically if "AUTORUN" is designed to select among the predetermined choices. To begin using the Support CD, insert the CD into your computer. For the detailed information about BIOS Setup, please refer to display the menus. 35 ASRock Z77M Motherboard English When you wish to enter BIOS Setup utility; If you start...
... User Manual (PDF file) contained in your CD-ROM drive. The Support CD that will display the Main Menu automatically if "AUTORUN" is designed to select among the predetermined choices. To begin using the Support CD, insert the CD into your computer. For the detailed information about BIOS Setup, please refer to display the menus. 35 ASRock Z77M Motherboard English When you wish to enter BIOS Setup utility; If you start...

Quick Installation Guide
Page 208
... install OS by following instructions to boot into Windows® or install driver/ utilities. Disable System Restore. Then Press "Ok". 208 ASRock Z77M Motherboard English Follow Windows® Installation Guide to confirm. Disk volume > 2TB), it may take more time to fix this problem. Then press "Enter". De-select Local Disks for this problem, you install Windows® 7 64-bit / VistaTM 64-bit in the Start Menu. E. a. If you encounter this problem. The steps listed...
... install OS by following instructions to boot into Windows® or install driver/ utilities. Disable System Restore. Then Press "Ok". 208 ASRock Z77M Motherboard English Follow Windows® Installation Guide to confirm. Disk volume > 2TB), it may take more time to fix this problem. Then press "Enter". De-select Local Disks for this problem, you install Windows® 7 64-bit / VistaTM 64-bit in the Start Menu. E. a. If you encounter this problem. The steps listed...


