
Intel Rapid Storage Guide
Page 12
... exit the BIOS Setup program. Unless you have selected RAID 1, use the up or down arrow keys to load the Intel® Rapid Storage Technology driver during POST, press Ctrl and i at the same time to enable RAID in the system BIOS. 1. How to install an operating system onto a RAID volume...
... exit the BIOS Setup program. Unless you have selected RAID 1, use the up or down arrow keys to load the Intel® Rapid Storage Technology driver during POST, press Ctrl and i at the same time to enable RAID in the system BIOS. 1. How to install an operating system onto a RAID volume...

Intel Rapid Storage Guide
Page 13
...Press F6 when you see a prompt that says, Press F6 if you have successfully installed the driver and Windows setup should continue. Press Enter to install a third party SCSI or RAID driver. At this point, you need to confirm your exit. 7. Select 4: Exit and press Enter.... the Floppy Configuration Utility to Specify Additional Device. 3. Leave 13 Press Y to install the Intel Rapid Storage Technology driver during text-mode phase). Install the RAID Driver Using the F6 Installation Method Perform the following files: IAAHCI.INF, IAAHCI.CAT, IASTOR.INF, IASTOR.CAT, IASTOR...
...Press F6 when you see a prompt that says, Press F6 if you have successfully installed the driver and Windows setup should continue. Press Enter to install a third party SCSI or RAID driver. At this point, you need to confirm your exit. 7. Select 4: Exit and press Enter.... the Floppy Configuration Utility to Specify Additional Device. 3. Leave 13 Press Y to install the Intel Rapid Storage Technology driver during text-mode phase). Install the RAID Driver Using the F6 Installation Method Perform the following files: IAAHCI.INF, IAAHCI.CAT, IASTOR.INF, IASTOR.CAT, IASTOR...

Intel Rapid Storage Guide
Page 16
...When you see a message in RAID mode or AHCI mode, the F6 installation method must be prompted with the necessary files. How to load the driver during OS installation using F6 when in AHCI/RAID mode In order to install an operating system onto a single Serial ATA hard drive when the...containing the following steps to load support for mass storage device(s). 2. Press F6 when you do not need to install a third party SCSI or RAID driver. This message appears at the beginning of the operating system. 16 You can use the Floppy Configuration Utility to create a floppy disk with a screen ...
...When you see a message in RAID mode or AHCI mode, the F6 installation method must be prompted with the necessary files. How to load the driver during OS installation using F6 when in AHCI/RAID mode In order to install an operating system onto a single Serial ATA hard drive when the...containing the following steps to load support for mass storage device(s). 2. Press F6 when you do not need to install a third party SCSI or RAID driver. This message appears at the beginning of the operating system. 16 You can use the Floppy Configuration Utility to create a floppy disk with a screen ...

Intel Rapid Storage Guide
Page 17
... the system reboots. 4. At this point, you wish to scroll through the list as needed. If you have successfully installed the Intel Rapid Storage Technology driver and Windows setup should continue.
... the system reboots. 4. At this point, you wish to scroll through the list as needed. If you have successfully installed the Intel Rapid Storage Technology driver and Windows setup should continue.

Intel Rapid Storage Guide
Page 18
... Microsoft document Deployment Guide Automating Windows NT* Setup. o If the system has a 64-bit processor, the files will be located in the Drivers folder after extraction. 2. Insert the lines shown below into the UNATTEND.TXT file: Systems configured for RAID: This same procedure can be used...Note controller hub by replacing the text within the quotation marks. // Insert the lines below , as outlined in order to install the RAID or AHCI driver, as applicable, into the UNATTEND.TXT file [MassStorageDrivers] "Intel(R) 82801R/DO/DH SATA RAID Controller" = OEM 18 o If the system has ...
... Microsoft document Deployment Guide Automating Windows NT* Setup. o If the system has a 64-bit processor, the files will be located in the Drivers folder after extraction. 2. Insert the lines shown below into the UNATTEND.TXT file: Systems configured for RAID: This same procedure can be used...Note controller hub by replacing the text within the quotation marks. // Insert the lines below , as outlined in order to install the RAID or AHCI driver, as applicable, into the UNATTEND.TXT file [MassStorageDrivers] "Intel(R) 82801R/DO/DH SATA RAID Controller" = OEM 18 o If the system has ...
Marvell SATA3 RAID Installation Guide
Page 2
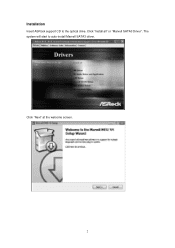
Click "Next" at the welcome screen. 2 The system will start to the optical drive. Click "Install all" or "Marvell SATA3 Driver". Installation Insert ASRock support CD to auto-install Marvell SATA3 driver.
Click "Next" at the welcome screen. 2 The system will start to the optical drive. Click "Install all" or "Marvell SATA3 Driver". Installation Insert ASRock support CD to auto-install Marvell SATA3 driver.
Marvell SATA3 RAID Installation Guide
Page 12
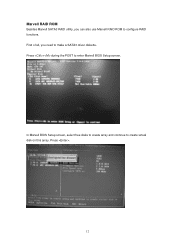
Marvell RAID ROM Besides Marvell SATA3 RAID utility, you need to make a SATA3 driver diskette. In Marvell BIOS Setup screen, select free disks to create array and continue to enter Marvell BIOS Setup screen. Press . 12 Press + during the POST to create virtual disk on this array. First of all, you can also use Marvell RAID ROM to configure RAID functions.
Marvell RAID ROM Besides Marvell SATA3 RAID utility, you need to make a SATA3 driver diskette. In Marvell BIOS Setup screen, select free disks to create array and continue to enter Marvell BIOS Setup screen. Press . 12 Press + during the POST to create virtual disk on this array. First of all, you can also use Marvell RAID ROM to configure RAID functions.

RAID Installation Guide
Page 6
...you see these messages, Please insert a diskette into the floppy diskette. Before you start to format the floppy diskette and copy SATA / SATAII drivers into the floppy drive. B. Then you will lose ALL data in the Support CD for boot devices selection appears. 2.3 Installing Windows® 7.../ XP 64-bit OS on your SATA / SATAII HDDs with RAID functions, please follow below steps. STEP 2: Make a SATA / SATAII Driver Diskette. Start to set RAID configuration. Set "SATA Operation Mode" to check the installation guide in it! Insert the Support CD into the ...
...you see these messages, Please insert a diskette into the floppy diskette. Before you start to format the floppy diskette and copy SATA / SATAII drivers into the floppy drive. B. Then you will lose ALL data in the Support CD for boot devices selection appears. 2.3 Installing Windows® 7.../ XP 64-bit OS on your SATA / SATAII HDDs with RAID functions, please follow below steps. STEP 2: Make a SATA / SATAII Driver Diskette. Start to set RAID configuration. Set "SATA Operation Mode" to check the installation guide in it! Insert the Support CD into the ...
RAID Installation Guide
Page 7
... Support CD, "Guide to SATA Hard Disks Installation and RAID Configuration", which is located in Windows® environment, please install SATA / SATAII drivers from the installation CD. 4. At the beginning of Windows setup, press F6 to Intel Rapid Storage", which is located in the folder at ... Set up a "RAID Ready" system with a single SATA / SATAII hard disk. When prompted, insert the SATA / SATAII driver diskette containing the Intel® RAID driver. Select the driver to install according to the mode you choose and the OS you are allowed to use "Intel Rapid Storage" in the...
... Support CD, "Guide to SATA Hard Disks Installation and RAID Configuration", which is located in Windows® environment, please install SATA / SATAII drivers from the installation CD. 4. At the beginning of Windows setup, press F6 to Intel Rapid Storage", which is located in the folder at ... Set up a "RAID Ready" system with a single SATA / SATAII hard disk. When prompted, insert the SATA / SATAII driver diskette containing the Intel® RAID driver. Select the driver to install according to the mode you choose and the OS you are allowed to use "Intel Rapid Storage" in the...

RAID Installation Guide
Page 9
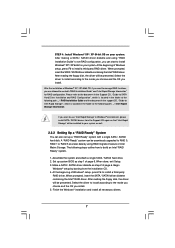
...2.3.4 Installing Windows® 7 / 7 64-bit / VistaTM / VistaTM 64-bit With RAID Functions If you want to load the Intel® RAID drivers. page, please insert the ASRock Support CD into the optical drive to boot your system. STEP 1: Set up BIOS. Set "SATA Operation Mode" to install Windows® 7 / ...your system. Insert the Windows® 7 / 7 64-bit / VistaTM / VistaTM 64-bit optical disk into your optical drive, and click the "Load Driver" button on the left on the bottom to install Windows® 7 / 7 64-bit / VistaTM / VistaTM 64-bit on your system, and follow ...
...2.3.4 Installing Windows® 7 / 7 64-bit / VistaTM / VistaTM 64-bit With RAID Functions If you want to load the Intel® RAID drivers. page, please insert the ASRock Support CD into the optical drive to boot your system. STEP 1: Set up BIOS. Set "SATA Operation Mode" to install Windows® 7 / ...your system. Insert the Windows® 7 / 7 64-bit / VistaTM / VistaTM 64-bit optical disk into your optical drive, and click the "Load Driver" button on the left on the bottom to install Windows® 7 / 7 64-bit / VistaTM / VistaTM 64-bit on your system, and follow ...

RAID Installation Guide
Page 10
If you want to use "Intel Rapid Storage" in Windows® environment, please install SATA / SATAII drivers from the Support CD again so that "Intel Rapid Storage" will be installed to your system as well. 10
If you want to use "Intel Rapid Storage" in Windows® environment, please install SATA / SATAII drivers from the Support CD again so that "Intel Rapid Storage" will be installed to your system as well. 10

User Manual
Page 3
... 43 2.18 Hot Plug and Hot Swap Functions for SATA3 HDDs ... 43 2.19 SATA / SATAII / SATA3 HDD Hot Plug Feature and Operation Guide 44 2.20 Driver Installation Guide 46 2.21 Installing Windows® 7 / 7 64-bit / VistaTM / VistaTM 64-bit / XP / XP 64-bit With RAID Functions 46 2.21.1 Installing Windows®...
... 43 2.18 Hot Plug and Hot Swap Functions for SATA3 HDDs ... 43 2.19 SATA / SATAII / SATA3 HDD Hot Plug Feature and Operation Guide 44 2.20 Driver Installation Guide 46 2.21 Installing Windows® 7 / 7 64-bit / VistaTM / VistaTM 64-bit / XP / XP 64-bit With RAID Functions 46 2.21.1 Installing Windows®...

User Manual
Page 4
... 3.6.1 Boot Settings Configuration 70 3.7 Security Screen 71 3.8 Exit Screen 72 4 Software Support 73 4.1 Install Operating System 73 4.2 Support CD Information 73 4.2.1 Running Support CD 73 4.2.2 Drivers Menu 73 4.2.3 Utilities Menu 73 4.2.4 Contact Information 73 4
... 3.6.1 Boot Settings Configuration 70 3.7 Security Screen 71 3.8 Exit Screen 72 4 Software Support 73 4.1 Install Operating System 73 4.2 Support CD Information 73 4.2.1 Running Support CD 73 4.2.2 Drivers Menu 73 4.2.3 Utilities Menu 73 4.2.4 Contact Information 73 4
User Manual
Page 8
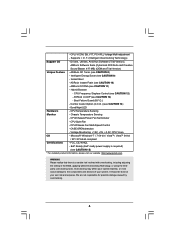
... VistaTM 64-bit / XP / XP 64-bit compliant Certifications - - CPU, VCCM, SB, VTT, PCH PLL Voltage Multi-adjustment - Drivers, Utilities, AntiVirus Software (Trial Version), ASRock Software Suite (CyberLink DVD Suite and Creative Sound Blaster X-Fi MB) (OEM and Trial Version) Unique Feature... (see CAUTION 13) - CPU/Chassis Fan Multi-Speed Control - CASE OPEN detection - ASRock OC Tuner (see CAUTION 15) * For detailed product information, please visit our website: http://www.asrock.com WARNING Please realize that there is required) (see CAUTION 8) - Hybrid Booster: -...
... VistaTM 64-bit / XP / XP 64-bit compliant Certifications - - CPU, VCCM, SB, VTT, PCH PLL Voltage Multi-adjustment - Drivers, Utilities, AntiVirus Software (Trial Version), ASRock Software Suite (CyberLink DVD Suite and Creative Sound Blaster X-Fi MB) (OEM and Trial Version) Unique Feature... (see CAUTION 13) - CPU/Chassis Fan Multi-Speed Control - CASE OPEN detection - ASRock OC Tuner (see CAUTION 15) * For detailed product information, please visit our website: http://www.asrock.com WARNING Please realize that there is required) (see CAUTION 8) - Hybrid Booster: -...

User Manual
Page 11
ASRock website: http://www.asrock.com/support/index.htm 1.4 Two CrossFireXTM Graphics Card Support List (for Windows® XP / XP 64-bit / VistaTM / VistaTM ... AX4670 512MD3-P RADEON 4670 Gecube GC-HD485PG3-E3 RADEON 4850 ASUS EAH5850/G/2DIS/1GD5/A RADEON 5850 MSI-ATI-R5770-PM2D1G RADEON 5770 Driver Catalyst 9.12 Catalyst 9.12 Catalyst 9.12 Catalyst 9.12 Catalyst 9.12 Catalyst 9.12 Catalyst 9.12 Catalyst 9.12 * For the... the supported PCI Express VGA card list for CrossFireXTM Mode, please visit our website for details. ASRock website: http://www.asrock.com/support/index.htm 11
ASRock website: http://www.asrock.com/support/index.htm 1.4 Two CrossFireXTM Graphics Card Support List (for Windows® XP / XP 64-bit / VistaTM / VistaTM ... AX4670 512MD3-P RADEON 4670 Gecube GC-HD485PG3-E3 RADEON 4850 ASUS EAH5850/G/2DIS/1GD5/A RADEON 5850 MSI-ATI-R5770-PM2D1G RADEON 5770 Driver Catalyst 9.12 Catalyst 9.12 Catalyst 9.12 Catalyst 9.12 Catalyst 9.12 Catalyst 9.12 Catalyst 9.12 Catalyst 9.12 * For the... the supported PCI Express VGA card list for CrossFireXTM Mode, please visit our website for details. ASRock website: http://www.asrock.com/support/index.htm 11

User Manual
Page 22
...that your system. Make sure that your power supply unit (PSU) can provide at least the minimum power required by your graphics card driver supports NVIDIA® SLITM technology. Step2. If required, connect the auxiliary power source to two identical PCI Express x16 graphics cards. ...174; SLITM technology supports Windows® XP / XP 64-bit / VistaTM / VistaTM 64-bit / 7 / 7 64-bit OS. Requirements 1. Download the driver from NVIDIA® website (www.nvidia.com). 3. Make sure that the cards are NVIDIA® certified because different types of graphics cards will not work...
...that your system. Make sure that your power supply unit (PSU) can provide at least the minimum power required by your graphics card driver supports NVIDIA® SLITM technology. Step2. If required, connect the auxiliary power source to two identical PCI Express x16 graphics cards. ...174; SLITM technology supports Windows® XP / XP 64-bit / VistaTM / VistaTM 64-bit / 7 / 7 64-bit OS. Requirements 1. Download the driver from NVIDIA® website (www.nvidia.com). 3. Make sure that the cards are NVIDIA® certified because different types of graphics cards will not work...

User Manual
Page 24
... Select an SLI configuration item, please select Enable SLI. C. B. Reboot your system. In Set PhysX GPU acceleration item, please select Enabled. 2.7.2 Driver Installation and Setup Install the graphics card drivers to enable the multi-GPU feature. For Windows® XP / XP 64-bit OS: (For SLITM mode only) A. Double-click NVIDIA Settings...
... Select an SLI configuration item, please select Enable SLI. C. B. Reboot your system. In Set PhysX GPU acceleration item, please select Enabled. 2.7.2 Driver Installation and Setup Install the graphics card drivers to enable the multi-GPU feature. For Windows® XP / XP 64-bit OS: (For SLITM mode only) A. Double-click NVIDIA Settings...

User Manual
Page 26
... mode. 2.8.1 Graphics Card Setup 2.8.1.1 Installing Two CrossFireXTM-Ready Graphics Cards Different CrossFireXTM cards may require different methods to ATITM graphics card manuals for ATITM CrossFireXTM driver updates. 1. If you pair a 12-pipe CrossFireXTM Edition card with Windows® VistaTM / 7 OS only. In below procedures, we use Radeon HD 3870 as 12...
... mode. 2.8.1 Graphics Card Setup 2.8.1.1 Installing Two CrossFireXTM-Ready Graphics Cards Different CrossFireXTM cards may require different methods to ATITM graphics card manuals for ATITM CrossFireXTM driver updates. 1. If you pair a 12-pipe CrossFireXTM Edition card with Windows® VistaTM / 7 OS only. In below procedures, we use Radeon HD 3870 as 12...

User Manual
Page 28
... ATITM recommends Windows® XP Service Pack 2 or higher to be installed (If you have any previously installed Catalyst drivers prior to your system, and restart your system, there is an optional download. Please check AMD website for details. Power....com/windowsxp/sp2/default.mspx B. Remove the ATITM driver if you will find "ATI Catalyst Control Center" on your Windows® taskbar. (Driver Version: 8-12_vista32_dd_ccc_wdm_enu_72275.exe) ATI Catalyst Control Center Step 6. Please check AMD website for ATITM driver updates. For Windows® 7 / VistaTM OS:...
... ATITM recommends Windows® XP Service Pack 2 or higher to be installed (If you have any previously installed Catalyst drivers prior to your system, and restart your system, there is an optional download. Please check AMD website for details. Power....com/windowsxp/sp2/default.mspx B. Remove the ATITM driver if you will find "ATI Catalyst Control Center" on your Windows® taskbar. (Driver Version: 8-12_vista32_dd_ccc_wdm_enu_72275.exe) ATI Catalyst Control Center Step 6. Please check AMD website for ATITM driver updates. For Windows® 7 / VistaTM OS:...

User Manual
Page 41
... HDMI_SPDIF cable to the HDMI_SPDIF connector of HDMI VGA card. (There are two white ends (2-pin and 3-pin) on this motherboard. Install HDMI VGA card driver to the same pin definition. Step 1. white end (2-pin) (B) white end (3-pin) (C) Step 4. Step 2. Please refer to connect HDMI Digital TV/projector/LCD devices. Make...
... HDMI_SPDIF cable to the HDMI_SPDIF connector of HDMI VGA card. (There are two white ends (2-pin and 3-pin) on this motherboard. Install HDMI VGA card driver to the same pin definition. Step 1. white end (2-pin) (B) white end (3-pin) (C) Step 4. Step 2. Please refer to connect HDMI Digital TV/projector/LCD devices. Make...


