User Manual
Page 3
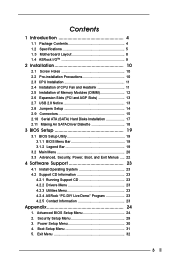
..., and Exit Menus ..... 22 4 Software Support 23 4.1 Install Operating System 23 4.2 Support CD Information 23 4.2.1 Running Support CD 23 4.2.2 Drivers Menu 23 4.2.3 Utilities Menu 23 4.2.4 ASRock "PC-DIY Live Demo" Program 23 4.2.5 Contact Information 23 Appendix 24 1. Security Setup Menu 29 3. Advanced BIOS Setup Menu 24 2. Power Setup Menu 30 4.
..., and Exit Menus ..... 22 4 Software Support 23 4.1 Install Operating System 23 4.2 Support CD Information 23 4.2.1 Running Support CD 23 4.2.2 Drivers Menu 23 4.2.3 Utilities Menu 23 4.2.4 ASRock "PC-DIY Live Demo" Program 23 4.2.5 Contact Information 23 Appendix 24 1. Security Setup Menu 29 3. Advanced BIOS Setup Menu 24 2. Power Setup Menu 30 4.

User Manual
Page 4
... installation guide. You may find the latest memory and CPU support lists on ASRock website without notice. For advanced users' reference, the Appendix appearing on page 24 offers more advanced BIOS setup information. ASRock website http://www.asrock.com 1.1 Package Contents ASRock P4i45PE+ Motherboard (ATX Form Factor: 12.0-in x 7.0-in Floppy Drive Two Serial ATA (SATA...
... installation guide. You may find the latest memory and CPU support lists on ASRock website without notice. For advanced users' reference, the Appendix appearing on page 24 offers more advanced BIOS setup information. ASRock website http://www.asrock.com 1.1 Package Contents ASRock P4i45PE+ Motherboard (ATX Form Factor: 12.0-in x 7.0-in Floppy Drive Two Serial ATA (SATA...

User Manual
Page 6
...resume the system. ACPI 1.1 compliance wake up events; Frequencies other than the recommended CPU bus frequencies may cause permanent damage! 5. BIOS: OS: AMI legal BIOS; CPU frequency stepless control (only for USB 2.0 works fine under Microsoft® Windows® 98/ ME. It may cause ...AGP slot of "Hyper Threading Technology", please check page 24. 3. Do NOT use a 3.3V AGP card on certain condition (over -clocking. P4i45PE+ motherboard may not work properly under Microsoft® Windows® XP SP1 / 2000 SP4. Although this motherboard! Supports "Plug and Play"; Power...
...resume the system. ACPI 1.1 compliance wake up events; Frequencies other than the recommended CPU bus frequencies may cause permanent damage! 5. BIOS: OS: AMI legal BIOS; CPU frequency stepless control (only for USB 2.0 works fine under Microsoft® Windows® 98/ ME. It may cause ...AGP slot of "Hyper Threading Technology", please check page 24. 3. Do NOT use a 3.3V AGP card on certain condition (over -clocking. P4i45PE+ motherboard may not work properly under Microsoft® Windows® XP SP1 / 2000 SP4. Although this motherboard! Supports "Plug and Play"; Power...

User Manual
Page 14
... setup, please turn off the computer and unplug the power cord, then use a jumper cap to clear the CMOS when you just finish updating the BIOS, you need to short the pins on these 2 pins. If you must boot up events. If no jumper cap is placed on pins, the jumper...
... setup, please turn off the computer and unplug the power cord, then use a jumper cap to clear the CMOS when you just finish updating the BIOS, you need to short the pins on these 2 pins. If you must boot up events. If no jumper cap is placed on pins, the jumper...

User Manual
Page 18
... Windows 2000 or Windows XP on your system while you only have the SATA driver diskette ready, you may start to use "SiS RAID Card BIOS Setting Utility" to set RAID 0 / RAID 1 / JBOD configuration before you start the OS installation. Before you start to format the floppy diskette and... Configuration", at the beginning of system boot-up, press key, and then a window for proper configuration. STEP 1: STEP 2: STEP 3: STEP 4: STEP 5: Insert the ASRock Support CD into your optical drive to boot your system. (Do NOT insert any floppy diskette into the floppy drive, and press . When you see...
... Windows 2000 or Windows XP on your system while you only have the SATA driver diskette ready, you may start to use "SiS RAID Card BIOS Setting Utility" to set RAID 0 / RAID 1 / JBOD configuration before you start the OS installation. Before you start to format the floppy diskette and... Configuration", at the beginning of system boot-up, press key, and then a window for proper configuration. STEP 1: STEP 2: STEP 3: STEP 4: STEP 5: Insert the ASRock Support CD into your optical drive to boot your system. (Do NOT insert any floppy diskette into the floppy drive, and press . When you see...

User Manual
Page 19
... ADVANCED Sets up the advanced features SECURITY Sets up the computer, there is a menu-driven program, which allows you wish to enter the BIOS Setup after POST, restart the system by pressing + + , or by turning the system off and then back on the motherboard stores the... BIOS Setup Utility. Press during the Power-On-Self-Test (POST) to run the BIOS Setup. When you start up the security features POWER Configures Power Management features BOOT Configures the default system device...
... ADVANCED Sets up the advanced features SECURITY Sets up the computer, there is a menu-driven program, which allows you wish to enter the BIOS Setup after POST, restart the system by pressing + + , or by turning the system off and then back on the motherboard stores the... BIOS Setup Utility. Press during the Power-On-Self-Test (POST) to run the BIOS Setup. When you start up the security features POWER Configures Power Management features BOOT Configures the default system device...

User Manual
Page 20
... Update Total Memory DDR1 DDR2 AMIBIOS SETUP UTILITY - Use keys to set the type of floppy drives installed. Dec Day: 01 - 31 Year: 1980 - 2099 P4i45PE+ BIOS P2.30 Pentium (R) 4 CPU 2400 MHz 512 KB F24 / 18 256 MB 256 MB / 133 MHz (DDR266) None F1:Help Esc:Exit :Select Item :Select...
... Update Total Memory DDR1 DDR2 AMIBIOS SETUP UTILITY - Use keys to set the type of floppy drives installed. Dec Day: 01 - 31 Year: 1980 - 2099 P4i45PE+ BIOS P2.30 Pentium (R) 4 CPU 2400 MHz 512 KB F24 / 18 256 MB 256 MB / 133 MHz (DDR266) None F1:Help Esc:Exit :Select Item :Select...

User Manual
Page 21
...due to partition and format new IDE hard disk drives. If the hard disk was already formatted on Main menu and press to get into BIOS, use a disk utility, such as FDISK, to that you have the correct configuration information supplied by the drive manufacturer. Make sure to ... configured. Main AMIBIOS SETUP UTILITY - TYPE To set the type of the IDE device, first, please select "IDE Devices" on an older system, the BIOS Setup may detect incorrect parameters. Then, select among "Primary IDE Master", "Primary IDE Slave", "Secondary IDE Master", and "Secondary IDE Slave" to manually ...
...due to partition and format new IDE hard disk drives. If the hard disk was already formatted on Main menu and press to get into BIOS, use a disk utility, such as FDISK, to that you have the correct configuration information supplied by the drive manufacturer. Make sure to ... configured. Main AMIBIOS SETUP UTILITY - TYPE To set the type of the IDE device, first, please select "IDE Devices" on an older system, the BIOS Setup may detect incorrect parameters. Then, select among "Primary IDE Master", "Primary IDE Slave", "Secondary IDE Master", and "Secondary IDE Slave" to manually ...

User Manual
Page 22
... by reading or writing more data during each transfer. Cylinders This is used for IDE ARMD (ATAPI Removable Media Device), such as calculated by the BIOS based on the drive information you entered. Block Mode Set the block mode to configure the number of cylinders. Sectors This is used to maximize...
... by reading or writing more data during each transfer. Cylinders This is used for IDE ARMD (ATAPI Removable Media Device), such as calculated by the BIOS based on the drive information you entered. Block Mode Set the block mode to configure the number of cylinders. Sectors This is used to maximize...
User Manual
Page 24
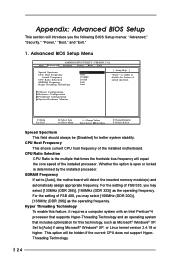
... This section will detect the inserted memory module(s) and automatically assign appropriate frequency. Advanced BIOS Setup Menu Main Advanced AMIBIOS SETUP UTILITY - CPU Host Frequency This shows current CPU host frequency of the installed processor. CPU Ratio Selection CPU Ratio ... ] to [Auto] if using Microsoft® Windows® XP, or Linux kernel version 2.4.18 or higher. For the setting of FSB 533, you the following BIOS Setup menus: "Advanced," "Security," "Power," "Boot," and "Exit." 1.
... This section will detect the inserted memory module(s) and automatically assign appropriate frequency. Advanced BIOS Setup Menu Main Advanced AMIBIOS SETUP UTILITY - CPU Host Frequency This shows current CPU host frequency of the installed processor. CPU Ratio Selection CPU Ratio ... ] to [Auto] if using Microsoft® Windows® XP, or Linux kernel version 2.4.18 or higher. For the setting of FSB 533, you the following BIOS Setup menus: "Advanced," "Security," "Power," "Boot," and "Exit." 1.

User Manual
Page 29
... the check point for "Password Check". If [Setup] option is selected, the "Password Check" is performed before BIOS setup. If [Always] option is selected, the "Password Check" is performed before both boot-up and BIOS setup. 29 Valid password can be a 1 to create a new password. If you already have a password, you must...
... the check point for "Password Check". If [Setup] option is selected, the "Password Check" is performed before BIOS setup. If [Always] option is selected, the "Password Check" is performed before both boot-up and BIOS setup. 29 Valid password can be a 1 to create a new password. If you already have a password, you must...

User Manual
Page 32
... "Quit without making any changes to the settings. 5. If you press , you enter the sub-menu, the message "Load setup original values" will exit the BIOS Setup Utility without saving changes" will be restored and all the setup configuration. Discard Changes After you will appear. If you press , it will load... the default values for all changes are discarded. 32 If you press , it will save the current settings and exit the BIOS SETUP Utility. Exit Menu Main Advanced AMIBIOS SETUP UTILITY -
... "Quit without making any changes to the settings. 5. If you press , you enter the sub-menu, the message "Load setup original values" will exit the BIOS Setup Utility without saving changes" will be restored and all the setup configuration. Discard Changes After you will appear. If you press , it will load... the default values for all changes are discarded. 32 If you press , it will save the current settings and exit the BIOS SETUP Utility. Exit Menu Main Advanced AMIBIOS SETUP UTILITY -

User Manual
Page 3
... ..... 21 4 Software Support 22 4.1 Installing Operating System 22 4.2 Support CD Information 22 4.2.1 Running Support CD 22 4.2.2 Drivers Menu 22 4.2.3 Utilities Menu 22 4.2.4 ASRock "PC-DIY Live Demo" Program 22 4.2.5 Contact Information 22 Appendix: Advanced BIOS Setup 23 1. Advanced Menu 23 2. Power Menu 29 4. Exit Menu 31 3 Security Menu 28 3. Boot Menu 30 5.
... ..... 21 4 Software Support 22 4.1 Installing Operating System 22 4.2 Support CD Information 22 4.2.1 Running Support CD 22 4.2.2 Drivers Menu 22 4.2.3 Utilities Menu 22 4.2.4 ASRock "PC-DIY Live Demo" Program 22 4.2.5 Contact Information 22 Appendix: Advanced BIOS Setup 23 1. Advanced Menu 23 2. Power Menu 29 4. Exit Menu 31 3 Security Menu 28 3. Boot Menu 30 5.

User Manual
Page 4
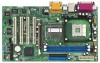
... http://www.asrock.com 1.1 Package Contents ASRock P4i45PE motherboard (ATX form factor: 12" x 8.6", 30.5 x 21.8 cm) ASRock P4i45PE Quick Installation Guide ASRock Intel-Intel Series Support CD 1 Cable for IDE devices (1 x ATA 66/100) 1 Cable for new DIY system builders. Because the motherboard specifications and the BIOS software might be updated, the content of this manual will...
... http://www.asrock.com 1.1 Package Contents ASRock P4i45PE motherboard (ATX form factor: 12" x 8.6", 30.5 x 21.8 cm) ASRock P4i45PE Quick Installation Guide ASRock Intel-Intel Series Support CD 1 Cable for IDE devices (1 x ATA 66/100) 1 Cable for new DIY system builders. Because the motherboard specifications and the BIOS software might be updated, the content of this manual will...

User Manual
Page 5
... IDE2: ATA 100 / Ultra DMA Mode 5; Chassis temperature sensing; Audio Jack: Line Out/ Line In/ Microphone + 1 Game port BIOS: AMI legal BIOS;Supports "Plug and Play"; Can connect up events; CPU fan tachometer; Chassis fan tachometer PCI slots: 5 PCI slots with PCI Specification 2.2...of header for two additional USB 2.0 ports upgrade (see CAUTION 6); SMBIOS 2.3.1 support; CPU frequency stepless control (only for advanced users' reference, see CAUTION 5) ASRock I/OTM: PS/2: 1 keyboard port / 1 mouse port; 1 RJ 45 port; 4 rear default USB 2.0 ports; 1 serial port: COM1; 1 parallel ...
... IDE2: ATA 100 / Ultra DMA Mode 5; Chassis temperature sensing; Audio Jack: Line Out/ Line In/ Microphone + 1 Game port BIOS: AMI legal BIOS;Supports "Plug and Play"; Can connect up events; CPU fan tachometer; Chassis fan tachometer PCI slots: 5 PCI slots with PCI Specification 2.2...of header for two additional USB 2.0 ports upgrade (see CAUTION 6); SMBIOS 2.3.1 support; CPU frequency stepless control (only for advanced users' reference, see CAUTION 5) ASRock I/OTM: PS/2: 1 keyboard port / 1 mouse port; 1 RJ 45 port; 4 rear default USB 2.0 ports; 1 serial port: COM1; 1 parallel ...

User Manual
Page 7
... mode, then it is set to support higher CPU front side bus frequencies on DDR1 DIMM. (If it does not support CL3 module.) 3. CPU FSB P4i45PE 800 MHz Configuration Note 1. FSB 800 MHz / DDR 400 Mode DRAM SIZE TYPE CELL VENDOR (MB) VENDOR CELL NO. Please refer to 1.10 or ... TRANSCEND 256 DDR266 MITSUBISHI M2S56D30ATP SINGLE SIDE SINGLE SIDE APACER 128 DDR266 NANYA NT5DS32M8AT-6 SINGLE SIDE 7 The Recommended Memory Modules lists for the details. Update BIOS version to the tables below for P4i45PE motherboard. Set the "FSB" jumper to "TEST" mode (see page 18). 2.
... mode, then it is set to support higher CPU front side bus frequencies on DDR1 DIMM. (If it does not support CL3 module.) 3. CPU FSB P4i45PE 800 MHz Configuration Note 1. FSB 800 MHz / DDR 400 Mode DRAM SIZE TYPE CELL VENDOR (MB) VENDOR CELL NO. Please refer to 1.10 or ... TRANSCEND 256 DDR266 MITSUBISHI M2S56D30ATP SINGLE SIDE SINGLE SIDE APACER 128 DDR266 NANYA NT5DS32M8AT-6 SINGLE SIDE 7 The Recommended Memory Modules lists for the details. Update BIOS version to the tables below for P4i45PE motherboard. Set the "FSB" jumper to "TEST" mode (see page 18). 2.

User Manual
Page 18
..., POST continues with their corresponding functions. 18 If you wish to locate and load the Operating System EXIT Exits the current menu or the BIOS Setup To access the menu bar items, press the right or left arrow key on the keyboard until the desired item is highlighted. 3.1.2 Legend... sub-menus and select among the predetermined choices. You can also restart by pressing the reset button on your system using the BIOS Setup Utility. Because the BIOS software is a chance for reference purpose only, and may not exactly match what you to scroll through its test routines. The...
..., POST continues with their corresponding functions. 18 If you wish to locate and load the Operating System EXIT Exits the current menu or the BIOS Setup To access the menu bar items, press the right or left arrow key on the keyboard until the desired item is highlighted. 3.1.2 Legend... sub-menus and select among the predetermined choices. You can also restart by pressing the reset button on your system using the BIOS Setup Utility. Because the BIOS software is a chance for reference purpose only, and may not exactly match what you to scroll through its test routines. The...

User Manual
Page 19
... Memory DDR1 DDR2 AMIBIOS SETUP UTILITY - Floppy Drives Use this to set the type of floppy drives installed. Dec Day: 01 - 31 Year: 1980 - 2099 P4I45PE BIOS P1.20 Pentium (R) 4 CPU 2400 MHz 512 KB F24 / 0F 256 MB 256 MB / 133 MHz (DDR266) None F1:Help Esc:Exit :Select Item :Select... the upper menu from the current menu Moves cursor up to the default values Saves changes and exits Setup 3.2 Main Menu When you enter the BIOS Setup Utility, the following screen appears. Use keys to move between fields Selects menu to the left or right Increases or decreases values Brings up...
... Memory DDR1 DDR2 AMIBIOS SETUP UTILITY - Floppy Drives Use this to set the type of floppy drives installed. Dec Day: 01 - 31 Year: 1980 - 2099 P4I45PE BIOS P1.20 Pentium (R) 4 CPU 2400 MHz 512 KB F24 / 0F 256 MB 256 MB / 133 MHz (DDR266) None F1:Help Esc:Exit :Select Item :Select... the upper menu from the current menu Moves cursor up to the default values Saves changes and exits Setup 3.2 Main Menu When you enter the BIOS Setup Utility, the following screen appears. Use keys to move between fields Selects menu to the left or right Increases or decreases values Brings up...

User Manual
Page 20
... heads, and sectors per track for the remaining fields on this sub-menu. This is necessary so that the hard disk is successful, the BIOS Setup automatically fills in whcih the hard disk drive field will display the size of the hard disk drive that you have the correct configuration... to configure a hard disk drive, make configuration of its type. If the hard disk was already formatted on Main menu and press to get into BIOS, use a disk utility, such as FDISK, to partition and format new IDE hard disk drives. VERSION 3.31a Primary IDE Master: [ Setup Help ] Type ...
... heads, and sectors per track for the remaining fields on this sub-menu. This is necessary so that the hard disk is successful, the BIOS Setup automatically fills in whcih the hard disk drive field will display the size of the hard disk drive that you have the correct configuration... to configure a hard disk drive, make configuration of its type. If the hard disk was already formatted on Main menu and press to get into BIOS, use a disk utility, such as FDISK, to partition and format new IDE hard disk drives. VERSION 3.31a Primary IDE Master: [ Setup Help ] Type ...

User Manual
Page 21
.../DVD]: This is used for IDE CD/DVD drives. [ARMD]: This is used for IDE ARMD (ATAPI Removable Media Device), such as calculated by the BIOS based on the drive information you entered. Ultra DMA Mode Ultra DMA capability allows improved transfer speeds and data integrity for compatible IDE devices.
.../DVD]: This is used for IDE CD/DVD drives. [ARMD]: This is used for IDE ARMD (ATAPI Removable Media Device), such as calculated by the BIOS based on the drive information you entered. Ultra DMA Mode Ultra DMA capability allows improved transfer speeds and data integrity for compatible IDE devices.


