User Manual
Page 3
Boot Setup Menu 33 5. Exit Menu 34 3 Power Setup Menu 32 4. Advanced BIOS Setup Menu 26 2. Contents 1 Introduction 4 1.1 Package Contents 4 1.2 Specifications 5 1.3 Motherboard Layout (P4S55FX 7 1.4 Motherboard Layout (P4S55FX 8 1.5 ASRock I/O PlusTM (P4S55FX+/ P4S55FX 9 2 Installation 10 Pre-installation Precautions 10 2.1 CPU Installation 11 2.2 Installation of CPU Fan and Heatsink 11 2.3 Installation of Memory Modules (DIMM 12 2.4 Expansion Slots (PCI ...
Boot Setup Menu 33 5. Exit Menu 34 3 Power Setup Menu 32 4. Advanced BIOS Setup Menu 26 2. Contents 1 Introduction 4 1.1 Package Contents 4 1.2 Specifications 5 1.3 Motherboard Layout (P4S55FX 7 1.4 Motherboard Layout (P4S55FX 8 1.5 ASRock I/O PlusTM (P4S55FX+/ P4S55FX 9 2 Installation 10 Pre-installation Precautions 10 2.1 CPU Installation 11 2.2 Installation of CPU Fan and Heatsink 11 2.3 Installation of Memory Modules (DIMM 12 2.4 Expansion Slots (PCI ...
User Manual
Page 4
... ASRock P4S55FX+ or P4S55FX Motherboard (ATX Form Factor: 12.0-in x 8.6-in, 30.5 cm x 21.8 cm) ASRock P4S55FX+ / P4S55FX Quick Installation Guide ASRock P4S55FX+ / P4S55FX Support CD One 80-conductor Ultra ATA 66/100/133 IDE Ribbon Cable One Ribbon Cable for purchasing ASRock P4S55FX+ / P4S55FX motherboard, a reliable motherboard produced under ASRock's consistently stringent quality control. More information of advanced BIOS setup is offered on ASRock...
... ASRock P4S55FX+ or P4S55FX Motherboard (ATX Form Factor: 12.0-in x 8.6-in, 30.5 cm x 21.8 cm) ASRock P4S55FX+ / P4S55FX Quick Installation Guide ASRock P4S55FX+ / P4S55FX Support CD One 80-conductor Ultra ATA 66/100/133 IDE Ribbon Cable One Ribbon Cable for purchasing ASRock P4S55FX+ / P4S55FX motherboard, a reliable motherboard produced under ASRock's consistently stringent quality control. More information of advanced BIOS setup is offered on ASRock...
User Manual
Page 6
... 6 To improve heat dissipation, remember to perform over-clocking. It may not work properly under Microsoft® Windows® XP SP1 / 2000 SP4. ASRock I/O PlusTM: 1 PS/2 mouse port, 1 PS/2 keyboard port, 1 serial port: COM1, 1 parallel port: ECP/EPP support, 6 default USB ...2.0 ports, 1 RJ 45 port, Audio Jack: Line In / Line Out / Microphone BIOS: AMI BIOS Supports "Plug and Play" ACPI 1.1 compliance wake up events Supports jumperfree SMBIOS 2.3.1 support CPU frequency stepless control (only for proper installation. 2. It...
... 6 To improve heat dissipation, remember to perform over-clocking. It may not work properly under Microsoft® Windows® XP SP1 / 2000 SP4. ASRock I/O PlusTM: 1 PS/2 mouse port, 1 PS/2 keyboard port, 1 serial port: COM1, 1 parallel port: ECP/EPP support, 6 default USB ...2.0 ports, 1 RJ 45 port, Audio Jack: Line In / Line Out / Microphone BIOS: AMI BIOS Supports "Plug and Play" ACPI 1.1 compliance wake up events Supports jumperfree SMBIOS 2.3.1 support CPU frequency stepless control (only for proper installation. 2. It...
User Manual
Page 7
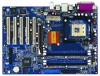
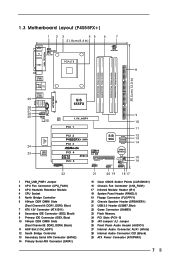
...Audio Header (AUDIO1) 27 Internal Audio Connector: AUX1 (White) 28 Internal Audio Connector: CD1 (Black) 29 ATX Power Connector (ATXPWR1) 7 1.3 Motherboard Layout (P4S55FX+) 1 23 45 6 7 21.8cm (8.6 in) PS2 Mouse PS2 Keyboard 1 PS2_USB_PWR1 CPU_FAN1 ATX12V1 PARALLEL PORT COM1 PGA478 IDE2 8 DDR1 (64/72 bit, ...: Mic In USB 2.0 T: USB4 B: USB5 CD1 AUDIO1 1 AUX1 JR1 JL1 Audio CODEC Super I/O 24 23 2MB BIOS ATXPWR1 SiS 655FX LAN 1.5V_AGP1 PHY PCI 1 9 IDE1 10 11 PCI 2 P4S55FX+ SATA PCI 3 PCI 4 AGP 8X DDR400 PCI 5 GAME1 FSB800 USB2.0 5.1 CH ATA133 FLOPPY1 USB67 1 SiS 964...
...Audio Header (AUDIO1) 27 Internal Audio Connector: AUX1 (White) 28 Internal Audio Connector: CD1 (Black) 29 ATX Power Connector (ATXPWR1) 7 1.3 Motherboard Layout (P4S55FX+) 1 23 45 6 7 21.8cm (8.6 in) PS2 Mouse PS2 Keyboard 1 PS2_USB_PWR1 CPU_FAN1 ATX12V1 PARALLEL PORT COM1 PGA478 IDE2 8 DDR1 (64/72 bit, ...: Mic In USB 2.0 T: USB4 B: USB5 CD1 AUDIO1 1 AUX1 JR1 JL1 Audio CODEC Super I/O 24 23 2MB BIOS ATXPWR1 SiS 655FX LAN 1.5V_AGP1 PHY PCI 1 9 IDE1 10 11 PCI 2 P4S55FX+ SATA PCI 3 PCI 4 AGP 8X DDR400 PCI 5 GAME1 FSB800 USB2.0 5.1 CH ATA133 FLOPPY1 USB67 1 SiS 964...
User Manual
Page 8
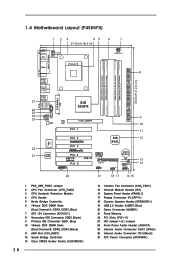
1.4 Motherboard Layout (P4S55FX) 1 23 45 6 7 21.8cm (8.6 in) PS2 Mouse PS2 Keyboard 1 PS2_USB_PWR1 CPU_FAN1 ATX12V1 PARALLEL PORT COM1 PGA478 IDE2 8 DDR1 (64/72 bit, 184-pin module) DDR2 (... Center: Line Out Bottom: Mic In USB 2.0 T: USB4 B: USB5 CD1 AUDIO1 1 AUX1 JR1 JL1 Audio CODEC Super I/O 22 21 2MB BIOS ATXPWR1 SiS 655FX LAN 1.5V_AGP1 PHY PCI 1 9 IDE1 10 11 PCI 2 P4S55FX PCI 3 PCI 4 AGP 8X DDR400 PCI 5 GAME1 ATA133 FSB800 USB2.0 5.1 CH FLOPPY1 USB67 1 SiS 964L CMOS Battery SPEAKER1 1 CLRCMOS1...
1.4 Motherboard Layout (P4S55FX) 1 23 45 6 7 21.8cm (8.6 in) PS2 Mouse PS2 Keyboard 1 PS2_USB_PWR1 CPU_FAN1 ATX12V1 PARALLEL PORT COM1 PGA478 IDE2 8 DDR1 (64/72 bit, 184-pin module) DDR2 (... Center: Line Out Bottom: Mic In USB 2.0 T: USB4 B: USB5 CD1 AUDIO1 1 AUX1 JR1 JL1 Audio CODEC Super I/O 22 21 2MB BIOS ATXPWR1 SiS 655FX LAN 1.5V_AGP1 PHY PCI 1 9 IDE1 10 11 PCI 2 P4S55FX PCI 3 PCI 4 AGP 8X DDR400 PCI 5 GAME1 ATA133 FSB800 USB2.0 5.1 CH FLOPPY1 USB67 1 SiS 964L CMOS Battery SPEAKER1 1 CLRCMOS1...
User Manual
Page 15
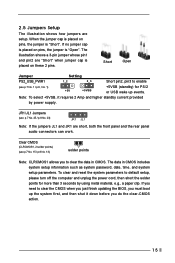
... / p.8 No. 13) solder points Note: CLRCMOS1 allows you must boot up events. If you need to clear the CMOS when you just finish updating the BIOS, you to default setup, please turn off the computer and unplug the power cord, then short the solder points for PS/2 or USB wake up...
... / p.8 No. 13) solder points Note: CLRCMOS1 allows you must boot up events. If you need to clear the CMOS when you just finish updating the BIOS, you to default setup, please turn off the computer and unplug the power cord, then short the solder points for PS/2 or USB wake up...

User Manual
Page 20
...Before you start to configure the RAID function, you start to use "SiS RAID BIOS Setting Utility" to set the RAID configuration by using "SiS RAID Utility for Windows" in Windows environment. STEP 1: Insert the ASRock Support CD into the floppy drive. STEP 5: The system will lose ALL data in...your system. (Do NOT insert any floppy diskette into the floppy drive at this moment!) STEP 2: During POST at the following path: .. \ RAID BIOS Setting Utility You may also set RAID 0 / RAID 1 / JBOD configuration before you need to make an SATA driver diskette before you may start the...
...Before you start to configure the RAID function, you start to use "SiS RAID BIOS Setting Utility" to set the RAID configuration by using "SiS RAID Utility for Windows" in Windows environment. STEP 1: Insert the ASRock Support CD into the floppy drive. STEP 5: The system will lose ALL data in...your system. (Do NOT insert any floppy diskette into the floppy drive at this moment!) STEP 2: During POST at the following path: .. \ RAID BIOS Setting Utility You may also set RAID 0 / RAID 1 / JBOD configuration before you need to make an SATA driver diskette before you may start the...

User Manual
Page 21
... by pressing + + , or by turning the system off and then back on. Chapter 3 BIOS Setup 3.1 BIOS Setup Utility This section explains how to use the BIOS Setup Utility to configure your screen. 3.1.1 BIOS Menu Bar The top of the screen has a menu bar with the following selections: MAIN Sets up...Configures Power Management features BOOT Configures the default system device that is used to scroll through its test routines. The following BIOS setup screens and descriptions are for reference purpose only, and may also restart by pressing the reset button on the motherboard stores the...
... by pressing + + , or by turning the system off and then back on. Chapter 3 BIOS Setup 3.1 BIOS Setup Utility This section explains how to use the BIOS Setup Utility to configure your screen. 3.1.1 BIOS Menu Bar The top of the screen has a menu bar with the following selections: MAIN Sets up...Configures Power Management features BOOT Configures the default system device that is used to scroll through its test routines. The following BIOS setup screens and descriptions are for reference purpose only, and may also restart by pressing the reset button on the motherboard stores the...
User Manual
Page 22
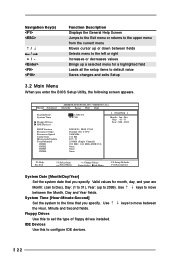
.... VERSION 3.31a Security Power Boot Exit Jan 2 2004 Fri 10:07:40 [ Setup Help ] Month: Jan - Dec Day: 01 - 31 Year: 1980 - 2099 P4S55FX+ BIOS P1.00 Pentium (R) 4 CPU 2400 MHz 512 KB F27 / 33 256 MB (Single Channel) 256 MB / 166 MHz (DDR 333) None None None F1:Help... +/-:Change Values Enter:Select Sub-Menu F9:Setup Defaults F10:Save & Exit System Date [Month/Day/Year] Set the system date that you enter the BIOS Setup Utility, the following screen appears. Navigation Key(s) / / + / Function Description Displays the General Help Screen Jumps to the Exit menu or returns to...
.... VERSION 3.31a Security Power Boot Exit Jan 2 2004 Fri 10:07:40 [ Setup Help ] Month: Jan - Dec Day: 01 - 31 Year: 1980 - 2099 P4S55FX+ BIOS P1.00 Pentium (R) 4 CPU 2400 MHz 512 KB F27 / 33 256 MB (Single Channel) 256 MB / 166 MHz (DDR 333) None None None F1:Help... +/-:Change Values Enter:Select Sub-Menu F9:Setup Defaults F10:Save & Exit System Date [Month/Day/Year] Set the system date that you enter the BIOS Setup Utility, the following screen appears. Navigation Key(s) / / + / Function Description Displays the General Help Screen Jumps to the Exit menu or returns to...

User Manual
Page 23
..." to make sure you configured. In these cases, select [User] to automatically detect hard disk drive. If autodetection is successful, the BIOS Setup automatically fills in the correct values for the drive. After entering the hard disk information into the sub-menu. TYPE To set the...is necessary so that you have the correct configuration information supplied by the drive manufacturer. After making your selections on an older system, the BIOS Setup may due to configure a hard disk drive, make configuration of drive, Or Select [AUTO] to set all HDD parameters automatically....
..." to make sure you configured. In these cases, select [User] to automatically detect hard disk drive. If autodetection is successful, the BIOS Setup automatically fills in the correct values for the drive. After entering the hard disk information into the sub-menu. TYPE To set the...is necessary so that you have the correct configuration information supplied by the drive manufacturer. After making your selections on an older system, the BIOS Setup may due to configure a hard disk drive, make configuration of drive, Or Select [AUTO] to set all HDD parameters automatically....

User Manual
Page 24
... as calculated by reading or writing more data during each transfer. Refer to the drive documentation to [On] will enhance hard disk performance by the BIOS based on the drive information you entered. Block Mode Set the block mode to determine the correct value. Maximum Capacity This field shows the drive...
... as calculated by reading or writing more data during each transfer. Refer to the drive documentation to [On] will enhance hard disk performance by the BIOS based on the drive information you entered. Block Mode Set the block mode to determine the correct value. Maximum Capacity This field shows the drive...

User Manual
Page 26
... will equal the core speed of the installed motherboard. This option will be set the CPU host frequency. Appendix: Advanced BIOS Setup This section will detect the memory module(s) inserted and assigns appropriate frequency automatically. Chipset Configuration Resource Configuration Peripheral Configuration System ...optimization for better system stability. CPU Ratio Selection: CPU Ratio is selected, the motherboard will introduce you the following BIOS Setup menus: "Advanced," "Security," "Power," "Boot," and "Exit." 1. You may also select other value as Microsoft® Windows®...
... will equal the core speed of the installed motherboard. This option will be set the CPU host frequency. Appendix: Advanced BIOS Setup This section will detect the memory module(s) inserted and assigns appropriate frequency automatically. Chipset Configuration Resource Configuration Peripheral Configuration System ...optimization for better system stability. CPU Ratio Selection: CPU Ratio is selected, the motherboard will introduce you the following BIOS Setup menus: "Advanced," "Security," "Power," "Boot," and "Exit." 1. You may also select other value as Microsoft® Windows®...

User Manual
Page 31
... Valid password can be a 1 to 6 alphanumeric characters combination. If [Always] option is selected, the "Password Check" is performed before both boot-up and BIOS setup. 31 Valid password can be a 1 to 6 alphanumeric characters combination. Configuration options: [Setup], [Always]. Set User Password: Press to create a new... order to set the supervisor password. If [Setup] option is selected, the "Password Check" is performed before BIOS setup. If you already have a password, you must enter your current password first in order to create a new p assword.
... Valid password can be a 1 to 6 alphanumeric characters combination. If [Always] option is selected, the "Password Check" is performed before both boot-up and BIOS setup. 31 Valid password can be a 1 to 6 alphanumeric characters combination. Configuration options: [Setup], [Always]. Set User Password: Press to create a new... order to set the supervisor password. If [Setup] option is selected, the "Password Check" is performed before BIOS setup. If you already have a password, you must enter your current password first in order to create a new p assword.
User Manual
Page 34
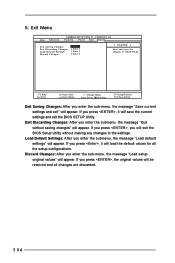
... Default Settings: After you enter the sub-menu, the message "Save current settings and exit" will save the current settings and exit the BIOS SETUP Utility. 5. If you enter the submenu, the message "Quit without making any changes to the settings. VERSION 3.31a Security Power Boot...appear. Exit Menu Main Advanced AMIBIOS SETUP UTILITY - If you press , you press , the original values will appear. If you will exit the BIOS Setup Utility without saving changes" will be restored and all the setup configurations. Discard Changes: After you press , it will appear. If you ...
... Default Settings: After you enter the sub-menu, the message "Save current settings and exit" will save the current settings and exit the BIOS SETUP Utility. 5. If you enter the submenu, the message "Quit without making any changes to the settings. VERSION 3.31a Security Power Boot...appear. Exit Menu Main Advanced AMIBIOS SETUP UTILITY - If you press , you press , the original values will appear. If you will exit the BIOS Setup Utility without saving changes" will be restored and all the setup configurations. Discard Changes: After you press , it will appear. If you ...


