User Manual
Page 3
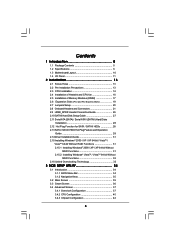
...1.1 Package Contents 5 1.2 Specifications 6 1.3 Motherboard Layout 10 1.4 I/O Panel 11 2 Installation 13 2.1 Screw Holes 13 2.2 Pre-installation Precautions 13 2.3 CPU Installation 14 2.4 Installation of Heatsink and CPU fan 16 2.5 Installation of Memory Modules (DIMM 17 2.6 Expansion Slots (PCI and PCI Express Slots 19 2.7 Jumpers Setup 20 2.8 Onboard Headers and Connectors... 3.1.1 BIOS Menu Bar 34 3.1.2 Navigation Keys 35 3.2 Main Screen 35 3.3 Smart Screen 36 3.4 Advanced Screen 37 3.4.1 Overclock Configuration 37 3.4.2 CPU Configuration 40 3.4.3 Chipset Configuration 42 3
...1.1 Package Contents 5 1.2 Specifications 6 1.3 Motherboard Layout 10 1.4 I/O Panel 11 2 Installation 13 2.1 Screw Holes 13 2.2 Pre-installation Precautions 13 2.3 CPU Installation 14 2.4 Installation of Heatsink and CPU fan 16 2.5 Installation of Memory Modules (DIMM 17 2.6 Expansion Slots (PCI and PCI Express Slots 19 2.7 Jumpers Setup 20 2.8 Onboard Headers and Connectors... 3.1.1 BIOS Menu Bar 34 3.1.2 Navigation Keys 35 3.2 Main Screen 35 3.3 Smart Screen 36 3.4 Advanced Screen 37 3.4.1 Overclock Configuration 37 3.4.2 CPU Configuration 40 3.4.3 Chipset Configuration 42 3

User Manual
Page 5
...CPU support lists on ASRock website without notice. Chapter 3 and 4 contain the configuration guide to BIOS setup and information of the motherboard and step-by-step guide to the hardware installation. In this manual, chapter 1 and 2 contain introduction of the Support CD. www.asrock.com/support/index.asp 1.1 Package Contents ASRock P45DE... Motherboard (ATX Form Factor: 12.0-in x 8.5-in, 30.5 cm x 21.6 cm) ASRock P45DE Quick Installation Guide ASRock P45DE Support CD One 80-conductor Ultra...
...CPU support lists on ASRock website without notice. Chapter 3 and 4 contain the configuration guide to BIOS setup and information of the motherboard and step-by-step guide to the hardware installation. In this manual, chapter 1 and 2 contain introduction of the Support CD. www.asrock.com/support/index.asp 1.1 Package Contents ASRock P45DE... Motherboard (ATX Form Factor: 12.0-in x 8.5-in, 30.5 cm x 21.6 cm) ASRock P45DE Quick Installation Guide ASRock P45DE Support CD One 80-conductor Ultra...

User Manual
Page 6
... - capacity of system memory: 16GB (see CAUTION 4) - 4 x DDR2 DIMM slots - PCIE x1 Gigabit LAN 10/100/1000 Mb/s - Supports EM64T CPU - Dual Channel DDR2 Memory Technology (see CAUTION 6) - 1 x PCI Express 2.0 x16 slot (green @ x16 mode) - 3 x PCI Express x1 ... - Supports Hyper-Threading Technology (see CAUTION 5) - Supports Wake-On-LAN I /O Connector - Supports Untied Overclocking Technology (see CAUTION 3) - Max. 1.2 Specifications Platform CPU Chipset Memory Expansion Slot Audio LAN Rear Panel I /O Panel - 1 x PS/2 Mouse Port - 1 x PS/2 Keyboard Port - 1 x Coaxial SPDIF Out Port...
... - capacity of system memory: 16GB (see CAUTION 4) - 4 x DDR2 DIMM slots - PCIE x1 Gigabit LAN 10/100/1000 Mb/s - Supports EM64T CPU - Dual Channel DDR2 Memory Technology (see CAUTION 6) - 1 x PCI Express 2.0 x16 slot (green @ x16 mode) - 3 x PCI Express x1 ... - Supports Hyper-Threading Technology (see CAUTION 5) - Supports Wake-On-LAN I /O Connector - Supports Untied Overclocking Technology (see CAUTION 3) - Max. 1.2 Specifications Platform CPU Chipset Memory Expansion Slot Audio LAN Rear Panel I /O Panel - 1 x PS/2 Mouse Port - 1 x PS/2 Keyboard Port - 1 x Coaxial SPDIF Out Port...

User Manual
Page 7
... information, please visit our website: http://www.asrock.com 7 O. ASRock OC Tuner (see CAUTION 11) - Intelligent Energy Saver (see CAUTION 10) - Chassis Temperature Sensing - Microsoft® Windows® 2000 / XP / XP 64-bit / VistaTM / VistaTM 64-bit compliant (see CAUTION 12) - Supports Jumperfree - Instant Boot - CPU Frequency Stepless Control (see CAUTION 14) Certifications...
... information, please visit our website: http://www.asrock.com 7 O. ASRock OC Tuner (see CAUTION 11) - Intelligent Energy Saver (see CAUTION 10) - Chassis Temperature Sensing - Microsoft® Windows® 2000 / XP / XP 64-bit / VistaTM / VistaTM 64-bit compliant (see CAUTION 12) - Supports Jumperfree - Instant Boot - CPU Frequency Stepless Control (see CAUTION 14) Certifications...

User Manual
Page 8
...to SATAII connector, please read the "SATAII Hard Disk Setup Guide" on page 17 for proper connection. 8. ASRock website: http://www.asrock.com 8 About the setting of ASRock OC Tuner. Due to the operating system limitation, the actual memory size may be less than 4GB for ... 2. This motherboard supports Dual Channel Memory Technology. WARNING Please realize that there is a certain risk involved with 64-bit CPU, there is a user-friendly ASRock overclocking tool which allows you adopt may be done at your hardware devices to get the best system performance under Windows®...
...to SATAII connector, please read the "SATAII Hard Disk Setup Guide" on page 17 for proper connection. 8. ASRock website: http://www.asrock.com 8 About the setting of ASRock OC Tuner. Due to the operating system limitation, the actual memory size may be less than 4GB for ... 2. This motherboard supports Dual Channel Memory Technology. WARNING Please realize that there is a certain risk involved with 64-bit CPU, there is a user-friendly ASRock overclocking tool which allows you adopt may be done at your hardware devices to get the best system performance under Windows®...
User Manual
Page 9
Frequencies other words, it is detected, the system will automatically shutdown. Before you install the PC system. 14. ASRock website: http://www.asrock.com 12. It is a revolutionary technology that delivers unparalleled power savings. Featuring an advanced proprietary hardware and software design, Intelligent...stepless control, it back again. AHCI function is not recommended to spray thermal grease between the CPU and the heatsink when you resume the system, please check if the CPU fan on the motherboard functions properly and unplug the power cord, then plug it is not ...
Frequencies other words, it is detected, the system will automatically shutdown. Before you install the PC system. 14. ASRock website: http://www.asrock.com 12. It is a revolutionary technology that delivers unparalleled power savings. Featuring an advanced proprietary hardware and software design, Intelligent...stepless control, it back again. AHCI function is not recommended to spray thermal grease between the CPU and the heatsink when you resume the system, please check if the CPU fan on the motherboard functions properly and unplug the power cord, then plug it is not ...
User Manual
Page 10
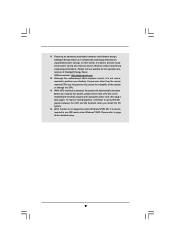
...: CTR BASS Intel P45 Chipset LAN PHY Top: LINE IN Center: FRONT Bottom: MIC IN 35 PCIE1 34 PCI Express 2.0 33 AUDIO CODEC CD1 PCIE2 P45DE FSB2000 DDR2 1200 Dual Channel DDRII_A1 (64 bit, 240-pin module) DDRII_A2 (64 bit, 240-pin module) 8 IDE1 9 30.5cm (12.0 in) 32 31 30... (Port 4) SATAII_6 (Port 5) CHA_FAN1 24 23 22 21 20 19 18 17 16 10 11 12 13 14 15 1 ATX 12V Connector (ATX12V1) 2 775-Pin CPU Socket 3 North Bridge Controller 4 CPU Fan Connector (CPU_FAN1) 5 PS2_USB_PWR1 Jumper 6 2 x 240-pin DDR2 DIMM Slots (Dual Channel A: DDRII_A1, DDRII_B1;
...: CTR BASS Intel P45 Chipset LAN PHY Top: LINE IN Center: FRONT Bottom: MIC IN 35 PCIE1 34 PCI Express 2.0 33 AUDIO CODEC CD1 PCIE2 P45DE FSB2000 DDR2 1200 Dual Channel DDRII_A1 (64 bit, 240-pin module) DDRII_A2 (64 bit, 240-pin module) 8 IDE1 9 30.5cm (12.0 in) 32 31 30... (Port 4) SATAII_6 (Port 5) CHA_FAN1 24 23 22 21 20 19 18 17 16 10 11 12 13 14 15 1 ATX 12V Connector (ATX12V1) 2 775-Pin CPU Socket 3 North Bridge Controller 4 CPU Fan Connector (CPU_FAN1) 5 PS2_USB_PWR1 Jumper 6 2 x 240-pin DDR2 DIMM Slots (Dual Channel A: DDRII_A1, DDRII_B1;

User Manual
Page 14
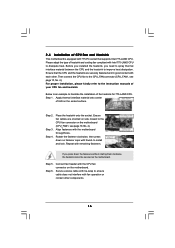
...the edges where are marked with IHS (Integrated Heat Sink) up. Step 1-3. Orient the CPU with black lines. Pin1 orientation key notch orientation key notch Pin1 alignment key alignment key 775-LAND CPU 775-Pin Socket 14 black line black line Do not force to fully open position at ...approximately 100 degrees. Otherwise, the CPU will be seriously damaged. Rotate the load lever to clear retention tab. Step 2. Hold the CPU by depressing down and out on the socket. Locate Pin1 and the two orientation key notches...
...the edges where are marked with IHS (Integrated Heat Sink) up. Step 1-3. Orient the CPU with black lines. Pin1 orientation key notch orientation key notch Pin1 alignment key alignment key 775-LAND CPU 775-Pin Socket 14 black line black line Do not force to fully open position at ...approximately 100 degrees. Otherwise, the CPU will be seriously damaged. Rotate the load lever to clear retention tab. Step 2. Hold the CPU by depressing down and out on the socket. Locate Pin1 and the two orientation key notches...

User Manual
Page 15
... in removal. 1. Close the socket: Step 4-1. While pressing down lightly on center of the socket. Step 4-3. Carefully place the CPU into the socket by using a purely vertical motion. Step 3. Verify that the CPU is recommended to use the cap tab to match the two orientation key notches of the... CPU with the two alignment keys of PnP cap to the orient keys. Step 4-2. For proper inserting, please ensure to handle...
... in removal. 1. Close the socket: Step 4-1. While pressing down lightly on center of the socket. Step 4-3. Carefully place the CPU into the socket by using a purely vertical motion. Step 3. Verify that the CPU is recommended to use the cap tab to match the two orientation key notches of the... CPU with the two alignment keys of PnP cap to the orient keys. Step 4-2. For proper inserting, please ensure to handle...
User Manual
Page 16
...page 10, No. 4). Repeat with the motherboard throughholes. Place the heatsink onto the socket. Ensure that supports Intel 775-LAND CPU. Secure excess cable with 775-Pin socket that the CPU and the heatsink are oriented on side closest to install and lock. Please adopt the type of the heatsink for 775...-LAND CPU. Below is equipped with tie-wrap to dissipate heat. Ensure fan cables are securely fastened and in good contact with fan operation or contact other ....
...page 10, No. 4). Repeat with the motherboard throughholes. Place the heatsink onto the socket. Ensure that supports Intel 775-LAND CPU. Secure excess cable with 775-Pin socket that the CPU and the heatsink are oriented on side closest to install and lock. Please adopt the type of the heatsink for 775...-LAND CPU. Below is equipped with tie-wrap to dissipate heat. Ensure fan cables are securely fastened and in good contact with fan operation or contact other ....

User Manual
Page 23
... 2. Please follow the instruction in our manual and chassis manual to OUT2_L. B. D. E. MIC_RET and OUT_RET are for AC'97 audio panel. CPU Fan Connector (4-pin CPU_FAN1) (see p.10 No. 32) GND PRESENCE# MIC_RET OUT_RET 1 OUT2_L J_SENSE OUT2_R MIC2_R MIC2_L This is an interface for ...on the chassis must support HDA to [Enabled]. Front Panel Audio Header (9-pin HD_AUDIO1) (see p.10, No. 4) 1 GND Please connect a CPU fan cable 2 +12V 3 CPU_FAN_SPEED to this connector and match 4 FAN_SPEED_CONTROL the black wire to the ground pin. 23 Set the Front Panel Control ...
... 2. Please follow the instruction in our manual and chassis manual to OUT2_L. B. D. E. MIC_RET and OUT_RET are for AC'97 audio panel. CPU Fan Connector (4-pin CPU_FAN1) (see p.10 No. 32) GND PRESENCE# MIC_RET OUT_RET 1 OUT2_L J_SENSE OUT2_R MIC2_R MIC2_L This is an interface for ...on the chassis must support HDA to [Enabled]. Front Panel Audio Header (9-pin HD_AUDIO1) (see p.10, No. 4) 1 GND Please connect a CPU fan cable 2 +12V 3 CPU_FAN_SPEED to this connector and match 4 FAN_SPEED_CONTROL the black wire to the ground pin. 23 Set the Front Panel Control ...

User Manual
Page 24
...(8-pin ATX12V1) (see p.10 No. 1) 5 1 8 4 Please connect an ATX 12V power supply to Pin 1-3. Though this motherboard provides 4-Pin CPU fan (Quiet Fan) support, the 3-Pin CPU fan still can work successfully even without the fan speed control function. To use the 20-pin ATX power supply, please plug...12 24 Please connect an ATX power supply to this connector. 1 13 Though this connector. If you plan to connect the 3-Pin CPU fan to the CPU fan connector on this motherboard, please connect it to this motherboard provides 24-pin ATX power connector, 12 24 it can still work ...
...(8-pin ATX12V1) (see p.10 No. 1) 5 1 8 4 Please connect an ATX 12V power supply to Pin 1-3. Though this motherboard provides 4-Pin CPU fan (Quiet Fan) support, the 3-Pin CPU fan still can work successfully even without the fan speed control function. To use the 20-pin ATX power supply, please plug...12 24 Please connect an ATX power supply to this connector. 1 13 Though this connector. If you plan to connect the 3-Pin CPU fan to the CPU fan connector on this motherboard, please connect it to this motherboard provides 24-pin ATX power connector, 12 24 it can still work ...

User Manual
Page 33
... the possible overclocking risk before you enable Untied Overclocking function, please enter "Overclock Mode" option of BIOS setup to set the option to [Manual]. Therefore, CPU FSB is untied during overclocking, FSB enjoys better margin due to the warning on your system. 2.16 Untied Overclocking Technology This motherboard supports Untied Overclocking...
... the possible overclocking risk before you enable Untied Overclocking function, please enter "Overclock Mode" option of BIOS setup to set the option to [Manual]. Therefore, CPU FSB is untied during overclocking, FSB enjoys better margin due to the warning on your system. 2.16 Untied Overclocking Technology This motherboard supports Untied Overclocking...

User Manual
Page 35
... Smart Advanced H/W Monitor Boot Security Exit System Overview System Time System Date [14:00:09] [Mon 10/06/2008] BIOS Version : P45DE P1.00 Processor Type : Intel (R) Core(TM)2 Duo CPU E6750 @ 2.66GHz (64bit) Processor Speed : 2666MHz Microcode Update : 6FB/B6 Cache Size : 4096KB Total Memory DDRII_A1 DDRII_A2 DDRII_B1 DDRII_B2 : 4096MB Dual...
... Smart Advanced H/W Monitor Boot Security Exit System Overview System Time System Date [14:00:09] [Mon 10/06/2008] BIOS Version : P45DE P1.00 Processor Type : Intel (R) Core(TM)2 Duo CPU E6750 @ 2.66GHz (64bit) Processor Speed : 2666MHz Microcode Update : 6FB/B6 Cache Size : 4096KB Total Memory DDRII_A1 DDRII_A2 DDRII_B1 DDRII_B2 : 4096MB Dual...

User Manual
Page 37
...Intel (R) SpeedStep(tm) tech. Setting wrong values in below sections may cause system to malfunction. Overclock Configuration CPU Configuration Chipset Configuration ACPI Configuration IDE Configuration PCIPnP Configuration Floppy Configuration SuperIO Configuration USB Configuration Overclock Settings Select Screen ...Select Item Enter Go to MCH DRAM Frequency 8 [8] [Auto] [Auto] [333] [100] [Auto] [Auto] Vcore : 1.304 V CPU Voltage [Auto] DRAM Voltage : 1.96 V DRAM Voltage [Auto] DRAM VREF Increment [Normal] Mother Board Voltage Info : 1-1-1-1-3 NB GTL Voltage [Auto...
...Intel (R) SpeedStep(tm) tech. Setting wrong values in below sections may cause system to malfunction. Overclock Configuration CPU Configuration Chipset Configuration ACPI Configuration IDE Configuration PCIPnP Configuration Floppy Configuration SuperIO Configuration USB Configuration Overclock Settings Select Screen ...Select Item Enter Go to MCH DRAM Frequency 8 [8] [Auto] [Auto] [333] [100] [Auto] [Auto] Vcore : 1.304 V CPU Voltage [Auto] DRAM Voltage : 1.96 V DRAM Voltage [Auto] DRAM VREF Increment [Normal] Mother Board Voltage Info : 1-1-1-1-3 NB GTL Voltage [Auto...

User Manual
Page 38
...533MHz (DDR2 1066)] or [600MHz (DDR2 1200)]. Please refer to page 8 for the details of this option to page 33 for the CPU FSB frequency and its corresponding memory support frequency. 38 Ratio CMOS Setting If the ratio status is unlocked, you will automatically enable the overclocking ...function when your CPU is heavy loaded. Processor can switch between multiple frequency and voltage points to MCH. The default value is Intel's new power saving...
...533MHz (DDR2 1066)] or [600MHz (DDR2 1200)]. Please refer to page 8 for the details of this option to page 33 for the CPU FSB frequency and its corresponding memory support frequency. 38 Ratio CMOS Setting If the ratio status is unlocked, you will automatically enable the overclocking ...function when your CPU is heavy loaded. Processor can switch between multiple frequency and voltage points to MCH. The default value is Intel's new power saving...

User Manual
Page 39
... [2.02V], [2.08V], [2.14V], [2.20V], [2.31V], [2.37V], [2.42V], [2.48V], [2.54V], [2.60V], [2.66V] and [2.72V]. SB Core Voltage Use this to select CPU Voltage. Max: 2.22V. Configuration options: [Auto], [Low], [Middle], [High] and [Highest]. Configuration options: [Auto], [Low], [Middle], [High] and [Highest]. The... [Highest]. Configuration options: [Auto], [0.67 x Vtt], [0.65 x Vtt], [0.63 x Vtt] and [0.615 x Vtt]. Vcore : 1.304 V CPU Voltage Use this to select SB Core Voltage. Mother Board Voltage Info : 1.12-1.20-1.50 NB 1.1V Voltage Use this feature is [Auto]. The default...
... [2.02V], [2.08V], [2.14V], [2.20V], [2.31V], [2.37V], [2.42V], [2.48V], [2.54V], [2.60V], [2.66V] and [2.72V]. SB Core Voltage Use this to select CPU Voltage. Max: 2.22V. Configuration options: [Auto], [Low], [Middle], [High] and [Highest]. Configuration options: [Auto], [Low], [Middle], [High] and [Highest]. The... [Highest]. Configuration options: [Auto], [0.67 x Vtt], [0.65 x Vtt], [0.63 x Vtt] and [0.615 x Vtt]. Vcore : 1.304 V CPU Voltage Use this to select SB Core Voltage. Mother Board Voltage Info : 1.12-1.20-1.50 NB 1.1V Voltage Use this feature is [Auto]. The default...

User Manual
Page 40
... adjust PCIE frequency. Overclock Mode Use this motherboard. If you changing the ratio value of Untied Overclocking Technology. CPU Frequency (MHz) Use this item appear to adjust the CPU frequency and PCIE frequency in the following two items. If you select [I .O.T.] and [Optimized]. Enhance Halt ...State All processors support the Halt State (C1). The default value is unlocked, you will automatically enable the overclocking function when your CPU is a read-only item, which displays the ratio actual value of this option to page 33 for better system stability. Ratio CMOS...
... adjust PCIE frequency. Overclock Mode Use this motherboard. If you changing the ratio value of Untied Overclocking Technology. CPU Frequency (MHz) Use this item appear to adjust the CPU frequency and PCIE frequency in the following two items. If you select [I .O.T.] and [Optimized]. Enhance Halt ...State All processors support the Halt State (C1). The default value is unlocked, you will automatically enable the overclocking function when your CPU is a read-only item, which displays the ratio actual value of this option to page 33 for better system stability. Ratio CMOS...

User Manual
Page 41
...VMM (Virtual Machine Architecture) can utilize the additional hardware capabilities provided by Vanderpool Technology. This option will be hidden if the current CPU does not support No-Excute Memory Protection. Please set to system stability or compatibility issue with some power supplies. is [Auto]....of the core logic and not part of both cores' requests, portraying a single CPU entity to keep the CPU from overheated. This option will be hidden if the installed CPU does not support Hyper-Threading technology. Please note that includes optimization for individual core ...
...VMM (Virtual Machine Architecture) can utilize the additional hardware capabilities provided by Vanderpool Technology. This option will be hidden if the current CPU does not support No-Excute Memory Protection. Please set to system stability or compatibility issue with some power supplies. is [Auto]....of the core logic and not part of both cores' requests, portraying a single CPU entity to keep the CPU from overheated. This option will be hidden if the installed CPU does not support Hyper-Threading technology. Please note that includes optimization for individual core ...

User Manual
Page 42
...for TRAS. DRAM tRP This controls the number of memory accessing. Configuration options: [Enabled] and [Disabled]. The configuration options depend on the CPU and memory module you adopt on this option is set to [10]. 42 Configuration options : [3], [4], [5], [6], [7] and [Auto]. ... it is [Disabled]. Configuration options are: [C2], [C3], [C4] and [Disabled]. DISABLE: Do not allow better tolerance for the CPU FSB frequency and its corresponding memory support frequency. Please refer to [24]. Configuration options: Configuration options: [Auto], [3] to [Enabled]. The...
...for TRAS. DRAM tRP This controls the number of memory accessing. Configuration options: [Enabled] and [Disabled]. The configuration options depend on the CPU and memory module you adopt on this option is set to [10]. 42 Configuration options : [3], [4], [5], [6], [7] and [Auto]. ... it is [Disabled]. Configuration options are: [C2], [C3], [C4] and [Disabled]. DISABLE: Do not allow better tolerance for the CPU FSB frequency and its corresponding memory support frequency. Please refer to [24]. Configuration options: Configuration options: [Auto], [3] to [Enabled]. The...


