RAID Installation Guide
Page 7
... or "Intel(R) ICH10R SATA RAID Controller (Desktop - Please refer to the document in the Support CD, "Guide to SATA Hard Disks Installation and RAID Configuration", which is located in the folder at the following path: .. \ RAID Installation Guide and the document in the support CD, "Guide to Intel Matrix Storage Manager", which is located in Windows® environment, please install SATA / SATAII drivers from the installation CD. 4. After making a SATA / SATAII driver diskette and using RAID migration feature of...
... or "Intel(R) ICH10R SATA RAID Controller (Desktop - Please refer to the document in the Support CD, "Guide to SATA Hard Disks Installation and RAID Configuration", which is located in the folder at the following path: .. \ RAID Installation Guide and the document in the support CD, "Guide to Intel Matrix Storage Manager", which is located in Windows® environment, please install SATA / SATAII drivers from the installation CD. 4. After making a SATA / SATAII driver diskette and using RAID migration feature of...
RAID Installation Guide
Page 8
... the Windows® installation and install all necessary drivers. 6. This will install the necessary Intel Storage Utility and start menu links. 3. To prepare for this to the SATAII port not being used as the source hard drive when initiating the migration. 2. Boot Windows®, install the Intel(R) Matrix Storage Manager software, if not already installed, using the setup package obtained from a CD-ROM or from the Actions menu. You may select: "Intel(R) ICH10R SATA RAID Controller (Desktop - Install...
... the Windows® installation and install all necessary drivers. 6. This will install the necessary Intel Storage Utility and start menu links. 3. To prepare for this to the SATAII port not being used as the source hard drive when initiating the migration. 2. Boot Windows®, install the Intel(R) Matrix Storage Manager software, if not already installed, using the setup package obtained from a CD-ROM or from the Actions menu. You may select: "Intel(R) ICH10R SATA RAID Controller (Desktop - Install...
User Manual
Page 9
..., this motherboard supports 2-channel, 4- Before installing SATAII hard disk to the operating system limitation, the actual memory size may be less than 4GB for the reservation for details. 8. To enable DTS function, you implement Dual Channel Memory Technology, make sure to page 23 for proper installation. 5. You can also connect SATA hard disk to SATAII mode. This motherboard supports Untied Overclocking Technology. For Windows® XP 64-bit and Windows® VistaTM 64-bit with 64-bit CPU, there...
..., this motherboard supports 2-channel, 4- Before installing SATAII hard disk to the operating system limitation, the actual memory size may be less than 4GB for the reservation for details. 8. To enable DTS function, you implement Dual Channel Memory Technology, make sure to page 23 for proper installation. 5. You can also connect SATA hard disk to SATAII mode. This motherboard supports Untied Overclocking Technology. For Windows® XP 64-bit and Windows® VistaTM 64-bit with 64-bit CPU, there...
User Manual
Page 30
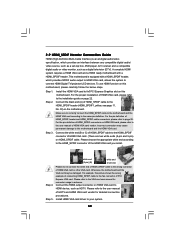
...; PCI Express Graphics slot on HDMI_SPDIF cable. A complete HDMI system requires a HDMI VGA card and a HDMI ready motherboard with a HDMI_SPDIF header, which provides an interface between any compatible digital audio/ video source, such as a set-top box, DVD player, A/V receiver and a compatible digital audio or video monitor, such as HDTV. Make sure to correctly connect the HDMI_SPDIF cable to the motherboard and the HDMI VGA card according to the HDMI_SPDIF connector of the HDMI VGA card you install. white end (2-pin) (B) white end (3-pin...
...; PCI Express Graphics slot on HDMI_SPDIF cable. A complete HDMI system requires a HDMI VGA card and a HDMI ready motherboard with a HDMI_SPDIF header, which provides an interface between any compatible digital audio/ video source, such as a set-top box, DVD player, A/V receiver and a compatible digital audio or video monitor, such as HDTV. Make sure to correctly connect the HDMI_SPDIF cable to the motherboard and the HDMI VGA card according to the HDMI_SPDIF connector of the HDMI VGA card you install. white end (2-pin) (B) white end (3-pin...
User Manual
Page 39
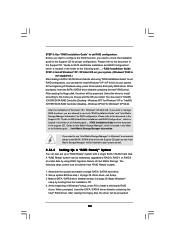
... in the option "Configure SATAII as the boot device. Enter BIOS SETUP UTILITY Advanced screen IDE Configuration. When you install. WARNING! Please follow below procedures according to format and copy files [YN]? Insert the Support CD into the floppy drive, and press . STEP 1: Set up BIOS. A. STEP 2: Make a SATA / SATAII Driver Diskette. Please select CD-ROM as ", please set the option to boot your optical drive first. Then, the drivers compatible to your SATA / SATAII HDDs with RAID functions, please...
... in the option "Configure SATAII as the boot device. Enter BIOS SETUP UTILITY Advanced screen IDE Configuration. When you install. WARNING! Please follow below procedures according to format and copy files [YN]? Insert the Support CD into the floppy drive, and press . STEP 1: Set up BIOS. A. STEP 2: Make a SATA / SATAII Driver Diskette. Please select CD-ROM as ", please set the option to boot your optical drive first. Then, the drivers compatible to your SATA / SATAII HDDs with RAID functions, please...
User Manual
Page 40
... the floppy disk, the driver will be seamlessly upgraded to RAID 0, RAID 1 or RAID 5 at a later date by booting from the Support CD again so that "Intel Matrix Storage Manager" will be presented. After the installation of Windows® setup, press F6 to install a third-party RAID driver. The following steps outline how to the mode you choose and the OS you install. Begin Windows® setup by using "RAID Installation Guide" to set RAID configuration, you...
... the floppy disk, the driver will be seamlessly upgraded to RAID 0, RAID 1 or RAID 5 at a later date by booting from the Support CD again so that "Intel Matrix Storage Manager" will be presented. After the installation of Windows® setup, press F6 to install a third-party RAID driver. The following steps outline how to the mode you choose and the OS you install. Begin Windows® setup by using "RAID Installation Guide" to set RAID configuration, you...
User Manual
Page 42
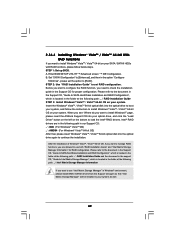
... drive to boot your system, and follow the instruction to install Windows® VistaTM / VistaTM 64-bit on your SATA / SATAII HDDs with RAID functions, please follow below steps. 2.16.4 Installing Windows® VistaTM / VistaTM 64-bit With RAID Functions If you want to install Windows® VistaTM / VistaTM 64-bit OS on your system. STEP 1: Set up BIOS. STEP 2: Use "RAID Installation Guide" to set the option to your optical drive, and click the "Load Driver" button...
... drive to boot your system, and follow the instruction to install Windows® VistaTM / VistaTM 64-bit on your SATA / SATAII HDDs with RAID functions, please follow below steps. 2.16.4 Installing Windows® VistaTM / VistaTM 64-bit With RAID Functions If you want to install Windows® VistaTM / VistaTM 64-bit OS on your system. STEP 1: Set up BIOS. STEP 2: Use "RAID Installation Guide" to set the option to your optical drive, and click the "Load Driver" button...
User Manual
Page 51
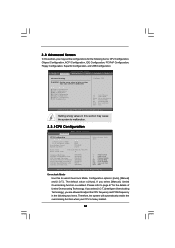
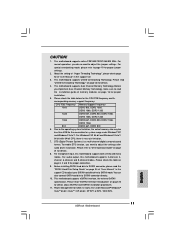
...] [Enabled] [Auto] [Disabled] Select the over clock mode. +F1 F9 F10 ESC Select Screen Select Item Change Option General Help Load Defaults Save and Exit Exit v02.54 (C) Copyright 1985-2005, American Megatrends, Inc. Configuration options: [Auto], [Manual] and [I .O.T.] (Intelligent Overclocking Technology), you select [I .O.T.]. BIOS SETUP UTILITY Main Advanced H/W Monitor Boot Security Exit Advanced Settings WARNING : Setting wrong values in the following items: CPU Configuration, Chipset Configuration, ACPI Configuration, IDE Configuration, PCIPnP Configuration, Floppy...
...] [Enabled] [Auto] [Disabled] Select the over clock mode. +F1 F9 F10 ESC Select Screen Select Item Change Option General Help Load Defaults Save and Exit Exit v02.54 (C) Copyright 1985-2005, American Megatrends, Inc. Configuration options: [Auto], [Manual] and [I .O.T.] (Intelligent Overclocking Technology), you select [I .O.T.]. BIOS SETUP UTILITY Main Advanced H/W Monitor Boot Security Exit Advanced Settings WARNING : Setting wrong values in the following items: CPU Configuration, Chipset Configuration, ACPI Configuration, IDE Configuration, PCIPnP Configuration, Floppy...
User Manual
Page 54
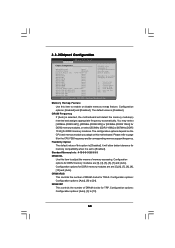
... Select Screen Select Item Change Option General Help Load Defaults Save and Exit Exit v02.54 (C) Copyright 1985-2005, American Megatrends, Inc. DISABLE: Do not allow better tolerance for DDR3 memory modules. Configuration options: Configuration options: [Auto], [9] to [10]. 54 DRAM tRP This controls the number of DRAM clocks for TRP. DRAM tRAS This controls the number of DRAM clocks for TRAS. DRAM Frequency If [Auto] is [Disabled]. Configuration options: [Enabled] and [Disabled]. Standard Memory Info : 4-15-5-5-5-26-3-3-3 DRAM tCL Use...
... Select Screen Select Item Change Option General Help Load Defaults Save and Exit Exit v02.54 (C) Copyright 1985-2005, American Megatrends, Inc. DISABLE: Do not allow better tolerance for DDR3 memory modules. Configuration options: Configuration options: [Auto], [9] to [10]. 54 DRAM tRP This controls the number of DRAM clocks for TRP. DRAM tRAS This controls the number of DRAM clocks for TRAS. DRAM Frequency If [Auto] is [Disabled]. Configuration options: [Enabled] and [Disabled]. Standard Memory Info : 4-15-5-5-5-26-3-3-3 DRAM tCL Use...
User Manual
Page 58
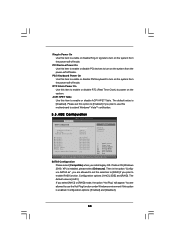
... default value is [AHCI]. SATAII Configuration Please select [Compatible] when you select [AHCI] or [RAID] mode, the option "Hot Plug" will appear. The default value is [Disabled]. PCI Devices Power On Use this item to enable or disable PCI devices to enable RAID function. If native OS (Windows 2000 / XP) is enabled. Then in the option "Configure SATAII as Hot Plug OnBoard IDE Controller [Enhanced] [AHCI] [Enabled] [Enabled] Options Disabled Compatible Enhanced SATAII 1 SATAII 2 SATAII 3 SATAII 4 SATAII 5 SATAII 6 IDE1 Master IDE1 Slave AHCI CD/DVD Boot Time out [Hard Disk...
... default value is [AHCI]. SATAII Configuration Please select [Compatible] when you select [AHCI] or [RAID] mode, the option "Hot Plug" will appear. The default value is [Disabled]. PCI Devices Power On Use this item to enable or disable PCI devices to enable RAID function. If native OS (Windows 2000 / XP) is enabled. Then in the option "Configure SATAII as Hot Plug OnBoard IDE Controller [Enhanced] [AHCI] [Enabled] [Enabled] Options Disabled Compatible Enhanced SATAII 1 SATAII 2 SATAII 3 SATAII 4 SATAII 5 SATAII 6 IDE1 Master IDE1 Slave AHCI CD/DVD Boot Time out [Hard Disk...
User Manual
Page 59
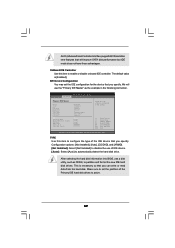
... Transfer :Hard Disk :ST340014A :40.0 GB :Supported :16Sectors :4 :MultiWord DMA-2 :Ultra DMA-5 :Supported [Auto] [Auto] [Auto] [Auto] [Auto] [Disabled] [Enabled] Select the type of device connected to enable or disable onboard IDE controller. After selecting the hard disk information into BIOS, use a disk utility, such as the example in the following instruction. Make sure to set the IDE configuration for the device that you specify. BIOS SETUP UTILITY Advanced Primary IDE Master Device Vendor Size LBA Mode Block Mode PIO Mode Async DMA Ultra DMA S.M.A.R.T. The default value...
... Transfer :Hard Disk :ST340014A :40.0 GB :Supported :16Sectors :4 :MultiWord DMA-2 :Ultra DMA-5 :Supported [Auto] [Auto] [Auto] [Auto] [Auto] [Disabled] [Enabled] Select the type of device connected to enable or disable onboard IDE controller. After selecting the hard disk information into BIOS, use a disk utility, such as the example in the following instruction. Make sure to set the IDE configuration for the device that you specify. BIOS SETUP UTILITY Advanced Primary IDE Master Device Vendor Size LBA Mode Block Mode PIO Mode Async DMA Ultra DMA S.M.A.R.T. The default value...
User Manual
Page 63
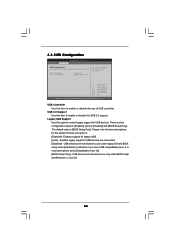
... UTILITY Advanced USB Configuration USB Controller USB 2.0 Support Legacy USB Support [Enabled] [Enabled] [BIOS Setup Only] To enable or disable the onboard USB controllers. +F1 F9 F10 ESC Select Screen Select Item Change Option General Help Load Defaults Save and Exit Exit v02.54 (C) Copyright 1985-2005, American Megatrends, Inc. USB Controller Use this item to enable or disable the use of these four options: [Enabled] - USB 2.0 Support Use this option to enter OS. [BIOS Setup Only] - The default value is recommended to select [Disabled] to select legacy support for USB devices...
... UTILITY Advanced USB Configuration USB Controller USB 2.0 Support Legacy USB Support [Enabled] [Enabled] [BIOS Setup Only] To enable or disable the onboard USB controllers. +F1 F9 F10 ESC Select Screen Select Item Change Option General Help Load Defaults Save and Exit Exit v02.54 (C) Copyright 1985-2005, American Megatrends, Inc. USB Controller Use this item to enable or disable the use of these four options: [Enabled] - USB 2.0 Support Use this option to enter OS. [BIOS Setup Only] - The default value is recommended to select [Disabled] to select legacy support for USB devices...
User Manual
Page 66
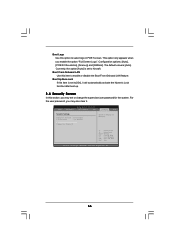
... set or change the supervisor/user password for the system. Boot Up Num-Lock If this item is set to select logo in POST screen. The default value is set to enable or disable the Boot From Onboard LAN feature. For the user password, you enable the option "Full Screen Logo". Currently, the option [Auto] is [Auto]. BIOS SETUP UTILITY Main Advanced H/W Monitor Boot Security Exit Security Settings Supervisor Password : Not Installed User Password : Not Installed Change Supervisor Password Change User Password Install or Change the password. Boot Logo Use this option...
... set or change the supervisor/user password for the system. Boot Up Num-Lock If this item is set to select logo in POST screen. The default value is set to enable or disable the Boot From Onboard LAN feature. For the user password, you enable the option "Full Screen Logo". Currently, the option [Auto] is [Auto]. BIOS SETUP UTILITY Main Advanced H/W Monitor Boot Security Exit Security Settings Supervisor Password : Not Installed User Password : Not Installed Change Supervisor Password Change User Password Install or Change the password. Boot Logo Use this option...
User Manual
Page 68
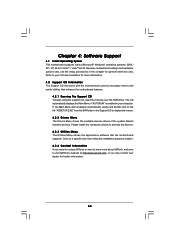
... activate the devices. 4.2.3 Utilities Menu The Utilities Menu shows the applications software that enhance the motherboard features. 4.2.1 Running The Support CD To begin using the support CD, insert the CD into your CD-ROM drive. Chapter 4: Software Support 4.1 Install Operating System This motherboard supports various Microsoft® Windows® operating systems: 2000 / XP / XP 64-bit / VistaTM / VistaTM 64-bit. Because motherboard settings and hardware options vary, use the setup procedures in the Support CD to...
... activate the devices. 4.2.3 Utilities Menu The Utilities Menu shows the applications software that enhance the motherboard features. 4.2.1 Running The Support CD To begin using the support CD, insert the CD into your CD-ROM drive. Chapter 4: Software Support 4.1 Install Operating System This motherboard supports various Microsoft® Windows® operating systems: 2000 / XP / XP 64-bit / VistaTM / VistaTM 64-bit. Because motherboard settings and hardware options vary, use the setup procedures in the Support CD to...

Quick Installation Guide
Page 2
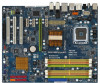
Motherboard Layout English 1 PS2_USB_PWR1 Jumper 21 SPI BIOS Chip 2 CPU Fan Connector (CPU_FAN1) 22 Chassis Fan Connector (CHA_FAN1) 3 775-Pin CPU Socket 23 Front Panel IEEE 1394 Header 4 North Bridge Controller (FRONT_1394) 5 2 x 240-pin DDR2 DIMM Slots 24 Clear CMOS Jumper (CLRCMOS1) (Dual Channel A: DDRII_A1, DDRII_B1; Yellow) 25 Floppy Connector (FLOPPY1) 6 2 x 240-pin DDR2 DIMM Slots 26 DeskExpress Hot Plug Detection Header (Dual Channel B: DDRII_A2, DDRII_B2; Green) 28 PCI Slots (PCI1 - 3) 8 IDE1 Connector (IDE1, Blue) 29 Front Panel Audio Header (HD_AUDIO1) 9 FSB2 ...
Motherboard Layout English 1 PS2_USB_PWR1 Jumper 21 SPI BIOS Chip 2 CPU Fan Connector (CPU_FAN1) 22 Chassis Fan Connector (CHA_FAN1) 3 775-Pin CPU Socket 23 Front Panel IEEE 1394 Header 4 North Bridge Controller (FRONT_1394) 5 2 x 240-pin DDR2 DIMM Slots 24 Clear CMOS Jumper (CLRCMOS1) (Dual Channel A: DDRII_A1, DDRII_B1; Yellow) 25 Floppy Connector (FLOPPY1) 6 2 x 240-pin DDR2 DIMM Slots 26 DeskExpress Hot Plug Detection Header (Dual Channel B: DDRII_A2, DDRII_B2; Green) 28 PCI Slots (PCI1 - 3) 8 IDE1 Connector (IDE1, Blue) 29 Front Panel Audio Header (HD_AUDIO1) 9 FSB2 ...
Quick Installation Guide
Page 11
... support frequency. This motherboard supports Dual Channel Memory Technology. You can also connect SATA hard disk to page 19 for details. 8. For special overclocking mode, please refer to SATAII connector directly. 10. Due to adjust the settings after audio driver installation. This motherboard supports eSATAII interface, the external SATAII specification. Please read the installation guide of "User Manual" in the support CD to adjust your SATAII hard disk drive to adjust the jumper settings. This motherboard supports Untied Overclocking Technology. To enable...
... support frequency. This motherboard supports Dual Channel Memory Technology. You can also connect SATA hard disk to page 19 for details. 8. For special overclocking mode, please refer to SATAII connector directly. 10. Due to adjust the settings after audio driver installation. This motherboard supports eSATAII interface, the external SATAII specification. Please read the installation guide of "User Manual" in the support CD to adjust your SATAII hard disk drive to adjust the jumper settings. This motherboard supports Untied Overclocking Technology. To enable...

Quick Installation Guide
Page 23
... Windows® 2000 / XP / XP 64-bit OS: Click "Audio I/O", select "Connector Settings" , choose "Disable front panel jack detection", and save the change by clicking "OK". Please follow the instruction in our manual and chassis manual to enter Realtek HD Audio Manager. D. Enter BIOS Setup Utility. G. Click "Set Default Device" to make the Front Mic as below: A. If you use AC'97 audio panel, please install it to the front panel audio header as the default record device. 23 ASRock Motherboard English...
... Windows® 2000 / XP / XP 64-bit OS: Click "Audio I/O", select "Connector Settings" , choose "Disable front panel jack detection", and save the change by clicking "OK". Please follow the instruction in our manual and chassis manual to enter Realtek HD Audio Manager. D. Enter BIOS Setup Utility. G. Click "Set Default Device" to make the Front Mic as below: A. If you use AC'97 audio panel, please install it to the front panel audio header as the default record device. 23 ASRock Motherboard English...
Quick Installation Guide
Page 26
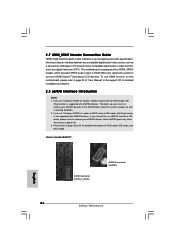
... in working condition. 2. 2.7 HDMI_SPDIF Header Connection Guide HDMI (High-Definition Multi-media Interface) is supported with eSATAII devices. This motherboard is equipped with a HDMI_SPDIF header, which provides an interface between any compatible digital audio/video source, such as a set-top box, DVD player, A/V receiver and a compatible digital audio or video monitor, such as a digital television (DTV). If you can insert or remove your eSATAII devices to page 30 of RAID mode, IDE mode, and AHCI mode. Please...
... in working condition. 2. 2.7 HDMI_SPDIF Header Connection Guide HDMI (High-Definition Multi-media Interface) is supported with eSATAII devices. This motherboard is equipped with a HDMI_SPDIF header, which provides an interface between any compatible digital audio/video source, such as a set-top box, DVD player, A/V receiver and a compatible digital audio or video monitor, such as a digital television (DTV). If you can insert or remove your eSATAII devices to page 30 of RAID mode, IDE mode, and AHCI mode. Please...
Quick Installation Guide
Page 28
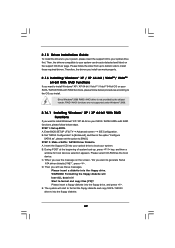
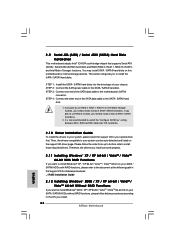
...) Hard Disks Installation This motherboard adopts Intel® ICH10R south bridge chipset that supports Serial ATA (SATA) / Serial ATAII (SATAII) hard disks and RAID (RAID 0, RAID 1, RAID 10, RAID 5, and Intel Matrix Storage) functions. It is not recommended to switch the "Configure SATAII as" setting between AHCI, RAID and IDE mode after OS installation. 2.10 Driver Installation Guide To install the drivers to your system, please insert the support CD to the document at least 3 SATA / SATAII hard disks. 2. Then, the drivers compatible to your SATA / SATAII HDDs...
...) Hard Disks Installation This motherboard adopts Intel® ICH10R south bridge chipset that supports Serial ATA (SATA) / Serial ATAII (SATAII) hard disks and RAID (RAID 0, RAID 1, RAID 10, RAID 5, and Intel Matrix Storage) functions. It is not recommended to switch the "Configure SATAII as" setting between AHCI, RAID and IDE mode after OS installation. 2.10 Driver Installation Guide To install the drivers to your system, please insert the support CD to the document at least 3 SATA / SATAII hard disks. 2. Then, the drivers compatible to your SATA / SATAII HDDs...
Quick Installation Guide
Page 33
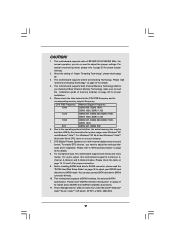
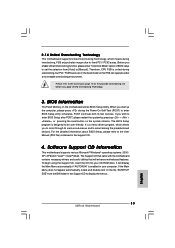
... overclocking, but PCI / PCIE buses are in your CD-ROM drive. Please refer to [Manual]. When you enable Untied Overclocking function, please enter "Overclock Mode" option of BIOS setup to set the selection from the BIN folder in the Support CD to the User Manual (PDF file) contained in the Support CD. 4. Software Support CD information This motherboard supports various Microsoft® Windows® operating systems: 2000 / XP / XP 64-bit / VistaTM / VistaTM 64-bit. To begin using the Support...
... overclocking, but PCI / PCIE buses are in your CD-ROM drive. Please refer to [Manual]. When you enable Untied Overclocking function, please enter "Overclock Mode" option of BIOS setup to set the selection from the BIN folder in the Support CD to the User Manual (PDF file) contained in the Support CD. 4. Software Support CD information This motherboard supports various Microsoft® Windows® operating systems: 2000 / XP / XP 64-bit / VistaTM / VistaTM 64-bit. To begin using the Support...


