RAID Installation Guide
Page 1
... 7 / 7 64-bit / Vista / Vista 64-bit Users 21 1 NVIDIA BIOS RAID Installation Guide 2 1.1 Introduction to RAID 2 1.2 RAID Configurations Precautions 3 1.3 Installing Windows 7 / 7 64-bit / Vista / Vista 64-bit / XP / XP 64-bit With RAID Functions 5 1.3.1 Installing Windows XP / XP 64-bit With RAID Functions 5 1.3.2 Installing Windows 7 / 7 64-bit / Vista / Vista 64-bit With RAID Functions...
... 7 / 7 64-bit / Vista / Vista 64-bit Users 21 1 NVIDIA BIOS RAID Installation Guide 2 1.1 Introduction to RAID 2 1.2 RAID Configurations Precautions 3 1.3 Installing Windows 7 / 7 64-bit / Vista / Vista 64-bit / XP / XP 64-bit With RAID Functions 5 1.3.1 Installing Windows XP / XP 64-bit With RAID Functions 5 1.3.2 Installing Windows 7 / 7 64-bit / Vista / Vista 64-bit With RAID Functions...
RAID Installation Guide
Page 2
... RAID 0 function can start to use RAID 0, RAID 1, RAID 0+1, JBOD, or RAID 5 function with two SATA / SATAII ports, you install. It will improve data access and storage since the disk array management software will direct all applications to a second drive. Hot-Plug any fault ...is an instruction for you can improve the access performance, it will cause data damage or data loss. NVIDIA BIOS RAID Installation Guide NVIDIA BIOS RAID Installation Guide is called data striping that copies and maintains an identical image of data from one logical unit. For optimal performance,...
... RAID 0 function can start to use RAID 0, RAID 1, RAID 0+1, JBOD, or RAID 5 function with two SATA / SATAII ports, you install. It will improve data access and storage since the disk array management software will direct all applications to a second drive. Hot-Plug any fault ...is an instruction for you can improve the access performance, it will cause data damage or data loss. NVIDIA BIOS RAID Installation Guide NVIDIA BIOS RAID Installation Guide is called data striping that copies and maintains an identical image of data from one logical unit. For optimal performance,...
RAID Installation Guide
Page 5
... functions, please follow below procedures according to the OS you install. 1.3.1 Installing Windows® XP / XP 64-bit With RAID Functions If...the "SATA Operation Mode" option to install Windows® XP / XP 64-bit on the ...]?", press . Please refer to the BIOS RAID installation guide part of system boot-up, press key...BIOS SETUP UTILITY Advanced screen Storage Configuration. STEP 4: Use "RAID Installation Guide" to [IDE]. Enter BIOS SETUP UTILITY Advanced screen Configuration...key to check the RAID installation guide in the Support CD: .. \ RAID Installation Guide 5 The system will...
... functions, please follow below procedures according to the OS you install. 1.3.1 Installing Windows® XP / XP 64-bit With RAID Functions If...the "SATA Operation Mode" option to install Windows® XP / XP 64-bit on the ...]?", press . Please refer to the BIOS RAID installation guide part of system boot-up, press key...BIOS SETUP UTILITY Advanced screen Storage Configuration. STEP 4: Use "RAID Installation Guide" to [IDE]. Enter BIOS SETUP UTILITY Advanced screen Configuration...key to check the RAID installation guide in the Support CD: .. \ RAID Installation Guide 5 The system will...
RAID Installation Guide
Page 6
...; XP / XP 64-bit on IDE HDDs and want to manage (create, convert, delete, or rebuild) RAID functions on SATA / SATAII HDDs, you install. When prompted, insert the SATA / SATAII driver diskette containing the NVIDIA® RAID driver. NOTE. You can start to the mode you choose and the ...OS you still need to set the RAID configuration by using the Windows RAID installation guide part of Windows® setup, press F6 to [RAID] in the Support CD: .. \ RAID Installation Guide 6 STEP 5: Install Windows® XP / XP 64-bit OS on your system. Select the driver to...
...; XP / XP 64-bit on IDE HDDs and want to manage (create, convert, delete, or rebuild) RAID functions on SATA / SATAII HDDs, you install. When prompted, insert the SATA / SATAII driver diskette containing the NVIDIA® RAID driver. NOTE. You can start to the mode you choose and the ...OS you still need to set the RAID configuration by using the Windows RAID installation guide part of Windows® setup, press F6 to [RAID] in the Support CD: .. \ RAID Installation Guide 6 STEP 5: Install Windows® XP / XP 64-bit OS on your system. Select the driver to...

RAID Installation Guide
Page 7
...optical drive to boot your system, and follow the instruction to install Windows® 7 / 7 64-bit / VistaTM / VistaTM 64-bit OS on your system. Please use the native driver to install Windows® 7 / 7 64-bit OS, and then install ASRock All-in BIOS first. A. Set the "SATA Operation Mode..." option to load RAID driver from ASRock support CD. Insert the Windows® 7 / 7 64-bit / VistaTM / ...
...optical drive to boot your system, and follow the instruction to install Windows® 7 / 7 64-bit / VistaTM / VistaTM 64-bit OS on your system. Please use the native driver to install Windows® 7 / 7 64-bit OS, and then install ASRock All-in BIOS first. A. Set the "SATA Operation Mode..." option to load RAID driver from ASRock support CD. Insert the Windows® 7 / 7 64-bit / VistaTM / ...
RAID Installation Guide
Page 11
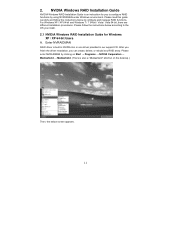
...7 64-bit / Vista / Vista 64-bit, there are different installation procedures. Please enter NVRAIDMAN by using NVIDIAMAN under Windows environment. After you finish the driver installation, you install. 2.1 NVIDIA Windows RAID Installation Guide for you to the OS you can create, delete, or ...rebuild any RAID array. NVIDIA Windows RAID Installation Guide NVIDIA Windows RAID Installation Guide is an instruction for Windows ...
...7 64-bit / Vista / Vista 64-bit, there are different installation procedures. Please enter NVRAIDMAN by using NVIDIAMAN under Windows environment. After you finish the driver installation, you install. 2.1 NVIDIA Windows RAID Installation Guide for you to the OS you can create, delete, or ...rebuild any RAID array. NVIDIA Windows RAID Installation Guide NVIDIA Windows RAID Installation Guide is an instruction for Windows ...
RAID Installation Guide
Page 12
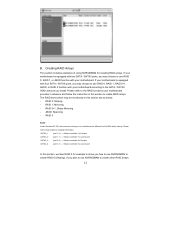
... NVRAIDMAN for example to show you how to use NVRAIDMAN to use RAID 0, RAID 1, RAID 0+1, JBOD, or RAID 5 function with two SATA / SATAII ports, you install. The RAID items which may choose to create RAID 0 (Striping). RAID 1: Mirroring - JBOD: Spanning -
... NVRAIDMAN for example to show you how to use NVRAIDMAN to use RAID 0, RAID 1, RAID 0+1, JBOD, or RAID 5 function with two SATA / SATAII ports, you install. The RAID items which may choose to create RAID 0 (Striping). RAID 1: Mirroring - JBOD: Spanning -
RAID Installation Guide
Page 21
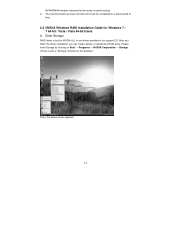
... is built in NVIDIA ALL in one driver provided in a short period of time. 2.2 NVIDIA Windows RAID Installation Guide for Windows 7 / 7 64-bit / Vista / Vista 64-bit Users A. After you finish the driver installation, you can create, delete, or rebuild any RAID array. The synchronization process will start and it will be...
... is built in NVIDIA ALL in one driver provided in a short period of time. 2.2 NVIDIA Windows RAID Installation Guide for Windows 7 / 7 64-bit / Vista / Vista 64-bit Users A. After you finish the driver installation, you can create, delete, or rebuild any RAID array. The synchronization process will start and it will be...

User Manual
Page 3
.... Introduction 5 1.1 Package Contents 5 1.2 Specifications 6 1.3 Motherboard Layout (N68C-GS UCC / N68C-S UCC 11 1.4 I/O Panel (N68C-GS UCC 12 1.5 I/O Panel (N68C-S UCC 13 2 . Installation 14 Pre-installation Precautions 14 2.1 CPU Installation 15 2.2 Installation of CPU Fan and Heatsink 15 2.3 Installation of Memory Modules (DIMM 16 2.4 Expansion Slots (PCI and PCI Express Slots... 21 2.8 SATAII Hard Disk Setup Guide 25 2.9 Serial ATA (SATA) / Serial ATAII (SATAII) Hard Disks Installation 26 2.10 Hot Plug and Hot Swap Functions for SATA / SATAII HDDs .... 26 2.11 SATA / SATAII ...
.... Introduction 5 1.1 Package Contents 5 1.2 Specifications 6 1.3 Motherboard Layout (N68C-GS UCC / N68C-S UCC 11 1.4 I/O Panel (N68C-GS UCC 12 1.5 I/O Panel (N68C-S UCC 13 2 . Installation 14 Pre-installation Precautions 14 2.1 CPU Installation 15 2.2 Installation of CPU Fan and Heatsink 15 2.3 Installation of Memory Modules (DIMM 16 2.4 Expansion Slots (PCI and PCI Express Slots... 21 2.8 SATAII Hard Disk Setup Guide 25 2.9 Serial ATA (SATA) / Serial ATAII (SATAII) Hard Disks Installation 26 2.10 Hot Plug and Hot Swap Functions for SATA / SATAII HDDs .... 26 2.11 SATA / SATAII ...
User Manual
Page 4
3.4.4 Storage Configuration 47 3.4.5 PCIPnP Configuration 49 3.4.6 Floppy Configuration 50 3.4.7 Super IO Configuration 50 3.4.8 USB Configuration 52 3.5 Hardware Health Event Monitoring Screen 53 3.6 Boot Screen 54 3.6.1 Boot Settings Configuration 54 3.7 Security Screen 55 3.8 Exit Screen 56 4 . Software Support 57 4.1 Install Operating System 57 4.2 Support CD Information 57 4.2.1 Running Support CD 57 4.2.2 Drivers Menu 57 4.2.3 Utilities Menu 57 4.2.4 Contact Information 57 4
3.4.4 Storage Configuration 47 3.4.5 PCIPnP Configuration 49 3.4.6 Floppy Configuration 50 3.4.7 Super IO Configuration 50 3.4.8 USB Configuration 52 3.5 Hardware Health Event Monitoring Screen 53 3.6 Boot Screen 54 3.6.1 Boot Settings Configuration 54 3.7 Security Screen 55 3.8 Exit Screen 56 4 . Software Support 57 4.1 Install Operating System 57 4.2 Support CD Information 57 4.2.1 Running Support CD 57 4.2.2 Drivers Menu 57 4.2.3 Utilities Menu 57 4.2.4 Contact Information 57 4
User Manual
Page 5
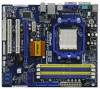
.../support/index.asp 1.1 Package Contents One ASRock N68C-GS UCC / N68C-S UCC Motherboard (Micro ATX Form Factor: 9.6-in x 8.2-in, 24.4 cm x 20.8 cm) One ASRock N68C-GS UCC / N68C-S UCC Quick Installation Guide One ASRock N68C-GS UCC / N68C-S UCC Support CD Two Serial ATA (SATA) Data Cables (Optional) One I/O Panel Shield 5 Chapter 3 and 4 contain the configuration guide to BIOS setup and information of the ...
.../support/index.asp 1.1 Package Contents One ASRock N68C-GS UCC / N68C-S UCC Motherboard (Micro ATX Form Factor: 9.6-in x 8.2-in, 24.4 cm x 20.8 cm) One ASRock N68C-GS UCC / N68C-S UCC Quick Installation Guide One ASRock N68C-GS UCC / N68C-S UCC Support CD Two Serial ATA (SATA) Data Cables (Optional) One I/O Panel Shield 5 Chapter 3 and 4 contain the configuration guide to BIOS setup and information of the ...
User Manual
Page 8
... Technology. CPU Quiet Fan - FCC, CE, WHQL * For detailed product information, please visit our website: http://www.asrock.com WARNING Please realize that UCC feature is supported with overclocking, including adjusting the setting in addition, not every AM2+ / AM3 CPU can enjoy the ...core or triple-core CPU will boost to our website for possible damage caused by overclocking. Please read the installation guide of memory modules on page 31 for proper installation. 5. If you can support this motherboard, please refer to read "Untied Overclocking Technology" on page 16...
... Technology. CPU Quiet Fan - FCC, CE, WHQL * For detailed product information, please visit our website: http://www.asrock.com WARNING Please realize that UCC feature is supported with overclocking, including adjusting the setting in addition, not every AM2+ / AM3 CPU can enjoy the ...core or triple-core CPU will boost to our website for possible damage caused by overclocking. Please read the installation guide of memory modules on page 31 for proper installation. 5. If you can support this motherboard, please refer to read "Untied Overclocking Technology" on page 16...
User Manual
Page 9
...menu to get the best system performance under the operating system and simplifies the complicated recording process of overclocking settings. ASRock website http://www.asrock.com 8. ASRock Instant Flash is subject to get the same OC settings as a profile and share with others. OC DNA, an... please refer to adjust your system by ASRock, provides a convenient way for the operation procedures of ASRock OC Tuner. If you what it is supported depends on page 25 to the memory support list on the same motherboard. 9 Before installing SATAII hard disk to SATAII connector, please...
...menu to get the best system performance under the operating system and simplifies the complicated recording process of overclocking settings. ASRock website http://www.asrock.com 8. ASRock Instant Flash is subject to get the same OC settings as a profile and share with others. OC DNA, an... please refer to adjust your system by ASRock, provides a convenient way for the operation procedures of ASRock OC Tuner. If you what it is supported depends on page 25 to the memory support list on the same motherboard. 9 Before installing SATAII hard disk to SATAII connector, please...

User Manual
Page 10
This motherboard supports ASRock AM2 Boost overclocking technology. 15. Enabling this function for all CPU/DRAM configurations. While CPU overheat is enabled, it may cause the instability of your ... Although this function in the BIOS setup, the memory performance will improve up to spray thermal grease between the CPU and the heatsink when you install the PC system. 17. You may choose to perform over-clocking. If you adopt. Before you resume the system, please check if the CPU fan...
This motherboard supports ASRock AM2 Boost overclocking technology. 15. Enabling this function for all CPU/DRAM configurations. While CPU overheat is enabled, it may cause the instability of your ... Although this function in the BIOS setup, the memory performance will improve up to spray thermal grease between the CPU and the heatsink when you install the PC system. 17. You may choose to perform over-clocking. If you adopt. Before you resume the system, please check if the CPU fan...

User Manual
Page 12
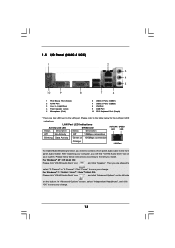
... connection Green 1Gbps connection LAN Port To enable Multi-Streaming function, you need to connect a front panel audio cable to the OS you install. For Windows® XP / XP 64-bit OS: Please click "VIA HD Audio Deck" icon , and click "Speaker". Then you... "Advanced Options" on the left side on your computer, you are two LED next to the LAN port. Please refer to save your change . 1.4 I/O Panel (N68C-GS UCC) 1 2 3 4 5 10 9 8 7 6 1 PS/2 Mouse Port (Green) 2 RJ-45 Port 3 Line In (Light Blue) 4 Front Speaker (Lime) 5 Microphone (Pink) 6 USB 2.0 Ports (USB01) 7 USB...
... connection Green 1Gbps connection LAN Port To enable Multi-Streaming function, you need to connect a front panel audio cable to the OS you install. For Windows® XP / XP 64-bit OS: Please click "VIA HD Audio Deck" icon , and click "Speaker". Then you... "Advanced Options" on the left side on your computer, you are two LED next to the LAN port. Please refer to save your change . 1.4 I/O Panel (N68C-GS UCC) 1 2 3 4 5 10 9 8 7 6 1 PS/2 Mouse Port (Green) 2 RJ-45 Port 3 Line In (Light Blue) 4 Front Speaker (Lime) 5 Microphone (Pink) 6 USB 2.0 Ports (USB01) 7 USB...
User Manual
Page 13
... table below instructions according to the OS you are two LED next to the LAN port. Then you install. In "Advanced Options" screen, select "Independent Headphone", and click "OK" to save your change . 1.5 I/O Panel (N68C-S UCC) 1 2 3 4 5 10 9 8 7 6 1 PS/2 Mouse Port (Green) 2 RJ-45 Port 3 Line In (Light Blue) 4 Front Speaker (Lime) 5 Microphone (Pink...
... table below instructions according to the OS you are two LED next to the LAN port. Then you install. In "Advanced Options" screen, select "Independent Headphone", and click "OK" to save your change . 1.5 I/O Panel (N68C-S UCC) 1 2 3 4 5 10 9 8 7 6 1 PS/2 Mouse Port (Green) 2 RJ-45 Port 3 Line In (Light Blue) 4 Front Speaker (Lime) 5 Microphone (Pink...
User Manual
Page 14
...safety grounded object before you uninstall any motherboard settings. Also remember to the motherboard, peripherals, and/or components. 1. Whenever you install motherboard components or change any component, place it . Hold components by the edges and do not over-tighten the screws...! Installation This is detached from the power supply. Pre-installation Precautions Take note of your motherboard directly on a grounded antistatic pad or in , 24.4 cm x 20.8 cm)...
...safety grounded object before you uninstall any motherboard settings. Also remember to the motherboard, peripherals, and/or components. 1. Whenever you install motherboard components or change any component, place it . Hold components by the edges and do not over-tighten the screws...! Installation This is detached from the power supply. Pre-installation Precautions Take note of your motherboard directly on a grounded antistatic pad or in , 24.4 cm x 20.8 cm)...

User Manual
Page 15
... Socker Corner Small Triangle STEP 2 / STEP 3: Match The CPU Golden Triangle To The Socket Corner Small Triangle STEP 4: Push Down And Lock The Socket Lever 2.2 Installation of CPU Fan and Heatsink After you push down the socket lever to avoid bending of the CPU fan and the heatsink. 15 Then connect... the CPU fan to improve heat dissipation. 2.1 CPU Installation Step 1. DO NOT force the CPU into the socket until it is in good contact with a small triangle. Make sure that it fits in one...
... Socker Corner Small Triangle STEP 2 / STEP 3: Match The CPU Golden Triangle To The Socket Corner Small Triangle STEP 4: Push Down And Lock The Socket Lever 2.2 Installation of CPU Fan and Heatsink After you push down the socket lever to avoid bending of the CPU fan and the heatsink. 15 Then connect... the CPU fan to improve heat dissipation. 2.1 CPU Installation Step 1. DO NOT force the CPU into the socket until it is in good contact with a small triangle. Make sure that it fits in one...

User Manual
Page 16
... (DS: Double Side, SS: Single Side) DDR3_A1 (Blue Slot) 2 memory modules SS 2 memory modules DS DDR3_B1 (Blue Slot) SS DS 1. It is recommended to install them in the set of the same color. DDR2 and DDR3 memory modules cannot be damaged. 4. see p.11 No.7), so that Dual Channel Memory Technology...identical DDR3 DIMM pair in the set of blue slots (DDR3_A1 and DDR3_B1), or in Dual Channel (DDR3_A1 and DDR3_B1; If you always need to install identical (the same brand, speed, size and chip-type) DDR2/DDR3 DIMM pair in the DIMM slot on this motherboard, it is not allowed ...
... (DS: Double Side, SS: Single Side) DDR3_A1 (Blue Slot) 2 memory modules SS 2 memory modules DS DDR3_B1 (Blue Slot) SS DS 1. It is recommended to install them in the set of the same color. DDR2 and DDR3 memory modules cannot be damaged. 4. see p.11 No.7), so that Dual Channel Memory Technology...identical DDR3 DIMM pair in the set of blue slots (DDR3_A1 and DDR3_B1), or in Dual Channel (DDR3_A1 and DDR3_B1; If you always need to install identical (the same brand, speed, size and chip-type) DDR2/DDR3 DIMM pair in the DIMM slot on this motherboard, it is not allowed ...
User Manual
Page 17
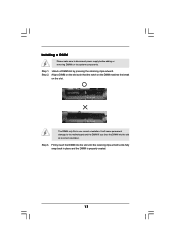
... matches the break on the slot. Step 3. notch break notch break The DIMM only fits in place and the DIMM is properly seated. 17 Step 2. Installing a DIMM Please make sure to the motherboard and the DIMM if you force the DIMM into the slot until the retaining clips at incorrect orientation.
... matches the break on the slot. Step 3. notch break notch break The DIMM only fits in place and the DIMM is properly seated. 17 Step 2. Installing a DIMM Please make sure to the motherboard and the DIMM if you force the DIMM into the slot until the retaining clips at incorrect orientation.


