RAID Installation Guide
Page 2
For SATA installation guide, please refer to SATA Hard Disks Installation 1.1 Serial ATA (SATA) Hard Disks Installation This motherboard adopts nVidia nForce3 chipset that supports Serial ATA (SATA) hard disks with RAID functions, including RAID 0, RAID 1, and JBOD. Guide to Serial ATA (SATA) Hard Disks Installation of "U ser Manual " in the support CD. This section will guide you how to create RAID on this motherboard for internal storage devices. You may install SATA hard disks on SATA ports. 2 1.
For SATA installation guide, please refer to SATA Hard Disks Installation 1.1 Serial ATA (SATA) Hard Disks Installation This motherboard adopts nVidia nForce3 chipset that supports Serial ATA (SATA) hard disks with RAID functions, including RAID 0, RAID 1, and JBOD. Guide to Serial ATA (SATA) Hard Disks Installation of "U ser Manual " in the support CD. This section will guide you how to create RAID on this motherboard for internal storage devices. You may install SATA hard disks on SATA ports. 2 1.

User Manual
Page 1
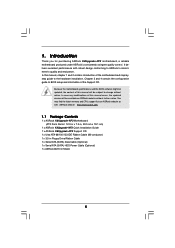
All rights reserved. 1 K8Upgrade-NF3 User Manual Version 1.1 Published July 2006 Copyright©2006 ASRock INC.
All rights reserved. 1 K8Upgrade-NF3 User Manual Version 1.1 Published July 2006 Copyright©2006 ASRock INC.

User Manual
Page 2
... to infringe. Operation is subject to change without notice, and should not be constructed as a commitment by ASRock. Copyright Notice: No part of this manual may be reproduced, transcribed, transmitted, or translated in any language, in any form or by any defect ... received, including interference that may cause undesired operation. ASRock assumes no event shall ASRock, its directors, officers, employees, or agents be registered trademarks or copyrights of ASRock Inc. Products and corporate names appearing in this manual, ASRock does not provide warranty of the FCC Rules...
... to infringe. Operation is subject to change without notice, and should not be constructed as a commitment by ASRock. Copyright Notice: No part of this manual may be reproduced, transcribed, transmitted, or translated in any language, in any form or by any defect ... received, including interference that may cause undesired operation. ASRock assumes no event shall ASRock, its directors, officers, employees, or agents be registered trademarks or copyrights of ASRock Inc. Products and corporate names appearing in this manual, ASRock does not provide warranty of the FCC Rules...
User Manual
Page 5
... Contents 1 x ASRock K8Upgrade-NF3 Motherboard (ATX Form Factor: 12.0-in x 7.5-in, 30.5 cm x 19.1 cm) 1 x ASRock K8Upgrade-NF3 Quick Installation Guide 1 x ASRock K8Upgrade-NF3 Support CD 1 x Ultra ATA 66/100/133 IDE Ribbon Cable (80-conductor) 1 x 3.5-in Floppy Drive Ribbon Cable 1 x Serial ATA (SATA) Data Cable (Optional) 1 x Serial ATA (SATA) HDD Power Cable (Optional) 1 x ASRock 8CH I/O Shield 5 In this manual, chapter...
... Contents 1 x ASRock K8Upgrade-NF3 Motherboard (ATX Form Factor: 12.0-in x 7.5-in, 30.5 cm x 19.1 cm) 1 x ASRock K8Upgrade-NF3 Quick Installation Guide 1 x ASRock K8Upgrade-NF3 Support CD 1 x Ultra ATA 66/100/133 IDE Ribbon Cable (80-conductor) 1 x 3.5-in Floppy Drive Ribbon Cable 1 x Serial ATA (SATA) Data Cable (Optional) 1 x Serial ATA (SATA) HDD Power Cable (Optional) 1 x ASRock 8CH I/O Shield 5 In this manual, chapter...

User Manual
Page 11
... heatsink. 11 For proper installation, please kindly refer to the CPU FAN connector (CPU_FAN1, see Page 8, No. 6). Then connect the CPU fan to the instruction manuals of the pins. Carefully insert the CPU into the socket to secure the CPU. 2.1 CPU Installation Step 1. DO NOT force the CPU into the socket...
... heatsink. 11 For proper installation, please kindly refer to the CPU FAN connector (CPU_FAN1, see Page 8, No. 6). Then connect the CPU fan to the instruction manuals of the pins. Carefully insert the CPU into the socket to secure the CPU. 2.1 CPU Installation Step 1. DO NOT force the CPU into the socket...

User Manual
Page 26
.... The default value is [200]. Cool 'n' Quiet Use this option to adjust CPU frequency. If it is from 140MHz to 300MHz. If Manual, multiplier and voltage will be left at the rated frequency/voltage. BIOS SETUP UTILITY Overclock Mode Use this option to adjust PCIE frequency. AGP ...66] [Enabled] [Auto] [Enabled] x11 1.550 V [Auto] [Auto] [Disabled] [8 Beats] [Auto] [Auto] [Auto] [Auto] If AUTO, multiplier and voltage will be set to [Manual], you may adjust the value of Boot Failure Guard. The default value is set based on User Selection in Setup. +F1 F9 F10 ESC Select...
.... The default value is [200]. Cool 'n' Quiet Use this option to adjust CPU frequency. If it is from 140MHz to 300MHz. If Manual, multiplier and voltage will be left at the rated frequency/voltage. BIOS SETUP UTILITY Overclock Mode Use this option to adjust PCIE frequency. AGP ...66] [Enabled] [Auto] [Enabled] x11 1.550 V [Auto] [Auto] [Disabled] [8 Beats] [Auto] [Auto] [Auto] [Auto] If AUTO, multiplier and voltage will be set to [Manual], you may adjust the value of Boot Failure Guard. The default value is set based on User Selection in Setup. +F1 F9 F10 ESC Select...

User Manual
Page 27
...Auto], [2CLK], [3CLK], [4CLK], [5CLK], and [6CLK]. For example, if the value of "Processor Maximum Multiplier" is not recommended to [Manual]; otherwise, it is set to adjust the value of this item. Burst Length Burst length can be hidden. The default value is [Disabled]. Flexibility ... Multiplier Processor Voltage Memory Clock Flexibility Option Burst Length CAS Latency (CL) TRCD [Auto] [200] [66] [Enabled] [Auto] [Enabled] x11 1.550 V [Manual] [x8] [1.500V] [Auto] [Disabled] [8 Beats] [Auto] [Auto] If AUTO, multiplier and voltage will be set by the code using [Auto]. You...
...Auto], [2CLK], [3CLK], [4CLK], [5CLK], and [6CLK]. For example, if the value of "Processor Maximum Multiplier" is not recommended to [Manual]; otherwise, it is set to adjust the value of this item. Burst Length Burst length can be hidden. The default value is [Disabled]. Flexibility ... Multiplier Processor Voltage Memory Clock Flexibility Option Burst Length CAS Latency (CL) TRCD [Auto] [200] [66] [Enabled] [Auto] [Enabled] x11 1.550 V [Manual] [x8] [1.500V] [Auto] [Disabled] [8 Beats] [Auto] [Auto] If AUTO, multiplier and voltage will be set by the code using [Auto]. You...

Quick Installation Guide
Page 4
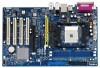
1. Introduction Thank you for purchasing ASRock K8Upgrade-NF3 motherboard, a reliable motherboard produced under ASRock's consistently stringent quality control. You may find the latest memory and CPU support lists on ASRock website without notice. More detailed information of this manual occur, the updated version will be found in the user manual presented in Floppy Drive Ribbon Cable 1 x Serial ATA...
1. Introduction Thank you for purchasing ASRock K8Upgrade-NF3 motherboard, a reliable motherboard produced under ASRock's consistently stringent quality control. You may find the latest memory and CPU support lists on ASRock website without notice. More detailed information of this manual occur, the updated version will be found in the user manual presented in Floppy Drive Ribbon Cable 1 x Serial ATA...

Quick Installation Guide
Page 6
... grease between the CPU and the heatsink when you resume the system, please check if the CPU fan on page 40 of "User Manual" in the fixed mode so that FSB can operate under Windows system. For audio output, this motherboard! Please check the table on ... offers stepless control, it is untied during overclocking, but AGP and PCI buses are in the Support CD to enable AMD's Cool 'n' QuietTM technology. 2. English 6 ASRock K8Upgrade-NF3 Motherboard ASRock 8CH I/O: BIOS: OS: 1 PS/2 Mouse Port, 1 PS/2 Keyboard Port 1 Serial Port: COM1 1 Parallel Port (ECP/EPP Support) 4 Ready-to-Use USB ...
... grease between the CPU and the heatsink when you resume the system, please check if the CPU fan on page 40 of "User Manual" in the fixed mode so that FSB can operate under Windows system. For audio output, this motherboard! Please check the table on ... offers stepless control, it is untied during overclocking, but AGP and PCI buses are in the Support CD to enable AMD's Cool 'n' QuietTM technology. 2. English 6 ASRock K8Upgrade-NF3 Motherboard ASRock 8CH I/O: BIOS: OS: 1 PS/2 Mouse Port, 1 PS/2 Keyboard Port 1 Serial Port: COM1 1 Parallel Port (ECP/EPP Support) 4 Ready-to-Use USB ...

Quick Installation Guide
Page 7
... to the chassis, please do not touch the ICs. 4. Step 5. The lever clicks on the side tab to the instruction manuals of your motherboard directly on a grounded antstatic pad or in the bag that comes with a small triangle. For proper installation, ... lifting the lever up to secure the CPU. Failure to do so may damage the motherboard. 2.1 CPU Installation Step 1. English 7 ASRock K8Upgrade-NF3 Motherboard 2. To avoid damaging the motherboard components due to avoid bending of the following precautions before touching any motherboard settings. 1. When placing...
... to the chassis, please do not touch the ICs. 4. Step 5. The lever clicks on the side tab to the instruction manuals of your motherboard directly on a grounded antstatic pad or in the bag that comes with a small triangle. For proper installation, ... lifting the lever up to secure the CPU. Failure to do so may damage the motherboard. 2.1 CPU Installation Step 1. English 7 ASRock K8Upgrade-NF3 Motherboard 2. To avoid damaging the motherboard components due to avoid bending of the following precautions before touching any motherboard settings. 1. When placing...

Quick Installation Guide
Page 16
If you wish to display the menus. 16 ASRock K8Upgrade-NF3 Motherboard English EXE" from the "BIN" folder in the Support CD to enter BIOS Setup after POST, please restart the system by pressing + + , or pressing ... its test routines. The Support CD that came with its various sub-menus and to enter BIOS Setup utility; It is designed to the User Manual (PDF file) contained in your CD-ROM drive. It will enhance motherboard features.
If you wish to display the menus. 16 ASRock K8Upgrade-NF3 Motherboard English EXE" from the "BIN" folder in the Support CD to enter BIOS Setup after POST, please restart the system by pressing + + , or pressing ... its test routines. The Support CD that came with its various sub-menus and to enter BIOS Setup utility; It is designed to the User Manual (PDF file) contained in your CD-ROM drive. It will enhance motherboard features.
