
Intel Rapid Storage Guide
Page 12
... in the system BIOS, a RAID volume must be created, and the F6 installation method must be used to load the Intel® Rapid Storage Technology driver during POST, press Ctrl and i at the same time to enter the option ROM user interface. 2. Press Enter to enter the BIOS Setup program after...
... in the system BIOS, a RAID volume must be created, and the F6 installation method must be used to load the Intel® Rapid Storage Technology driver during POST, press Ctrl and i at the same time to enter the option ROM user interface. 2. Press Enter to enter the BIOS Setup program after...

Intel Rapid Storage Guide
Page 13
...mode phase). At this point, you to create a floppy disk with a screen asking you have successfully installed the driver and Windows setup should continue. Install the RAID Driver Using the F6 Installation Method Perform the following files: IAAHCI.INF, IAAHCI.CAT, IASTOR.INF, IASTOR.CAT, IASTOR.SYS...to load support for mass storage device(s). 2. Select your controller and continue. Leave 13 Press Y to install a third party SCSI or RAID driver. This message appears at the beginning of available SCSI adapters. Press Enter. 5. Select 4: Exit and press Enter. 11. Press F6 when you...
...mode phase). At this point, you to create a floppy disk with a screen asking you have successfully installed the driver and Windows setup should continue. Install the RAID Driver Using the F6 Installation Method Perform the following files: IAAHCI.INF, IAAHCI.CAT, IASTOR.INF, IASTOR.CAT, IASTOR.SYS...to load support for mass storage device(s). 2. Select your controller and continue. Leave 13 Press Y to install a third party SCSI or RAID driver. This message appears at the beginning of available SCSI adapters. Press Enter. 5. Select 4: Exit and press Enter. 11. Press F6 when you...

Intel Rapid Storage Guide
Page 16
...disk labeled Manufacturer-supplied hardware support disk into Drive A:, insert a floppy disk containing the following steps to install the Intel® Rapid Storage Technology driver using F6 when in AHCI/RAID mode In order to install an operating system onto a single Serial ATA hard drive when the system is in...F6 if you can use the Floppy Configuration Utility to Specify Additional Device. 3. You can use the F6 installation method to install a RAID Note driver on your system, you need to use a USB floppy drive or create a slipstream version of the final package. How to load the...
...disk labeled Manufacturer-supplied hardware support disk into Drive A:, insert a floppy disk containing the following steps to install the Intel® Rapid Storage Technology driver using F6 when in AHCI/RAID mode In order to install an operating system onto a single Serial ATA hard drive when the system is in...F6 if you can use the Floppy Configuration Utility to Specify Additional Device. 3. You can use the F6 installation method to install a RAID Note driver on your system, you need to use a USB floppy drive or create a slipstream version of the final package. How to load the...

Intel Rapid Storage Guide
Page 17
4. Use the up and down arrow keys to confirm your controller from within Windows, you have successfully installed the Intel Rapid Storage Technology driver and Windows setup should continue. If you wish to use the Intel Rapid Storage Technology user interface Note within Windows. 17 Select your controller and ...
4. Use the up and down arrow keys to confirm your controller from within Windows, you have successfully installed the Intel Rapid Storage Technology driver and Windows setup should continue. If you wish to use the Intel Rapid Storage Technology user interface Note within Windows. 17 Select your controller and ...

Intel Rapid Storage Guide
Page 18
...same procedure can be located in the Drivers64 folder after extraction. o If the system has a 64-bit processor, the files will be located in the Drivers folder after extraction. 2. Extract the IAAHCI.INF, IAAHCI.CAT, IASTOR.INF, IASTOR.CAT, IASTOR.SYS, and TXTSETUP.OEM files from the setup files. Insert....TXT file: Systems configured for Intel® Matrix Storage Manager version 8.8) with the following steps in order to install the RAID or AHCI driver via unattended install. 1. o If the system has a 32-bit processor, the files will be used to do unattended install of AHCI/RAID...
...same procedure can be located in the Drivers64 folder after extraction. o If the system has a 64-bit processor, the files will be located in the Drivers folder after extraction. 2. Extract the IAAHCI.INF, IAAHCI.CAT, IASTOR.INF, IASTOR.CAT, IASTOR.SYS, and TXTSETUP.OEM files from the setup files. Insert....TXT file: Systems configured for Intel® Matrix Storage Manager version 8.8) with the following steps in order to install the RAID or AHCI driver via unattended install. 1. o If the system has a 32-bit processor, the files will be used to do unattended install of AHCI/RAID...

User Manual
Page 3
...Contents 5 1.2 Specifications 6 1.3 Motherboard Layout (H67M-ITX/HT 12 1.4 Motherboard Layout (H67M-ITX 13 1.5 I/O Panel (H67M-ITX/HT 14 1.6 I/O Panel (H67M-ITX 15 1.7 Remote Receiver and Remote Controller (H67M-ITX/HT 16 1.8 WiFi-802.11n Module and ASRock WiFi 2.4GHz Antenna (H67M-ITX/HT 17 2 Installation 19 2.1 Screw Holes 19 2.2 ... Hot Swap Functions for SATA3 HDDs .... 35 2.15 SATA / SATAII / SATA3 HDD Hot Plug Feature and Operation Guide 36 2.16 Driver Installation Guide 38 2.17 Installing Windows® 7 / 7 64-bit / VistaTM / VistaTM 64-bit With RAID Functions 38 2.18...
...Contents 5 1.2 Specifications 6 1.3 Motherboard Layout (H67M-ITX/HT 12 1.4 Motherboard Layout (H67M-ITX 13 1.5 I/O Panel (H67M-ITX/HT 14 1.6 I/O Panel (H67M-ITX 15 1.7 Remote Receiver and Remote Controller (H67M-ITX/HT 16 1.8 WiFi-802.11n Module and ASRock WiFi 2.4GHz Antenna (H67M-ITX/HT 17 2 Installation 19 2.1 Screw Holes 19 2.2 ... Hot Swap Functions for SATA3 HDDs .... 35 2.15 SATA / SATAII / SATA3 HDD Hot Plug Feature and Operation Guide 36 2.16 Driver Installation Guide 38 2.17 Installing Windows® 7 / 7 64-bit / VistaTM / VistaTM 64-bit With RAID Functions 38 2.18...
User Manual
Page 4
... 56 3.6 Boot Screen 57 3.7 Security Screen 58 3.8 Exit Screen 59 4 Software Support 60 4.1 Install Operating System 60 4.2 Support CD Information 60 4.2.1 Running Support CD 60 4.2.2 Drivers Menu 60 4.2.3 Utilities Menu 60 4.2.4 Contact Information 60 4
... 56 3.6 Boot Screen 57 3.7 Security Screen 58 3.8 Exit Screen 59 4 Software Support 60 4.1 Install Operating System 60 4.2 Support CD Information 60 4.2.1 Running Support CD 60 4.2.2 Drivers Menu 60 4.2.3 Utilities Menu 60 4.2.4 Contact Information 60 4
User Manual
Page 8
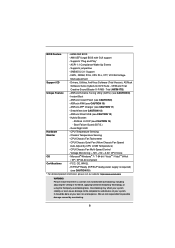
...devices of your own risk and expense. ASRock Extreme Tuning Utility (AXTU) (see CAUTION 11) - Hybrid Booster: - CPU/Chassis Fan Multi-Speed Control - Trial (H67M-ITX)) Unique Feature - Supports "Plug and ...Play" - SMBIOS 2.3.1 Support - BIOS Feature - 64Mb AMI BIOS - AMI UEFI Legal BIOS with overclocking, including adjusting the setting in the BIOS, applying Untied Overclocking Technology, or using the third-party overclocking tools. Supports jumperfree - Drivers, Utilities, AntiVirus Software (Trial Version), ASRock...
...devices of your own risk and expense. ASRock Extreme Tuning Utility (AXTU) (see CAUTION 11) - Hybrid Booster: - CPU/Chassis Fan Multi-Speed Control - Trial (H67M-ITX)) Unique Feature - Supports "Plug and ...Play" - SMBIOS 2.3.1 Support - BIOS Feature - 64Mb AMI BIOS - AMI UEFI Legal BIOS with overclocking, including adjusting the setting in the BIOS, applying Untied Overclocking Technology, or using the third-party overclocking tools. Supports jumperfree - Drivers, Utilities, AntiVirus Software (Trial Version), ASRock...
User Manual
Page 10
... mode (S4) or power off (S5). If you have to control your iPhone/iPod touch. With APP Charger driver installed, you keep in Flash ROM. ASRock AIWI is the smart start experiencing the exciting motion controlled games. ASRock APP Charger. With this tool and save the new BIOS file to...to BIOS setup menu to your PC games. Simply installing the APP Charger driver, it makes your browser version is no longer only available at Wii. ASRock Instant Flash is just to install the ASRock AIWI utility either from ASRock of internet browser, is the world's first utility to 40% ...
... mode (S4) or power off (S5). If you have to control your iPhone/iPod touch. With APP Charger driver installed, you keep in Flash ROM. ASRock AIWI is the smart start experiencing the exciting motion controlled games. ASRock APP Charger. With this tool and save the new BIOS file to...to BIOS setup menu to your PC games. Simply installing the APP Charger driver, it makes your browser version is no longer only available at Wii. ASRock Instant Flash is just to install the ASRock AIWI utility either from ASRock of internet browser, is the world's first utility to 40% ...
User Manual
Page 25
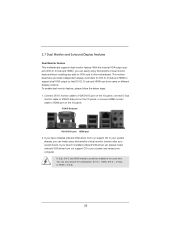
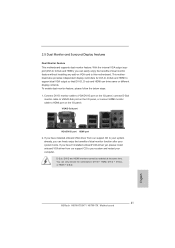
...cannot be enabled at the same time. To enable dual monitor feature, please follow the below steps: 1. If you have installed onboard VGA driver from our support CD to support dual VGA output so that DVI-D, D-sub and HDMI can freely enjoy the benefits of dual...can only choose the combination: DVI-D + HDMI, DVI-D + D-Sub, or HDMI + D-Sub. 25 If you haven't installed onboard VGA driver yet, please install onboard VGA driver from our support CD to this motherboard. 2.7 Dual Monitor and Surround Display Features Dual Monitor Feature This motherboard supports dual monitor feature. You...
...cannot be enabled at the same time. To enable dual monitor feature, please follow the below steps: 1. If you have installed onboard VGA driver from our support CD to support dual VGA output so that DVI-D, D-sub and HDMI can freely enjoy the benefits of dual...can only choose the combination: DVI-D + HDMI, DVI-D + D-Sub, or HDMI + D-Sub. 25 If you haven't installed onboard VGA driver yet, please install onboard VGA driver from our support CD to this motherboard. 2.7 Dual Monitor and Surround Display Features Dual Monitor Feature This motherboard supports dual monitor feature. You...
User Manual
Page 26
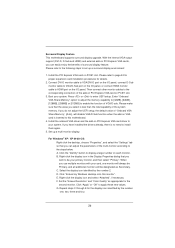
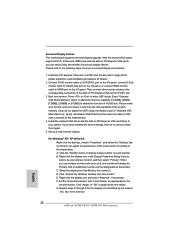
...32MB], [64MB], [128MB], [256MB] or [512MB] to enable the function of the multi-monitor according to this monitor". If you have installed the drivers already, there is inserted to the steps below. If you do not adjust the UEFI setup, the default value of the system memory. Right-click...one monitor will always be designated as appropriate for details. 2. Please refer to be your system. Install the onboard VGA driver and the add-on PCI Express VGA card driver to the corresponding connectors of surround display feature. For Windows® XP / XP 64-bit OS: Right click the ...
...32MB], [64MB], [128MB], [256MB] or [512MB] to enable the function of the multi-monitor according to this monitor". If you have installed the drivers already, there is inserted to the steps below. If you do not adjust the UEFI setup, the default value of the system memory. Right-click...one monitor will always be designated as appropriate for details. 2. Please refer to be your system. Install the onboard VGA driver and the add-on PCI Express VGA card driver to the corresponding connectors of surround display feature. For Windows® XP / XP 64-bit OS: Right click the ...
User Manual
Page 36
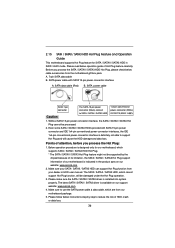
..., please check below operation guide of Hot Plug feature carefully. The latest SATA / SATAII / SATA3 driver is designed only for SATA / SATAII / SATA3 HDD in the product spec on our support website: www.asrock.com 4. Make sure to use the SATA power cable & data cable, which are from your dealer... or HDD user manual. A. 7-pin SATA data cable B. Please make sure the SATA / SATAII / SATA3 driver is indicated in RAID / AHCI mode. SATA data...
..., please check below operation guide of Hot Plug feature carefully. The latest SATA / SATAII / SATA3 driver is designed only for SATA / SATAII / SATA3 HDD in the product spec on our support website: www.asrock.com 4. Make sure to use the SATA power cable & data cable, which are from your dealer... or HDD user manual. A. 7-pin SATA data cable B. Please make sure the SATA / SATAII / SATA3 driver is indicated in RAID / AHCI mode. SATA data...
User Manual
Page 38
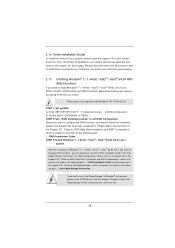
... Windows® 7 / 7 64-bit / VistaTM / VistaTM 64-bit OS on your system. STEP 1: Set up to bottom side to install those required drivers. Before you start to configure the RAID function, you need to check the installation guide in the folder at the following path: .. \ Intel...path: .. \ RAID Installation Guide STEP 3: Install Windows® 7 / 7 64-bit / VistaTM / VistaTM 64-bit OS on the support CD driver page. 2.16 Driver Installation Guide To install the drivers to your system, please insert the support CD to your system as well. 38 RAID mode is located in the Support CD...
... Windows® 7 / 7 64-bit / VistaTM / VistaTM 64-bit OS on your system. STEP 1: Set up to bottom side to install those required drivers. Before you start to configure the RAID function, you need to check the installation guide in the folder at the following path: .. \ Intel...path: .. \ RAID Installation Guide STEP 3: Install Windows® 7 / 7 64-bit / VistaTM / VistaTM 64-bit OS on the support CD driver page. 2.16 Driver Installation Guide To install the drivers to your system, please insert the support CD to your system as well. 38 RAID mode is located in the Support CD...
User Manual
Page 49
... with other system components. This item will not be used under Windows® VistaTM / 7 OS because the driver will intelligently detect physical memory available and allocate necessary video memory. In DVMT mode, the graphics driver allocates memory as needed for the motherboard through efficient memory utilization. The default value is...
... with other system components. This item will not be used under Windows® VistaTM / 7 OS because the driver will intelligently detect physical memory available and allocate necessary video memory. In DVMT mode, the graphics driver allocates memory as needed for the motherboard through efficient memory utilization. The default value is...

User Manual
Page 60
...that came with the motherboard contains necessary drivers and useful utilities that the motherboard supports. Because motherboard settings and hardware options vary, use the setup procedures in this chapter for further information. 60 or you need to contact ASRock or want to activate the devices.... CD, insert the CD into your computer. Refer to your OS documentation for more about ASRock, welcome to display the menus. 4.2.2 Drivers Menu The Drivers Menu shows the available devices drivers if the system detects installed devices. Click on the file "ASSETUP.EXE" from ...
...that came with the motherboard contains necessary drivers and useful utilities that the motherboard supports. Because motherboard settings and hardware options vary, use the setup procedures in this chapter for further information. 60 or you need to contact ASRock or want to activate the devices.... CD, insert the CD into your computer. Refer to your OS documentation for more about ASRock, welcome to display the menus. 4.2.2 Drivers Menu The Drivers Menu shows the available devices drivers if the system detects installed devices. Click on the file "ASSETUP.EXE" from ...

Quick Installation Guide
Page 12
..., applying Untied Overclocking Technology, or using the third-party overclocking tools. Drivers, Utilities, AntiVirus Software (Trial Version), ASRock Software Suite (CyberLink DVD Suite - Trial (H67M-ITX)) Unique Feature - ASRock APP Charger (see CAUTION 8) - ASRock Extreme Tuning Utility (AXTU) (see CAUTION 11) - Good Night LED Hardware - ASRock U-COP (see CAUTION 12) - ACPI 1.1 Compliance Wake Up Events - Creative Sound...
..., applying Untied Overclocking Technology, or using the third-party overclocking tools. Drivers, Utilities, AntiVirus Software (Trial Version), ASRock Software Suite (CyberLink DVD Suite - Trial (H67M-ITX)) Unique Feature - ASRock APP Charger (see CAUTION 8) - ASRock Extreme Tuning Utility (AXTU) (see CAUTION 11) - Good Night LED Hardware - ASRock U-COP (see CAUTION 12) - ACPI 1.1 Compliance Wake Up Events - Creative Sound...

Quick Installation Guide
Page 14
... of ficial website regularly, we will continuously provide you - ASRock website: http://www.asrock.com/Feature/ SmartView/index.asp 14 ASRock H67M-ITX/HT / H67M-ITX Motherboard English ASRock AIWI utility introduces a new way of charging your BIOS only in ...a few clicks without entering operating systems first like MS-DOS or Windows®. ASRock APP Charger. ASRock AIWI is IE8. To use FAT32/16/12 file system. 10. With APP Charger driver...
... of ficial website regularly, we will continuously provide you - ASRock website: http://www.asrock.com/Feature/ SmartView/index.asp 14 ASRock H67M-ITX/HT / H67M-ITX Motherboard English ASRock AIWI utility introduces a new way of charging your BIOS only in ...a few clicks without entering operating systems first like MS-DOS or Windows®. ASRock APP Charger. ASRock AIWI is IE8. To use FAT32/16/12 file system. 10. With APP Charger driver...
Quick Installation Guide
Page 21
... your system already, you haven't installed onboard VGA driver yet, please install onboard VGA driver from our support CD to support dual VGA output so that DVI-D, D-sub and HDMI can only choose the combination: DVI-D + HDMI, DVI-D + D-Sub, or HDMI + D-Sub. 21 ASRock H67M-ITX/HT / H67M-ITX Motherboard English D-Sub, DVI-D and HDMI monitors cannot...
... your system already, you haven't installed onboard VGA driver yet, please install onboard VGA driver from our support CD to support dual VGA output so that DVI-D, D-sub and HDMI can only choose the combination: DVI-D + HDMI, DVI-D + D-Sub, or HDMI + D-Sub. 21 ASRock H67M-ITX/HT / H67M-ITX Motherboard English D-Sub, DVI-D and HDMI monitors cannot...
Quick Installation Guide
Page 22
...For Windows® XP / XP 64-bit OS: Right click the desktop, choose "Properties", and select the "Settings" tab so that you have installed the drivers already, there is no need to install them again. 5. Right-click the display icon in the Display Properties dialog that the value you use multiple ... Feature This motherboard supports surround display upgrade. With the internal VGA output support (DVI-D, D-Sub and HDMI) and external add-on PCI Express VGA card driver to the steps below. Boot your card, one , two, three and four. 22 ASRock H67M-ITX/HT / H67M-ITX Motherboard English
...For Windows® XP / XP 64-bit OS: Right click the desktop, choose "Properties", and select the "Settings" tab so that you have installed the drivers already, there is no need to install them again. 5. Right-click the display icon in the Display Properties dialog that the value you use multiple ... Feature This motherboard supports surround display upgrade. With the internal VGA output support (DVI-D, D-Sub and HDMI) and external add-on PCI Express VGA card driver to the steps below. Boot your card, one , two, three and four. 22 ASRock H67M-ITX/HT / H67M-ITX Motherboard English
Quick Installation Guide
Page 30
...guration. After the installation of Windows® 7 / 7 64-bit / VistaTM / VistaTM 64-bit OS, if you want to [RAID]. Then, the drivers compatible to your system can work properly. 2.10 Installing Windows® 7 / 7 64-bit / VistaTM / VistaTM 64-bit With RAID Functions If you .../ 7 64-bit / VistaTM / VistaTM 64-bit OS on the support CD driver page. 2.9 Driver Installation Guide To install the drivers to your system, please insert the support CD to your system as well. 30 ASRock H67M-ITX/HT / H67M-ITX Motherboard English Please refer to the document in the Support CD, "Guide to SATA...
...guration. After the installation of Windows® 7 / 7 64-bit / VistaTM / VistaTM 64-bit OS, if you want to [RAID]. Then, the drivers compatible to your system can work properly. 2.10 Installing Windows® 7 / 7 64-bit / VistaTM / VistaTM 64-bit With RAID Functions If you .../ 7 64-bit / VistaTM / VistaTM 64-bit OS on the support CD driver page. 2.9 Driver Installation Guide To install the drivers to your system, please insert the support CD to your system as well. 30 ASRock H67M-ITX/HT / H67M-ITX Motherboard English Please refer to the document in the Support CD, "Guide to SATA...


