
User Manual
Page 3
...HD 1080p Blu-ray (BD) / HD-DVD Films in Our Lab Test 11 1.6 Motherboard Layout 12 1.7 ASRock GLAN_8CH I/O 13 1.8 ASRock DVI_DisplayPort Specifications 14 2 Installation 15 2.1 Screw Holes 15 2.2 Pre-installation Precautions 15 2.3 CPU Installation 16 ...Installation of Memory Modules (DIMM 19 2.6 Expansion Slots (PCI and PCI Express Slots 21 2.7 Installation of ASRock DVI_DisplayPort Card 22 2.8 Jumpers Setup 24 2.9 Onboard Headers and Connectors 26 2.10 SATAII Hard Disk Setup Guide... Functions 35 2.16 Untied Overclocking Technology 36 3 BIOS SETUP UTILITY 37 3.1 Introduction 37...
...HD 1080p Blu-ray (BD) / HD-DVD Films in Our Lab Test 11 1.6 Motherboard Layout 12 1.7 ASRock GLAN_8CH I/O 13 1.8 ASRock DVI_DisplayPort Specifications 14 2 Installation 15 2.1 Screw Holes 15 2.2 Pre-installation Precautions 15 2.3 CPU Installation 16 ...Installation of Memory Modules (DIMM 19 2.6 Expansion Slots (PCI and PCI Express Slots 21 2.7 Installation of ASRock DVI_DisplayPort Card 22 2.8 Jumpers Setup 24 2.9 Onboard Headers and Connectors 26 2.10 SATAII Hard Disk Setup Guide... Functions 35 2.16 Untied Overclocking Technology 36 3 BIOS SETUP UTILITY 37 3.1 Introduction 37...
User Manual
Page 5
..., chapter 1 and 2 contain introduction of the Support CD. Because the motherboard specifications and the BIOS software might be available on ASRock website as well. Chapter 1: Introduction Thank you for a 3.5-in , 24.4 cm x 24.4 cm) ASRock G43Twins-FullHD Quick Installation Guide ASRock G43Twins-FullHD Support CD One 80-conductor Ultra ATA 66/100/133 IDE Ribbon Cable One Ribbon...
..., chapter 1 and 2 contain introduction of the Support CD. Because the motherboard specifications and the BIOS software might be available on ASRock website as well. Chapter 1: Introduction Thank you for a 3.5-in , 24.4 cm x 24.4 cm) ASRock G43Twins-FullHD Quick Installation Guide ASRock G43Twins-FullHD Support CD One 80-conductor Ultra ATA 66/100/133 IDE Ribbon Cable One Ribbon...
User Manual
Page 7
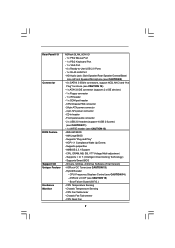
...Line in header - ACPI 1.1 Compliance Wake Up Events - Hybrid Booster: - Boot Failure Guard (B.F.G.) - Chassis Fan Tachometer - AMI Legal BIOS - CPU, DRAM, NB, SB, VTT Voltage Multi-adjustment - Drivers, Utilities, AntiVirus Software (Trial Version) - CPU Temperature Sensing - ...Support - CPU Fan Tachometer - CPU Quiet Fan 7 Rear Panel I/O Connector BIOS Feature Support CD Unique Feature Hardware Monitor ASRock GLAN_8CH I . Supports "Plug and Play" - O. ASRock OC Tuner (see CAUTION 15) - ASRock U-COP (see CAUTION 13) - CPU/Chassis FAN connector - 24 pin ...
...Line in header - ACPI 1.1 Compliance Wake Up Events - Hybrid Booster: - Boot Failure Guard (B.F.G.) - Chassis Fan Tachometer - AMI Legal BIOS - CPU, DRAM, NB, SB, VTT Voltage Multi-adjustment - Drivers, Utilities, AntiVirus Software (Trial Version) - CPU Temperature Sensing - ...Support - CPU Fan Tachometer - CPU Quiet Fan 7 Rear Panel I/O Connector BIOS Feature Support CD Unique Feature Hardware Monitor ASRock GLAN_8CH I . Supports "Plug and Play" - O. ASRock OC Tuner (see CAUTION 15) - ASRock U-COP (see CAUTION 13) - CPU/Chassis FAN connector - 24 pin ...
User Manual
Page 8
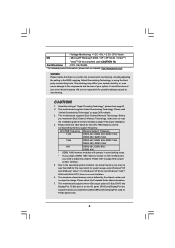
..., DDR2 1066, DDR3 800, DDR3 1066 800 DDR2 667, DDR2 800, DDR3 800 * DDR2 1066 memory modules will operate in the BIOS, applying Untied Overclocking Technology, or using the thirdparty overclocking tools. For Windows® XP 64-bit and Windows® VistaTM 64-bit with...the CPU FSB frequency and its corresponding memory support frequency. FCC, CE, WHQL * For detailed product information, please visit our website: http://www.asrock.com WARNING Please realize that there is no such limitation. 6. CAUTION! 1. Before you need to the components and devices of "Hyper Threading ...
..., DDR2 1066, DDR3 800, DDR3 1066 800 DDR2 667, DDR2 800, DDR3 800 * DDR2 1066 memory modules will operate in the BIOS, applying Untied Overclocking Technology, or using the thirdparty overclocking tools. For Windows® XP 64-bit and Windows® VistaTM 64-bit with...the CPU FSB frequency and its corresponding memory support frequency. FCC, CE, WHQL * For detailed product information, please visit our website: http://www.asrock.com WARNING Please realize that there is no such limitation. 6. CAUTION! 1. Before you need to the components and devices of "Hyper Threading ...
User Manual
Page 10
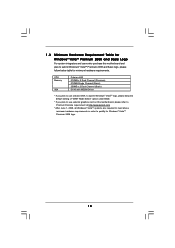
...® VistaTM Premium 2008 and Basic Logo For system integrators and users who purchase this motherboard, please refer to Premium Discrete requirement at http://www.asrock.com * After June 1, 2008, all Windows® VistaTM systems are required to meet above minimum hardware requirements in order to submit Windows® ...* If you plan to use onboard VGA to submit Windows® VistaTM logo, please keep the default setting of "DVMT Mode Select" option under BIOS. * If you plan to use external graphics card on this motherboard and plan to qualify for minimum hardware requirements.
...® VistaTM Premium 2008 and Basic Logo For system integrators and users who purchase this motherboard, please refer to Premium Discrete requirement at http://www.asrock.com * After June 1, 2008, all Windows® VistaTM systems are required to meet above minimum hardware requirements in order to submit Windows® ...* If you plan to use onboard VGA to submit Windows® VistaTM logo, please keep the default setting of "DVMT Mode Select" option under BIOS. * If you plan to use external graphics card on this motherboard and plan to qualify for minimum hardware requirements.
User Manual
Page 11
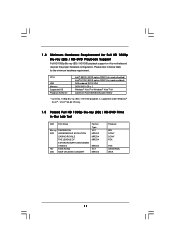
...-DVD playback support on this motherboard requires the proper hardware configuration. CPU VGA Memory Suggested OS Playback Software Intel® E5200 (BIOS option PAVP Lite mode disabled) Intel® E1200 (BIOS option PAVP Lite mode enabled) G43 onboard DX10 VGA DDR2 800 1GB x 2 Windows® VistaTM or Windows® VistaTM 64 CyberLink...
...-DVD playback support on this motherboard requires the proper hardware configuration. CPU VGA Memory Suggested OS Playback Software Intel® E5200 (BIOS option PAVP Lite mode disabled) Intel® E1200 (BIOS option PAVP Lite mode enabled) G43 onboard DX10 VGA DDR2 800 1GB x 2 Windows® VistaTM or Windows® VistaTM 64 CyberLink...

User Manual
Page 12
...DDR3_B1 (64 bit, 240-pin module) DDR3_A1 (64 bit, 240-pin module) DDRII_1 (64 bit, 240-pin module) FSB1333 DDR3 1066 DDR2 1066 CPU_FAN1 G43Twins-FullHD Dual Channel Quad Core CPU USB 2.0 T: USB4 B: USB5 USB 2.0 T: USB2 B: USB3 1 FSB1 IDE1 Top: SIDE SPK Center: REAR SPK Bottom... FRONT Bottom: MIC IN LAN PHY 1 IR1 CD1 1 HD_AUDIO1 AUDIO CODEC Super I/O PCIE1 1 CLRCMOS1 CMOS Battery PCIE2 PCI Express 2.0 8Mb BIOS PCI1 CHA_FAN1 Intel ICH10 SATAII_2 SATAII_1 PANEL1 PLED PWRBTN 1 WIFI/E PCI2 FLOPPY1 COM1 1 SPEAKER1 1 SATAII_5 SATAII_6 1 1 USB6_7 USB8_9 SATAII_3 SATAII_4...
...DDR3_B1 (64 bit, 240-pin module) DDR3_A1 (64 bit, 240-pin module) DDRII_1 (64 bit, 240-pin module) FSB1333 DDR3 1066 DDR2 1066 CPU_FAN1 G43Twins-FullHD Dual Channel Quad Core CPU USB 2.0 T: USB4 B: USB5 USB 2.0 T: USB2 B: USB3 1 FSB1 IDE1 Top: SIDE SPK Center: REAR SPK Bottom... FRONT Bottom: MIC IN LAN PHY 1 IR1 CD1 1 HD_AUDIO1 AUDIO CODEC Super I/O PCIE1 1 CLRCMOS1 CMOS Battery PCIE2 PCI Express 2.0 8Mb BIOS PCI1 CHA_FAN1 Intel ICH10 SATAII_2 SATAII_1 PANEL1 PLED PWRBTN 1 WIFI/E PCI2 FLOPPY1 COM1 1 SPEAKER1 1 SATAII_5 SATAII_6 1 1 USB6_7 USB8_9 SATAII_3 SATAII_4...

User Manual
Page 21
... be onboard VGA. If you install the add-on this motherboard to support DVI-D and DisplayPort, please install ASRock DVI_DisplayPort Card on PCI Express VGA card to PCIE2 (PCIE x16 slot) and adjust the BIOS options "Primary Graphics Adapter" to [Onboard] and "Share Memory" to PCIE2 (PCIE x16 slot), the onboard VGA...
... be onboard VGA. If you install the add-on this motherboard to support DVI-D and DisplayPort, please install ASRock DVI_DisplayPort Card on PCI Express VGA card to PCIE2 (PCIE x16 slot) and adjust the BIOS options "Primary Graphics Adapter" to [Onboard] and "Share Memory" to PCIE2 (PCIE x16 slot), the onboard VGA...

User Manual
Page 24
... p.12, No. 3) 1_2 2_3 Default Clear CMOS Note: CLRCMOS1 allows you update the BIOS. To clear and reset the system parameters to be overclocked very high. When the jumper ... you mount a FSB800 or FSB1066 CPU, and try to overclock to clear the CMOS when you just finish updating the BIOS, you must boot up events. The data in CMOS. Please use a jumper cap to enable +5VSB (standby) for... up the system first, and then shut it requires 2 Amp and higher standby current provided by BIOS setting) you may face the problem, that DRAM frequency will be strapped at higher frequency, so the ...
... p.12, No. 3) 1_2 2_3 Default Clear CMOS Note: CLRCMOS1 allows you update the BIOS. To clear and reset the system parameters to be overclocked very high. When the jumper ... you mount a FSB800 or FSB1066 CPU, and try to overclock to clear the CMOS when you just finish updating the BIOS, you must boot up events. The data in CMOS. Please use a jumper cap to enable +5VSB (standby) for... up the system first, and then shut it requires 2 Amp and higher standby current provided by BIOS setting) you may face the problem, that DRAM frequency will be strapped at higher frequency, so the ...

User Manual
Page 28
... Mic" of audio devices. 1. Connect Ground (GND) to connect them for HD audio panel only. D. If you want to enter Realtek HD Audio Manager. Enter BIOS Setup Utility. G. High Definition Audio supports Jack Sensing, but the panel wire on the lower right hand taskbar to hear your system. 2. Enter Windows system...
... Mic" of audio devices. 1. Connect Ground (GND) to connect them for HD audio panel only. D. If you want to enter Realtek HD Audio Manager. Enter BIOS Setup Utility. G. High Definition Audio supports Jack Sensing, but the panel wire on the lower right hand taskbar to hear your system. 2. Enter Windows system...
User Manual
Page 34
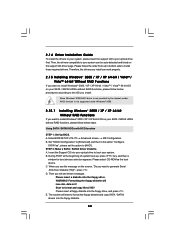
...CD-ROM as ", please set the option to generate Serial ATA driver diskette [YN]?", press . Using SATA / SATAII HDDs with NCQ function STEP 1: Set Up BIOS. When you want to install Windows® 2000 / XP / XP 64-bit / VistaTM / VistaTM 64-bit OS on the support CD driver page. B. ...is not supported under Windows® 2000. 2.15.1 Installing Windows® 2000 / XP / XP 64-bit Without RAID Functions If you install. A. Enter BIOS SETUP UTILITY Advanced screen IDE Configuration. Set "SATAII Configuration" to install Windows® 2000 / XP / XP 64-bit OS on the screen, "Do you ...
...CD-ROM as ", please set the option to generate Serial ATA driver diskette [YN]?", press . Using SATA / SATAII HDDs with NCQ function STEP 1: Set Up BIOS. When you want to install Windows® 2000 / XP / XP 64-bit / VistaTM / VistaTM 64-bit OS on the support CD driver page. B. ...is not supported under Windows® 2000. 2.15.1 Installing Windows® 2000 / XP / XP 64-bit Without RAID Functions If you install. A. Enter BIOS SETUP UTILITY Advanced screen IDE Configuration. Set "SATAII Configuration" to install Windows® 2000 / XP / XP 64-bit OS on the screen, "Do you ...
User Manual
Page 35
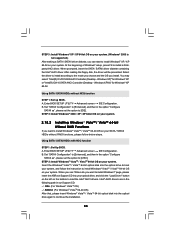
...bit OS on your system. 2.15.2 Installing Windows® VistaTM / VistaTM 64-bit Without RAID Functions If you want to install Windows?" Enter BIOS SETUP UTILITY Advanced screen IDE Configuration. At the beginning of Windows® setup, press F6 to install a thirdparty AHCI driver. After reading the floppy... BIOS SETUP UTILITY Advanced screen IDE Configuration. Insert the Windows® VistaTM / VistaTM 64-bit optical disk into your system. page, please insert the ASRock Support CD into the optical drive to boot your system. STEP 3: Install Windows® XP / XP 64-bit OS on your system. ...
...bit OS on your system. 2.15.2 Installing Windows® VistaTM / VistaTM 64-bit Without RAID Functions If you want to install Windows?" Enter BIOS SETUP UTILITY Advanced screen IDE Configuration. At the beginning of Windows® setup, press F6 to install a thirdparty AHCI driver. After reading the floppy... BIOS SETUP UTILITY Advanced screen IDE Configuration. Insert the Windows® VistaTM / VistaTM 64-bit optical disk into your system. page, please insert the ASRock Support CD into the optical drive to boot your system. STEP 3: Install Windows® XP / XP 64-bit OS on your system. ...

User Manual
Page 36
A. B. Before you apply Untied Overclocking Technology. 36 Enter BIOS SETUP UTILITY Advanced screen IDE Configuration. STEP 2: Install Windows® VistaTM / VistaTM 64-bit OS on your system. 2 . 1 6 Untied Overclocking Technology This motherboard supports Untied ... selection from [Auto] to the warning on page 8 for the possible overclocking risk before you enable Untied Overclocking function, please enter "Overclock Mode" option of BIOS setup to set the option to [IDE]. Therefore, CPU FSB is untied during overclocking, FSB enjoys better margin due to [Enhanced], and then in the...
A. B. Before you apply Untied Overclocking Technology. 36 Enter BIOS SETUP UTILITY Advanced screen IDE Configuration. STEP 2: Install Windows® VistaTM / VistaTM 64-bit OS on your system. 2 . 1 6 Untied Overclocking Technology This motherboard supports Untied ... selection from [Auto] to the warning on page 8 for the possible overclocking risk before you enable Untied Overclocking function, please enter "Overclock Mode" option of BIOS setup to set the option to [IDE]. Therefore, CPU FSB is untied during overclocking, FSB enjoys better margin due to [Enhanced], and then in the...

User Manual
Page 37
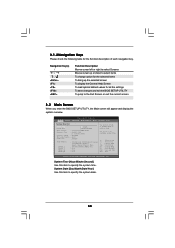
... reference purpose only, and they may also restart by pressing the reset button on . You may not exactly match what you wish to enter the BIOS SETUP UTILITY after POST, restart the system by pressing + + , or by turning the system off and then back on the system chassis. If you see... press to locate and load the Operating System Security To set up the default system device to get into the sub screen. 37 Because the BIOS software is constantly being updated, the following selections: Main To set up the system time/date information Advanced To set up the advanced...
... reference purpose only, and they may also restart by pressing the reset button on . You may not exactly match what you wish to enter the BIOS SETUP UTILITY after POST, restart the system by pressing + + , or by turning the system off and then back on the system chassis. If you see... press to locate and load the Operating System Security To set up the default system device to get into the sub screen. 37 Because the BIOS software is constantly being updated, the following selections: Main To set up the system time/date information Advanced To set up the advanced...
User Manual
Page 38
... UTILITY Main Smart Advanced H/W Monitor Boot Security Exit System Overview System Time System Date [14:00:09] [Thu 07/10/2008] BIOS Version : G43Twins-FullHD P1.00 Processor Type : Intel(R) CPU @ 2.13GHz (64bit) Processor Speed : 2133MHz Microcode Update : 6F4/0 Cache Size : 2048KB Total Memory DDRII_1 DDRII_2 DDR3_A1 DDR3_B1 :... Inc. Use [+] or [-] to select a field. 3.1.2Navigation Keys Please check the following table for all the settings To save changes and exit the BIOS SETUP UTILITY To jump to the Exit Screen or exit the current screen 3.2 Main Screen When you enter the...
... UTILITY Main Smart Advanced H/W Monitor Boot Security Exit System Overview System Time System Date [14:00:09] [Thu 07/10/2008] BIOS Version : G43Twins-FullHD P1.00 Processor Type : Intel(R) CPU @ 2.13GHz (64bit) Processor Speed : 2133MHz Microcode Update : 6F4/0 Cache Size : 2048KB Total Memory DDRII_1 DDRII_2 DDR3_A1 DDR3_B1 :... Inc. Use [+] or [-] to select a field. 3.1.2Navigation Keys Please check the following table for all the settings To save changes and exit the BIOS SETUP UTILITY To jump to the Exit Screen or exit the current screen 3.2 Main Screen When you enter the...

User Manual
Page 39
... Smart screen, you select this option, it will pop-out the following message, "Save configuration changes and exit setup?" Load BIOS Defaults Load BIOS default values for this operation. 39 F3 key can be used for this operation. Load Performance Setup AHCI Mode This performance setup...If system boot failure occurs after saving the changes. F9 key can load the BIOS setup according to your requirements. Load Power Saving Setup Default Load power saving setup default. BIOS SETUP UTILITY Main Smart Advanced H/W Monitor Boot Security Exit Smart Settings Save Changes and...
... Smart screen, you select this option, it will pop-out the following message, "Save configuration changes and exit setup?" Load BIOS Defaults Load BIOS default values for this operation. 39 F3 key can be used for this operation. Load Performance Setup AHCI Mode This performance setup...If system boot failure occurs after saving the changes. F9 key can load the BIOS setup according to your requirements. Load Power Saving Setup Default Load power saving setup default. BIOS SETUP UTILITY Main Smart Advanced H/W Monitor Boot Security Exit Smart Settings Save Changes and...
User Manual
Page 40
BIOS SETUP UTILITY Main Smart Advanced H/W Monitor Boot Security Exit Advanced Settings Options for CPU WARNING : Setting wrong values in the following items: CPU Configuration, Chipset ... enable the overclocking function when your CPU is heavy loaded. 40 3.4 Advanced Screen In this section, you may cause the system to malfunction. 3.4.1 CPU Configuration BIOS SETUP UTILITY Advanced CPU Configuration Overclock Mode CPU Frequency (MHz) PCIE Frequency (MHz) Boot Failure Guard Spread Spectrum [Auto] [266] [100] [Enabled] [Auto] Ratio Status...
BIOS SETUP UTILITY Main Smart Advanced H/W Monitor Boot Security Exit Advanced Settings Options for CPU WARNING : Setting wrong values in the following items: CPU Configuration, Chipset ... enable the overclocking function when your CPU is heavy loaded. 40 3.4 Advanced Screen In this section, you may cause the system to malfunction. 3.4.1 CPU Configuration BIOS SETUP UTILITY Advanced CPU Configuration Overclock Mode CPU Frequency (MHz) PCIE Frequency (MHz) Boot Failure Guard Spread Spectrum [Auto] [266] [100] [Enabled] [Auto] Ratio Status...

User Manual
Page 42
...]. Please refer to enable powersavings. If you adopt on this motherboard. Please note that enabling this item to [Disable] if above issue occurs. 3.4.2 Chipset Configuration BIOS SETUP UTILITY Advanced Chipset Configuration Memory Remap Feature [Disabled] DRAM Frequency [Auto] Flexibility Option [Disabled] Standard Memory Info : 4-15-5-5-5-26-3-3-3 DRAM tCL [Auto] DRAM tRAS...
...]. Please refer to enable powersavings. If you adopt on this motherboard. Please note that enabling this item to [Disable] if above issue occurs. 3.4.2 Chipset Configuration BIOS SETUP UTILITY Advanced Chipset Configuration Memory Remap Feature [Disabled] DRAM Frequency [Auto] Flexibility Option [Disabled] Standard Memory Info : 4-15-5-5-5-26-3-3-3 DRAM tCL [Auto] DRAM tRAS...

User Manual
Page 46
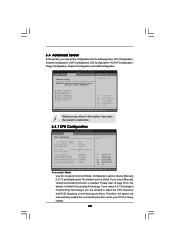
... power-soft-off mode. Repost Video on STR Resume This feature allows you set the power state after an unexpected AC/power loss. 3.4.3 ACPI Configuration BIOS SETUP UTILITY Advanced ACPI Configuration Suspend To RAM Repost Video on STR Resume Check Ready Bit Restore on STR resume. (STR refers to suspend to...
... power-soft-off mode. Repost Video on STR Resume This feature allows you set the power state after an unexpected AC/power loss. 3.4.3 ACPI Configuration BIOS SETUP UTILITY Advanced ACPI Configuration Suspend To RAM Repost Video on STR Resume Check Ready Bit Restore on STR resume. (STR refers to suspend to...

User Manual
Page 47
... [Disabled]. SATAII Configuration Please select [Compatible] when you install legacy OS. ACPI HPET Table Use this item to submit Windows® VistaTM certification. 3.4.4 IDE Configuration BIOS SETUP UTILITY Advanced IDE Configuration SATAII Configuration Configure SATAII as ", you are allowed to [AHCI] or [IDE] mode.
... [Disabled]. SATAII Configuration Please select [Compatible] when you install legacy OS. ACPI HPET Table Use this item to submit Windows® VistaTM certification. 3.4.4 IDE Configuration BIOS SETUP UTILITY Advanced IDE Configuration SATAII Configuration Configure SATAII as ", you are allowed to [AHCI] or [IDE] mode.


