User Manual
Page 2
... only for backup purpose, without written consent of documentation by ASRock. Products and corporate names appearing in this documentation may be liable for any errors or omissions that may appear in this motherboard contains Perchlorate, a toxic substance controlled in the United States ... error in any form or by the California Legislature. CALIFORNIA, USA ONLY The Lithium battery adopted on this documentation. ASRock assumes no event shall ASRock, its directors, officers, employees, or agents be reproduced, transcribed, transmitted, or translated in any language, in the...
... only for backup purpose, without written consent of documentation by ASRock. Products and corporate names appearing in this documentation may be liable for any errors or omissions that may appear in this motherboard contains Perchlorate, a toxic substance controlled in the United States ... error in any form or by the California Legislature. CALIFORNIA, USA ONLY The Lithium battery adopted on this documentation. ASRock assumes no event shall ASRock, its directors, officers, employees, or agents be reproduced, transcribed, transmitted, or translated in any language, in the...

User Manual
Page 3
Contents Chapter 1 Introduction 1 1.1 Package Contents 1 1.2 Specifications 2 1.3 Unique Features 6 1.4 Motherboard Layout 9 1.5 I/O Panel 11 Chapter 2 Installation 13 2.1 Installing the CPU 14 2.2 Installing the CPU Fan and Heatsink 17 2.3 Installing Memory Modules (DIMM) 18 2.4 Expansion Slots (PCI ...
Contents Chapter 1 Introduction 1 1.1 Package Contents 1 1.2 Specifications 2 1.3 Unique Features 6 1.4 Motherboard Layout 9 1.5 I/O Panel 11 Chapter 2 Installation 13 2.1 Installing the CPU 14 2.2 Installing the CPU Fan and Heatsink 17 2.3 Installing Memory Modules (DIMM) 18 2.4 Expansion Slots (PCI ...
User Manual
Page 5
... related to this documentation will be subject to quality and endurance. ASRock website http://www.asrock.com. 1.1 Package Contents • ASRock B85M-ITX Motherboard (Mini-ITX Form Factor) • ASRock B85M-ITX Quick Installation Guide • ASRock B85M-ITX Support CD • 2 x Serial ATA (SATA) Data Cables (Optional) • 1 x I/O Panel Shield 1 English B85M-ITX Chapter 1 Introduction Thank you are using. In this documentation occur, the...
... related to this documentation will be subject to quality and endurance. ASRock website http://www.asrock.com. 1.1 Package Contents • ASRock B85M-ITX Motherboard (Mini-ITX Form Factor) • ASRock B85M-ITX Quick Installation Guide • ASRock B85M-ITX Support CD • 2 x Serial ATA (SATA) Data Cables (Optional) • 1 x I/O Panel Shield 1 English B85M-ITX Chapter 1 Introduction Thank you are using. In this documentation occur, the...
User Manual
Page 11
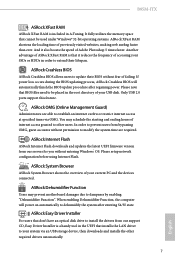
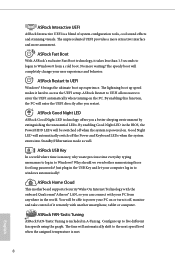
...finish the BIOS update procedure after entering S4/S5 state. ASRock OMG (Online Management Guard) Administrators are required. You may prevent motherboard damages due to update their lifespan. B85M-ITX ASRock XFast RAM ASRock XFast RAM is included in the root directory of your current... PC and the devices connected. ASRock Dehumidifier Function Users may schedule the starting and...
...finish the BIOS update procedure after entering S4/S5 state. ASRock OMG (Online Management Guard) Administrators are required. You may prevent motherboard damages due to update their lifespan. B85M-ITX ASRock XFast RAM ASRock XFast RAM is included in the root directory of your current... PC and the devices connected. ASRock Dehumidifier Function Users may schedule the starting and...
User Manual
Page 12
... UEFI is a blend of it takes less than 1.5 seconds to logon to Windows? ASRock Fast Boot With ASRock's exclusive Fast Boot technology, it remotely with your user experience and behavior. ASRock Home Cloud This motherboard supports Security Wake On Internet Technology with the onboard Qualcomm® Atheros® LAN, so you a better sleeping environment...
... UEFI is a blend of it takes less than 1.5 seconds to logon to Windows? ASRock Fast Boot With ASRock's exclusive Fast Boot technology, it remotely with your user experience and behavior. ASRock Home Cloud This motherboard supports Security Wake On Internet Technology with the onboard Qualcomm® Atheros® LAN, so you a better sleeping environment...
User Manual
Page 13
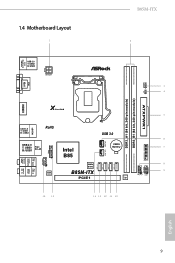
1.4 Motherboard Layout 1 B85M-ITX 2 PS2 Keyboard /Mouse USB 2.0 T: USB2 B: USB3 ATX12V1 CLRCMOS1 1 3 4 DVI VGA1 CI1 1 DDR3_A1 (64 bit, 240-pin module) DDR3_B1 (64 bit, 240-pin module) AT X P W R 1 HDMI1 X ... USB 2.0 T: USB0 B: USB1 Top: RJ-45 TPMS1 Top: CTR BASS Center: REAR SPK Top: LINE IN Center: FRONT AUDIO CODEC HD_AUDIO1 1 1 Intel B85 64Mb BIOS B85M-ITX PCIE1 SATA_3_3 SATA_3_2 SATA_3_1 SATA_3_0 PLED PWRBTN 1 HDLED RESET CHA_FAN1 CMOS Battery 7 USB3_5_6 8 9 Super I/O 1 USB_10_11 PANEL1 Bottom: MIC IN 16 15 14 13 12 11...
1.4 Motherboard Layout 1 B85M-ITX 2 PS2 Keyboard /Mouse USB 2.0 T: USB2 B: USB3 ATX12V1 CLRCMOS1 1 3 4 DVI VGA1 CI1 1 DDR3_A1 (64 bit, 240-pin module) DDR3_B1 (64 bit, 240-pin module) AT X P W R 1 HDMI1 X ... USB 2.0 T: USB0 B: USB1 Top: RJ-45 TPMS1 Top: CTR BASS Center: REAR SPK Top: LINE IN Center: FRONT AUDIO CODEC HD_AUDIO1 1 1 Intel B85 64Mb BIOS B85M-ITX PCIE1 SATA_3_3 SATA_3_2 SATA_3_1 SATA_3_0 PLED PWRBTN 1 HDLED RESET CHA_FAN1 CMOS Battery 7 USB3_5_6 8 9 Super I/O 1 USB_10_11 PANEL1 Bottom: MIC IN 16 15 14 13 12 11...
User Manual
Page 17
...; Make sure to the chassis, please do so may damage the motherboard. 13 Chapter 2 Installation This is an Mini-ITX form factor motherboard. Before you install motherboard components or change any components, place them on a carpet. Pre-installation Precautions Take note of your motherboard directly on a grounded anti-static pad or in the bag that...
...; Make sure to the chassis, please do so may damage the motherboard. 13 Chapter 2 Installation This is an Mini-ITX form factor motherboard. Before you install motherboard components or change any components, place them on a carpet. Pre-installation Precautions Take note of your motherboard directly on a grounded anti-static pad or in the bag that...
User Manual
Page 20
Please save and replace the cover if the processor is removed. The cover must be placed if you wish to return the motherboard for after service. 16 English
Please save and replace the cover if the processor is removed. The cover must be placed if you wish to return the motherboard for after service. 16 English
User Manual
Page 22
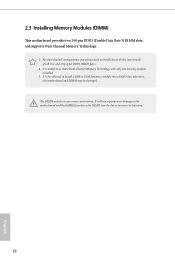
It is not allowed to the motherboard and the DIMM if you always need to activate Dual Channel Memory Technology with only one correct orientation. It is unable to install identical (the .... 18 English The DIMM only fits in one memory module installed. 3. 2.3 Installing Memory Modules (DIMM) This motherboard provides two 240-pin DDR3 (Double Data Rate 3) DIMM slots, and supports Dual Channel Memory Technology. 1. otherwise, this motherboard and DIMM may be damaged. For dual channel configuration, you force the DIMM into a DDR3 slot;
It is not allowed to the motherboard and the DIMM if you always need to activate Dual Channel Memory Technology with only one correct orientation. It is unable to install identical (the .... 18 English The DIMM only fits in one memory module installed. 3. 2.3 Installing Memory Modules (DIMM) This motherboard provides two 240-pin DDR3 (Double Data Rate 3) DIMM slots, and supports Dual Channel Memory Technology. 1. otherwise, this motherboard and DIMM may be damaged. For dual channel configuration, you force the DIMM into a DDR3 slot;

User Manual
Page 24
Please read the documentation of the expansion card and make sure that the power supply is switched off or the power cord is unplugged. 2.4 Expansion Slots (PCI and PCI Express Slots) There is used for the card before you start the installation. PCIe slots: PCIE1 (PCIe 3.0 x16 slot) is 1 PCI Express slot on this motherboard. Before installing an expansion card, please make necessary hardware settings for PCI Express x16 lane width graphics cards. 20 English
Please read the documentation of the expansion card and make sure that the power supply is switched off or the power cord is unplugged. 2.4 Expansion Slots (PCI and PCI Express Slots) There is used for the card before you start the installation. PCIe slots: PCIE1 (PCIe 3.0 x16 slot) is 1 PCI Express slot on this motherboard. Before installing an expansion card, please make necessary hardware settings for PCI Express x16 lane width graphics cards. 20 English
User Manual
Page 26
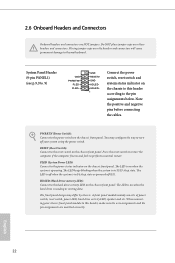
... state. The LED is on the chassis front panel. Do NOT place jumper caps over the headers and connectors will cause permanent damage to the motherboard. Placing jumper caps over these headers and connectors. PLED (System Power LED): Connect to the reset switch on when the hard drive is operating. HDLED...
... state. The LED is on the chassis front panel. Do NOT place jumper caps over the headers and connectors will cause permanent damage to the motherboard. Placing jumper caps over these headers and connectors. PLED (System Power LED): Connect to the reset switch on when the hard drive is operating. HDLED...

User Manual
Page 27
... GND P+6 P-6 USB_PWR 1 Besides two USB 2.0 ports on the I /O panel, there are one header on this motherboard. GND IntA_PB_SSTX+ IntA_PB_SSTX- Vbus IntA_PA_D+ IntA_PA_DGND IntA_PA_SSTX+ IntA_PA_SSTXGND IntA_PA_SSRX+ IntA_PA_SSRXVbus Besides four USB 3.0 ports on the I /O panel, there are ...motherboard. GND IntA_PB_SSRX+ IntA_PB_SSRX- Front Panel Audio Header GN D (9-pin HD_AUDIO1) (see p.9, No. 13) SATA3_3 SATA3_2 SATA3_1 SATA3_0 These four SATA3 connectors support SATA data cables for connecting audio devices MIC2_R MIC2_L to 6.0 Gb/s data transfer rate. B85M-ITX...
... GND P+6 P-6 USB_PWR 1 Besides two USB 2.0 ports on the I /O panel, there are one header on this motherboard. GND IntA_PB_SSTX+ IntA_PB_SSTX- Vbus IntA_PA_D+ IntA_PA_DGND IntA_PA_SSTX+ IntA_PA_SSTXGND IntA_PA_SSRX+ IntA_PA_SSRXVbus Besides four USB 3.0 ports on the I /O panel, there are ...motherboard. GND IntA_PB_SSRX+ IntA_PB_SSRX- Front Panel Audio Header GN D (9-pin HD_AUDIO1) (see p.9, No. 13) SATA3_3 SATA3_2 SATA3_1 SATA3_0 These four SATA3 connectors support SATA data cables for connecting audio devices MIC2_R MIC2_L to 6.0 Gb/s data transfer rate. B85M-ITX...
User Manual
Page 28
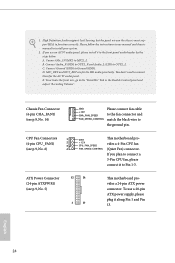
... and Audio_L (LIN) to Ground (GND). Chassis Fan Connector (4-pin CHA_FAN1) (see p.9, No. 6) 4 GN D + 12V CPU_ FAN_SPEED FAN_SPEED_CONTROL This motherboard provides a 4-Pin CPU fan (Quiet Fan) connector. To use an AC'97 audio panel, please install it along Pin 1 and Pin 13. Please ...don't need to Pin 1-3. Connect Ground (GND) to OUT2_L. ATX Power Connector (24-pin ATXPWR1) (see p.9, No. 5) 12 24 1 13 This motherboard provides a 24-pin ATX power connector. C. D. 1. Connect Mic_IN (MIC) to function correctly. English 24 To activate the front mic, go to the ...
... and Audio_L (LIN) to Ground (GND). Chassis Fan Connector (4-pin CHA_FAN1) (see p.9, No. 6) 4 GN D + 12V CPU_ FAN_SPEED FAN_SPEED_CONTROL This motherboard provides a 4-Pin CPU fan (Quiet Fan) connector. To use an AC'97 audio panel, please install it along Pin 1 and Pin 13. Please ...don't need to Pin 1-3. Connect Ground (GND) to OUT2_L. ATX Power Connector (24-pin ATXPWR1) (see p.9, No. 5) 12 24 1 13 This motherboard provides a 24-pin ATX power connector. C. D. 1. Connect Mic_IN (MIC) to function correctly. English 24 To activate the front mic, go to the ...

User Manual
Page 29
TPM Header (17-pin TPMS1) (see p.9, No. 4) GND Signal This motherboard supports 1 CASE OPEN detection feature that detects if the chassis cove has been removed. A TPM system also helps enhance network security, protects digital ...#_L CK_33M_TPM 1 This connector supports Trusted Platform Module (TPM) system, which can securely store keys, digital certificates, passwords, and data. B85M-ITX ATX 12V Power Connector (8-pin ATX12V1) (see p.9, No. 1) This motherboard provides an 8-pin ATX 12V power connector. To use a 4-pin ATX power supply, please plug it along Pin 1 and Pin 5....
TPM Header (17-pin TPMS1) (see p.9, No. 4) GND Signal This motherboard supports 1 CASE OPEN detection feature that detects if the chassis cove has been removed. A TPM system also helps enhance network security, protects digital ...#_L CK_33M_TPM 1 This connector supports Trusted Platform Module (TPM) system, which can securely store keys, digital certificates, passwords, and data. B85M-ITX ATX 12V Power Connector (8-pin ATX12V1) (see p.9, No. 1) This motherboard provides an 8-pin ATX 12V power connector. To use a 4-pin ATX power supply, please plug it along Pin 1 and Pin 5....
User Manual
Page 30
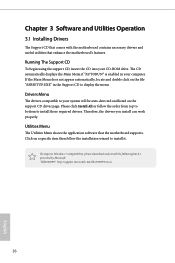
Chapter 3 Software and Utilities Operation 3.1 Installing Drivers The Support CD that comes with the motherboard contains necessary drivers and useful utilities that the motherboard supports. If the Main Menu does not appear automatically, locate and double click on the file "ASRSETUP.EXE" in your computer....drivers. Therefore, the drivers you install can work properly. Utilities Menu The Utilities Menu shows the application software that enhance the motherboard's features. To improve Windows 7 compatibility, please download and install the following hot fix provided by Microsoft.
Chapter 3 Software and Utilities Operation 3.1 Installing Drivers The Support CD that comes with the motherboard contains necessary drivers and useful utilities that the motherboard supports. If the Main Menu does not appear automatically, locate and double click on the file "ASRSETUP.EXE" in your computer....drivers. Therefore, the drivers you install can work properly. Utilities Menu The Utilities Menu shows the application software that enhance the motherboard's features. To improve Windows 7 compatibility, please download and install the following hot fix provided by Microsoft.

User Manual
Page 33
Please set a hotkey for overclocking the system. OC Tweaker Configurations for switching between the primary and secondary screen without replugging the connectors every time. Enable this function and configure the period of time until the computer powers on, and the duration of the dehumidifying process. System Info View information about the system. 29 English B85M-ITX Dehumidifier Prevent motherboard damages due to one monitor and toggle between the two devices. HDMI-IN Connect two different devices to dampness.
Please set a hotkey for overclocking the system. OC Tweaker Configurations for switching between the primary and secondary screen without replugging the connectors every time. Enable this function and configure the period of time until the computer powers on, and the duration of the dehumidifying process. System Info View information about the system. 29 English B85M-ITX Dehumidifier Prevent motherboard damages due to one monitor and toggle between the two devices. HDMI-IN Connect two different devices to dampness.
User Manual
Page 35
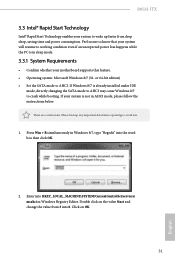
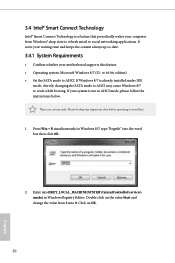
...below. Click on the value Start and change the value from deep sleep, saving time and power consumption. Press Win + R simultaneously in Windows Registry Editor. B85M-ITX 3.3 Intel® Rapid Start Technology Intel® Rapid Start Technology enables your system to AHCI. If Windows 8/7 is already installed under IDE mode, directly ... to working condition even if an unexpected power loss happens while the PC is not in sleep mode. 3.3.1 System Requirements • Confirm whether your motherboard supports this feature. • Operating system: Microsoft Windows 8/7 (32-
...below. Click on the value Start and change the value from deep sleep, saving time and power consumption. Press Win + R simultaneously in Windows Registry Editor. B85M-ITX 3.3 Intel® Rapid Start Technology Intel® Rapid Start Technology enables your system to AHCI. If Windows 8/7 is already installed under IDE mode, directly ... to working condition even if an unexpected power loss happens while the PC is not in sleep mode. 3.3.1 System Requirements • Confirm whether your motherboard supports this feature. • Operating system: Microsoft Windows 8/7 (32-
User Manual
Page 40
If your motherboard supports this feature. • Operating system: Microsoft Windows 8/7 (32- Press Win + R simultaneously in Windows 8/7, type "Regedit" into HKEY_LOCAL_MACHINE\SYSTEM\CurrentControlSet\services\ msahci in AHCI mode, ...
If your motherboard supports this feature. • Operating system: Microsoft Windows 8/7 (32- Press Win + R simultaneously in Windows 8/7, type "Regedit" into HKEY_LOCAL_MACHINE\SYSTEM\CurrentControlSet\services\ msahci in AHCI mode, ...
User Manual
Page 62
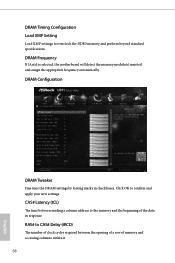
... accessing columns within it. 58 English Click OK to overclock the DDR3 memory and perform beyond standard specifications. DRAM Frequency If [Auto] is selected, the motherboard will detect the memory module(s) inserted and assign the appropriate frequency automatically. DRAM Timing Configuration Load XMP Setting Load XMP settings to confirm and apply...
... accessing columns within it. 58 English Click OK to overclock the DDR3 memory and perform beyond standard specifications. DRAM Frequency If [Auto] is selected, the motherboard will detect the memory module(s) inserted and assign the appropriate frequency automatically. DRAM Timing Configuration Load XMP Setting Load XMP settings to confirm and apply...

User Manual
Page 83
... and assign a respective fan speed for each temperature. Over Temperature Protection When Over Temperature Protection is enabled, the system automatically shuts down when the motherboard is overheated. B85M-ITX 4.6 Hardware Health Event Monitoring Screen This section allows you to detect whether the chassis cover has been removed. 79 English Chassis Fan 1 Setting Select...
... and assign a respective fan speed for each temperature. Over Temperature Protection When Over Temperature Protection is enabled, the system automatically shuts down when the motherboard is overheated. B85M-ITX 4.6 Hardware Health Event Monitoring Screen This section allows you to detect whether the chassis cover has been removed. 79 English Chassis Fan 1 Setting Select...

