
RAID Installation Guide
Page 1
... Windows XP / XP 64-bit With RAID Funtions 3 1.3.2 Installing Windows Vista / Vista 64-bit With RAID Funtions 4 1.4 Create Disk Array 5 2. AMD RAID Installation Guide 1. AMD BIOS RAID Installation Guide 2 1.1 Introduction to RAIDXpert from the Internet 17 2.9 Running RAIDXpert without Network Connection 17 1
... Windows XP / XP 64-bit With RAID Funtions 3 1.3.2 Installing Windows Vista / Vista 64-bit With RAID Funtions 4 1.4 Create Disk Array 5 2. AMD RAID Installation Guide 1. AMD BIOS RAID Installation Guide 2 1.1 Introduction to RAIDXpert from the Internet 17 2.9 Running RAIDXpert without Network Connection 17 1
RAID Installation Guide
Page 2
..., 2 1. WARNING!! The AMD SB710 controller offers the added feature of concatenation, where the capacity of RAID logical drives. AMD BIOS RAID Installation Guide AMD BIOS RAID Installation Guide is added together. For optimal performance, please install identical drives of the "User Manual" in our support CD ...or "Quick Installation Guide", then you make a SATA / SATAII driver diskette, press to enter BIOS setup to set the option to configure RAID functions by following the detailed instruction of the same model and capacity when creating a RAID ...
..., 2 1. WARNING!! The AMD SB710 controller offers the added feature of concatenation, where the capacity of RAID logical drives. AMD BIOS RAID Installation Guide AMD BIOS RAID Installation Guide is added together. For optimal performance, please install identical drives of the "User Manual" in our support CD ...or "Quick Installation Guide", then you make a SATA / SATAII driver diskette, press to enter BIOS setup to set the option to configure RAID functions by following the detailed instruction of the same model and capacity when creating a RAID ...
RAID Installation Guide
Page 4
... this document for details. B. A. C. Then you want to install Windows XP or Windows XP 64-bit on your system. (There are two ASRock Support CD in this RAID installation guide for proper configuration. Please refer to boot your system. Set the "SATA Operation Mode" option to install a... please set RAID configuration. A. Please select CD-ROM as the boot device. When you see the message on your optical drive to the BIOS RAID installation guide part in the motherboard gift box pack, please choose the one for boot devices selection appears. E. At the beginning of system...
... this document for details. B. A. C. Then you want to install Windows XP or Windows XP 64-bit on your system. (There are two ASRock Support CD in this RAID installation guide for proper configuration. Please refer to boot your system. Set the "SATA Operation Mode" option to install a... please set RAID configuration. A. Please select CD-ROM as the boot device. When you see the message on your optical drive to the BIOS RAID installation guide part in the motherboard gift box pack, please choose the one for boot devices selection appears. E. At the beginning of system...

RAID Installation Guide
Page 5
...the optical drive to boot your optical drive, and click the "Load Driver" button on the left on your system. page, please insert the ASRock Support CD into the optical drive again to set RAID configuration. A. B. NOTE2. Set the "SATA Operation Mode" option to load the AMD RAID...64-bit With RAID Functions If you want to [RAID] first. Enter BIOS SETUP UTILITY → Advanced screen →IDE Configuration. STEP 3: Install Windows Vista / Vista 64-bit OS on IDE HDDs and there are two ASRock Support CD in this RAID installation guide for details. If you install ...
...the optical drive to boot your optical drive, and click the "Load Driver" button on the left on your system. page, please insert the ASRock Support CD into the optical drive again to set RAID configuration. A. B. NOTE2. Set the "SATA Operation Mode" option to load the AMD RAID...64-bit With RAID Functions If you want to [RAID] first. Enter BIOS SETUP UTILITY → Advanced screen →IDE Configuration. STEP 3: Install Windows Vista / Vista 64-bit OS on IDE HDDs and there are two ASRock Support CD in this RAID installation guide for details. If you install ...

User Manual
Page 4
... 59 4.1 Install Operating System 59 4.2 Support CD Information 59 4.2.1 Running Support CD 59 4.2.2 Drivers Menu 59 4.2.3 Utilities Menu 59 4.2.4 Contact Information 59 4 BIOS SETUP UTILITY 35 3.1 Introduction 35 3.1.1 BIOS Menu Bar 35 3.1.2 Navigation Keys 36 3.2 Main Screen 36 3.3 OC Tweaker Screen 37 3.4 Advanced Screen 44 3.4.1 CPU Configuration 45 3.4.2 Chipset Configuration 46 3.4.3 ACPI...
... 59 4.1 Install Operating System 59 4.2 Support CD Information 59 4.2.1 Running Support CD 59 4.2.2 Drivers Menu 59 4.2.3 Utilities Menu 59 4.2.4 Contact Information 59 4 BIOS SETUP UTILITY 35 3.1 Introduction 35 3.1.1 BIOS Menu Bar 35 3.1.2 Navigation Keys 36 3.2 Main Screen 36 3.3 OC Tweaker Screen 37 3.4 Advanced Screen 44 3.4.1 CPU Configuration 45 3.4.2 Chipset Configuration 46 3.4.3 ACPI...
User Manual
Page 5
... information about the model you for purchasing ASRock A780LM-S motherboard, a reliable motherboard produced under ASRock's consistently stringent quality control. You may find the latest VGA cards and CPU support lists on ASRock website without notice. 1. Introduction Thank you are using. Chapter 3 and 4 contain the configuration guide to BIOS setup and information of the motherboard and...
... information about the model you for purchasing ASRock A780LM-S motherboard, a reliable motherboard produced under ASRock's consistently stringent quality control. You may find the latest VGA cards and CPU support lists on ASRock website without notice. 1. Introduction Thank you are using. Chapter 3 and 4 contain the configuration guide to BIOS setup and information of the motherboard and...

User Manual
Page 7
... connector - 4 pin 12V power connector - Supports "Plug and Play" - SMBIOS 2.3.1 Support - Supports Smart BIOS - ASRock Instant Flash (see CAUTION 6) - 1 x ATA133 IDE connector (supports 2 x IDE devices) - 1 x Floppy connector - 1 x Print port header - ... (see CAUTION 12) - Chassis Fan Tachometer - ACPI 1.1 Compliance Wake Up Events - Supports jumperfree - ASRock OC DNA (see CAUTION 7) - 8Mb AMI BIOS - CPU Temperature Sensing - Connector BIOS Feature Support CD Unique Feature Hardware Monitor OS - Boot Failure Guard (B.F.G.) - CPU Fan Tachometer - Microsoft...
... connector - 4 pin 12V power connector - Supports "Plug and Play" - SMBIOS 2.3.1 Support - Supports Smart BIOS - ASRock Instant Flash (see CAUTION 6) - 1 x ATA133 IDE connector (supports 2 x IDE devices) - 1 x Floppy connector - 1 x Print port header - ... (see CAUTION 12) - Chassis Fan Tachometer - ACPI 1.1 Compliance Wake Up Events - Supports jumperfree - ASRock OC DNA (see CAUTION 7) - 8Mb AMI BIOS - CPU Temperature Sensing - Connector BIOS Feature Support CD Unique Feature Hardware Monitor OS - Boot Failure Guard (B.F.G.) - CPU Fan Tachometer - Microsoft...

User Manual
Page 8
...Overclocking Technology. For Windows® XP 64-bit and Windows® VistaTM 64bit with overclocking, including adjusting the setting in the BIOS, applying Untied Overclocking Technology, or using the thirdparty overclocking tools. Please visit our website for USB 2.0 works fine under Windows...(EuP ready power supply is required) (see CAUTION 15) * For detailed product information, please visit our website: http://www.asrock.com WARNING Please realize that delivers unparalleled power savings. The maximum shared memory size is defined by overclocking. Please check AMD website...
...Overclocking Technology. For Windows® XP 64-bit and Windows® VistaTM 64bit with overclocking, including adjusting the setting in the BIOS, applying Untied Overclocking Technology, or using the thirdparty overclocking tools. Please visit our website for USB 2.0 works fine under Windows...(EuP ready power supply is required) (see CAUTION 15) * For detailed product information, please visit our website: http://www.asrock.com WARNING Please realize that delivers unparalleled power savings. The maximum shared memory size is defined by overclocking. Please check AMD website...

User Manual
Page 9
...of your system is unstable after AM2 Boost function is not recommended to perform over-clocking. ASRock website: http://www.asrock.com 10. ASRock Instant Flash is capable of. This convenient BIOS update tool allows you to define the power consumption for Energy Using Product, was a ...or hard drive must use Intelligent Energy Saver function, please enable Cool 'n' Quiet option in the BIOS setup in a few clicks without sacrificing computing performance. According to access ASRock Instant Flash. The software name itself - In other than the recommended CPU bus frequencies may ...
...of your system is unstable after AM2 Boost function is not recommended to perform over-clocking. ASRock website: http://www.asrock.com 10. ASRock Instant Flash is capable of. This convenient BIOS update tool allows you to define the power consumption for Energy Using Product, was a ...or hard drive must use Intelligent Energy Saver function, please enable Cool 'n' Quiet option in the BIOS setup in a few clicks without sacrificing computing performance. According to access ASRock Instant Flash. The software name itself - In other than the recommended CPU bus frequencies may ...

User Manual
Page 11
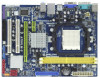
... IN Center: FRONT Bottom: MIC IN LAN EuP Ready PCIE1 Hybrid CrossFire AMD RS780L (760G) Chipset DX10 SPEAKER1 1 1 CLRCMOS1 IDE1 Super I/O 8Mb BIOS RoHS AUDIO CODEC HD_AUDIO1 1 1 LPT1 FLOPPY1 PCIE2 A780LM-S PCI1 PCI2 CHA_FAN1 USB6_7 1 USB4_5 1 AMD SB710 Chipset SATAII_3 SATAII_4 (PORT 2) (PORT 3) PANEL 1 SATAII_1 (PORT 0) SATAII_2 (PORT 1) PLED PWRBTN 1 HDLED RESET...
... IN Center: FRONT Bottom: MIC IN LAN EuP Ready PCIE1 Hybrid CrossFire AMD RS780L (760G) Chipset DX10 SPEAKER1 1 1 CLRCMOS1 IDE1 Super I/O 8Mb BIOS RoHS AUDIO CODEC HD_AUDIO1 1 1 LPT1 FLOPPY1 PCIE2 A780LM-S PCI1 PCI2 CHA_FAN1 USB6_7 1 USB4_5 1 AMD SB710 Chipset SATAII_3 SATAII_4 (PORT 2) (PORT 3) PANEL 1 SATAII_1 (PORT 0) SATAII_2 (PORT 1) PLED PWRBTN 1 HDLED RESET...

User Manual
Page 17
... wish to the corresponding connectors of the system memory. D. Please refer to the following steps to enter BIOS setup. VGA port 3. Press to set up a multi-monitor display. If you do not adjust the BIOS setup, the default value of VGA. A. Select the display icon identified by the number 2. Connect D-Sub monitor...
... wish to the corresponding connectors of the system memory. D. Please refer to the following steps to enter BIOS setup. VGA port 3. Press to set up a multi-monitor display. If you do not adjust the BIOS setup, the default value of VGA. A. Select the display icon identified by the number 2. Connect D-Sub monitor...

User Manual
Page 19
... may be supported with Windows® XP OS. What does an ATITM Hybrid CrossFireXTM system include? For the proper installation procedures, please refer to enter BIOS setup. Step 4. Install the onboard VGA driver from our support CD to a single display for both the onboard VGA and the discrete graphics card. Currently...
... may be supported with Windows® XP OS. What does an ATITM Hybrid CrossFireXTM system include? For the proper installation procedures, please refer to enter BIOS setup. Step 4. Install the onboard VGA driver from our support CD to a single display for both the onboard VGA and the discrete graphics card. Currently...

User Manual
Page 21
... and higher standby current provided by power supply. To clear and reset the system parameters to clear the CMOS when you just finish updating the BIOS, you need to default setup, please turn off the computer and unplug the power cord from the power supply. However, please do not clear the... cap is placed on pins, the jumper is "Open". If you must boot up events. Note: To select +5VSB, it down before you update the BIOS. When the jumper cap is placed on pins, the jumper is "Short". The data in CMOS.
... and higher standby current provided by power supply. To clear and reset the system parameters to clear the CMOS when you just finish updating the BIOS, you need to default setup, please turn off the computer and unplug the power cord from the power supply. However, please do not clear the... cap is placed on pins, the jumper is "Open". If you must boot up events. Note: To select +5VSB, it down before you update the BIOS. When the jumper cap is placed on pins, the jumper is "Short". The data in CMOS.

User Manual
Page 23
.... Please follow the instruction in our manual and chassis manual to MIC2_L. If you use AC'97 audio panel, please install it to [Enabled]. C. D. Enter BIOS Setup Utility. B. Set the Front Panel Control option from [Auto] to the front panel audio header as below: A. For Windows® XP / XP 64-bit...
.... Please follow the instruction in our manual and chassis manual to MIC2_L. If you use AC'97 audio panel, please install it to [Enabled]. C. D. Enter BIOS Setup Utility. B. Set the Front Panel Control option from [Auto] to the front panel audio header as below: A. For Windows® XP / XP 64-bit...
User Manual
Page 30
... / XP 64-bit.) B. C. When you start Please insert a floppy diskette into your optical drive to boot your system. (There are two ASRock Support CD in the Support CD for boot devices selection appears. Then you will start to format the floppy diskette and copy SATA / SATAII drivers... into the floppy diskette. Please follow the order from up , press key, and then a window for proper configuration. Enter BIOS SETUP UTILITY Advanced screen Storage Configuration. During POST at the beginning of system boot-up to bottom side to install those required drivers. 2.13 ...
... / XP 64-bit.) B. C. When you start Please insert a floppy diskette into your optical drive to boot your system. (There are two ASRock Support CD in the Support CD for boot devices selection appears. Then you will start to format the floppy diskette and copy SATA / SATAII drivers... into the floppy diskette. Please follow the order from up , press key, and then a window for proper configuration. Enter BIOS SETUP UTILITY Advanced screen Storage Configuration. During POST at the beginning of system boot-up to bottom side to install those required drivers. 2.13 ...

User Manual
Page 31
...174; XP 64-bit OS on your system. At the beginning of the document in the following path in our Support CD: (There are two ASRock Support CD in the Support CD: .. \ RAID Installation Guide 2.14.2 Installing Windows® VistaTM / VistaTM 64-bit With RAID Functions If you... Compatible RAID Controllerx86 platform" for Windows® XP, or "AMD AHCI Compatible RAID Controller-x64 platform" for proper configuration. Please refer to the BIOS RAID installation guide part of Windows® setup, press F6 to load the AMD RAID drivers. Insert the Windows® VistaTM / Windows®...
...174; XP 64-bit OS on your system. At the beginning of the document in the following path in our Support CD: (There are two ASRock Support CD in the Support CD: .. \ RAID Installation Guide 2.14.2 Installing Windows® VistaTM / VistaTM 64-bit With RAID Functions If you... Compatible RAID Controllerx86 platform" for Windows® XP, or "AMD AHCI Compatible RAID Controller-x64 platform" for proper configuration. Please refer to the BIOS RAID installation guide part of Windows® setup, press F6 to load the AMD RAID drivers. Insert the Windows® VistaTM / Windows®...

User Manual
Page 32
...RAID functions on your system. When prompted, insert the SATA / SATAII driver diskette containing the AMD AHCI driver. B. STEP 3: Set Up BIOS. After reading the floppy disk, the driver will be presented. Then, please set the RAID configuration by following path in the following section 2....14.1 step 2 on page 30. Enter BIOS SETUP UTILITY Advanced screen Storage Configuration. Set the "SATA Operation Mode" option to install a third-party AHCI driver. If you install Windows...
...RAID functions on your system. When prompted, insert the SATA / SATAII driver diskette containing the AMD AHCI driver. B. STEP 3: Set Up BIOS. After reading the floppy disk, the driver will be presented. Then, please set the RAID configuration by following path in the following section 2....14.1 step 2 on page 30. Enter BIOS SETUP UTILITY Advanced screen Storage Configuration. Set the "SATA Operation Mode" option to install a third-party AHCI driver. If you install Windows...

User Manual
Page 33
...to [IDE]. B. Set the "SATA Operation Mode" option to [IDE]. Enter BIOS SETUP UTILITY Advanced screen Storage Configuration. AMD AHCI drivers are in the following path in our Support CD: (There are two ASRock Support CD in the motherboard gift box pack, please choose the one for Windows...system. 33 B. Using SATA / SATAII HDDs without NCQ and Hot Plug functions STEP 1: Set up BIOS. B. Set the "SATA Operation Mode" option to continue the installation. " page, please insert the ASRock Support CD into the optical drive to boot your system, and follow below steps. Using SATA / ...
...to [IDE]. B. Set the "SATA Operation Mode" option to [IDE]. Enter BIOS SETUP UTILITY Advanced screen Storage Configuration. AMD AHCI drivers are in the following path in our Support CD: (There are two ASRock Support CD in the motherboard gift box pack, please choose the one for Windows...system. 33 B. Using SATA / SATAII HDDs without NCQ and Hot Plug functions STEP 1: Set up BIOS. B. Set the "SATA Operation Mode" option to continue the installation. " page, please insert the ASRock Support CD into the optical drive to boot your system, and follow below steps. Using SATA / ...

User Manual
Page 34
... better margin due to the warning on page 8 for the possible overclocking risk before you enable Untied Overclocking function, please enter "Overclock Mode" option of BIOS setup to set the selection from [Auto] to [CPU, PCIE, Async.]. Before you apply Untied Overclocking Technology. 34
... better margin due to the warning on page 8 for the possible overclocking risk before you enable Untied Overclocking function, please enter "Overclock Mode" option of BIOS setup to set the selection from [Auto] to [CPU, PCIE, Async.]. Before you apply Untied Overclocking Technology. 34

User Manual
Page 35
... < > key to choose among the selections on the menu bar, and then press to get into the sub screen. 35 Because the BIOS software is constantly being updated, the following selections: Main To set up the system time/date information OC Tweaker To set up overclocking features ... system. If you see on the motherboard stores the BIOS SETUP UTILITY. BIOS SETUP UTILITY 3.1 Introduction This section explains how to use the BIOS SETUP UTILITY to enter the BIOS SETUP UTILITY, otherwise, POST will continue with the following BIOS setup screens and descriptions are for reference purpose only,...
... < > key to choose among the selections on the menu bar, and then press to get into the sub screen. 35 Because the BIOS software is constantly being updated, the following selections: Main To set up the system time/date information OC Tweaker To set up overclocking features ... system. If you see on the motherboard stores the BIOS SETUP UTILITY. BIOS SETUP UTILITY 3.1 Introduction This section explains how to use the BIOS SETUP UTILITY to enter the BIOS SETUP UTILITY, otherwise, POST will continue with the following BIOS setup screens and descriptions are for reference purpose only,...


