User Manual
Page 1
All rights reserved. 1 A75M-ITX User Manual Version 1.0 Published July 2011 Copyright©2011 ASRock INC.
All rights reserved. 1 A75M-ITX User Manual Version 1.0 Published July 2011 Copyright©2011 ASRock INC.

User Manual
Page 2
With respect to the contents of this manual, ASRock does not provide warranty of any kind, either expressed or implied, including but not limited to change without notice, and should not be constructed as a commitment by ASRock. Disclaimer: Speci cations and information contained in this manual are used only for identi cation or explanation and...
With respect to the contents of this manual, ASRock does not provide warranty of any kind, either expressed or implied, including but not limited to change without notice, and should not be constructed as a commitment by ASRock. Disclaimer: Speci cations and information contained in this manual are used only for identi cation or explanation and...

User Manual
Page 5
... VGA cards and CPU support lists on ASRock website without notice. ASRock website http://www.asrock.com If you for details. 5 In case any modi cations of the motherboard and stepby-step guide to the "User Manual" in our support CD for purchasing ASRock A75M-ITX motherboard, a reliable motherboard produced under ASRock's consistently stringent quality control. Chapter 3 and...
... VGA cards and CPU support lists on ASRock website without notice. ASRock website http://www.asrock.com If you for details. 5 In case any modi cations of the motherboard and stepby-step guide to the "User Manual" in our support CD for purchasing ASRock A75M-ITX motherboard, a reliable motherboard produced under ASRock's consistently stringent quality control. Chapter 3 and...
User Manual
Page 16
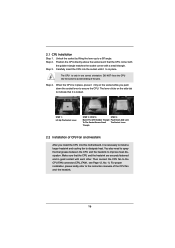
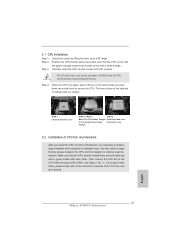
... (CPU_FAN1, see Page 12, No. 1). Carefully insert the CPU into this motherboard, it is necessary to install a larger heatsink and cooling fan to the instruction manuals of CPU Fan and Heatsink After you push down the socket lever to avoid bending of the pins. 2.1 CPU Installation Step 1. The CPU ts only...
... (CPU_FAN1, see Page 12, No. 1). Carefully insert the CPU into this motherboard, it is necessary to install a larger heatsink and cooling fan to the instruction manuals of CPU Fan and Heatsink After you push down the socket lever to avoid bending of the pins. 2.1 CPU Installation Step 1. The CPU ts only...

User Manual
Page 27
... to restart the computer if the computer freezes and fails to the reset switch on the chassis front panel. The LED is in our manual and chassis manual to turn off (S5). 27 Please follow the instruction in S3/S4 sleep state or powered off your system. 2. C. D. E. Adjust "Recording Volume". The LED...
... to restart the computer if the computer freezes and fails to the reset switch on the chassis front panel. The LED is in our manual and chassis manual to turn off (S5). 27 Please follow the instruction in S3/S4 sleep state or powered off your system. 2. C. D. E. Adjust "Recording Volume". The LED...
User Manual
Page 31
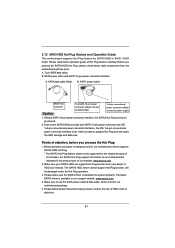
... package. 5. Please make sure the SATA3 driver is de nitely not able to reduce the risk of our motherboard is available on our website: www.asrock.com 2. A. 7-pin SATA data cable B. Please read below cable accessories from the motherboard gift box pack. SATA data cable (Red) B. The SATA3 ...HDD, which are from your dealer or HDD user manual. Please follow below instructions step by the chipset because of its limitation, the SATA3 Hot Plug support information of HDD crash or data loss. ...
... package. 5. Please make sure the SATA3 driver is de nitely not able to reduce the risk of our motherboard is available on our website: www.asrock.com 2. A. 7-pin SATA data cable B. Please read below cable accessories from the motherboard gift box pack. SATA data cable (Red) B. The SATA3 ...HDD, which are from your dealer or HDD user manual. Please follow below instructions step by the chipset because of its limitation, the SATA3 Hot Plug support information of HDD crash or data loss. ...
User Manual
Page 39
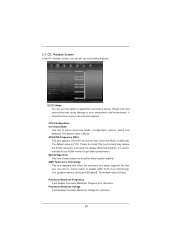
... is [Auto]. 3.3 OC Tweaker Screen In the OC Tweaker screen, you set up overclocking features. Configuration options: [Auto] and [Manual]. EZ OC Mode You can set the item "Overclock Mode" to [Manual]. The default value is recommended to use this to select enable or disable AMD Turbo Core Technology. Spread Spectrum This...
... is [Auto]. 3.3 OC Tweaker Screen In the OC Tweaker screen, you set up overclocking features. Configuration options: [Auto] and [Manual]. EZ OC Mode You can set the item "Overclock Mode" to [Manual]. The default value is recommended to use this to select enable or disable AMD Turbo Core Technology. Spread Spectrum This...
User Manual
Page 40
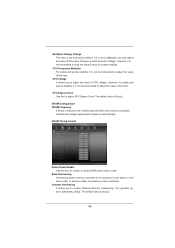
... Clock. DRAM Configuration DRAM Frequency If [Auto] is recommended to enable or disable DDR power down mode. However, it is not recommended to [Manual], you to be spread out over banks on the same node, or accross nodes, decreasing access contention. However, for system stability. Con guration options: [Disabled...
... Clock. DRAM Configuration DRAM Frequency If [Auto] is recommended to enable or disable DDR power down mode. However, it is not recommended to [Manual], you to be spread out over banks on the same node, or accross nodes, decreasing access contention. However, for system stability. Con guration options: [Disabled...
User Manual
Page 41
...default is [Auto]. The default is [Auto]. The default is [Auto]. 41 Voltage Control DRAM Voltage Use this item to change Command Rate (CR) Auto/Manual setting. The default value is [Auto]. The default is [Auto]. The default is [Auto]. The default is [Auto]. RAS# Cycle Time (tRC) ...Use this item to CAS# Delay (tRCD) Auto/Manual setting. The default is [Auto]. Max: 2T. The default is [Auto]. The default is [Auto]. Command Rate (CR) Use this item to change RAS# ...
...default is [Auto]. The default is [Auto]. The default is [Auto]. 41 Voltage Control DRAM Voltage Use this item to change Command Rate (CR) Auto/Manual setting. The default value is [Auto]. The default is [Auto]. The default is [Auto]. The default is [Auto]. RAS# Cycle Time (tRC) ...Use this item to CAS# Delay (tRCD) Auto/Manual setting. The default is [Auto]. Max: 2T. The default is [Auto]. The default is [Auto]. Command Rate (CR) Use this item to change RAS# ...

User Manual
Page 52
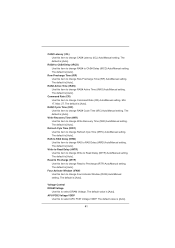
CPU Fan 1 & 2 Setting This allows you to set the CPU fan 1 & 2 speed. Con guration options: [Full On], [Manual Mode] and [Automatic Mode]. Chassis Fan 1 Setting This allows you to monitor the status of the hardware on your system, including the parameters of the ...
CPU Fan 1 & 2 Setting This allows you to set the CPU fan 1 & 2 speed. Con guration options: [Full On], [Manual Mode] and [Automatic Mode]. Chassis Fan 1 Setting This allows you to monitor the status of the hardware on your system, including the parameters of the ...

Quick Installation Guide
Page 5
... case any modifications of the motherboard can be subject to the "User Manual" in , 17.0 cm x 17.0 cm) ASRock A75M-ITX Quick Installation Guide ASRock A75M-ITX Support CD 2 x Serial ATA (SATA) Data Cables (Optional) 1 x 3.5mm Audio Cable (Optional) 1 x I/O Panel Shield ASRock Reminds You... 1. Because the motherboard specifications and the BIOS software might be...
... case any modifications of the motherboard can be subject to the "User Manual" in , 17.0 cm x 17.0 cm) ASRock A75M-ITX Quick Installation Guide ASRock A75M-ITX Support CD 2 x Serial ATA (SATA) Data Cables (Optional) 1 x 3.5mm Audio Cable (Optional) 1 x I/O Panel Shield ASRock Reminds You... 1. Because the motherboard specifications and the BIOS software might be...
Quick Installation Guide
Page 13
... NOT force the CPU into the socket to the instruction manuals of the pins. Make sure that the CPU and the heatsink are securely fastened and in one correct orientation. Step 3. Then connect the CPU fan to improve heat dissipation. English 13 ASRock A75M-ITX Motherboard Unlock the socket by lifting the lever up...
... NOT force the CPU into the socket to the instruction manuals of the pins. Make sure that the CPU and the heatsink are securely fastened and in one correct orientation. Step 3. Then connect the CPU fan to improve heat dissipation. English 13 ASRock A75M-ITX Motherboard Unlock the socket by lifting the lever up...
Quick Installation Guide
Page 24
... Select "Mixer". English Connect the power switch, reset switch and system status indicator on when the system is in our manual and chassis manual to function correctly. RESET (Reset Switch): Connect to the reset switch on the chassis must support HDA to install your .... Please follow the instruction in S3/S4 sleep state or powered off your system. 2. You don't need to turn off (S5). 24 ASRock A75M-ITX Motherboard Front Panel Audio Header (9-pin HD_AUDIO1) (see p.2 No. 9) This header accommodates several system front panel functions. D. Select "Recorder". ...
... Select "Mixer". English Connect the power switch, reset switch and system status indicator on when the system is in our manual and chassis manual to function correctly. RESET (Reset Switch): Connect to the reset switch on the chassis must support HDA to install your .... Please follow the instruction in S3/S4 sleep state or powered off your system. 2. You don't need to turn off (S5). 24 ASRock A75M-ITX Motherboard Front Panel Audio Header (9-pin HD_AUDIO1) (see p.2 No. 9) This header accommodates several system front panel functions. D. Select "Recorder". ...
Quick Installation Guide
Page 29
...begin using the Support CD, insert the CD into your computer. It will enhance motherboard features. When you wish to display the menus. 29 ASRock A75M-ITX Motherboard English The BIOS Setup program is enabled in the Support CD to enter BIOS Setup after POST, please restart the system by pressing + ... to be user-friendly. If you start up the computer, please press or during the Power-On-Self-Test (POST) to the User Manual (PDF file) contained in the Support CD. 4. If the Main Menu does not appear automatically, locate and doubleclick on the motherboard...
...begin using the Support CD, insert the CD into your computer. It will enhance motherboard features. When you wish to display the menus. 29 ASRock A75M-ITX Motherboard English The BIOS Setup program is enabled in the Support CD to enter BIOS Setup after POST, please restart the system by pressing + ... to be user-friendly. If you start up the computer, please press or during the Power-On-Self-Test (POST) to the User Manual (PDF file) contained in the Support CD. 4. If the Main Menu does not appear automatically, locate and doubleclick on the motherboard...

RAID Installation Guide
Page 3
... ROM to configure RAID. 1.1 Introduction to RAID The term "RAID" stands for you to configure RAID functions by following the detailed instruction of the "User Manual" in the other drive if one drive to the entire system since it does not provide any HDDs of data from one drive fails. For...
... ROM to configure RAID. 1.1 Introduction to RAID The term "RAID" stands for you to configure RAID functions by following the detailed instruction of the "User Manual" in the other drive if one drive to the entire system since it does not provide any HDDs of data from one drive fails. For...

RAID Installation Guide
Page 19
When you boot your system, the Option ROM screen informs you if there is a critical or offline logical drive. See the RAIDXpert User Manual for more information. 19 Allow your PC to finish booting and use RAIDXpert to identify the failed drive and to Logical Problems While physical drives ...
When you boot your system, the Option ROM screen informs you if there is a critical or offline logical drive. See the RAIDXpert User Manual for more information. 19 Allow your PC to finish booting and use RAIDXpert to identify the failed drive and to Logical Problems While physical drives ...

RAID Installation Guide
Page 23
..., type the entry explained below. If you did not choose the External Security option during RAIDXpert installation, use the Regular connection. 12. Or, log on manually with your entry looks like this: http://127.0.0.1:25902/ati or http://localhost:25902/ati 2.6 Secure Connection RAIDXpert uses a secure HTTP connection https:// 23 If...
..., type the entry explained below. If you did not choose the External Security option during RAIDXpert installation, use the Regular connection. 12. Or, log on manually with your entry looks like this: http://127.0.0.1:25902/ati or http://localhost:25902/ati 2.6 Secure Connection RAIDXpert uses a secure HTTP connection https:// 23 If...
