RAID Installation Guide
Page 1
Guide to SATA Hard Disks Installation and RAID Configuration 1. Guide to SATA Hard Disks Installation 2 1.1 Serial ATA (SATA) Hard Disks Installation 2 1.2 Making a SATA Driver Diskette 3 2. Guide to RAID Configurations 4 2.1 Introduction of RAID 4 2.2 RAID Configuration Precautions 6 2.3 BIOS Configuration Utility 7 2.3.1 Enter BIOS Configuration Utility 7 2.3.2 Create Disk Array 8 1
Guide to SATA Hard Disks Installation and RAID Configuration 1. Guide to SATA Hard Disks Installation 2 1.1 Serial ATA (SATA) Hard Disks Installation 2 1.2 Making a SATA Driver Diskette 3 2. Guide to RAID Configurations 4 2.1 Introduction of RAID 4 2.2 RAID Configuration Precautions 6 2.3 BIOS Configuration Utility 7 2.3.1 Enter BIOS Configuration Utility 7 2.3.2 Create Disk Array 8 1
RAID Installation Guide
Page 3
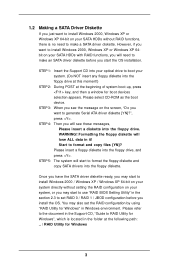
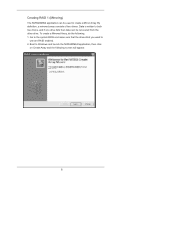
...!) STEP 2: During POST at the following path: .. \ RAID Utility for Windows 3 Please insert a floppy diskette into the floppy drive. You may start to use "RAID BIOS Setting Utility" in the section 2.3 to set the RAID configuration by using "RAID Utility for Windows" in Windows environment. Formatting the floppy diskette will need...
...!) STEP 2: During POST at the following path: .. \ RAID Utility for Windows 3 Please insert a floppy diskette into the floppy drive. You may start to use "RAID BIOS Setting Utility" in the section 2.3 to set the RAID configuration by using "RAID Utility for Windows" in Windows environment. Formatting the floppy diskette will need...
RAID Installation Guide
Page 7
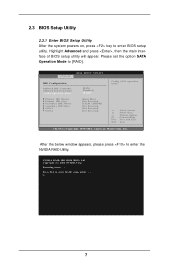
... Press F10 to [RAID]. Please set the option SATA Operation Mode to enter RAID setup utility . . . 7 Advanced BIOS SETUP UTILITY IDE Configuration OnBoard IDE Controller OnBoard SATA Controller SATA Operation Mode Primary IDE Master Primary IDE Slave Secondary IDE Master ...Save and Exit Exit v02.53 (C) Copyright 1985-2004. American Megatrends, Inc. NVIDIA RAID IDE ROM BIOS 4.81 Copyright (C) 2004 NVIDIA Corp. Detecting array . . . 2.3 BIOS Setup Utility 2.3.1 Enter BIOS Setup Utility After the system powers on, press key to enter the NVIDIA RAID Utility. After the below...
... Press F10 to [RAID]. Please set the option SATA Operation Mode to enter RAID setup utility . . . 7 Advanced BIOS SETUP UTILITY IDE Configuration OnBoard IDE Controller OnBoard SATA Controller SATA Operation Mode Primary IDE Master Primary IDE Slave Secondary IDE Master ...Save and Exit Exit v02.53 (C) Copyright 1985-2004. American Megatrends, Inc. NVIDIA RAID IDE ROM BIOS 4.81 Copyright (C) 2004 NVIDIA Corp. Detecting array . . . 2.3 BIOS Setup Utility 2.3.1 Enter BIOS Setup Utility After the system powers on, press key to enter the NVIDIA RAID Utility. After the below...
RAID Installation Guide
Page 8
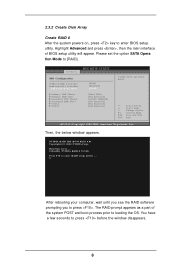
...Mode to press . The RAID prompt appears as a part of BIOS setup utility will appear. NVIDIA RAID IDE ROM BIOS 4.81 Copyright (C) 2004 NVIDIA Corp. You have a few seconds to loading the OS. Advanced BIOS SETUP UTILITY IDE Configuration OnBoard IDE Controller OnBoard SATA Controller SATA Operation... Help Save and Exit Exit v02.53 (C) Copyright 1985-2004. Detecting array . . . 0 Healthy NVIDIA RAID 0 74.54G Press F10 to enter BIOS setup utility. 2.3.2 Create Disk Array Create RAID 0 After the system powers on, press key to enter RAID setup utility . . . Then, the below ...
...Mode to press . The RAID prompt appears as a part of BIOS setup utility will appear. NVIDIA RAID IDE ROM BIOS 4.81 Copyright (C) 2004 NVIDIA Corp. You have a few seconds to loading the OS. Advanced BIOS SETUP UTILITY IDE Configuration OnBoard IDE Controller OnBoard SATA Controller SATA Operation... Help Save and Exit Exit v02.53 (C) Copyright 1985-2004. Detecting array . . . 0 Healthy NVIDIA RAID 0 74.54G Press F10 to enter BIOS setup utility. 2.3.2 Create Disk Array Create RAID 0 After the system powers on, press key to enter RAID setup utility . . . Then, the below ...

RAID Installation Guide
Page 10
..., and affect how data is selected. 2. These are the drives that are available for use as RAID array disk, 1. Move it from the RAID Config BIOS setup page appear in the list is arranged on the disk. Continue pressing the right-arrow key until all the disks that you have to...
..., and affect how data is selected. 2. These are the drives that are available for use as RAID array disk, 1. Move it from the RAID Config BIOS setup page appear in the list is arranged on the disk. Continue pressing the right-arrow key until all the disks that you have to...
RAID Installation Guide
Page 12
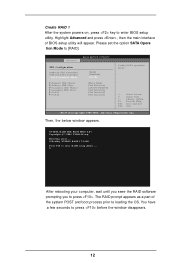
... RAID 1 After the system powers on, press key to press . After rebooting your computer, wait until you seee the RAID software prompting you to enter BIOS setup utility. Detecting array . . . 0 Healthy NVIDIA RAID 1 74.54G Press F10 to press before the window disappears. 12 You have a few seconds to... enter RAID setup utility . . . Please set the option SATA Opera tion Mode to loading the OS. NVIDIA RAID IDE ROM BIOS 4.81 Copyright (C) 2004 NVIDIA Corp. Highlight Advanced and press , then the main interface of the system POST and boot process prior to [RAID].
... RAID 1 After the system powers on, press key to press . After rebooting your computer, wait until you seee the RAID software prompting you to enter BIOS setup utility. Detecting array . . . 0 Healthy NVIDIA RAID 1 74.54G Press F10 to press before the window disappears. 12 You have a few seconds to... enter RAID setup utility . . . Please set the option SATA Opera tion Mode to loading the OS. NVIDIA RAID IDE ROM BIOS 4.81 Copyright (C) 2004 NVIDIA Corp. Highlight Advanced and press , then the main interface of the system POST and boot process prior to [RAID].
RAID Installation Guide
Page 15
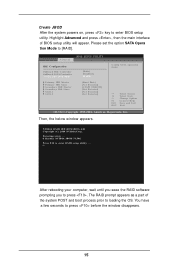
...press . After rebooting your computer, wait until you seee the RAID software prompting you to press before the window disappears. 15 Advanced BIOS SETUP UTILITY IDE Configuration OnBoard IDE Controller OnBoard SATA Controller SATA Operation Mode Primary IDE Master Primary IDE Slave Secondary IDE Master Secondary IDE...Help Save and Exit Exit v02.53 (C) Copyright 1985-2004. Then, the below window appears. The RAID prompt appears as a part of BIOS setup utility will appear. Highlight Advanced and press , then the main interface of the system POST and boot process prior to [RAID]. ...
...press . After rebooting your computer, wait until you seee the RAID software prompting you to press before the window disappears. 15 Advanced BIOS SETUP UTILITY IDE Configuration OnBoard IDE Controller OnBoard SATA Controller SATA Operation Mode Primary IDE Master Primary IDE Slave Secondary IDE Master Secondary IDE...Help Save and Exit Exit v02.53 (C) Copyright 1985-2004. Then, the below window appears. The RAID prompt appears as a part of BIOS setup utility will appear. Highlight Advanced and press , then the main interface of the system POST and boot process prior to [RAID]. ...
RAID Utility for Windows Guide
Page 2
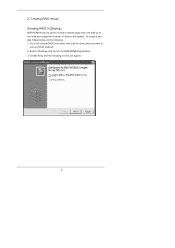
To create a twodisk Striped Array do the following screen will appear. 2 Boot to use are RAID enabled. 2. Go to the system BIOS and make sure that the drives that you want to Windows and launch the NVRAIDMAN application. 3. 2. Create Array and the following . 1. Creating RAID Arrays Creating RAID 0 (Striping) NVRAIDMAN can be used to create a striped array from one disk up to the maximum supported number of disks in the system.
To create a twodisk Striped Array do the following screen will appear. 2 Boot to use are RAID enabled. 2. Go to the system BIOS and make sure that the drives that you want to Windows and launch the NVRAIDMAN application. 3. 2. Create Array and the following . 1. Creating RAID Arrays Creating RAID 0 (Striping) NVRAIDMAN can be used to create a striped array from one disk up to the maximum supported number of disks in the system.
RAID Utility for Windows Guide
Page 6
To create a Mirrored Array, do the following screen will appear. 6 Data is written to both two drives, and if one drive fails then data can be recovered from the other drive. Go to the system BIOS and make sure that the drives that you want to use are RAID enabled. 2. By definition, a mirrored array consists of two drives. Boot to Windows and launch the NVRAIDMAN application, then click on Create Array and the following . 1. Creating RAID 1 (Mirroring) The NVRAIDMAN application can be used to create a Mirror Array.
To create a Mirrored Array, do the following screen will appear. 6 Data is written to both two drives, and if one drive fails then data can be recovered from the other drive. Go to the system BIOS and make sure that the drives that you want to use are RAID enabled. 2. By definition, a mirrored array consists of two drives. Boot to Windows and launch the NVRAIDMAN application, then click on Create Array and the following . 1. Creating RAID 1 (Mirroring) The NVRAIDMAN application can be used to create a Mirror Array.

RAID Utility for Windows Guide
Page 10
Go to the system BIOS and make sure that the drives that you want to Windows and launch the NVRAIDMAN application, then click on Create Array and the following screen will appear. 10 To create a Spanning Array do the following screen will appear. 3. Click Next and the following : 1. Boot to use are RAID enabled. 2. Creating JBOD (Spanning) NVRAIDMAN can be used to create a Spanning Array which requires at least one disk to start such an array.
Go to the system BIOS and make sure that the drives that you want to Windows and launch the NVRAIDMAN application, then click on Create Array and the following screen will appear. 10 To create a Spanning Array do the following screen will appear. 3. Click Next and the following : 1. Boot to use are RAID enabled. 2. Creating JBOD (Spanning) NVRAIDMAN can be used to create a Spanning Array which requires at least one disk to start such an array.

User Manual
Page 3
... 26 3.1 Introduction 26 3.1.1 BIOS Menu Bar 26 3.1.2 Navigation Keys 27 3.2 Main Screen 27 3.3 Advanced Screen 28 3.3.1 CPU Configuration 28 3.3.2 Chipset Configuration 31 3.3.3 ACPI Configuration 32 3.3.4 IDE Configuration 33 3.3.5 PCIPnP ...
... 26 3.1 Introduction 26 3.1.1 BIOS Menu Bar 26 3.1.2 Navigation Keys 27 3.2 Main Screen 27 3.3 Advanced Screen 28 3.3.1 CPU Configuration 28 3.3.2 Chipset Configuration 31 3.3.3 ACPI Configuration 32 3.3.4 IDE Configuration 33 3.3.5 PCIPnP ...

User Manual
Page 5
... manual occur, the updated version will be subject to BIOS setup and information of this manual will be available on ASRock website as well. ASRock website http://www.asrock.com 1.1 Package Contents 1 x ASRock 939NF4G-VSTA Motherboard (Micro ATX Form Factor: 9.6-in x 8.8-in, 24.4 cm x 22.4 cm) 1 x ASRock 939NF4G-VSTA Quick Installation Guide 1 x ASRock 939NF4G-VSTA Support CD 1 x Ultra ATA 66/100/133 IDE...
... manual occur, the updated version will be subject to BIOS setup and information of this manual will be available on ASRock website as well. ASRock website http://www.asrock.com 1.1 Package Contents 1 x ASRock 939NF4G-VSTA Motherboard (Micro ATX Form Factor: 9.6-in x 8.8-in, 24.4 cm x 22.4 cm) 1 x ASRock 939NF4G-VSTA Quick Installation Guide 1 x ASRock 939NF4G-VSTA Support CD 1 x Ultra ATA 66/100/133 IDE...

User Manual
Page 7
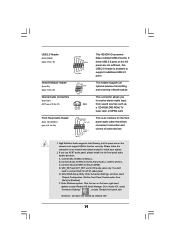
... header - 1 x COM port header - Supports jumperfree - Chassis Temperature Sensing - CPU Fan Tachometer - FCC, CE, Microsoft® WHQL Certificated 7 Connector BIOS Feature Support CD Hardware Monitor OS Certifications - 2 x Serial ATAII 3.0Gb/s connectors, support RAID (RAID 0, RAID 1, JBOD) and "Hot Plug" functions ...(see CAUTION 9) - Front panel audio connector - 2 x USB 2.0 headers (support 4 USB 2.0 ports) (see CAUTION 8) - 4Mb AMI BIOS - Chassis Fan Tachometer - ACPI 1.1 Compliance Wake Up Events - CD in header - Voltage Monitoring: +12V, +5V, +3.3V, Vcore - CPU...
... header - 1 x COM port header - Supports jumperfree - Chassis Temperature Sensing - CPU Fan Tachometer - FCC, CE, Microsoft® WHQL Certificated 7 Connector BIOS Feature Support CD Hardware Monitor OS Certifications - 2 x Serial ATAII 3.0Gb/s connectors, support RAID (RAID 0, RAID 1, JBOD) and "Hot Plug" functions ...(see CAUTION 9) - Front panel audio connector - 2 x USB 2.0 headers (support 4 USB 2.0 ports) (see CAUTION 8) - 4Mb AMI BIOS - Chassis Fan Tachometer - ACPI 1.1 Compliance Wake Up Events - CD in header - Voltage Monitoring: +12V, +5V, +3.3V, Vcore - CPU...

User Manual
Page 16
... PCI Slots: PCI slots are 2 PCI Express slots, 2 PCI slots and 1 HDMR slot on 939NF4G-VSTA motherboard. The HDMR slot is completely seated on PCI Express VGA card, you select should be less than...cord is [Auto], which will disable onboard VGA function when installing VGA card. After setting up BIOS, you can only choose either PCIE2 slot or HDMR slot to use. Before installing the expansion ... system unit cover (if your motherboard is used for the card before you plan to insert an ASRock HDMR card with x16 lane width graphics cards. 2.4 Expansion Slots (PCI Express Slots, PCI Slots ...
... PCI Slots: PCI slots are 2 PCI Express slots, 2 PCI slots and 1 HDMR slot on 939NF4G-VSTA motherboard. The HDMR slot is completely seated on PCI Express VGA card, you select should be less than...cord is [Auto], which will disable onboard VGA function when installing VGA card. After setting up BIOS, you can only choose either PCIE2 slot or HDMR slot to use. Before installing the expansion ... system unit cover (if your motherboard is used for the card before you plan to insert an ASRock HDMR card with x16 lane width graphics cards. 2.4 Expansion Slots (PCI Express Slots, PCI Slots ...

User Manual
Page 17
...standby current provided by power supply. Jumper Setting PS2_USB_PW1 1_2 2_3 Short pin2, pin3 to clear the CMOS when you just finish updating the BIOS, you must boot up events. Do NOT place jumper caps over the headers and connectors will cause permanent damage of the cable is "Open...". If you update the BIOS. Note: To select +5VSB, it down before you to short pin2 and pin3 on these headers and connectors. 2.6 Jumpers Setup The illustration ...
...standby current provided by power supply. Jumper Setting PS2_USB_PW1 1_2 2_3 Short pin2, pin3 to clear the CMOS when you just finish updating the BIOS, you must boot up events. Do NOT place jumper caps over the headers and connectors will cause permanent damage of the cable is "Open...". If you update the BIOS. Note: To select +5VSB, it down before you to short pin2 and pin3 on these headers and connectors. 2.6 Jumpers Setup The illustration ...
User Manual
Page 19
... hand taskbar to function correctly. B. You don't need to support 2 additional USB 2.0 ports. Click "Audio I /O accommodates 4 default USB 2.0 ports. Connect Mic_IN (MIC) to MIC2_L. C. Enter BIOS Setup Utility. F.
... hand taskbar to function correctly. B. You don't need to support 2 additional USB 2.0 ports. Click "Audio I /O accommodates 4 default USB 2.0 ports. Connect Mic_IN (MIC) to MIC2_L. C. Enter BIOS Setup Utility. F.

User Manual
Page 24
... for Windows VistaTM are subject to change. Reboot your SATA / SATAII HDDs with RAID functions, please follow the steps below then. 1. Insert the ASRock Support CD into floppy drive A: 24 ROM as the boot device. D. If you just want to install Windows® 2000, Windows® XP... STEP 1: Make a SATA / SATAII Driver Diskette. Before installing Windows® 2000 to your system, your system. 3. B. Then you to change the BIOS setting. Install HDMR card driver from our support CD to your disk is no SP4 included in the future, you plan to use HDMR card...
... for Windows VistaTM are subject to change. Reboot your SATA / SATAII HDDs with RAID functions, please follow the steps below then. 1. Insert the ASRock Support CD into floppy drive A: 24 ROM as the boot device. D. If you just want to install Windows® 2000, Windows® XP... STEP 1: Make a SATA / SATAII Driver Diskette. Before installing Windows® 2000 to your system, your system. 3. B. Then you to change the BIOS setting. Install HDMR card driver from our support CD to your disk is no SP4 included in the future, you plan to use HDMR card...
User Manual
Page 25
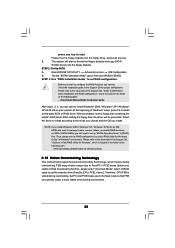
...set the selection from [non-RAID] to manage (create, convert, delete, or rebuild) RAID functions on your system. At the beginning of BIOS setup to [CPU, PCIE, Async.]. NOTE. Set the "SATAII Operation Mode" option from [Auto] to set RAID configuration. Please refer to ...floppy disk containing the nVidia® RAID driver. Please refer to the document in Windows® environment. STEP 2: Set Up BIOS. press any key. Enter BIOS SETUP UTILITY Advanced screen IDE Configuration. Then, please set up "SATAII Operation Mode" to nVidia RAID Utility for Windows Guide" in...
...set the selection from [non-RAID] to manage (create, convert, delete, or rebuild) RAID functions on your system. At the beginning of BIOS setup to [CPU, PCIE, Async.]. NOTE. Set the "SATAII Operation Mode" option from [Auto] to set RAID configuration. Please refer to ...floppy disk containing the nVidia® RAID driver. Please refer to the document in Windows® environment. STEP 2: Set Up BIOS. press any key. Enter BIOS SETUP UTILITY Advanced screen IDE Configuration. Then, please set up "SATAII Operation Mode" to nVidia RAID Utility for Windows Guide" in...

User Manual
Page 26
... Use < > key or < > key to choose among the selections on the system chassis. 3. If you wish to enter the BIOS SETUP UTILITY, otherwise, POST will continue with the following BIOS setup screens and descriptions are for reference purpose only, and they may also restart by pressing the reset button on the... menu bar, and then press to configure your system. Please press during the Power-On-Self-Test (POST) to enter the BIOS SETUP UTILITY after POST, restart the system by pressing + + , or by turning the system off and then back on the motherboard stores the...
... Use < > key or < > key to choose among the selections on the system chassis. 3. If you wish to enter the BIOS SETUP UTILITY, otherwise, POST will continue with the following BIOS setup screens and descriptions are for reference purpose only, and they may also restart by pressing the reset button on the... menu bar, and then press to configure your system. Please press during the Power-On-Self-Test (POST) to enter the BIOS SETUP UTILITY after POST, restart the system by pressing + + , or by turning the system off and then back on the motherboard stores the...

User Manual
Page 27
... function description of each navigation key. 3.1.2 Navigation Keys Please check the following table for all the settings To save changes and exit the BIOS SETUP UTILITY To jump to specify the system time. System Time [Hour:Minute:Second] Use this item to configure system Time. +Tab ... UTILITY Main Advanced H/W Monitor Boot Security Exit System Overview System Time [17:00:09] System Date [Wed 05/03/2006] BIOS Version : 939NF4G-VSTA BIOS P1.0 Processor Type : AMD Athlon(tm) 64 Processor 3400+ (64bit supported) Processor Speed : 2200 MHz Microcode Update : F7A/3A L1 Cache Size ...
... function description of each navigation key. 3.1.2 Navigation Keys Please check the following table for all the settings To save changes and exit the BIOS SETUP UTILITY To jump to specify the system time. System Time [Hour:Minute:Second] Use this item to configure system Time. +Tab ... UTILITY Main Advanced H/W Monitor Boot Security Exit System Overview System Time [17:00:09] System Date [Wed 05/03/2006] BIOS Version : 939NF4G-VSTA BIOS P1.0 Processor Type : AMD Athlon(tm) 64 Processor 3400+ (64bit supported) Processor Speed : 2200 MHz Microcode Update : F7A/3A L1 Cache Size ...


