
User Manual
Page 5
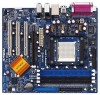
... of this manual will be subject to BIOS setup and information of this manual occur, the updated version will be available on ASRock website as well. ASRock website http://www.asrock.com 1.1 Package Contents 1 x ASRock 939A8X-M Motherboard (Micro ATX Form Factor: 9.6-in x 8.6-in, 24.4 cm x 21.8 cm) 1 x ASRock 939A8X-M Quick Installation Guide 1 x ASRock 939A8X-M Support CD 1 x Ultra ATA 66/100/133...
... of this manual will be subject to BIOS setup and information of this manual occur, the updated version will be available on ASRock website as well. ASRock website http://www.asrock.com 1.1 Package Contents 1 x ASRock 939A8X-M Motherboard (Micro ATX Form Factor: 9.6-in x 8.6-in, 24.4 cm x 21.8 cm) 1 x ASRock 939A8X-M Quick Installation Guide 1 x ASRock 939A8X-M Support CD 1 x Ultra ATA 66/100/133...

User Manual
Page 15
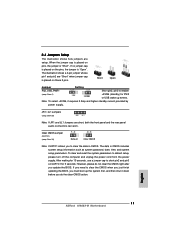
Clear CMOS (CLRTC1) (see p.8, No. 10) 1_2 Default 2_3 Clear CMOS Note: CLRTC1 allows you do not clear the CMOS right after you update the BIOS. The illustration shows a 3-pin jumper whose pin1 and pin2 are short, both the front panel and the rear panel audio connectors can work. JR1 / JL1 ... select +5VSB, it down before you to short pin2 and pin3 on these 2 pins. If you need to clear the CMOS when you just finish updating the BIOS, you must boot up the system first, and then shut it requires 2 Amp and higher standby current provided by power supply. Short Open Jumper...
Clear CMOS (CLRTC1) (see p.8, No. 10) 1_2 Default 2_3 Clear CMOS Note: CLRTC1 allows you do not clear the CMOS right after you update the BIOS. The illustration shows a 3-pin jumper whose pin1 and pin2 are short, both the front panel and the rear panel audio connectors can work. JR1 / JL1 ... select +5VSB, it down before you to short pin2 and pin3 on these 2 pins. If you need to clear the CMOS when you just finish updating the BIOS, you must boot up the system first, and then shut it requires 2 Amp and higher standby current provided by power supply. Short Open Jumper...
User Manual
Page 21
...being updated, the following selections: Main To set up the system time/date information Advanced To set up the advanced BIOS features H/W Monitor To display current hardware status Boot To set up the computer. The Flash Memory on the menu bar, and then press to configure your screen. 3.1.1 BIOS Menu... POST, restart the system by pressing + + , or by turning the system off and then back on. BIOS SETUP UTILITY 3.1 Introduction This section explains how to use the BIOS SETUP UTILITY to get into the sub screen. 21 You may not exactly match what you start up the security...
...being updated, the following selections: Main To set up the system time/date information Advanced To set up the advanced BIOS features H/W Monitor To display current hardware status Boot To set up the computer. The Flash Memory on the menu bar, and then press to configure your screen. 3.1.1 BIOS Menu... POST, restart the system by pressing + + , or by turning the system off and then back on. BIOS SETUP UTILITY 3.1 Introduction This section explains how to use the BIOS SETUP UTILITY to get into the sub screen. 21 You may not exactly match what you start up the security...
Quick Installation Guide
Page 4
.../100/133 IDE Ribbon Cable (80-conductor) 1 x 3.5-in the Support CD. Introduction Thank you for purchasing ASRock 939A8X-M motherboard, a reliable motherboard produced under ASRock's consistently stringent quality control. Because the motherboard specifications and the BIOS software might be updated, the content of the motherboard can be subject to quality and endurance. More detailed information of...
.../100/133 IDE Ribbon Cable (80-conductor) 1 x 3.5-in the Support CD. Introduction Thank you for purchasing ASRock 939A8X-M motherboard, a reliable motherboard produced under ASRock's consistently stringent quality control. Because the motherboard specifications and the BIOS software might be updated, the content of the motherboard can be subject to quality and endurance. More detailed information of...
Quick Installation Guide
Page 11
...". Clear CMOS Jumper (CLRTC1) (see p.2 item 10) Default Clear CMOS Note: CLRTC1 allows you update the BIOS. If you need to clear the CMOS when you just finish updating the BIOS, you must boot up events. 2.4 Jumpers Setup The illustration shows how jumpers are short, both the... CMOS. However, please do the clear-CMOS action. JR1 / JL1 Jumpers (see p.2 item 1) +5VSB (standby) for 5 seconds. English 11 ASRock 939A8X-M Motherboard After waiting for 15 seconds, use a jumper cap to clear the data in CMOS includes system setup information such as system password, date, ...
...". Clear CMOS Jumper (CLRTC1) (see p.2 item 10) Default Clear CMOS Note: CLRTC1 allows you update the BIOS. If you need to clear the CMOS when you just finish updating the BIOS, you must boot up events. 2.4 Jumpers Setup The illustration shows how jumpers are short, both the... CMOS. However, please do the clear-CMOS action. JR1 / JL1 Jumpers (see p.2 item 1) +5VSB (standby) for 5 seconds. English 11 ASRock 939A8X-M Motherboard After waiting for 15 seconds, use a jumper cap to clear the data in CMOS includes system setup information such as system password, date, ...


